Dataset - Annotation Campaign
An Annotation Campaign allows you to handle properly and efficiently the process of annotating a DatasetVersion on Picsellia.
By using Annotation Campaign on Picsellia, you will be able to:
- Define your Annotation Workflow
- Assign Annotation Tasks
- Review the
Annotationdone and raise Issues if something is wrong - Track the progress of the Annotation Campaign
1. Create an Annotation Campaign
First of all, it is important to note that each DatasetVersion can have up to one Annotation Campaign.
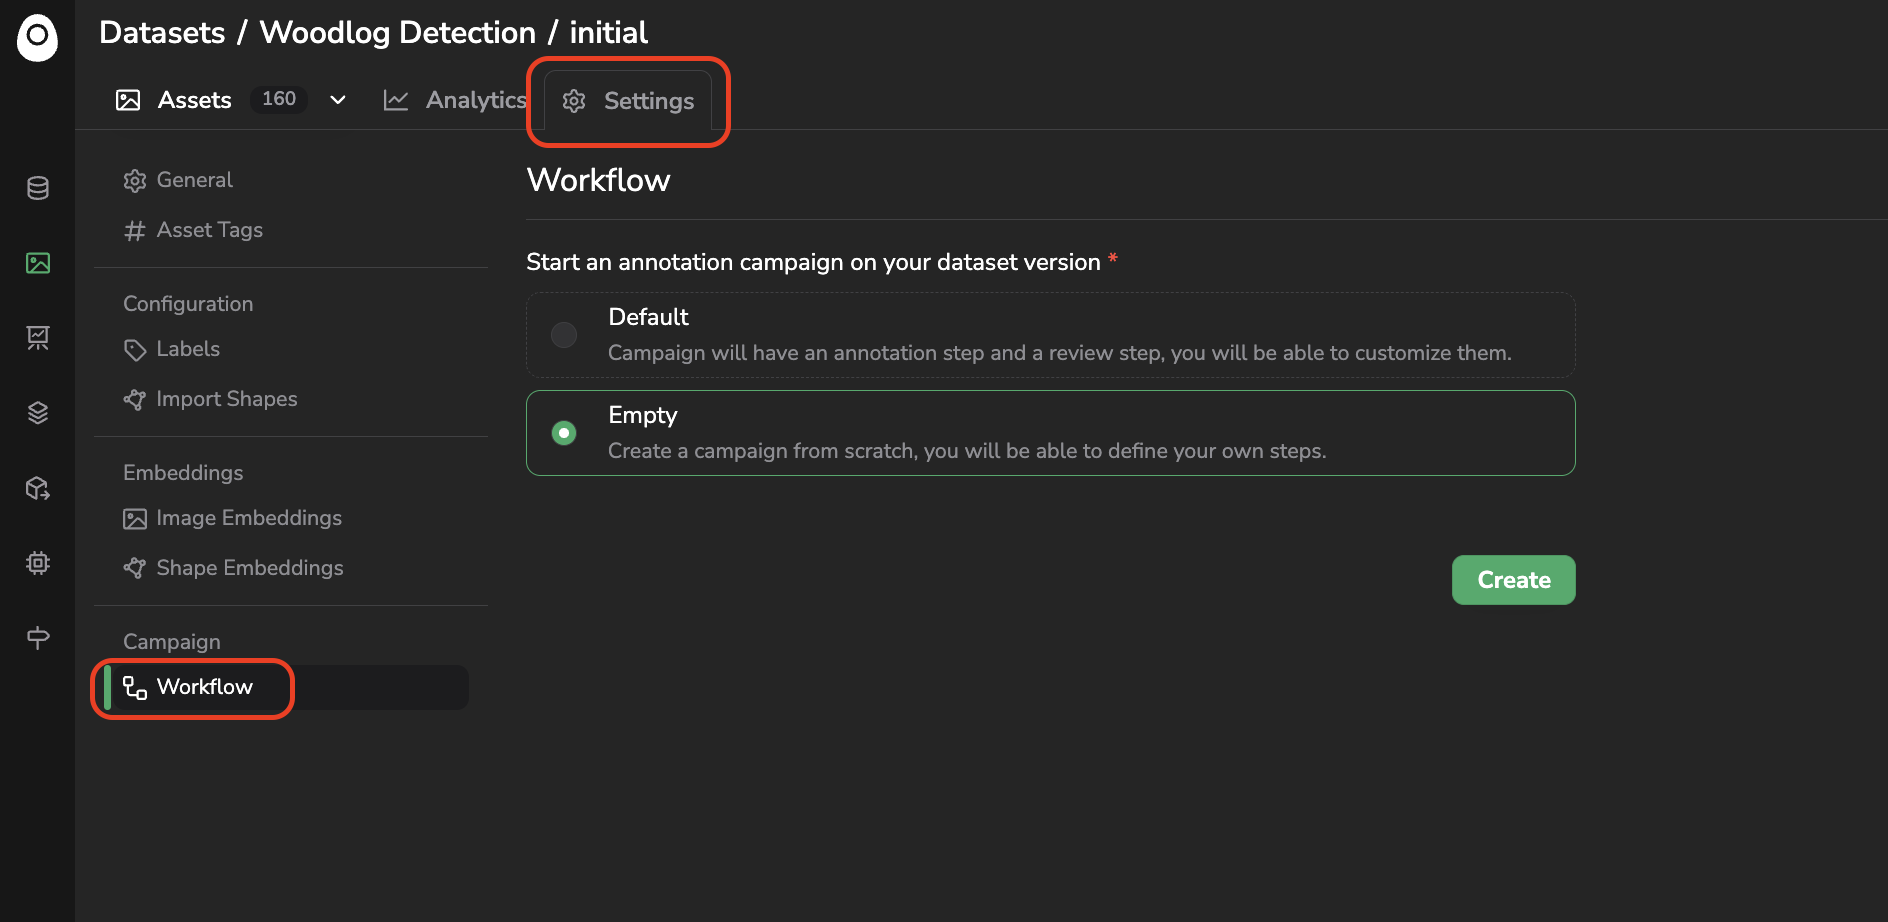
To initialize an Annotation Campaign on a DatasetVersion, go to the Settings tab, and click on Workflow in the Campaign sub-section.
From this view, you can choose either to create an Empty Workflow (i.e. without Steps already created) or a Default Workflow (i.e. a basic two Steps Workflow that you can for sure modify).
Annotation Workflow creation
A. The Campaign interface
As soon as the Annotation Campaign is created, you'll be redirected to the Campaign interface, this interface is always related to the impacted DatasetVersion and allows to manage and track the progress of the Campaign. The interface is composed of several tabs:
- Tasks, from which Annotation and Review Tasks can be listed, managed and completed through the Annotation Tool.
- Issues, that lists all the Issues created in the frame of the current Annotation Campaign.
- Analytics, from which several metrics related the current Annotation Campaign can be retrieved.
- Workflow, that allows the to edit the Annotation Workflow, meaning the steps and the settings of the ongoing Annotation Campaign.
Please note that from any tab of the Campaign interface you can access the related DatasetVersion, as shown below:
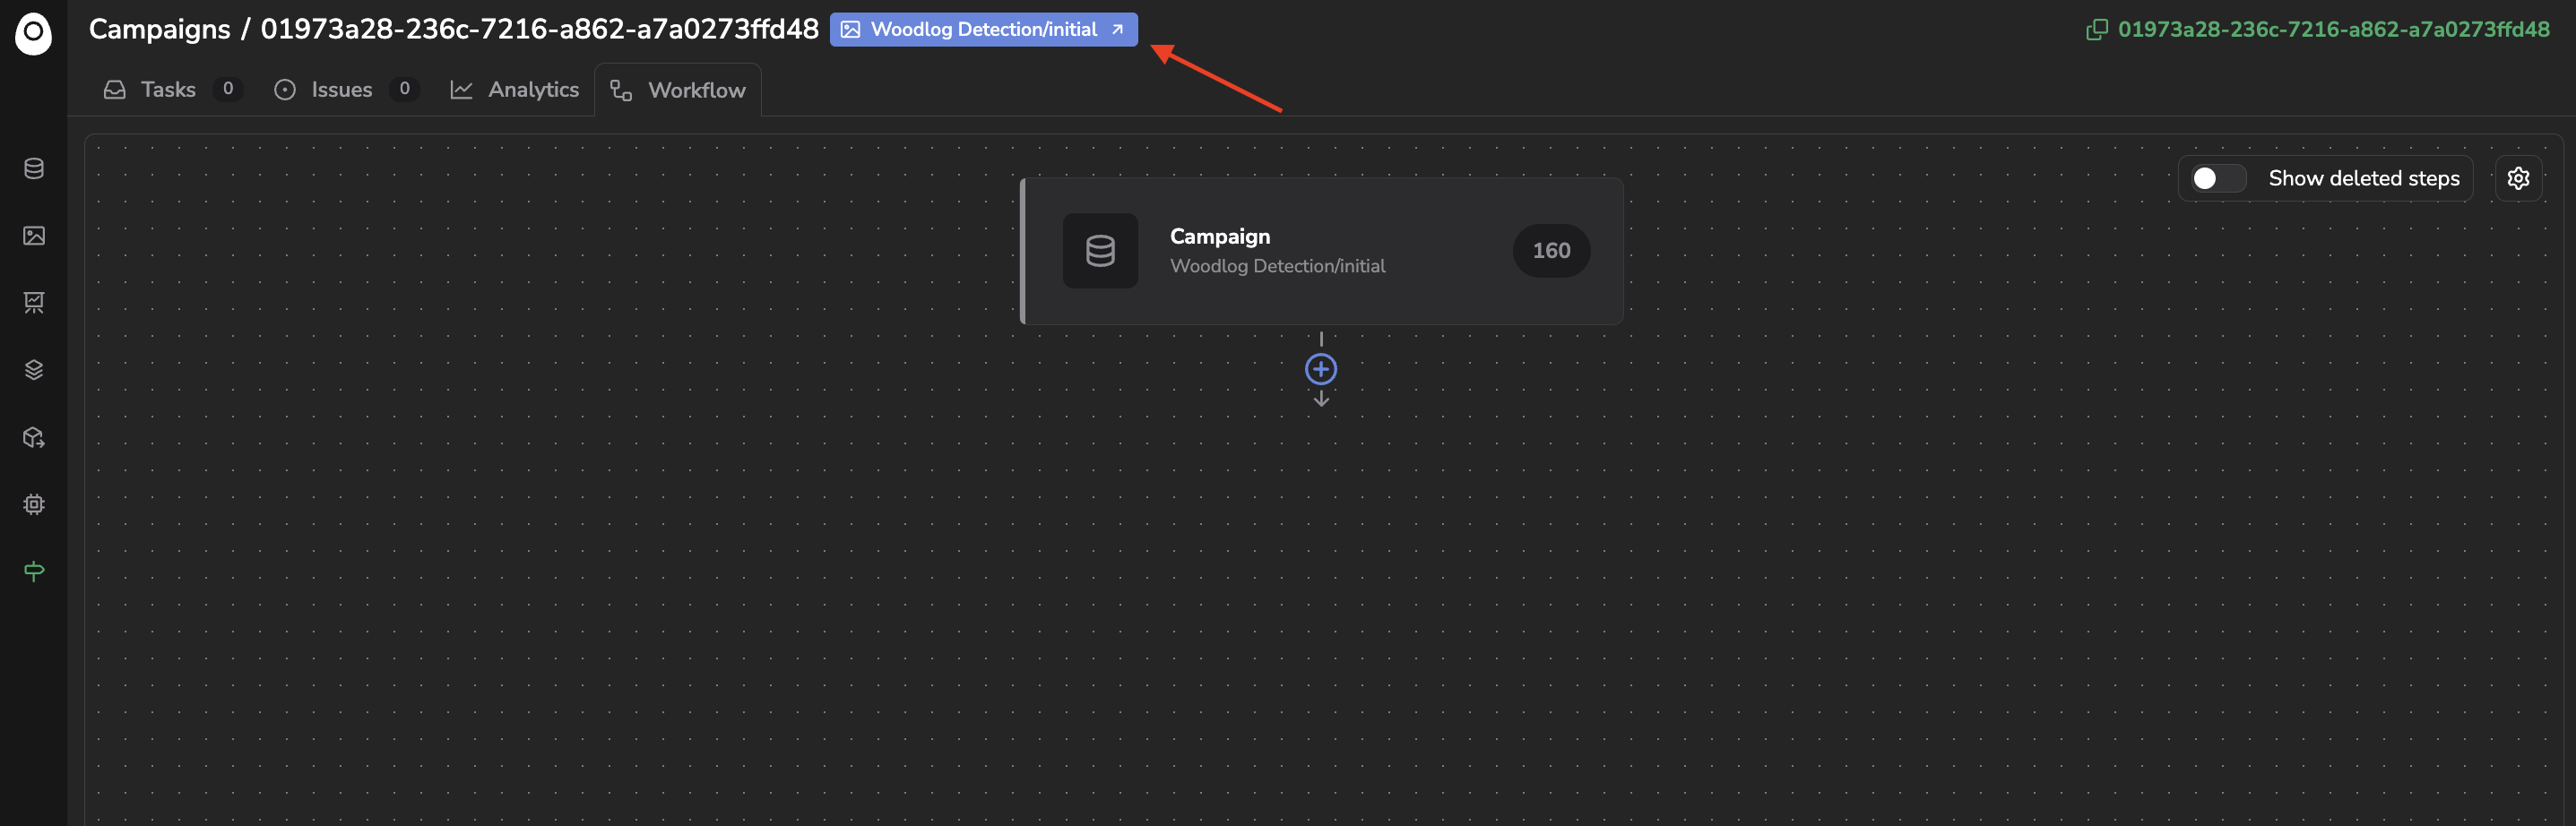
Access the DatasetVersion related to the current Annotation Campaign
The Campaign interface can be accessed from the related DatasetVersion by clicking on the Campaign button:
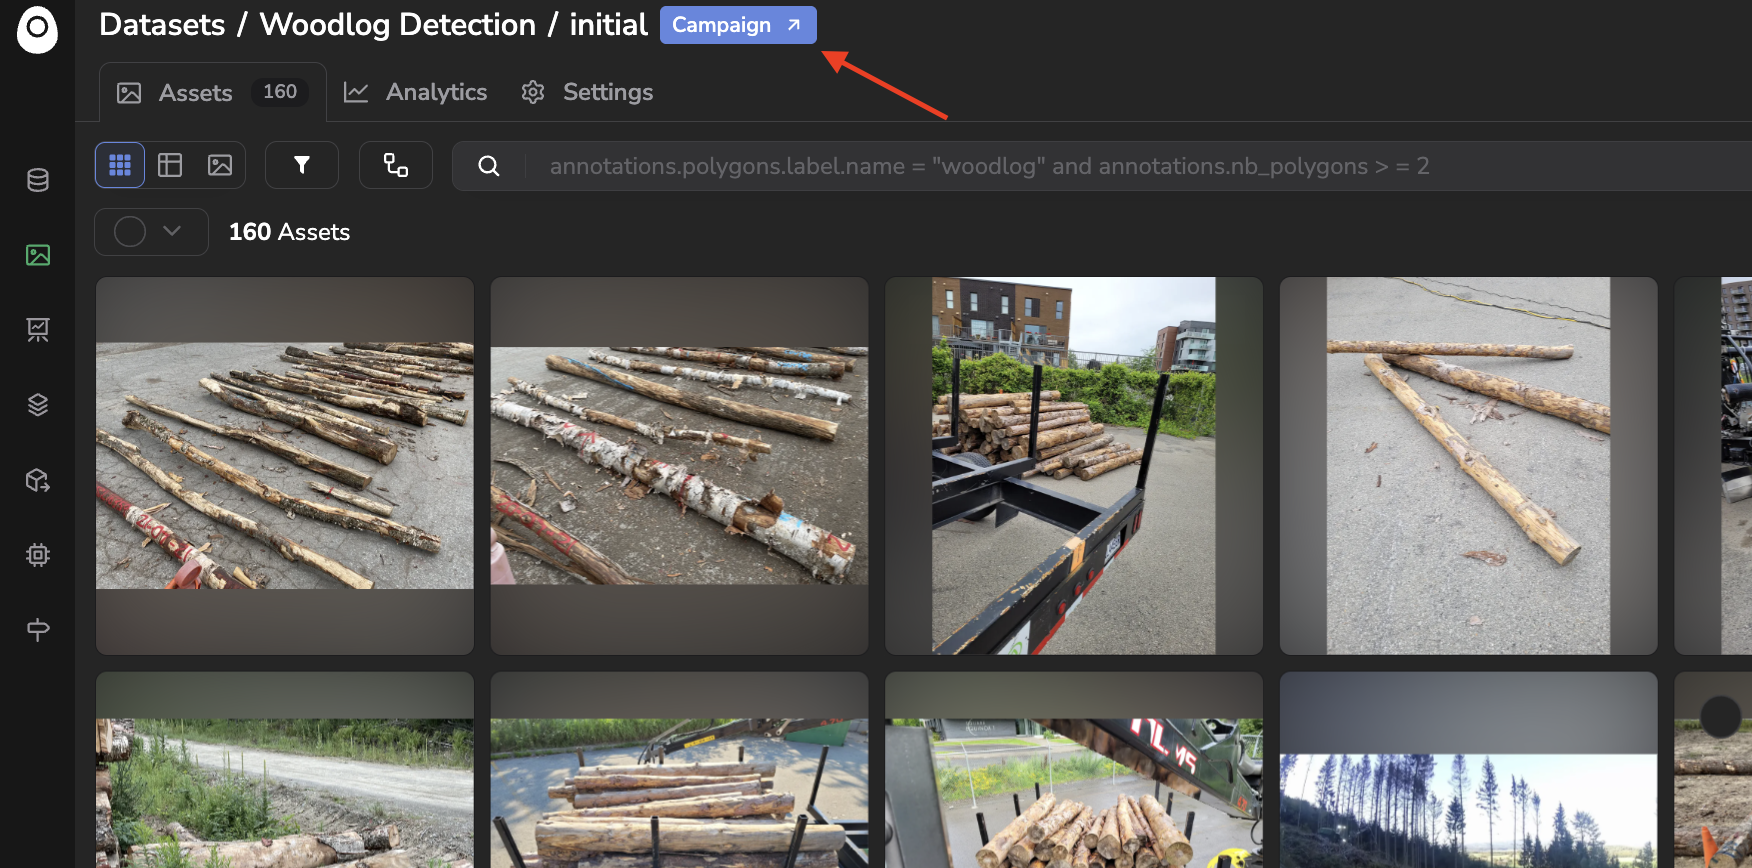
Access the Annotation Campaign from its related DatasetVersion
The Annotation Campaign can also be retrieved from the Campaigns list directly:
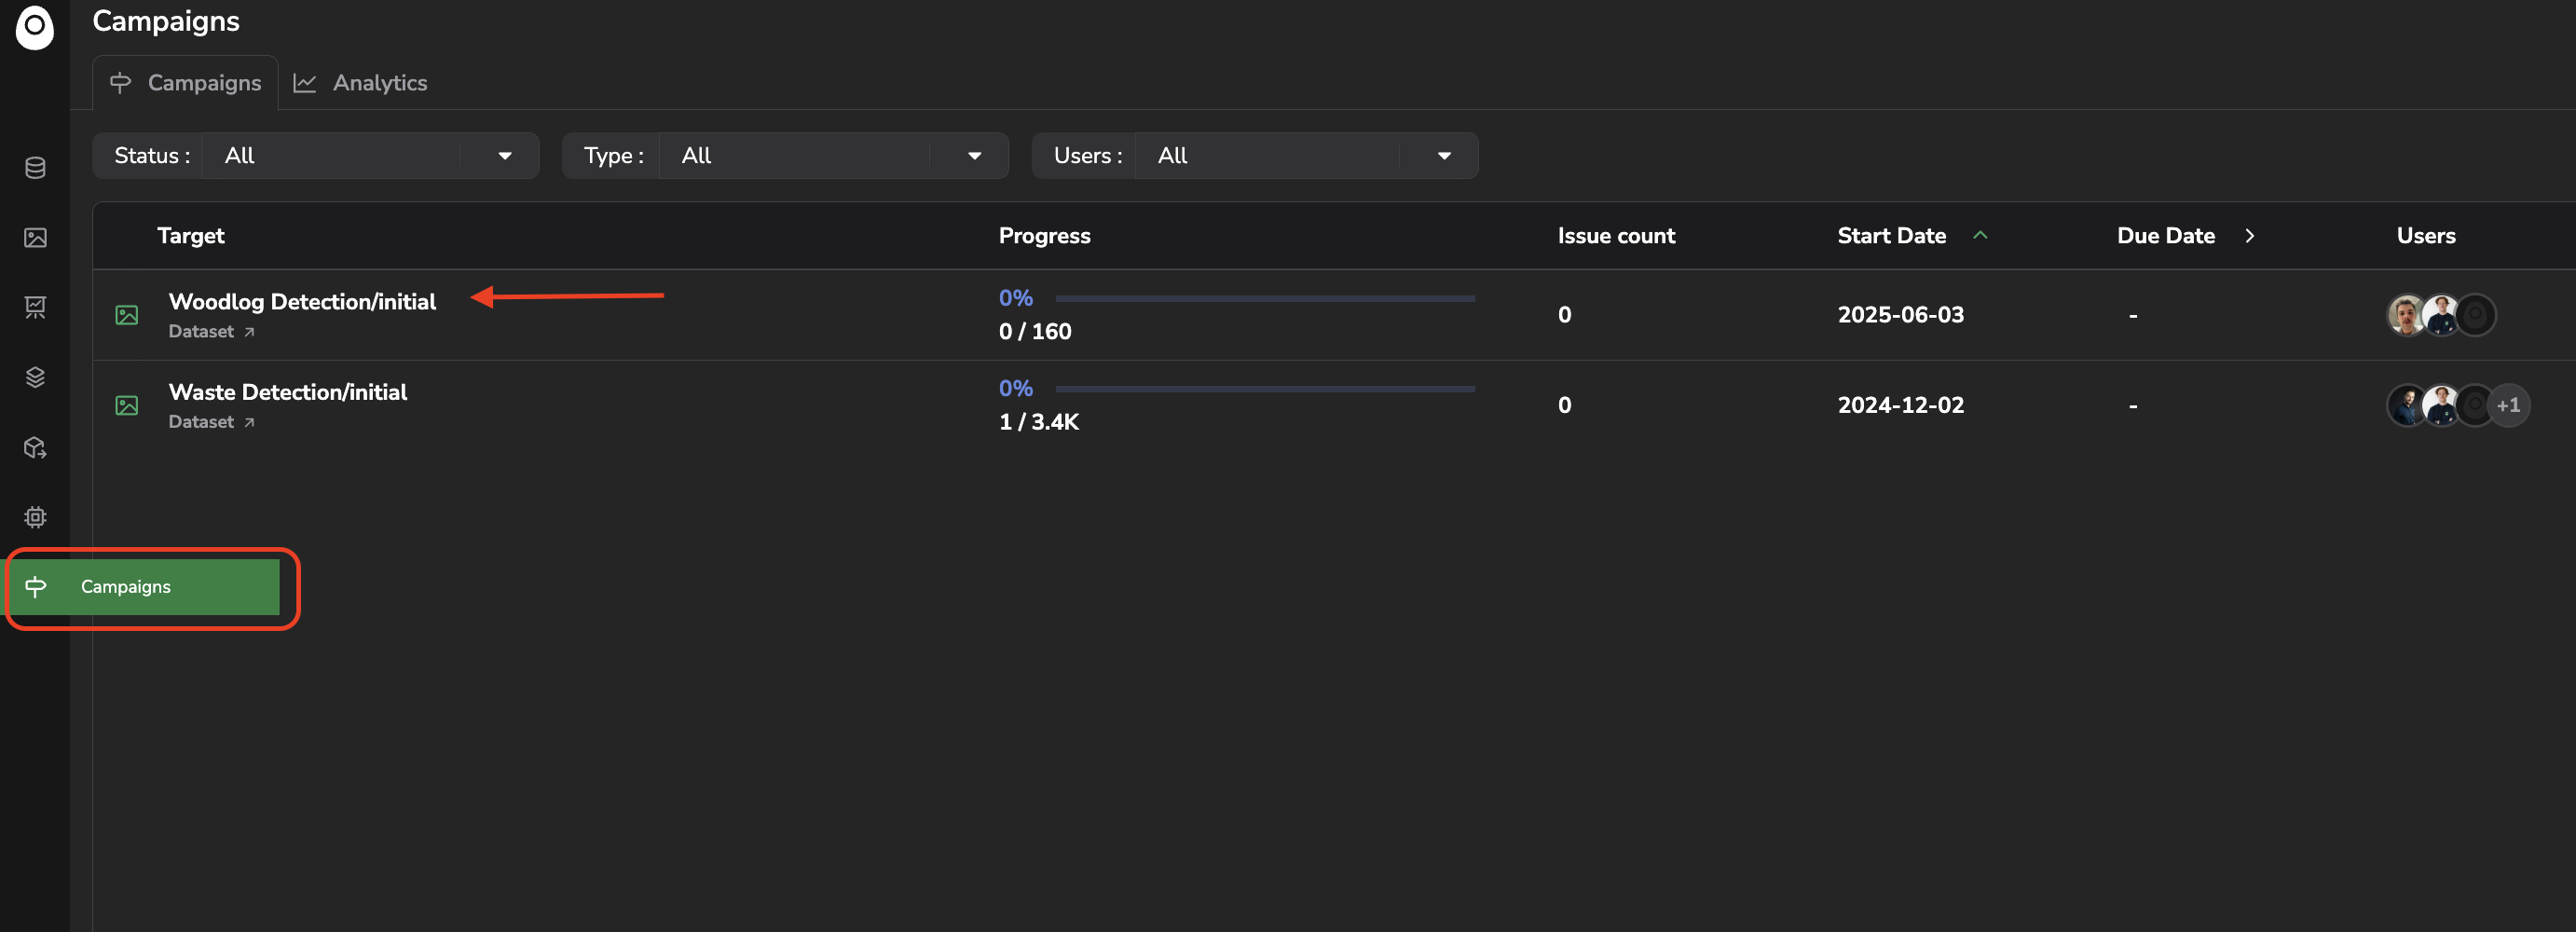
Access the Annotation Campaign from the Campaigns list
B. Create an Annotation Workflow
Once the Campaign is created, the first step is to define the Annotation Workflow by creating the Steps your Asset will follow during the Annotation Campaign you are about to launch on this DatasetVersion. The Annotation Workflow represents all the Steps the Asset will go through before being considered properly annotated. As you can see above, the Workflow is initially free of Steps, so you will now be able to define and configure new Steps before launching the Annotation Campaign.
To do so, access the Workflow tab and click on the + button next to the initial step of your Annotation Workflow. A new Step will be added to your Annotation Workflow, it is now time to configure it.
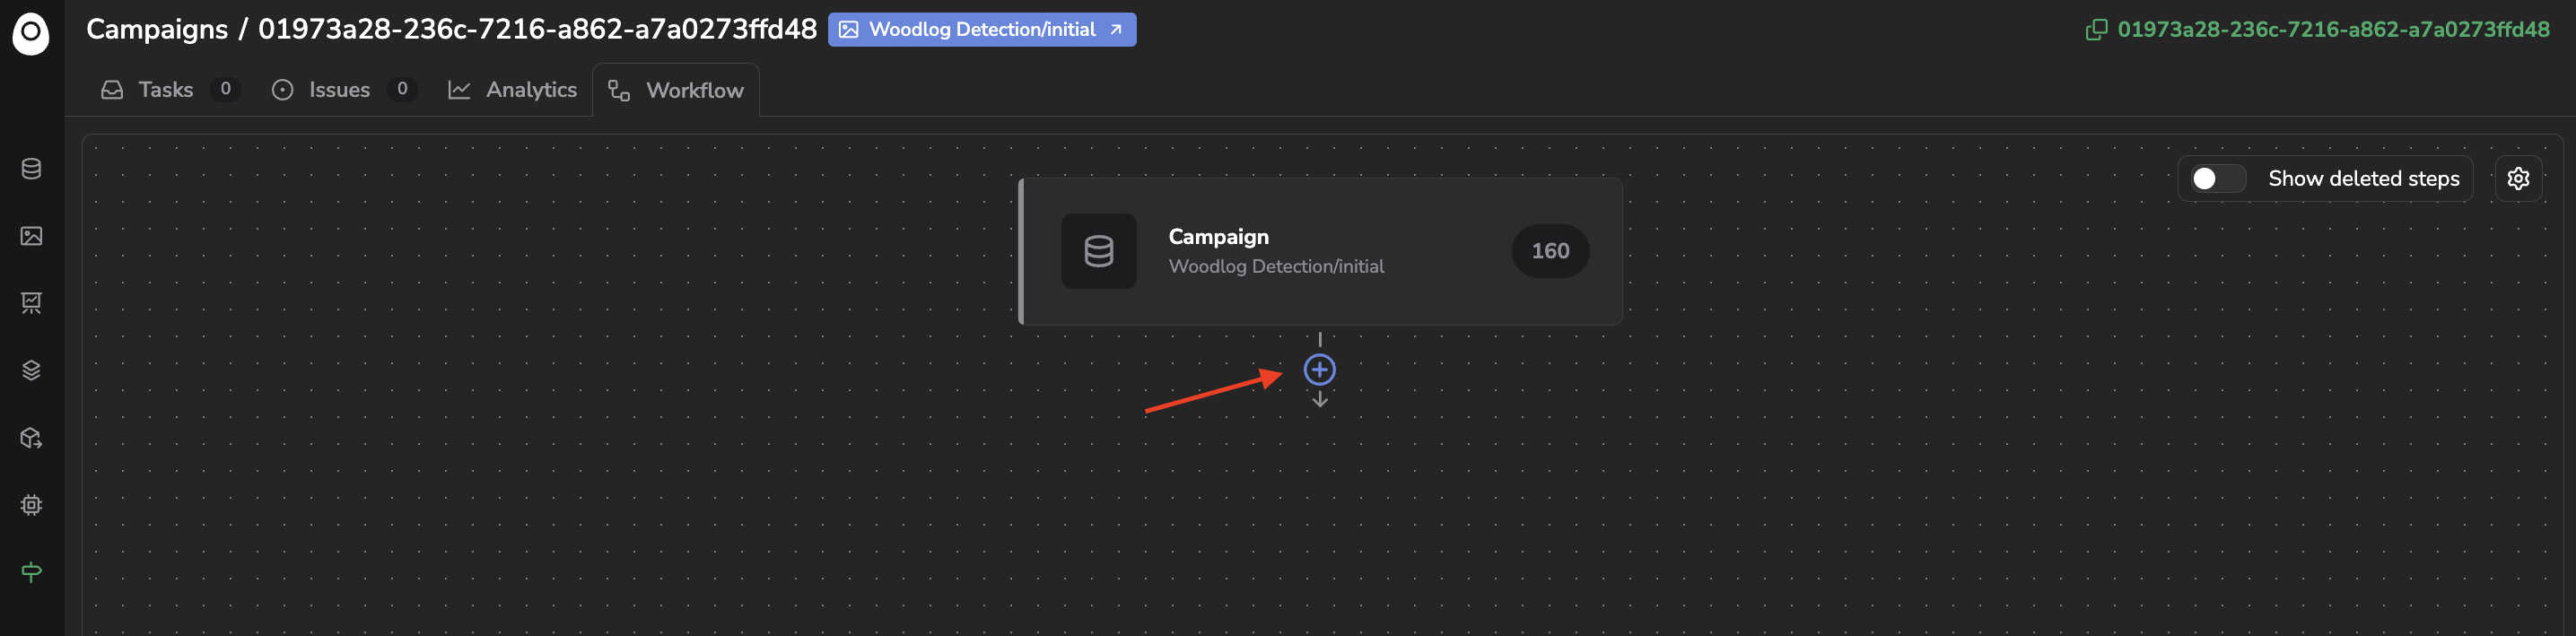
Create the first step of the Annotation Workflow
Once the new Step is created, its related configuration panel will pop up on the right side.
First, you'll be requested to give a name to your Step and to define if it is an Annotation or a Review Step.
The only difference between an Annotation or Review step is the ability in Review to also Accept or Reject what has been done in previous steps.
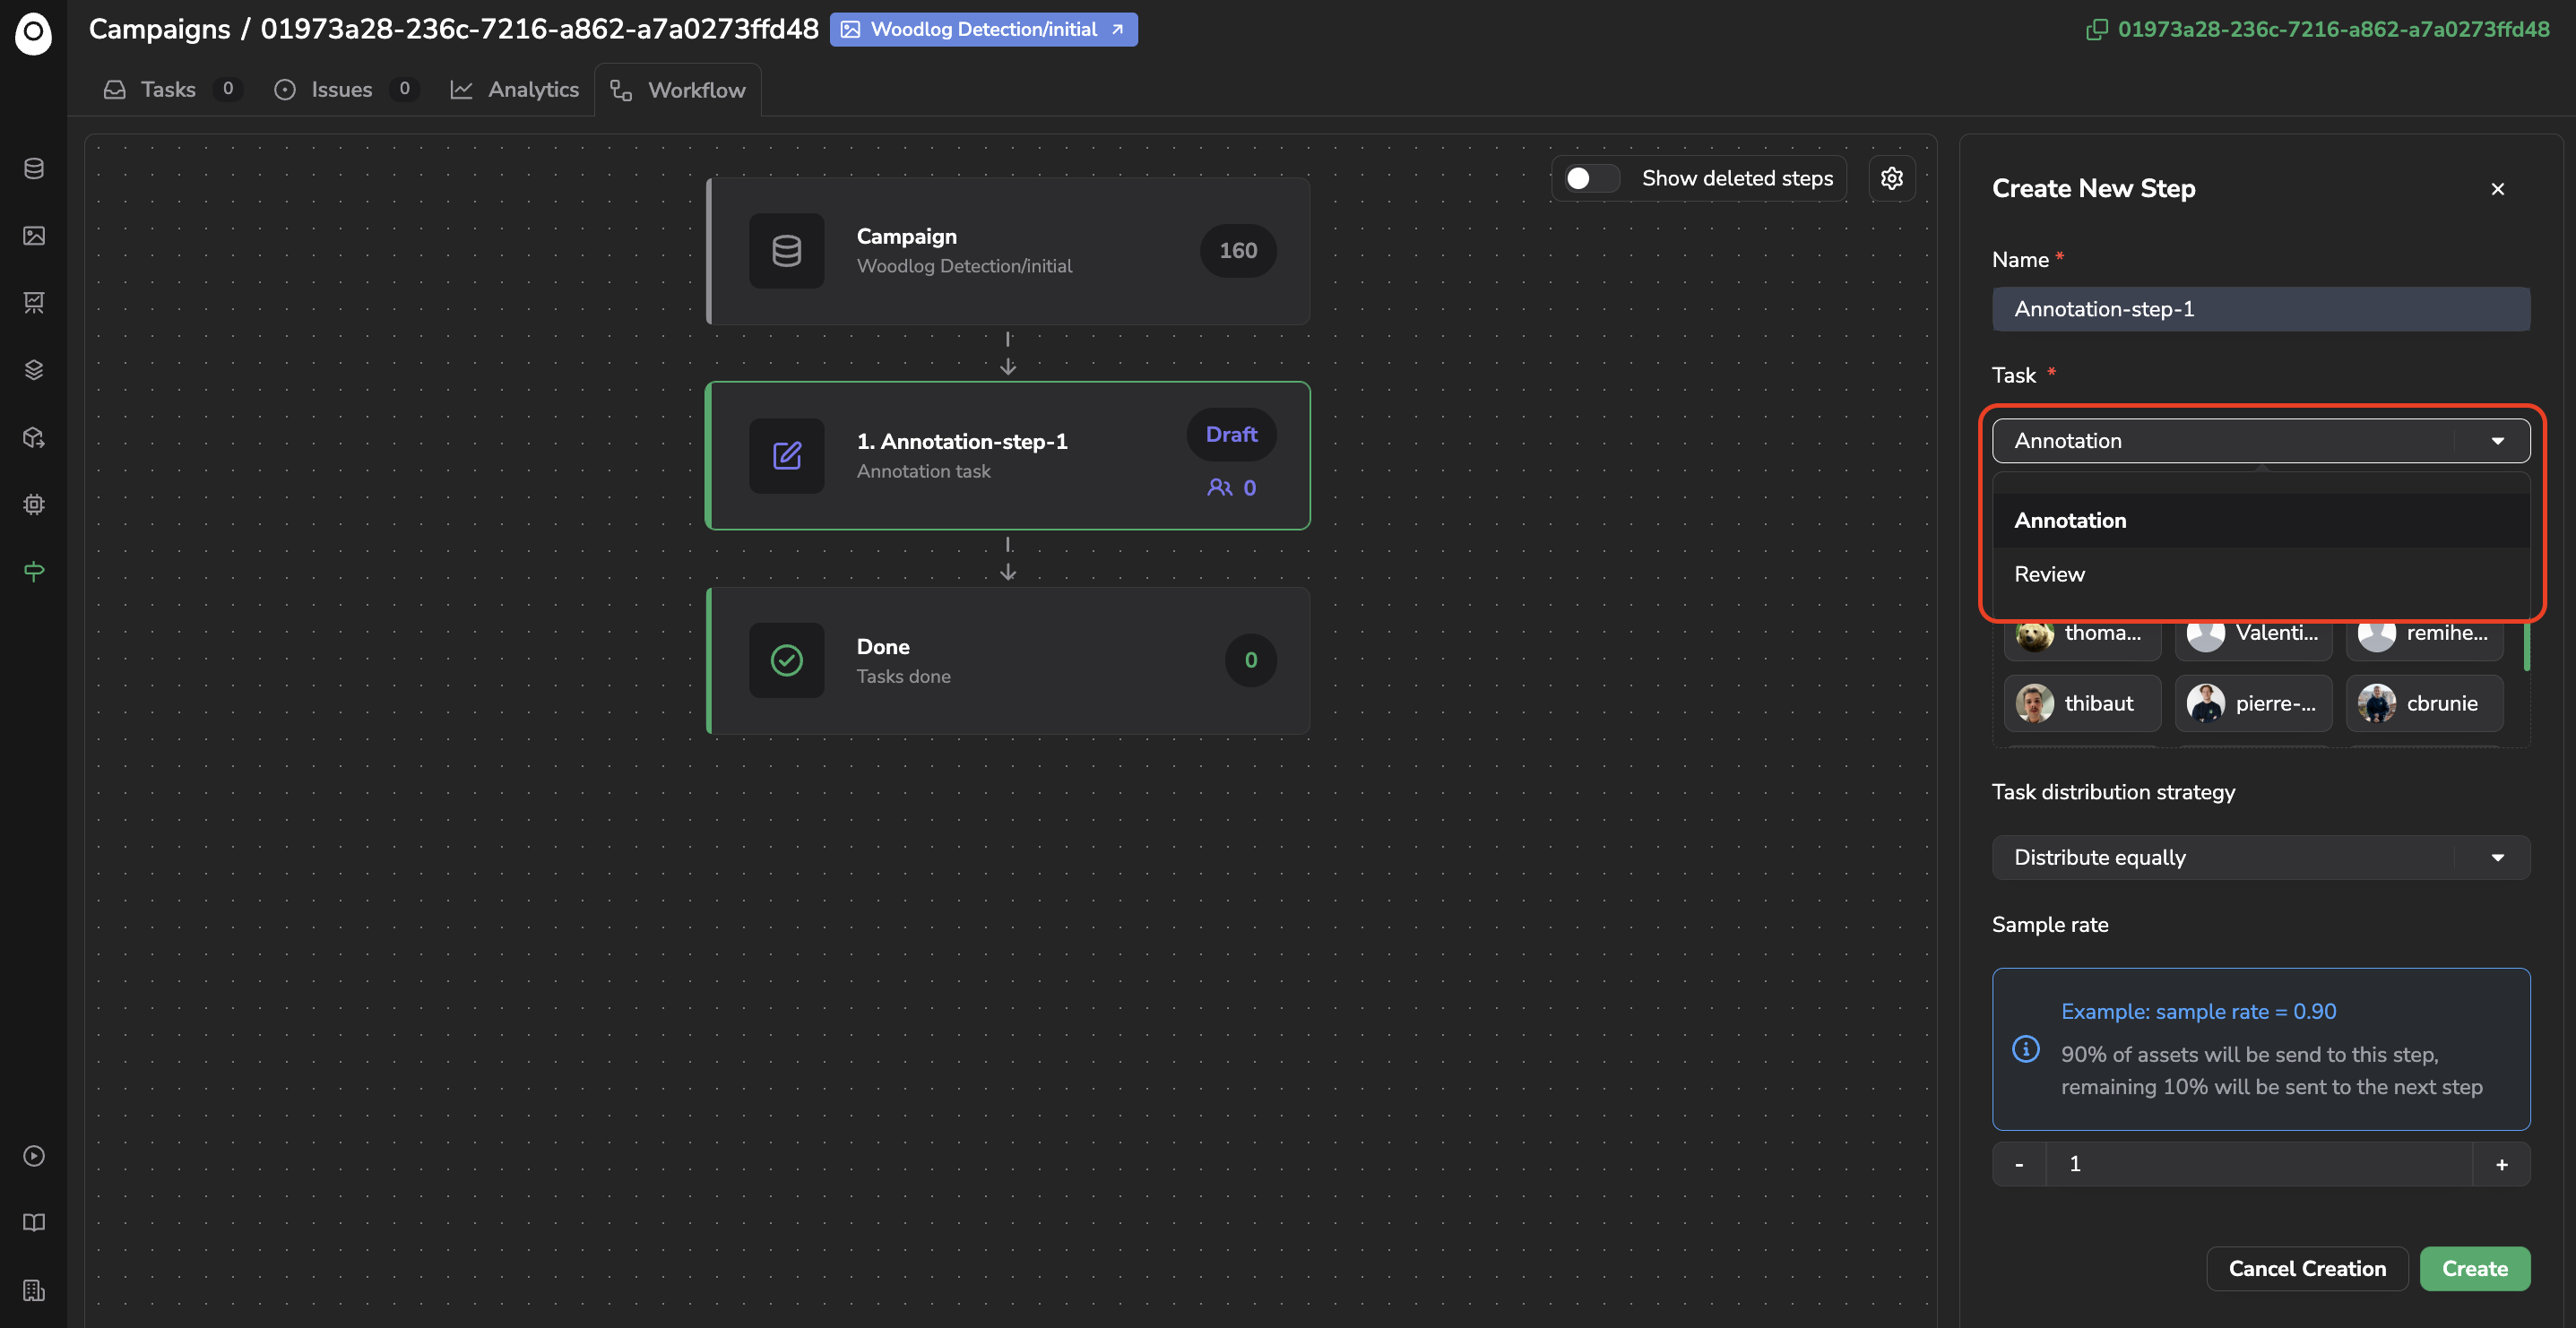
Step configuration
Then, you need to select the Assignees that will get Tasks attributed as part of this Step. As shown below you can select the Assignees.
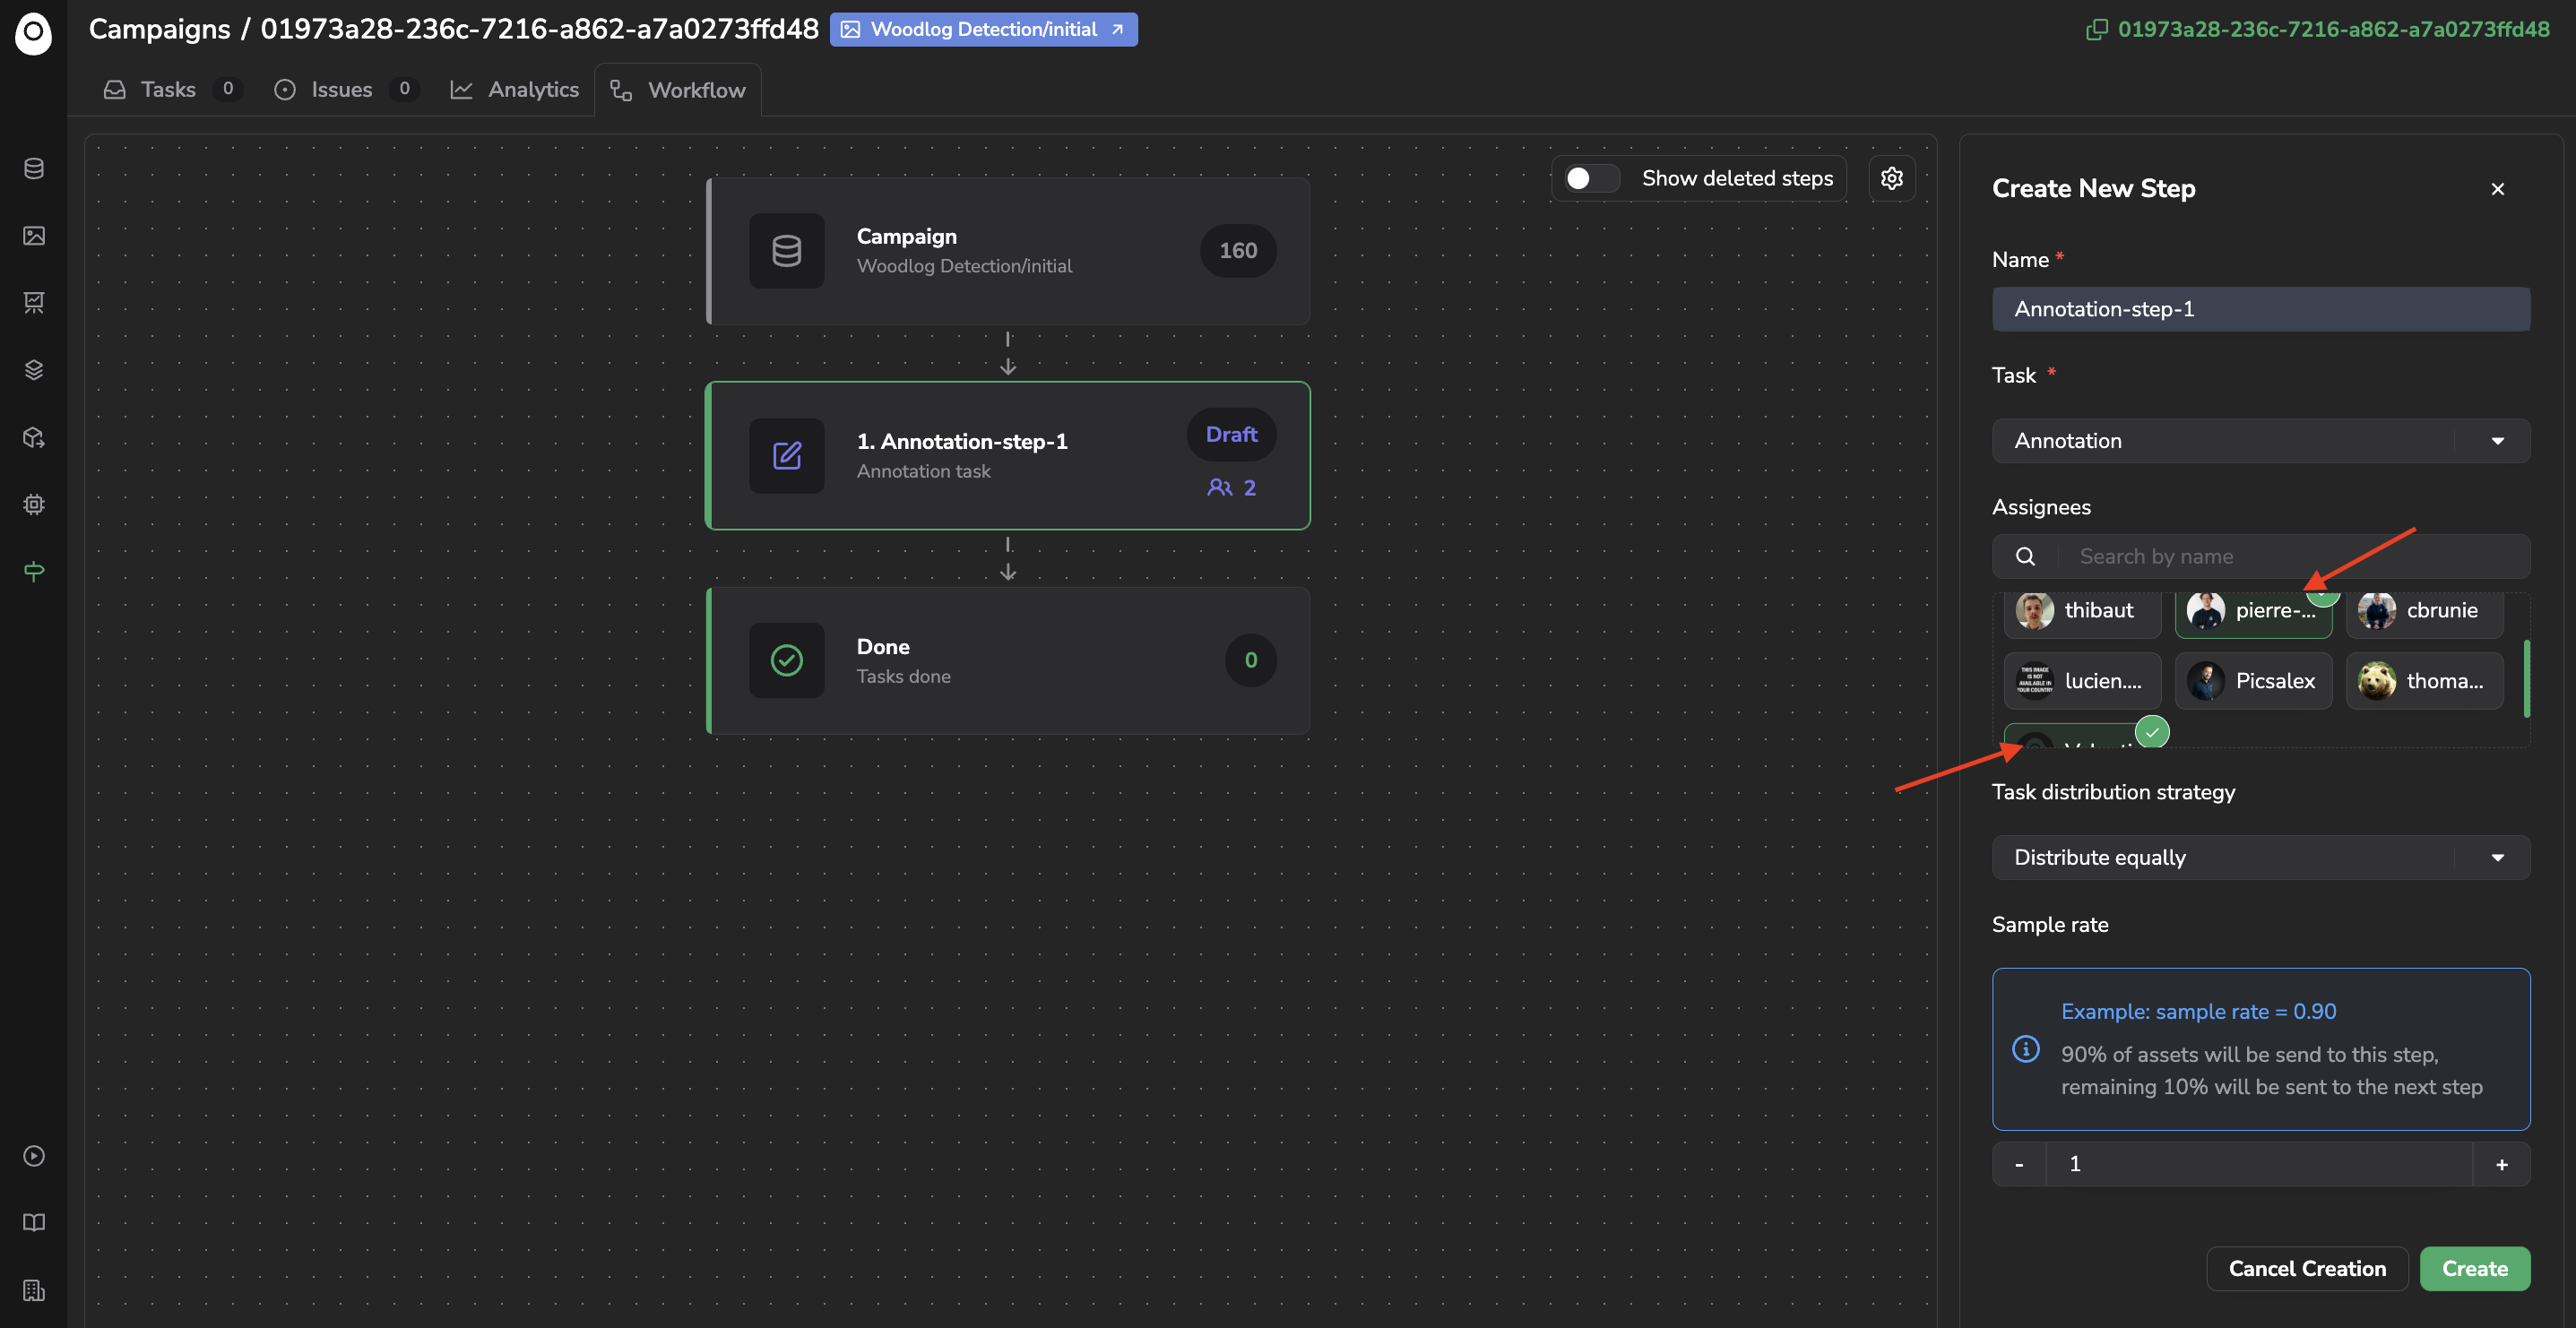
Step configuration
Select AssigneesThe potential Assignees are the members of the current Organization that are listed are Workers in the
Dataset.So if a member is not part of the Assignee list, you should add him as Worker in the related
Dataset.
Finally, you'll be requested to define the assignation strategy based on two criteria.
- The Asset split strategy allows you to define if the
Assetgoing through this Step should be equally assigned to all the selected Workers (Equally dispatched strategy) or if some Workers should get more Tasks assigned then others. In this case, you could set it up using the Custom Weights strategy. For Custom Weights strategy the percentage of Tasks assigned to each Worker will be displayed as shown below. - The Sample rate, allowing you to set the probability an image submitted at the previous step has to actually go through the current Step. This one could be really useful in case of want to perform a review on only a sample of the annotated images.
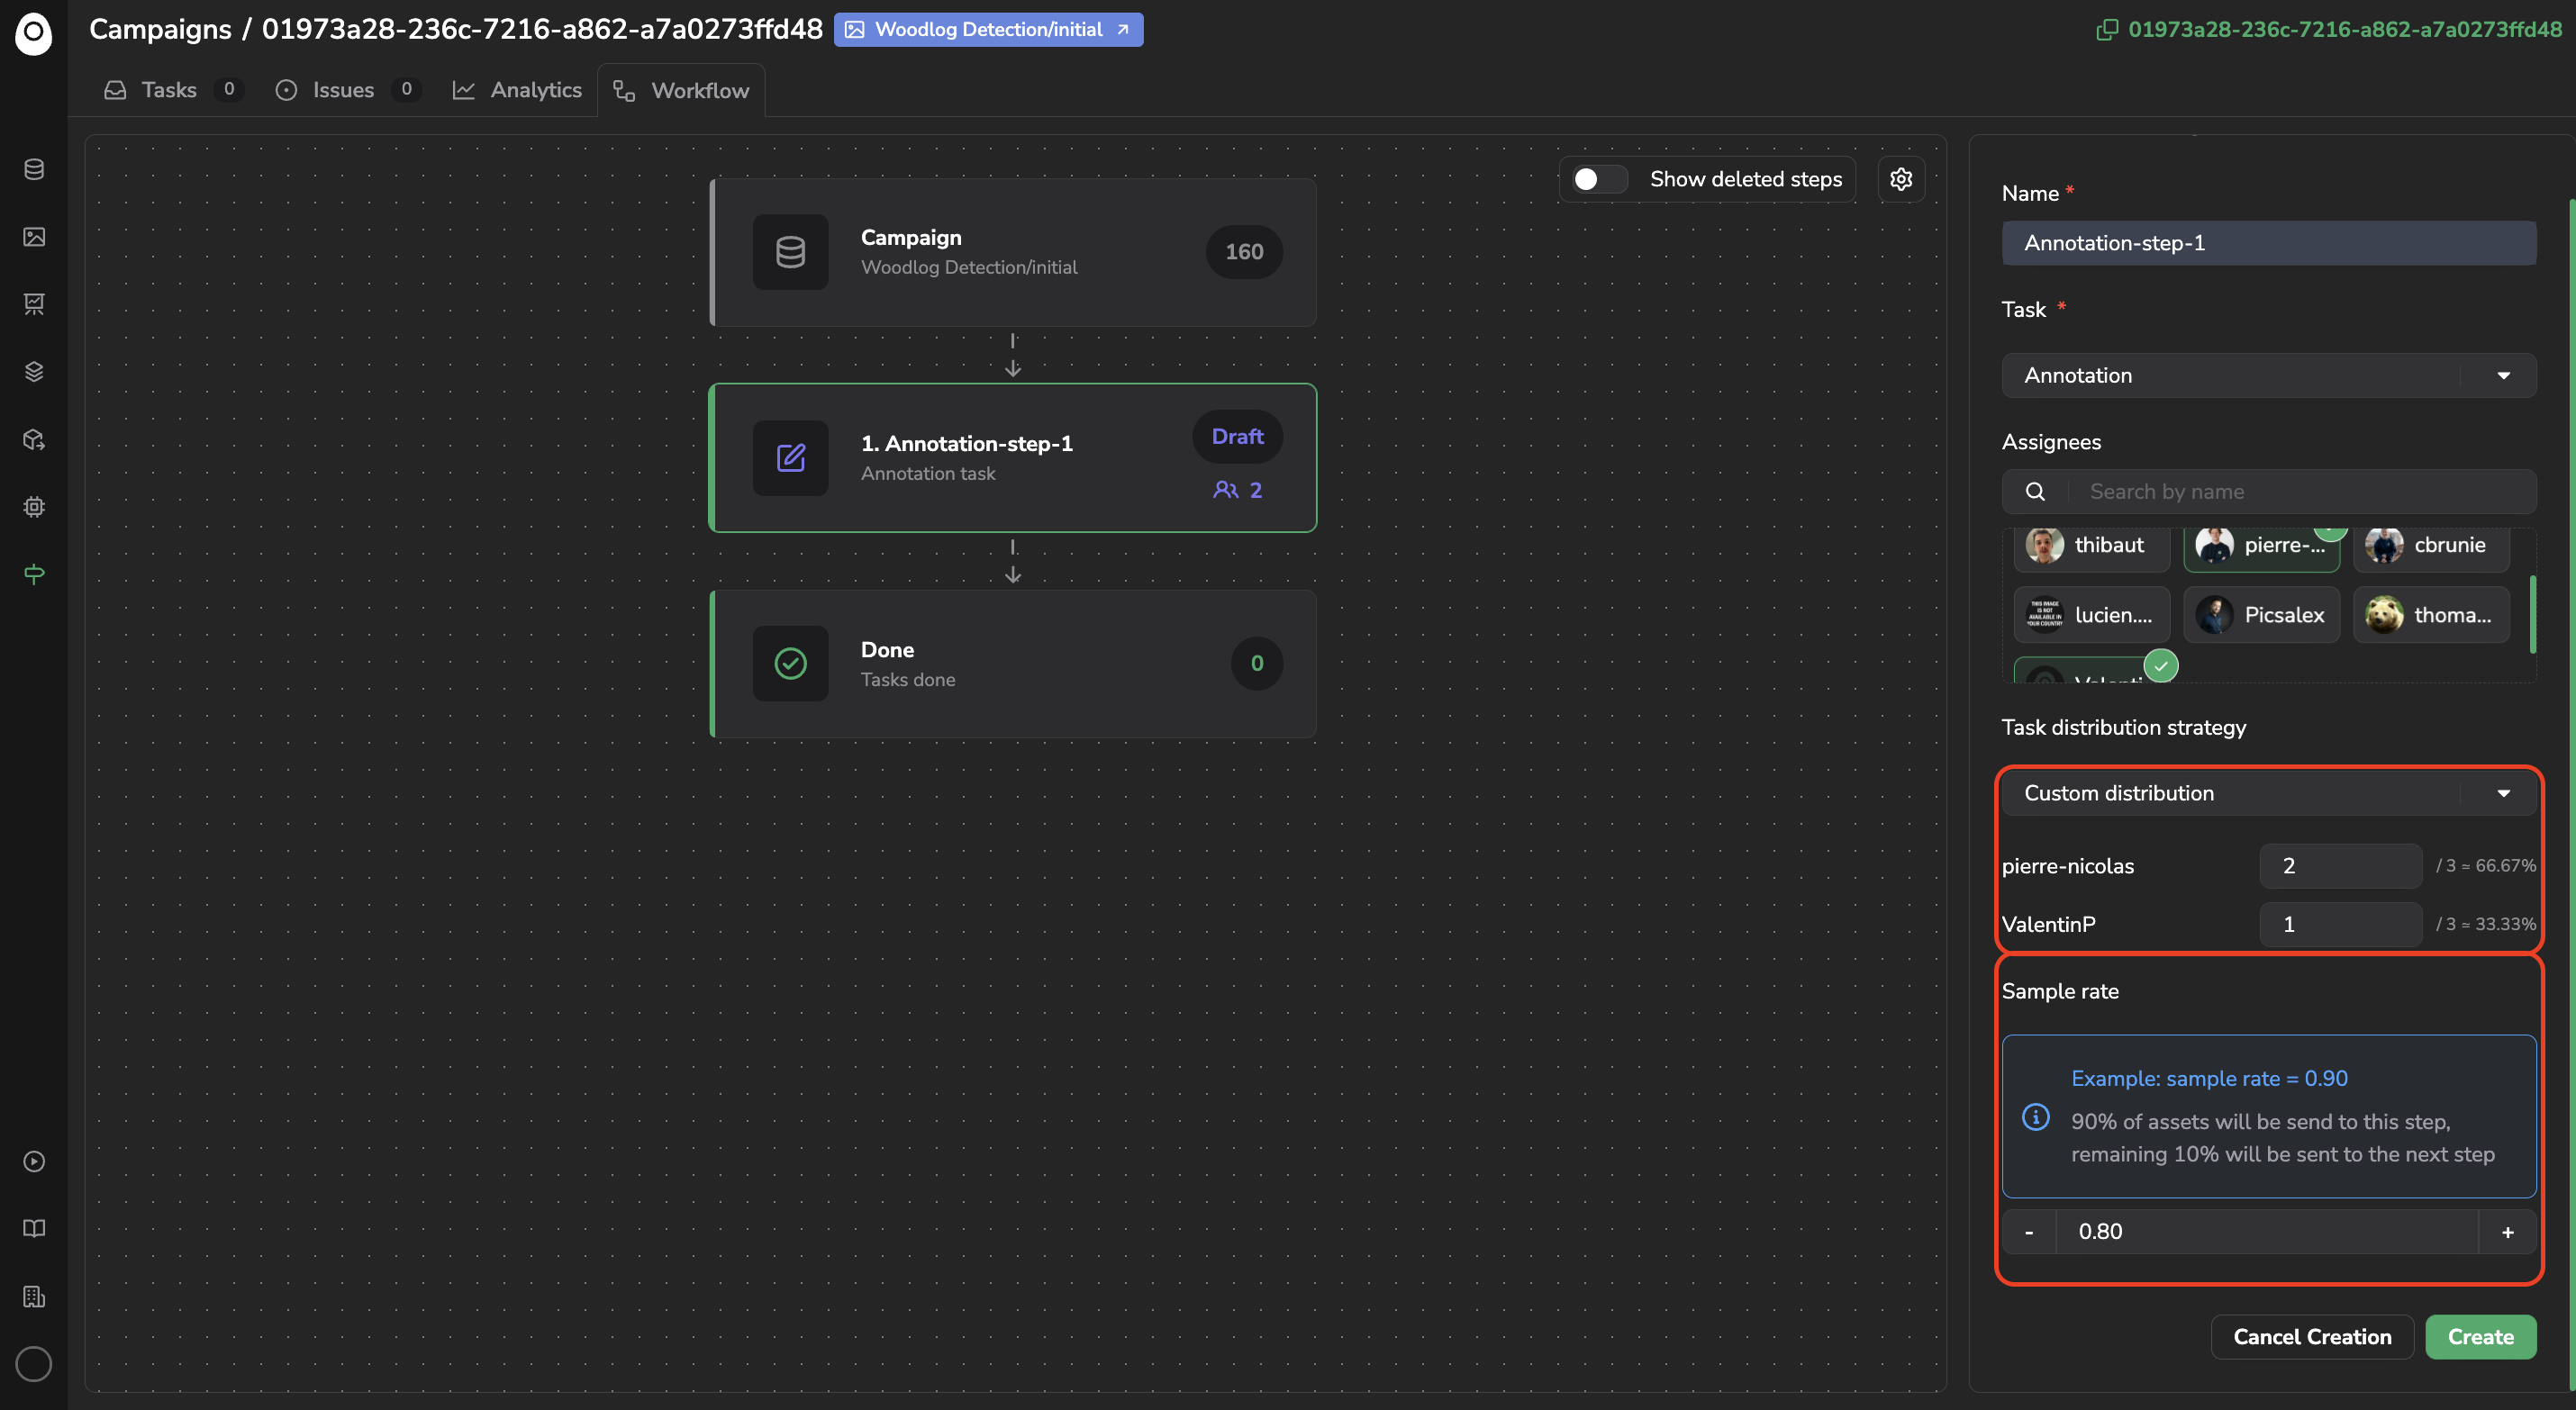
Asset split strategy & sample rate definition
Now that your Step is fully configured you just need to click on Create to finish the Step creation.
Once created, you can at any time find out the number of Assignees assigned to this Step and the number you can edit the step anytime by clicking on it and accessing the configuration panel through the Edit button,.
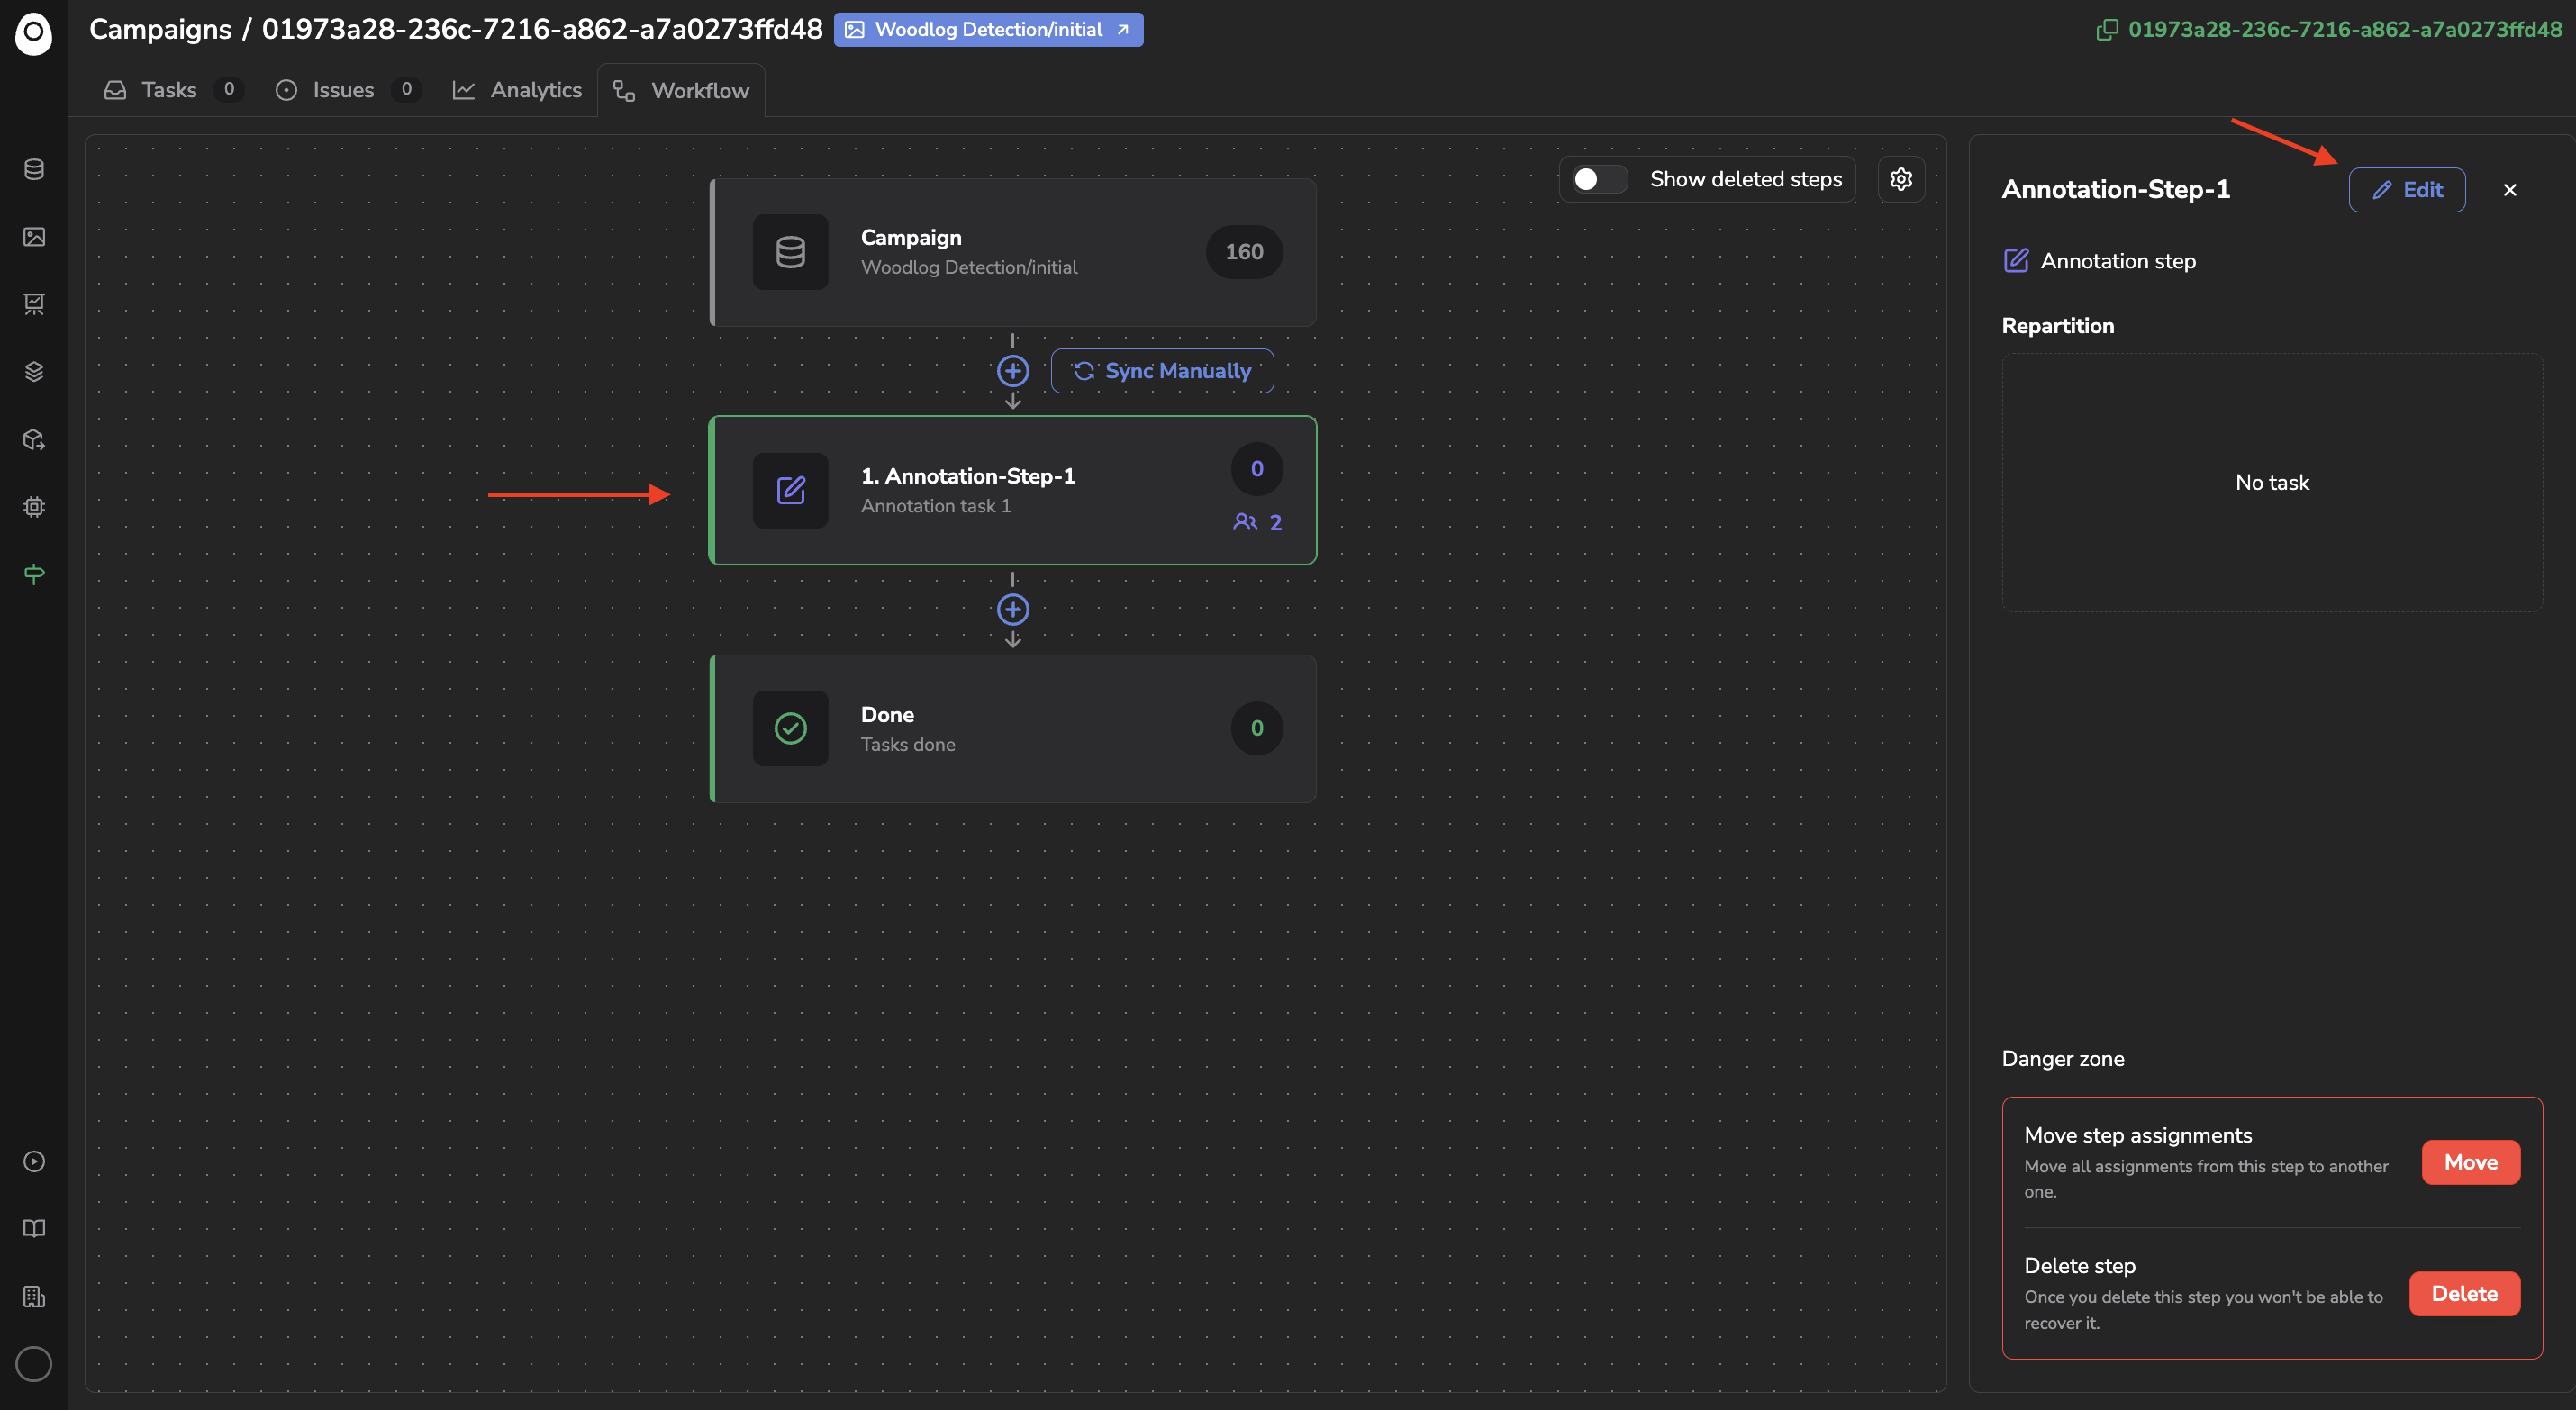
Access the configuration panel of an existing step
The Unpriviledged roleIf you want some members to only have access to the Tasks they are supposed to do within Annotation Campaigns running in your Organization and nothing else, you can set them as Unpriviledged members. More details are available here.
Then, you can reproduce the Step creation process add as many Steps as you want to create the Annotation Workflow that suits your needs.
For instance, a simple and efficient Annotation Workflow would be to have an Annotation Step and then a Review Step with a part of your team assigned to Annotation and some others to the Review, as shown below:

Example of a simple Annotation Workflow
A Worker can be assigned to several Steps of an Annotation WorkflowIn this case, the Tasks will be assigned to avoid a given
Assetto be annotated and reviewed by the same Worker when possible.
B. Configure your Annotation Campaign
Now that your Annotation Workflow is defined, you can configure the way your Annotation Campaign will be initialized by clicking on the settings button, a configuration panel will open allowing you to:
- Add an instruction PDF file for the Workers which will be visualizable by all the Assignees of the current Annotation Campaign while doing the Tasks they get assigned to. This pdf could, for instance, list all the guidelines and instructions the Workers need to be aware of for properly annotating the
DatasetVersion. - Define a due date for the Annotation Campaign
- Make sure the Annotation Campaign is closed when all the Tasks are Done
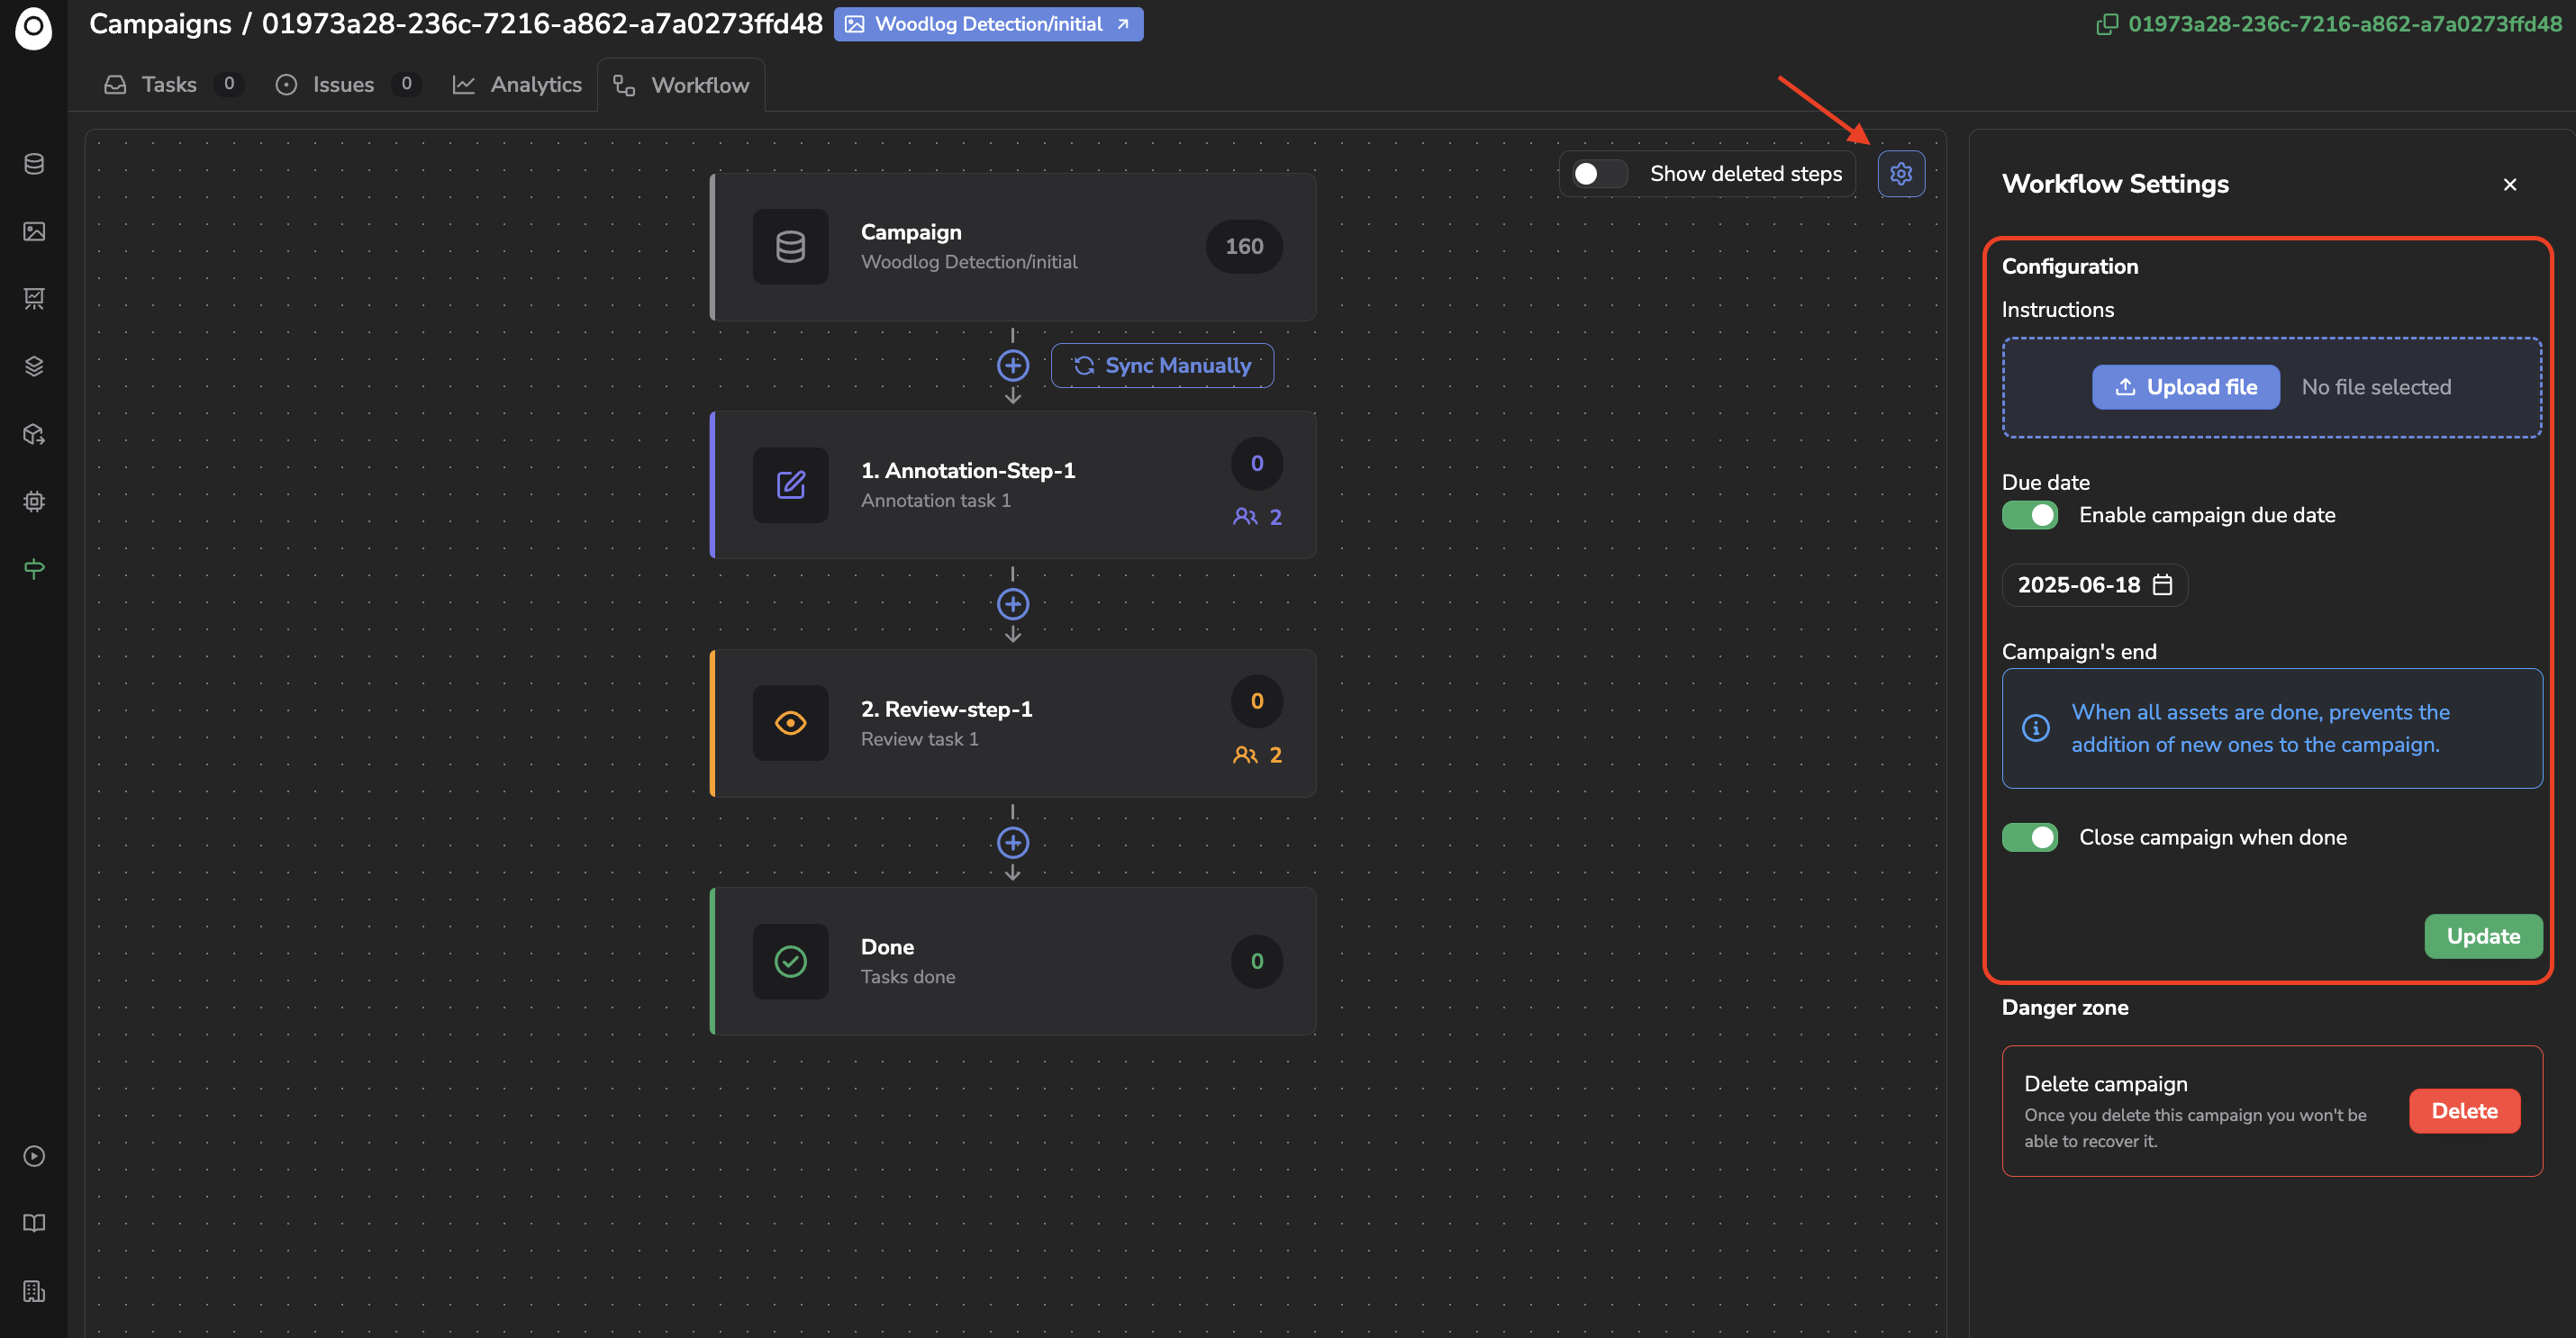
Workflow settings
C. Launch the Annotation Campaign
At the end of the configuration phase of your Annotation Campaign, all the Asset of your DatasetVersion are at the initial Step named Dataset Version.
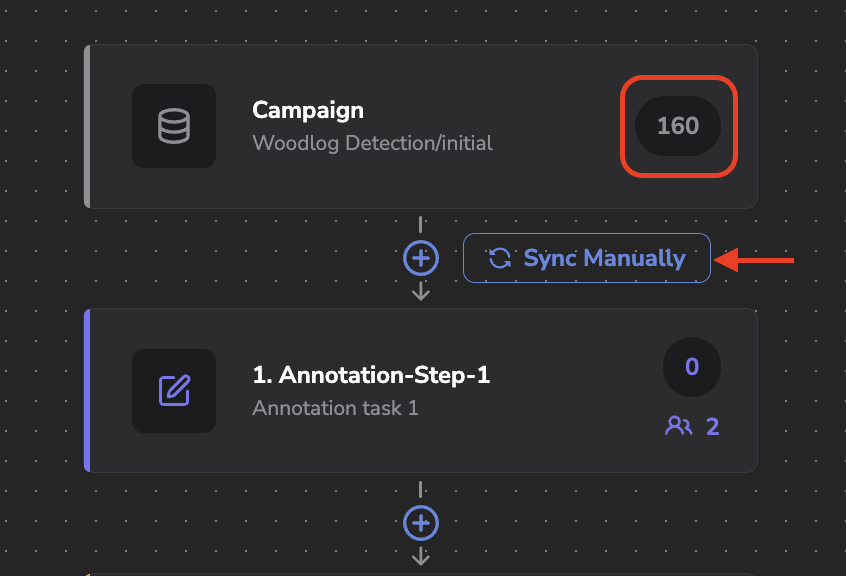
Asset waiting to enter the Annotation Workflow
It is now time to start the Annotation Campaign. To do so you simply need to click on Sync Manually, this will make all the Assets present in the DatasetVersion Step transition to the first Step of the Annotation Workflow, the related Tasks will then be created.
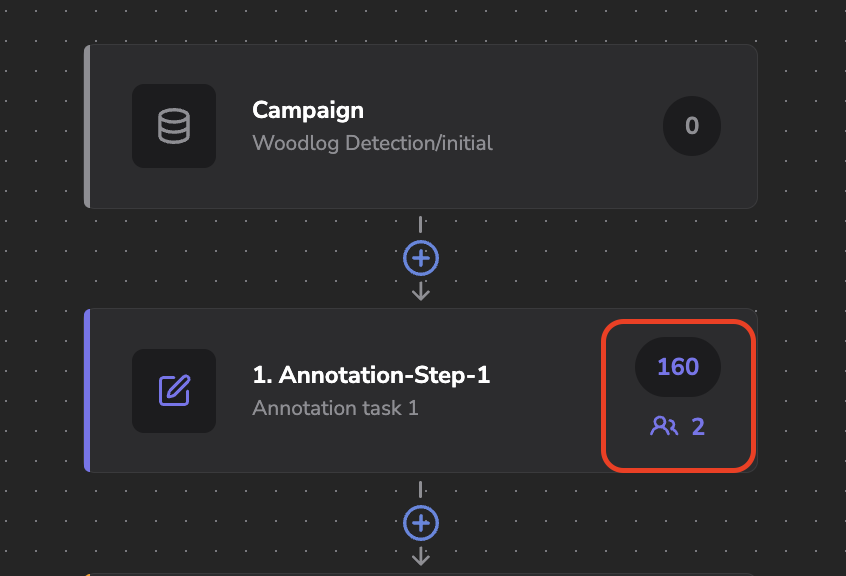
Task created at the first step
2. The Task list
The Tasks list allows you to visualize the current Status and Step of the latest Tasks related to any Asset that is currently going through the Annotation Campaign.
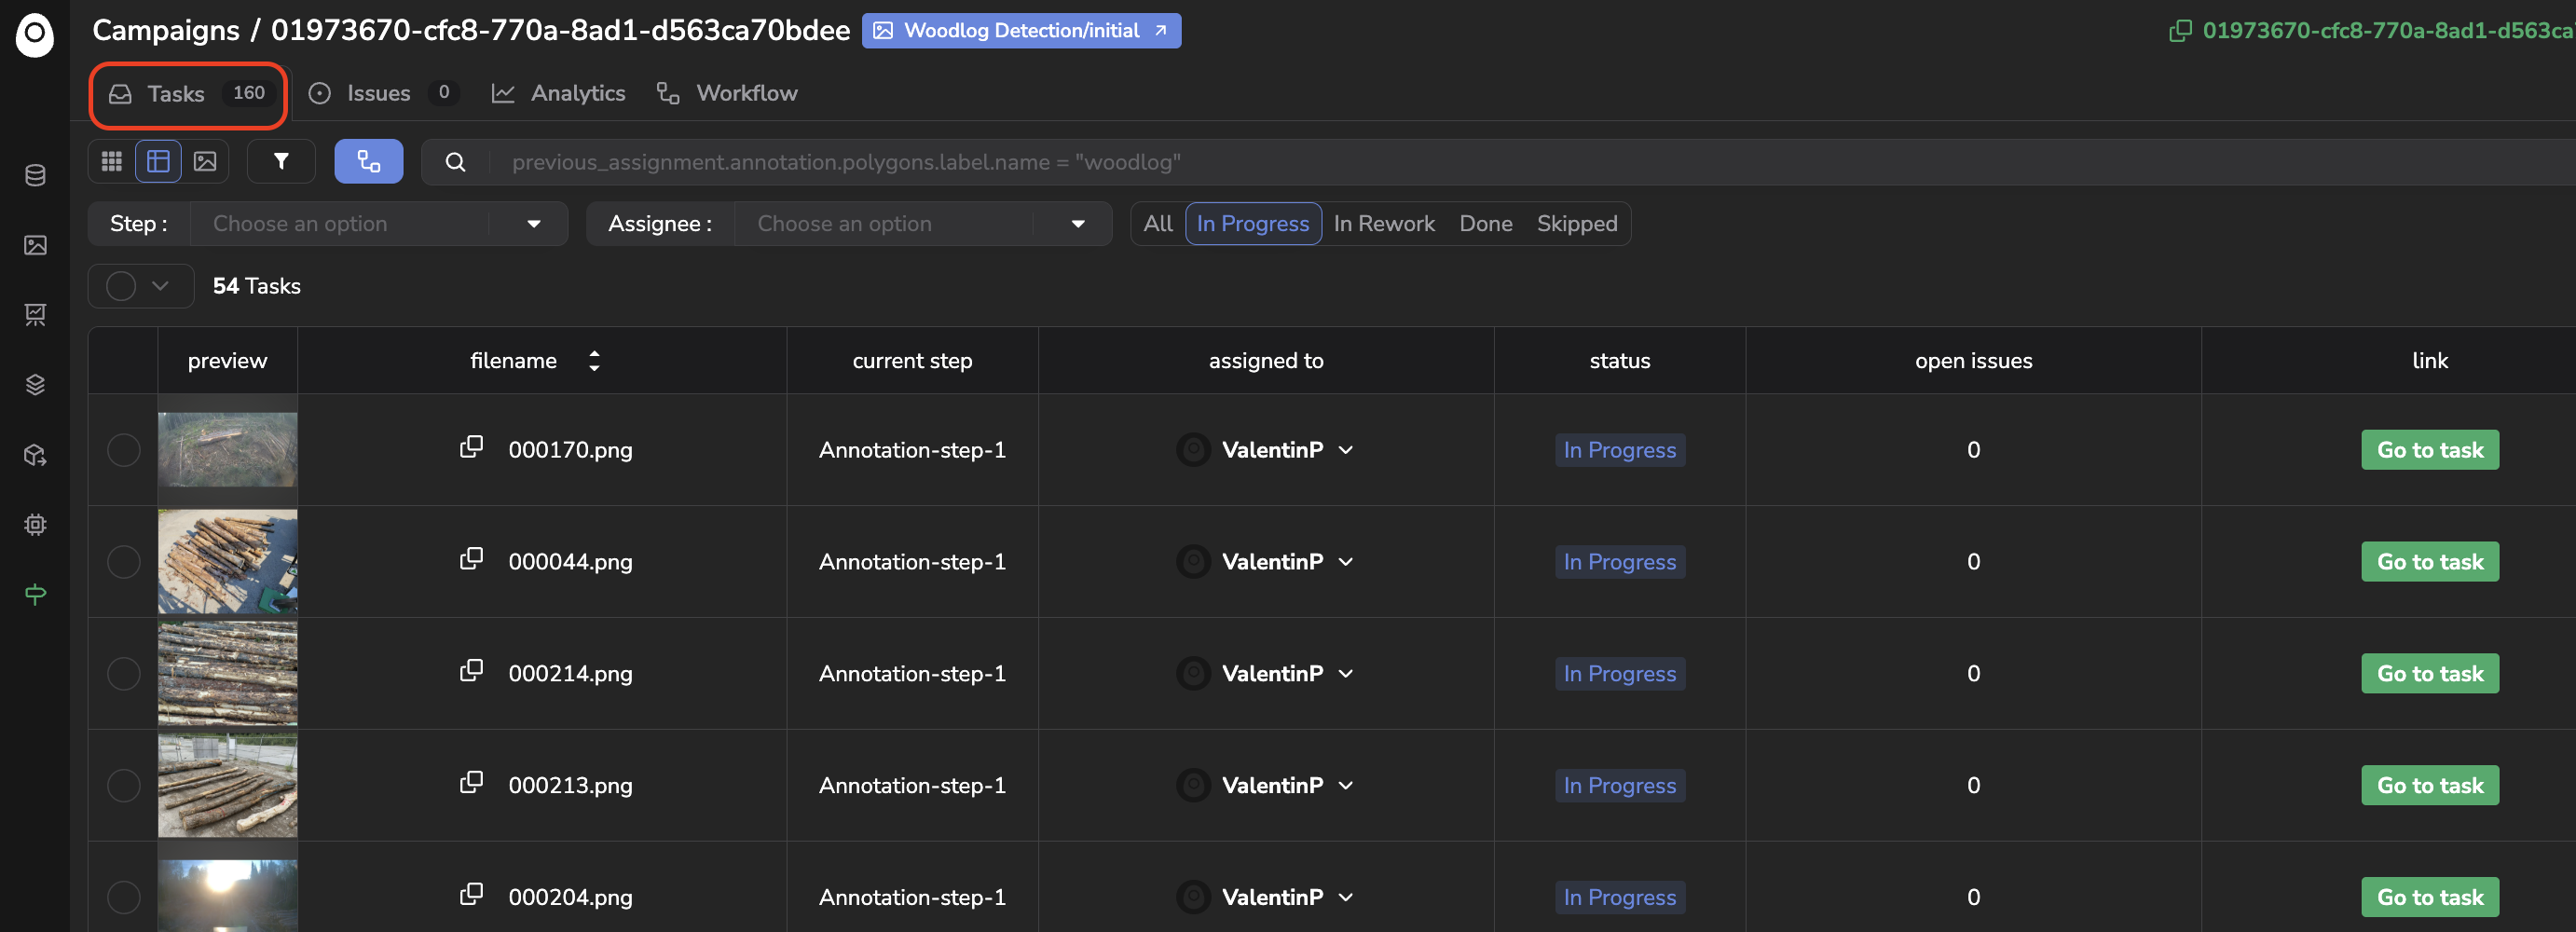
Tasks list
This view allows you to display the images related to the Tasks, filter the Tasks to display on the Status, Assignee or Step and perform advanced search queries using the Query Language.
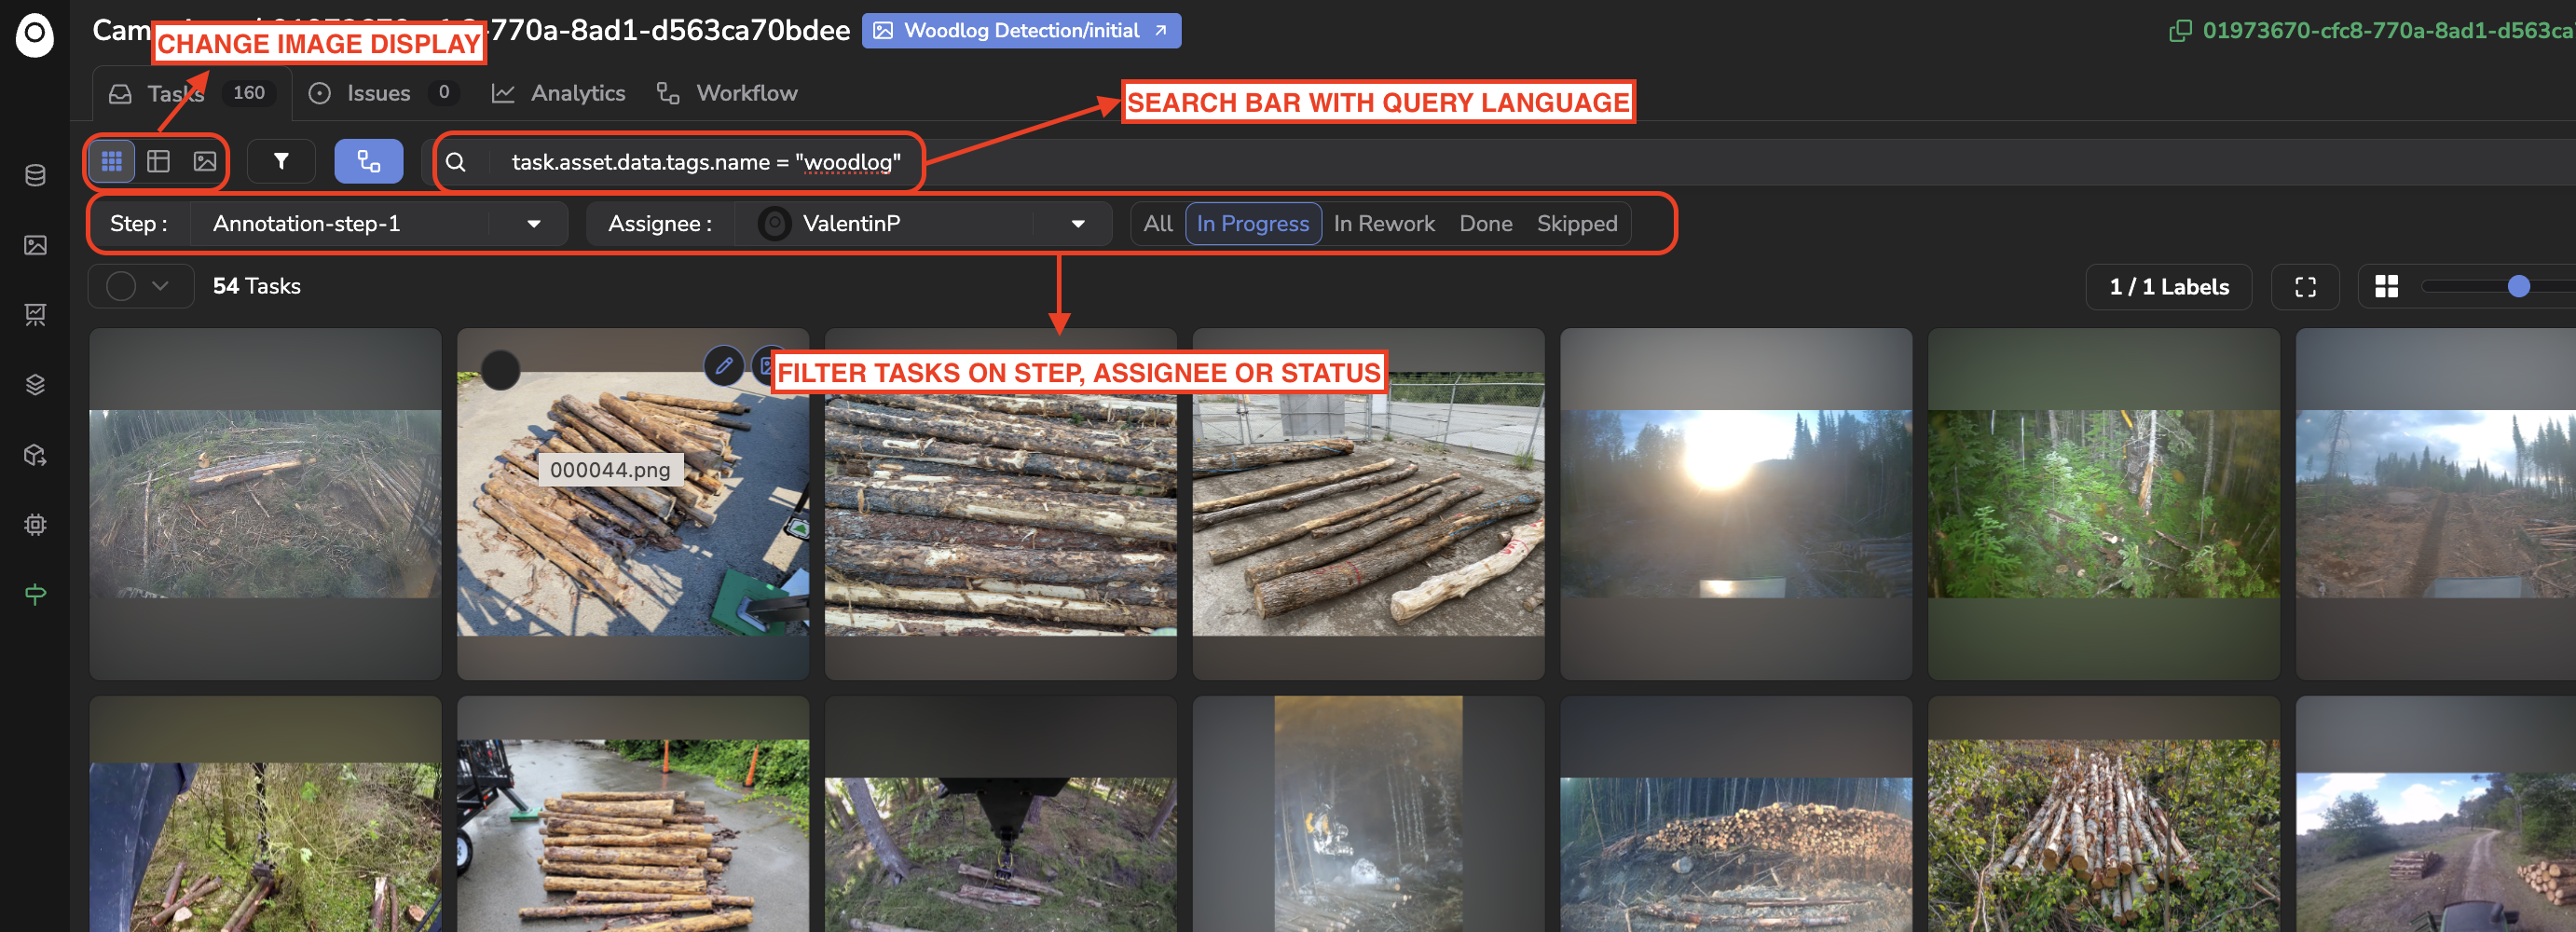
Filter and browse tasks
A. Task Status
As shown below each Task created for an Asset has a current Step and Assignee, those are defined while creating the Annotation Workflow as described here. However, we can also notice the presence of a new field named Status for each Task.
This Status field describes the status of the Asset journey in the Annotation Workflow. The Status of a Task can either be:
- In Progress: Everything is going well until now, the associated
Assetis going through the Annotation Workflow normally. However, the Asset is still at an Annotation or Review step reflected by the In Progress status. The Annotation Workflow isn't over yet. - To Rework: A Task with the to Rework status is an Annotation Task created when an
Assethas been annotated during a first Annotation task and submitted as To Rework during the next Review step. Indeed, the Assignee of this Review step didn't accept the proposedAnnotation. So he sent theAssetback to the previous Step in the Annotation Workflow. Usually, the reason is described in an Issue. As a consequence, a new Task with To Rework status has been re-created at the previous Annotation step of the Annotation Workflow and re-assigned to the Worker that created the rejectedAnnotation. This Assignee can then modify its firstAnnotationby completing this To Rework task and sending it back for the second time to the following Review Step. - Done: The
Assethas been through the whole Annotation Workflow, theAssetcan be considered as annotated. - Skipped: While completing an Annotation or Review task, the Assignee has the possibility to Skip the Task, this will kick the associated
Assetout of the Annotation Workflow. There is no Task to be completed on thisAssetanymore but it cannot be considered as properly annotated. Usually, the reason is described in an Issue.
B. Reassign a Task or a bunch of Tasks
As described in detail here, a Task can only be completed by the Assignee. If for some reason, a Task needs to be completed by someone else, this one can be reassigned for completion to a member that is identified as Worker on the Dataset.
If you have sufficient rights, it can be done for a particular Task, by clicking from the Task list on the Assignee, the list of available Workers will then be displayed. You just need to click on the new Assignee as shown below:
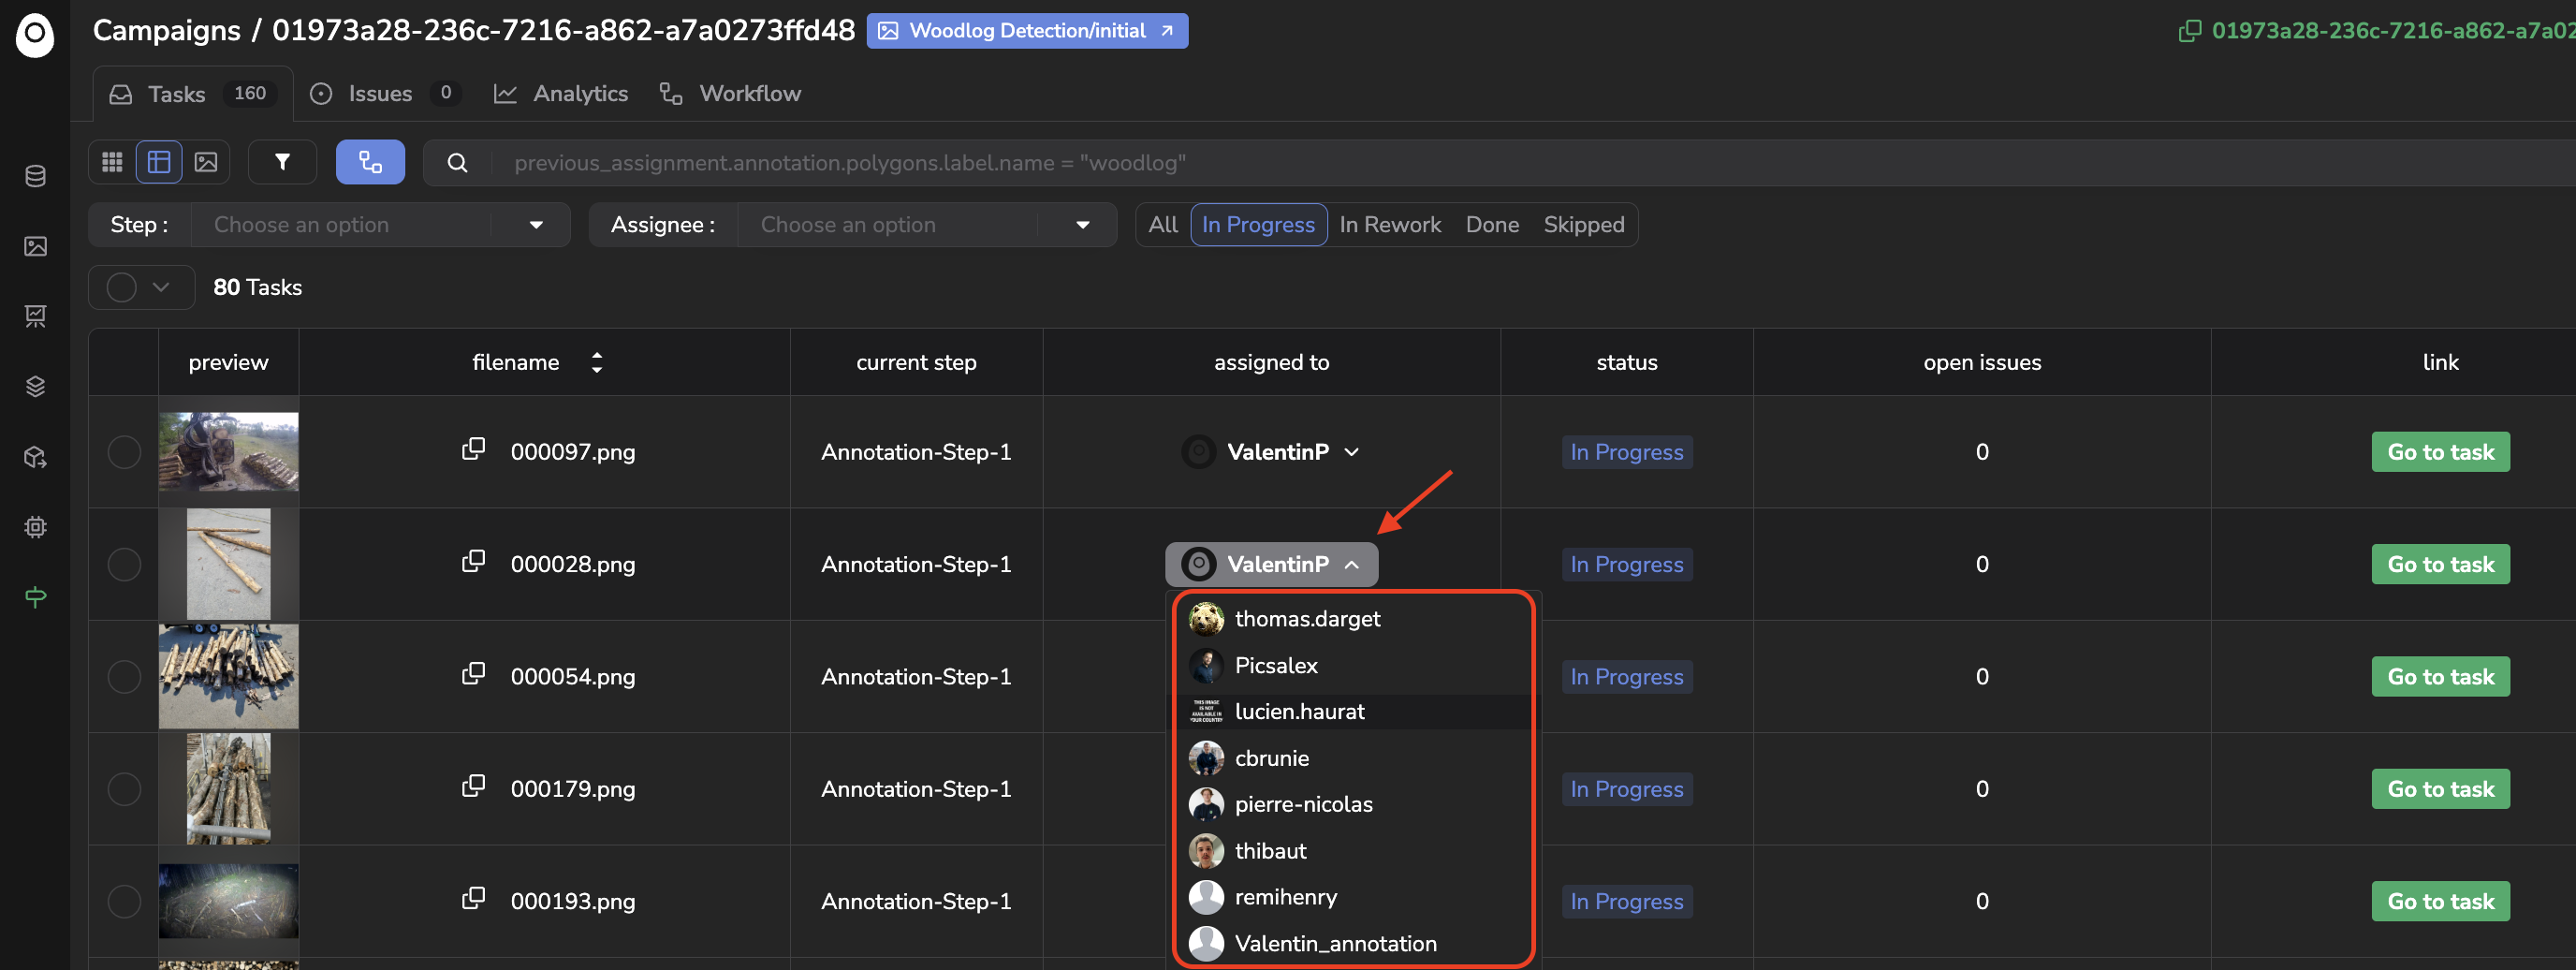
Reassign a Task
If you have sufficient rights, it can be done for a bunch of Tasks, by selecting the to-be-reassigned Tasks and clicking on the Reassign button. Then you simply need to select from the list of available Workers the one that will get the selected Tasks reassigned.
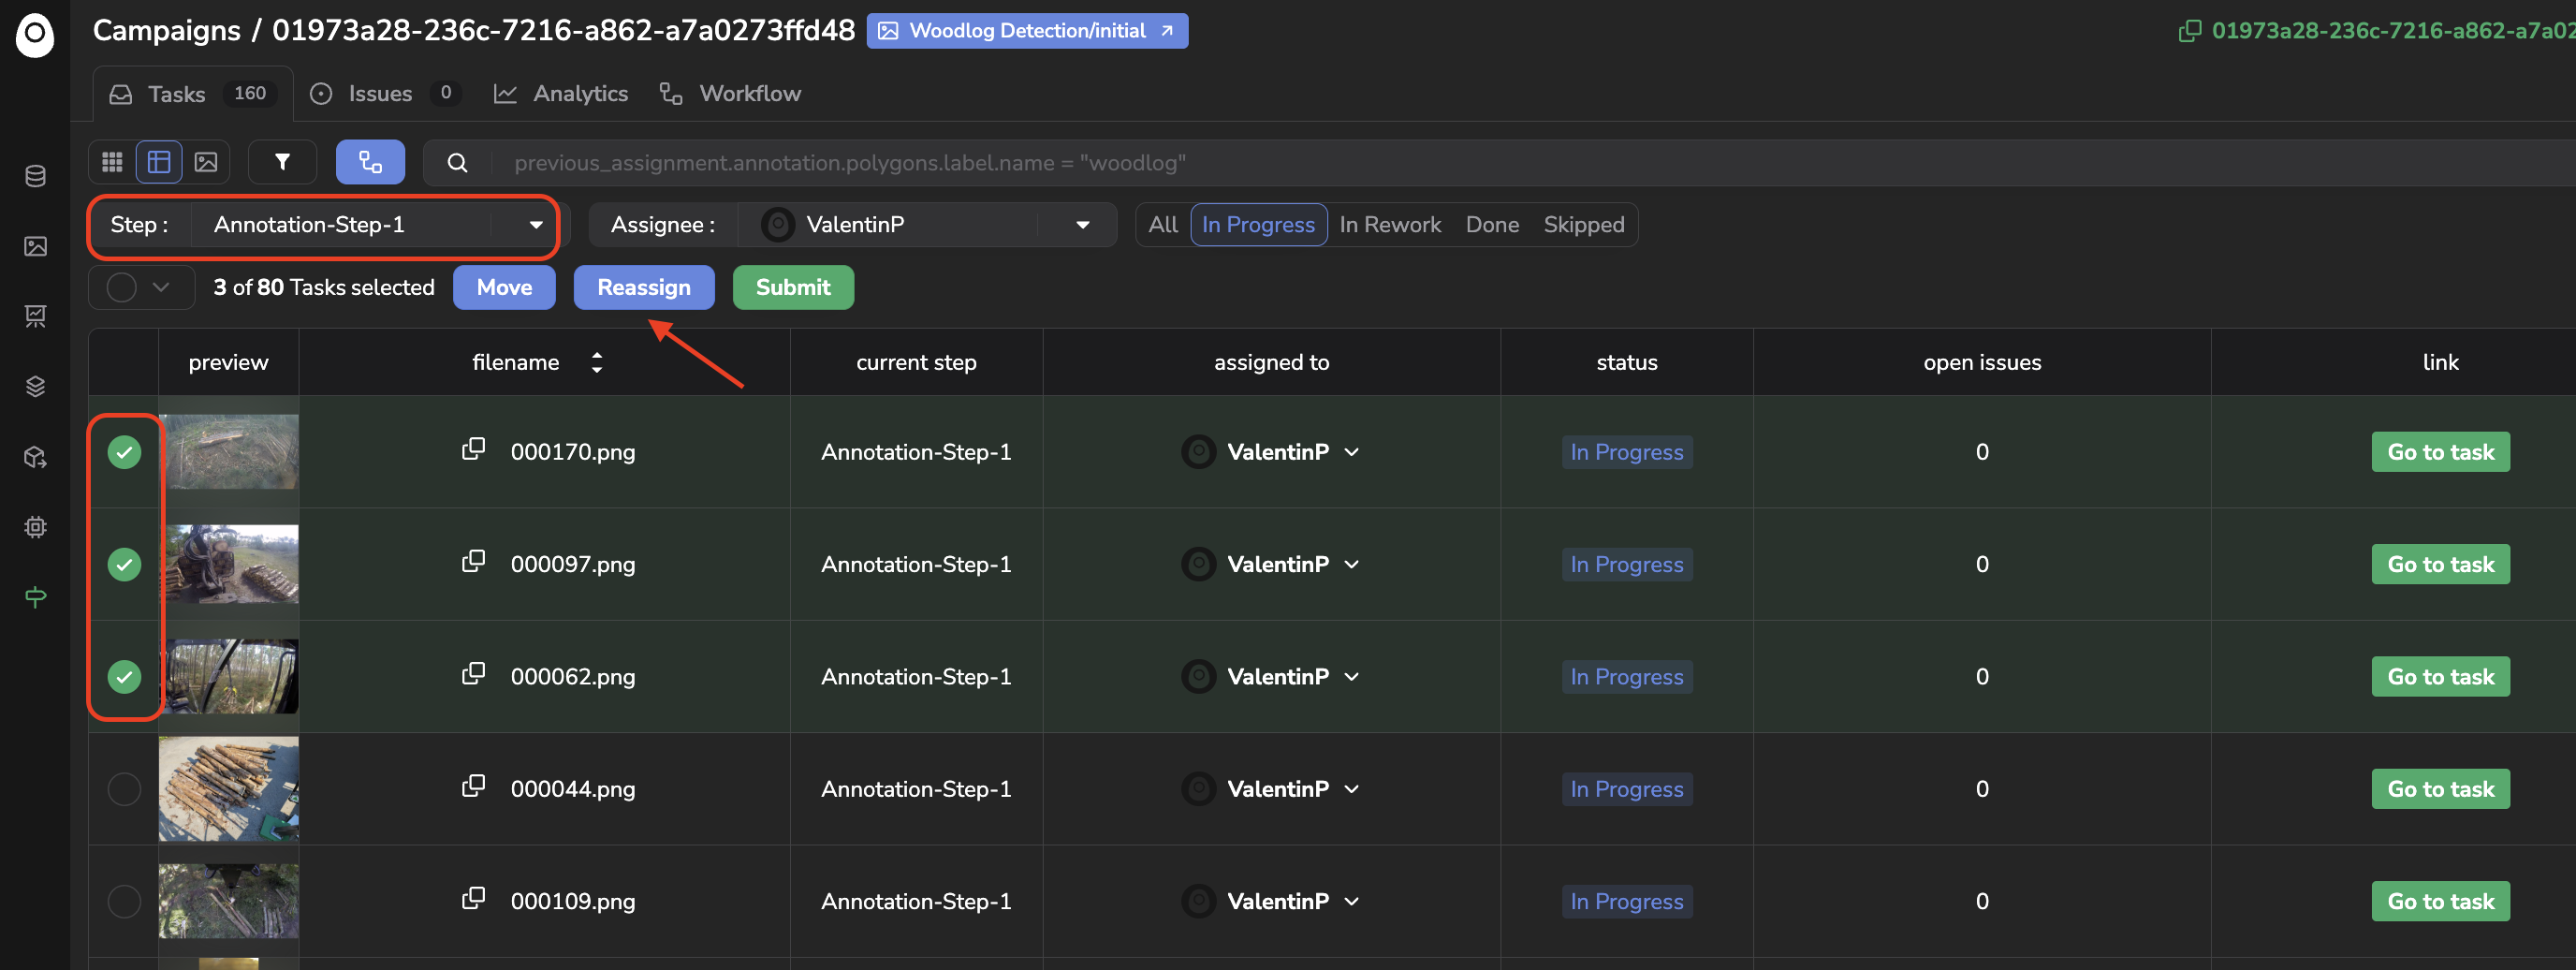
Reassign Tasks
A filter on the Steps should be activeFor the reassignment of several Tasks, you must ensure that a filter on the Task step is active on the Task list before reassigning.
C. Submit a bunch of Tasks
During a normal functioning process, each Task should be completed by its Assignee by opening the Annotation Studio.
But sometimes, Workers prefer to first complete their Tasks in the Annotation Studio, save them, and Submit all their Tasks at the same time. In this case, they can use the Submit button available in the Task list.
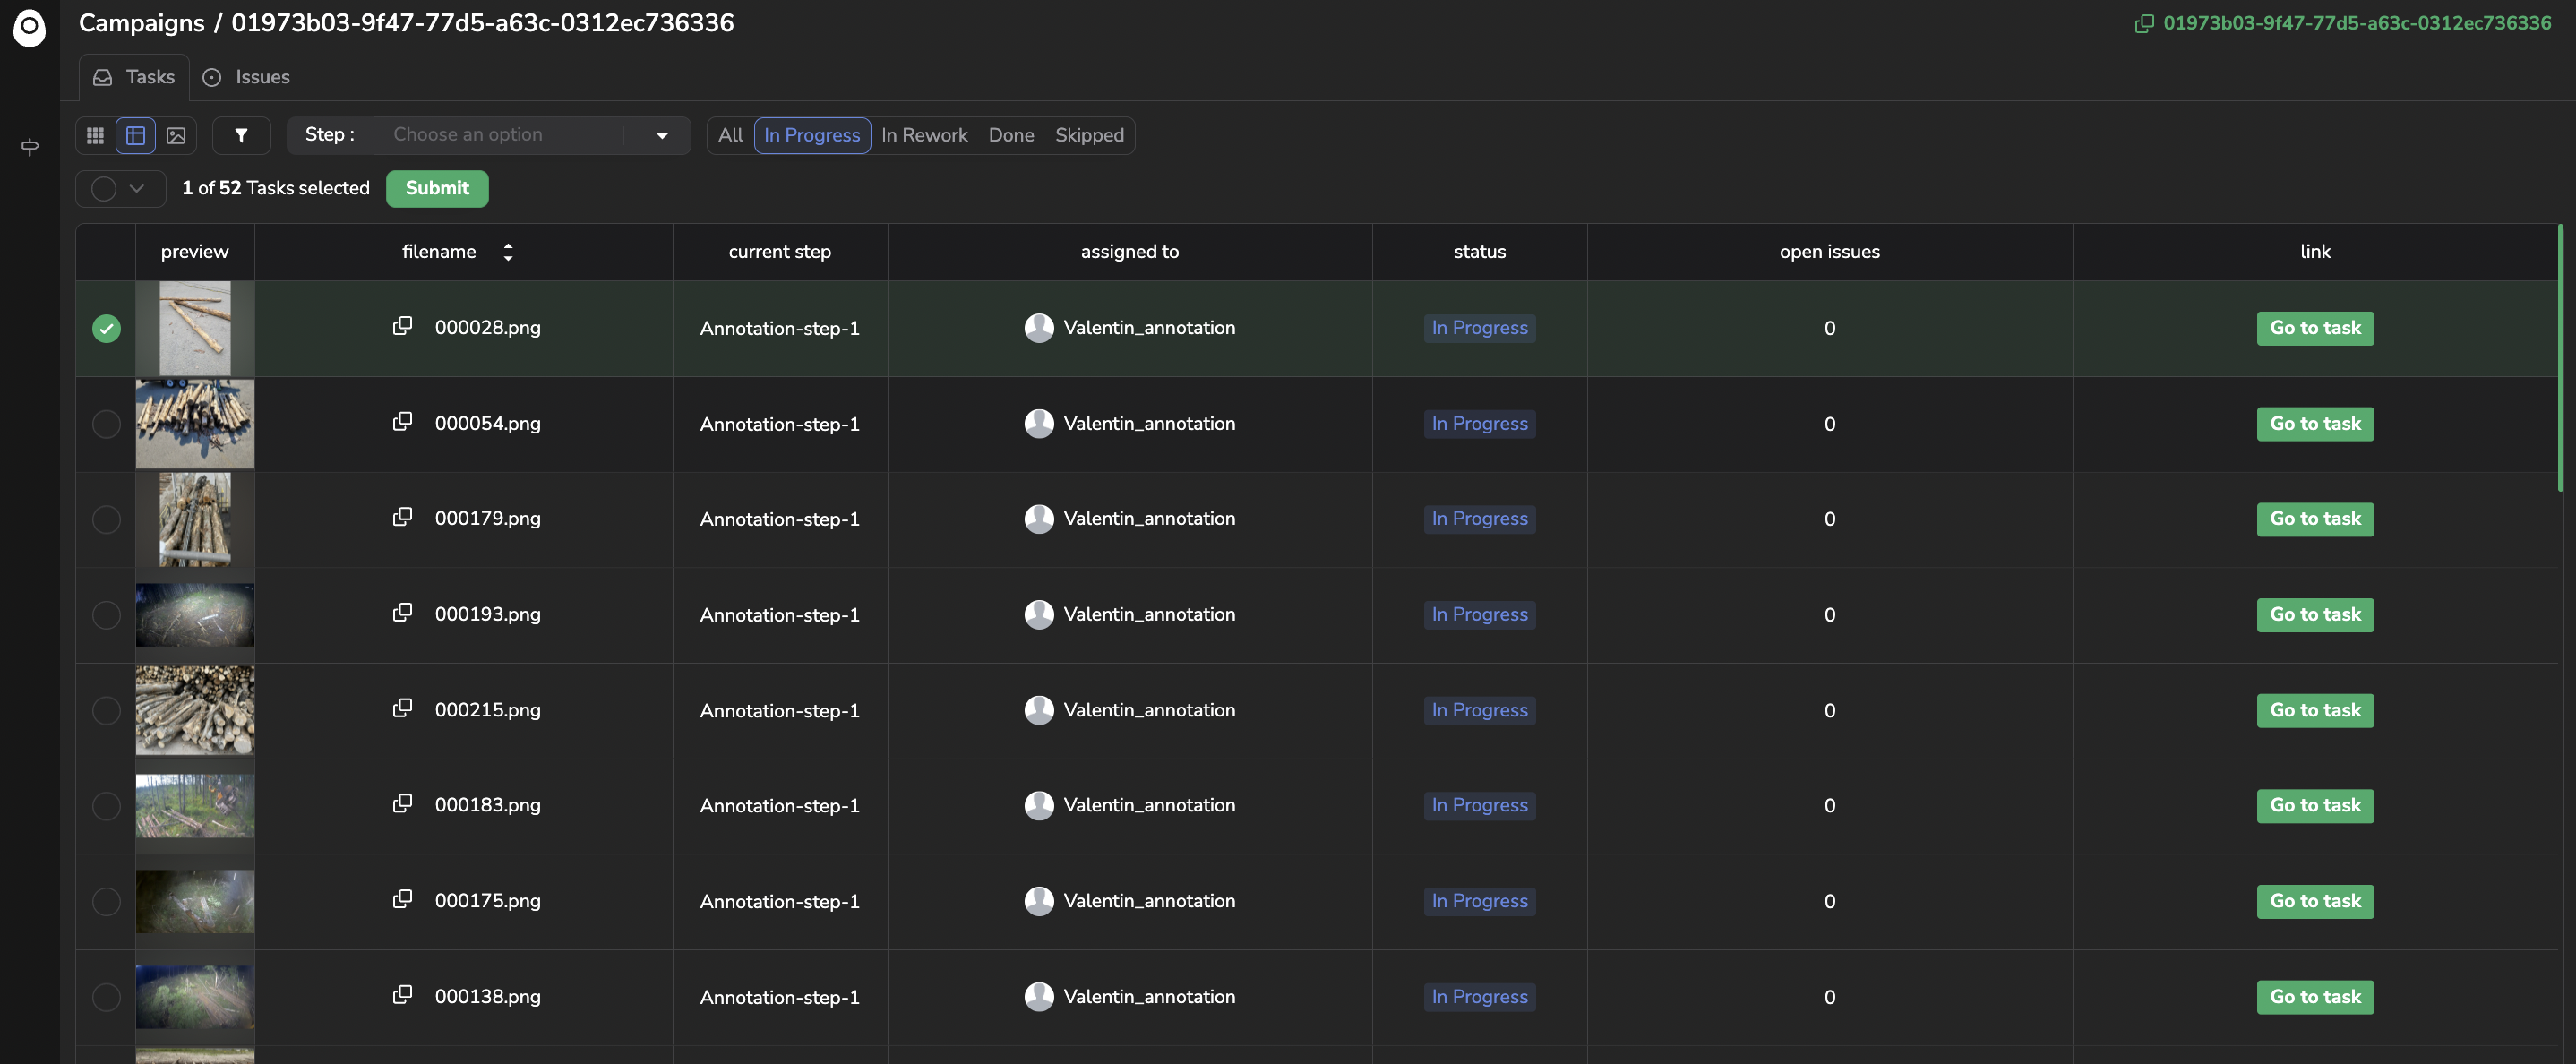
To bulk submit a bunch of Tasks, you simply need to use the filters or the Query Langage to retrieve and select Tasks to be submitted and click on Submit:
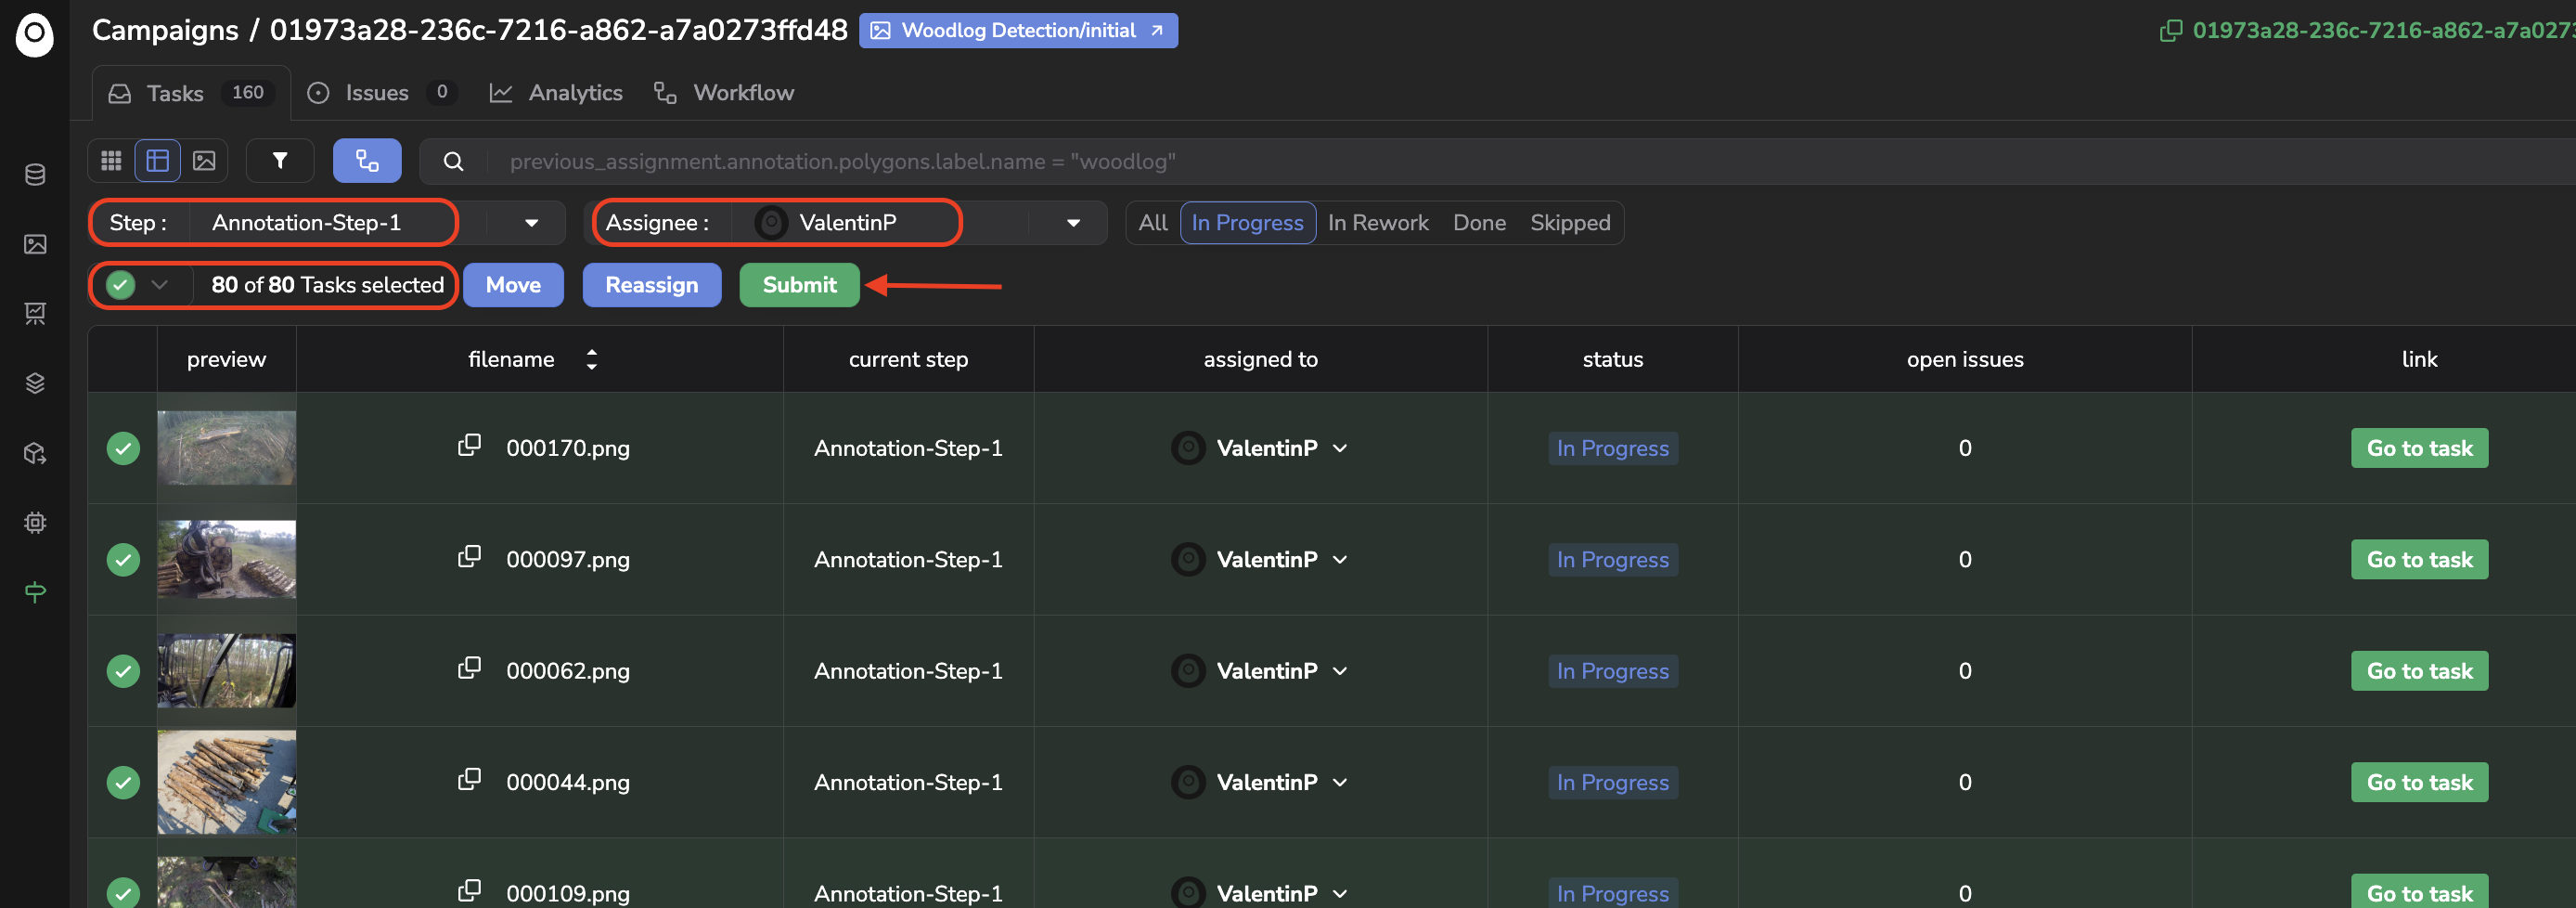
Bulk Submit
By clicking on Submit, all the selected Tasks will be submitted, meaning that the Asset will transition through the Annotation Workflow to the next Step. A new Task will be created according to the Task assignation rules of the Step.
Please be aware that only the selected Asset with an existing Annotation will be submitted. If you want to submit also theAsset without Annotation you can use the Move button described here.
In addition, if the next Step in the Workflow is Done, the Asset with Issues still open won't be submitted. Once again, if you want to submit also theAsset open Issues related, you can use the Move button described here.
D. Move a bunch of Tasks
During a normal functioning process, each Task should be completed by its Assignee by opening the Annotation Studio.
But in some cases, you might be forced to move several Tasks at the same time to another Step (including Done or Skipped), whether they are assigned to you or not.
To do so, you simply need to use the filters or the Query Langage to retrieve and select Tasks to be transitioned to another Step. Then click on Move:
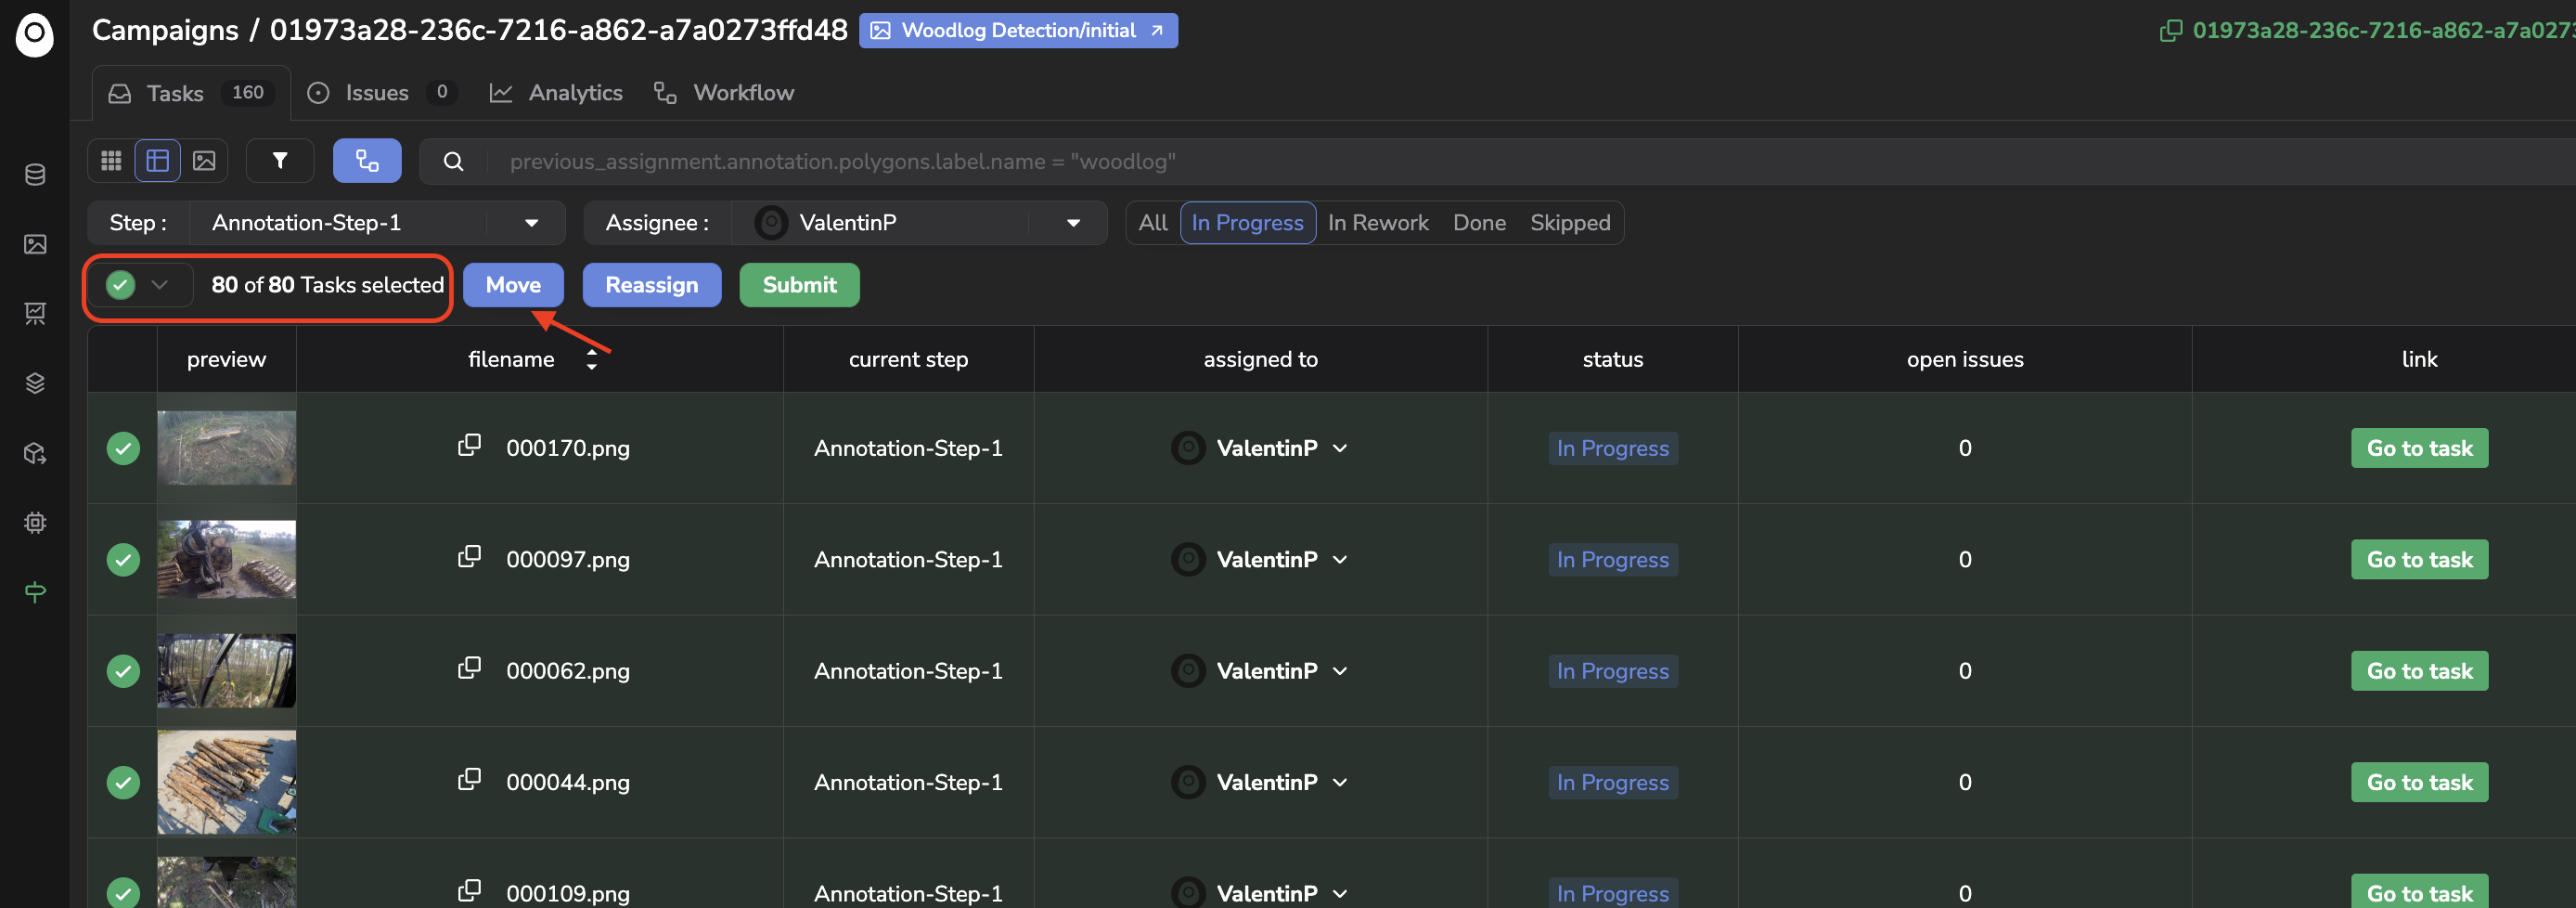
Bulk move
A pop-up will then open allowing you to select the destination Step of the selected Tasks:
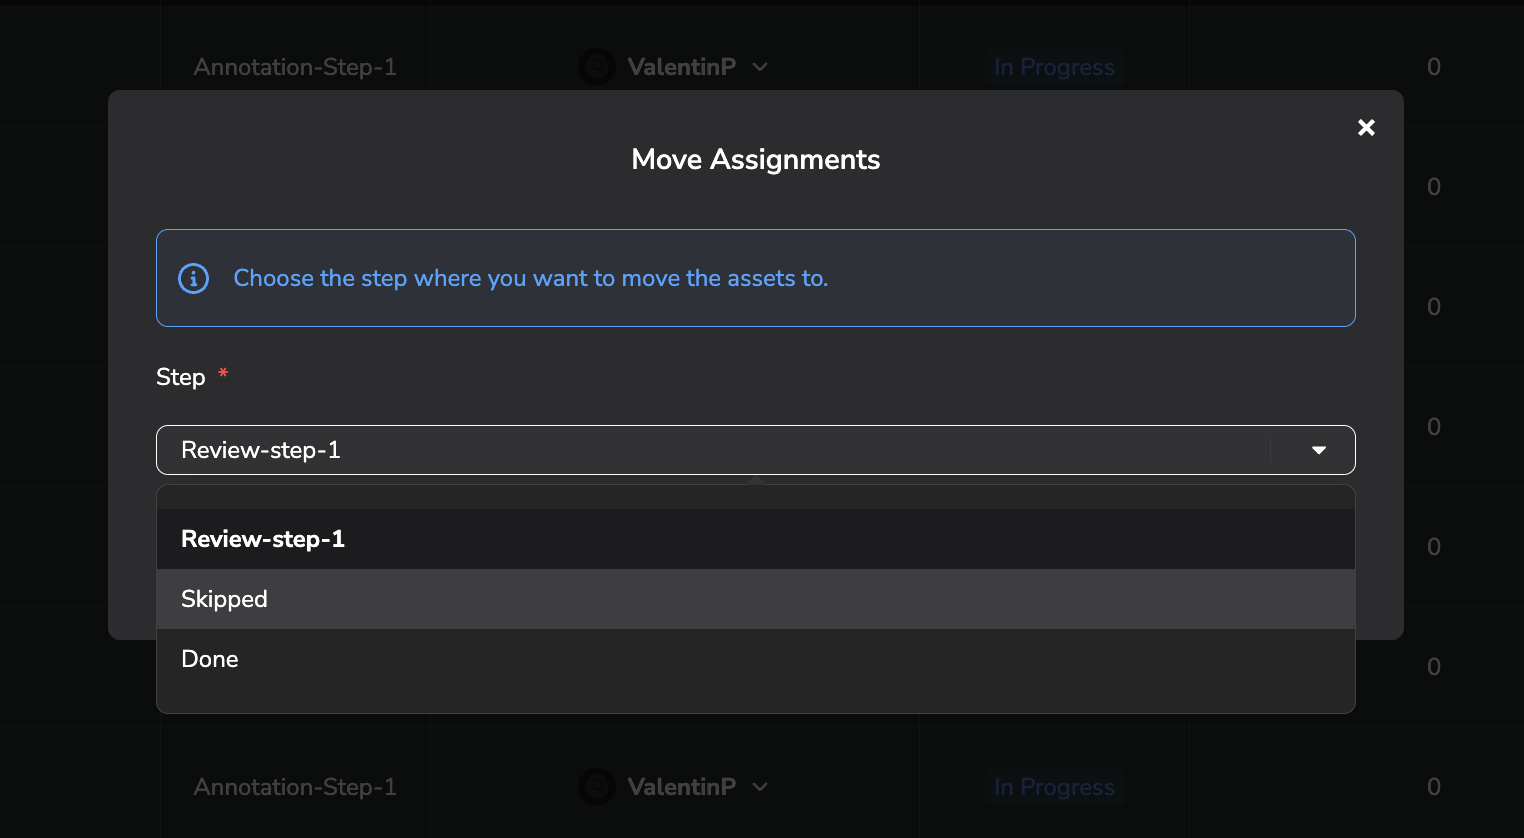
Select destination Step
Once Asset are move to another Step, obviously new Tasks will be generated at this new Step according the Task assignation rules of this one.
Assets moving backward in the WorkflowIf the selected
Assetare sent backward in the Annotation Workflow the new Task created will have the In Rework status, whereas ifAssetare more forward in the Annotation Workflow, the new Task created will have the In Progress status.
Please be also aware that unlike the Submit button, using the Move button will transition the selected Asset even if some Issues are still open or if no Annotation has been initiated on this Asset yet.
The Move operation can also be done from the Worflow tab as shown below. However, from this tab you cannot granularly select which Tasks from a given step should be moved or not.

Bulk move from Workflow tab
3. Complete a Task
Now that we can visualize, understand, and manipulate the Tasks created in the frame of the current Annotation Campaign, it is high time to start completing them to make our Asset go through the Annotation Workflow.
Who can complete a Task?The only member able to complete a Task is the Assignee.
So if you want to complete a Task without being the Assignee, you need to reassign it first as explained here.
Whatever the Task type (Annotation or Review) to complete it you need to click on the Go to task button as shown below, the Annotation Tool will then open allowing you to perform the Annotation or the Review required by the Task. The Asset can be free of Annotation or in case the Annotation has already been initialized this one will be displayed as submitted at the previous step of the Annotation Workflow.
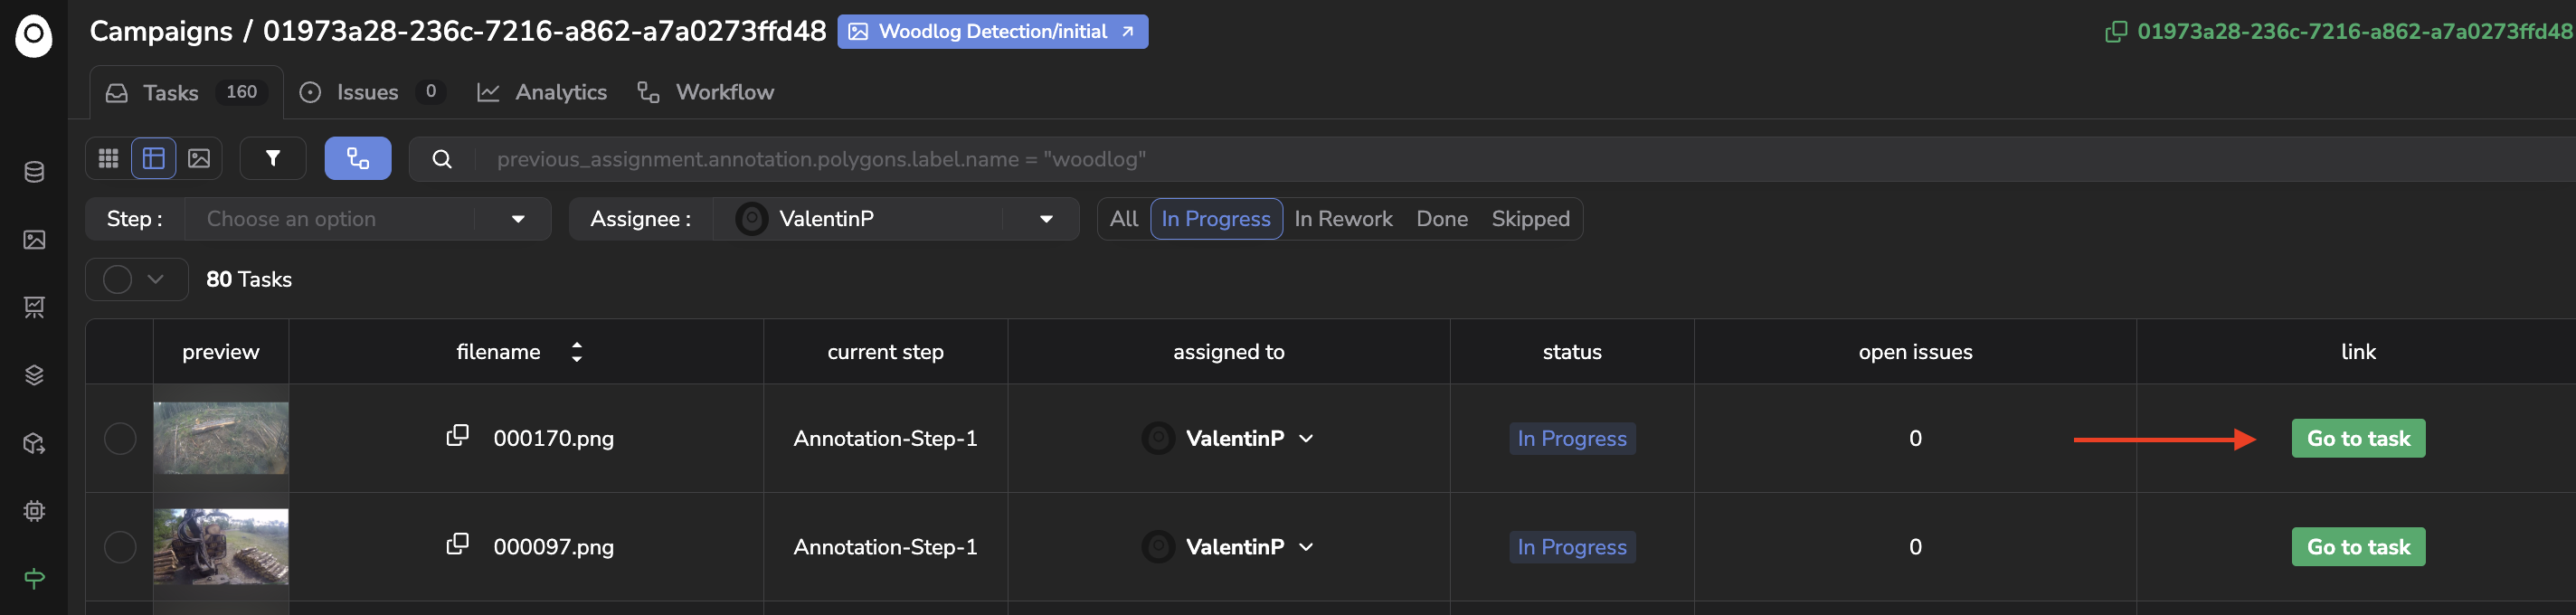
Open a Task
A. Complete an Annotation task
In case you need to complete an Annotation Task the Annotation Tool will open displaying the Asset to be annotated. You can rely on the documentation of the Annotation Tool here to create the Shape that will compose the Annotation.
Once you have created or edited the Shape and considered the Annotation satisfying, you can Submit the Task as shown below.
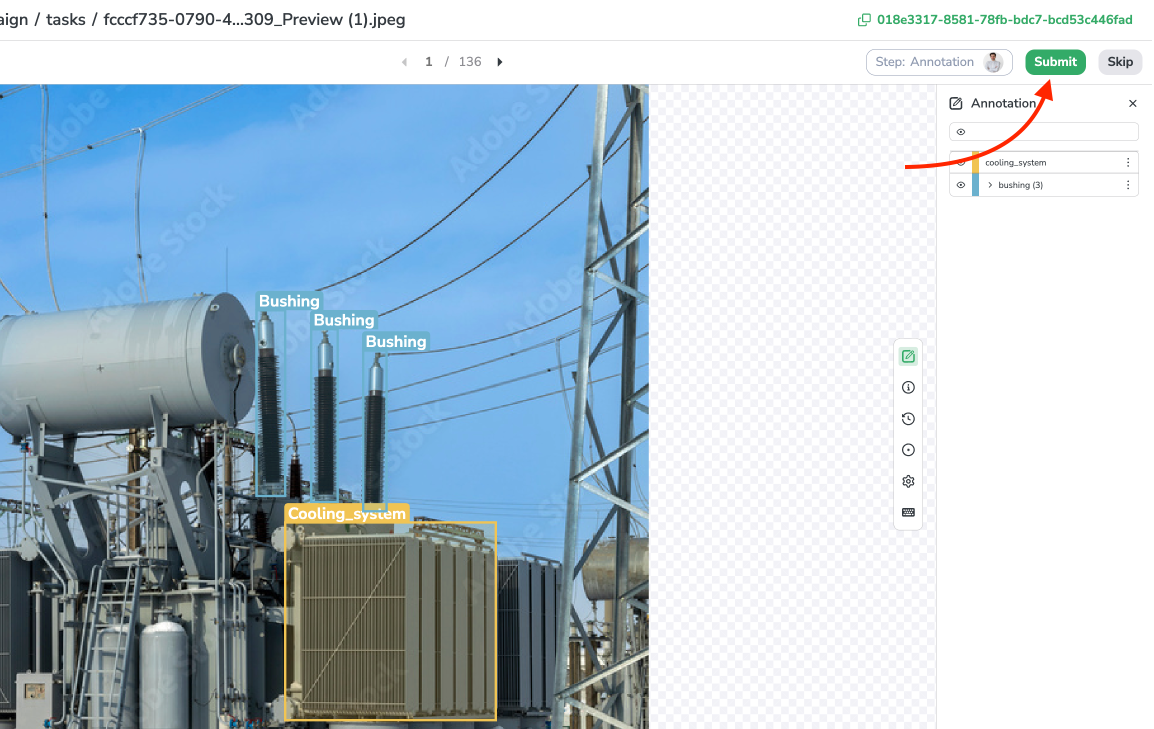
Submit a Task
Submitting a Task will save it and transition it to the next step of the Annotation Workflow.
Please note that you can also just Save the Annotation and submit the Task later on.
However, as you are annotation within an Annotation Campaign, the Annotation Tool has some additional features dedicated to Annotation Campaigns.
Please note that any Worker who’s not a Labeler and who has access to the DatasetVersion can click on the Go to task button and open the related Asset in the Annotation Tool, but only the Assignee of the Task can create, edit Annotation and submit the Task.
a. Accessing the history of the Asset
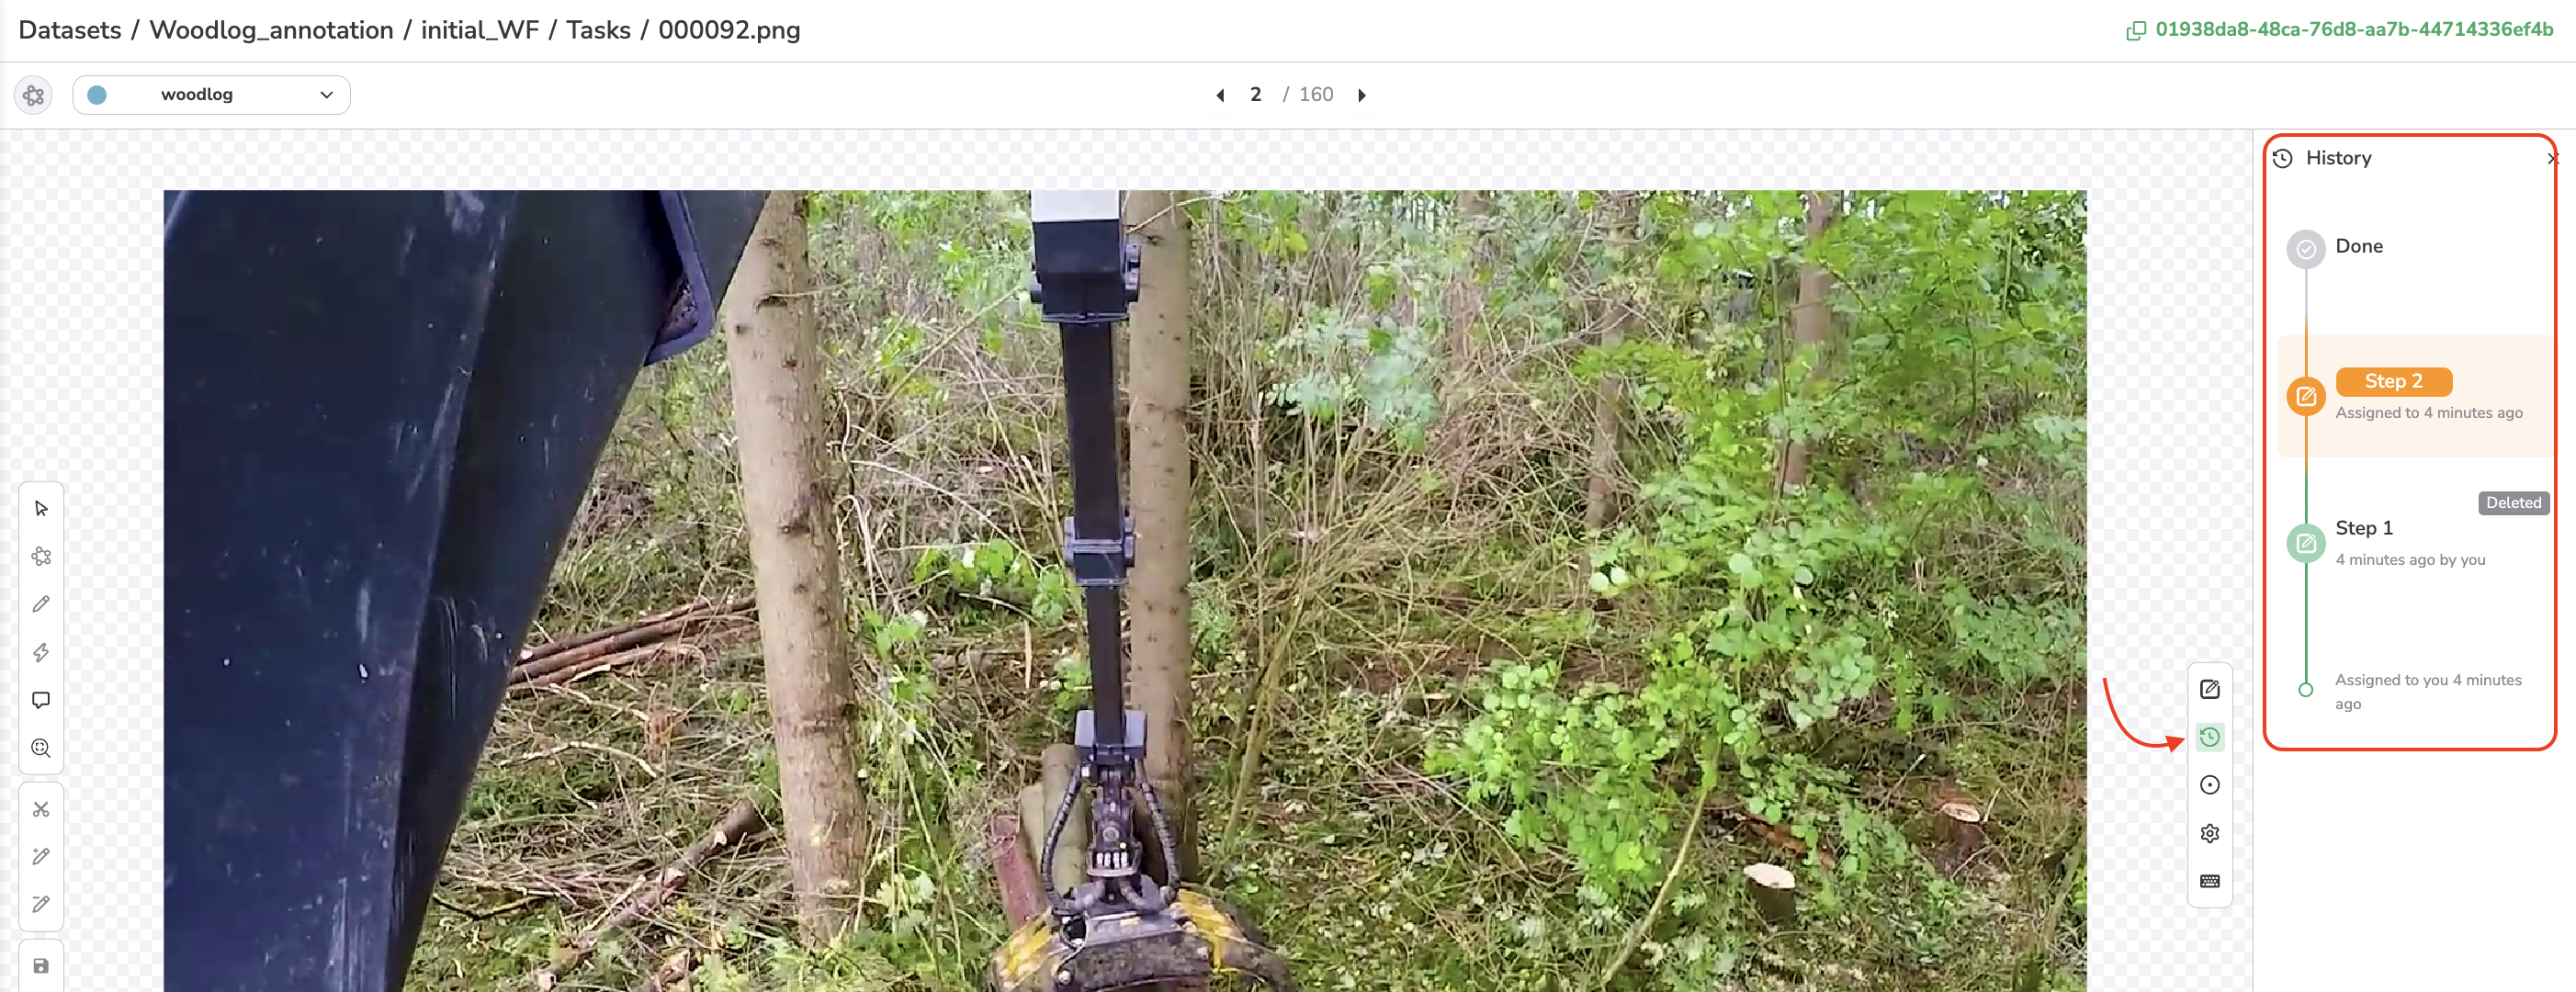
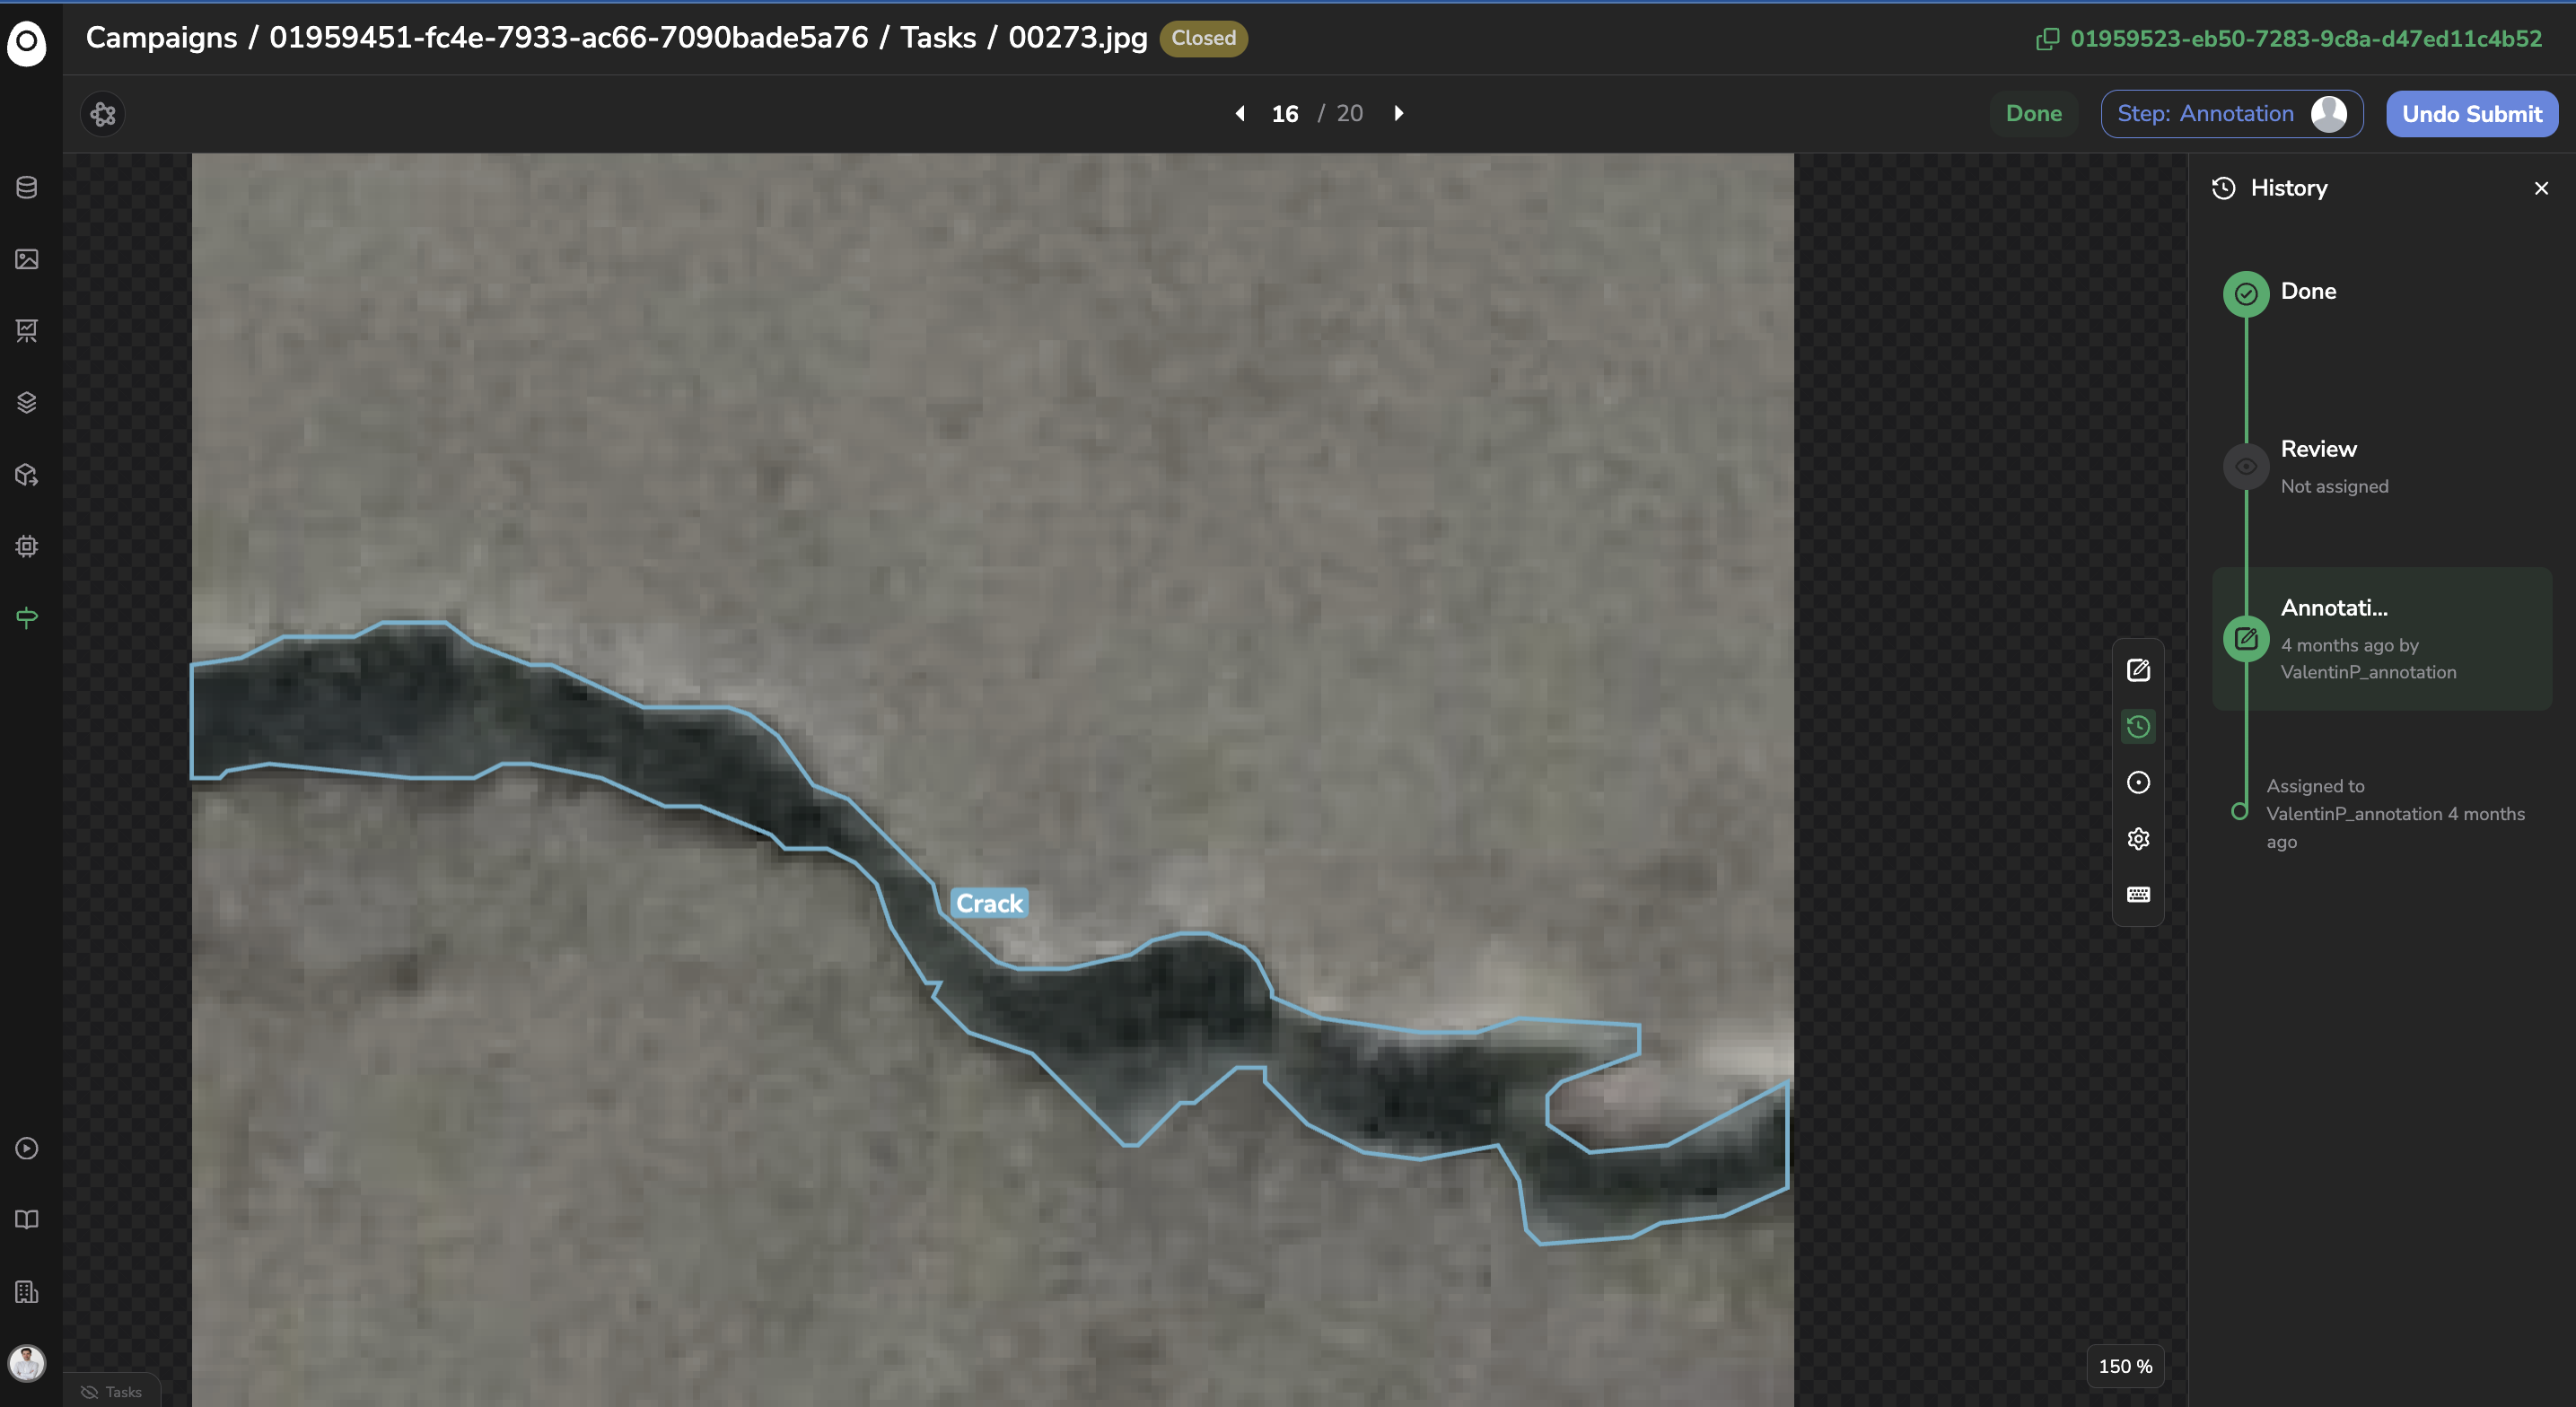
AssetFrom the Annotation Tool you can visualize the history of the Asset during the Annotation Workflow as shown below:
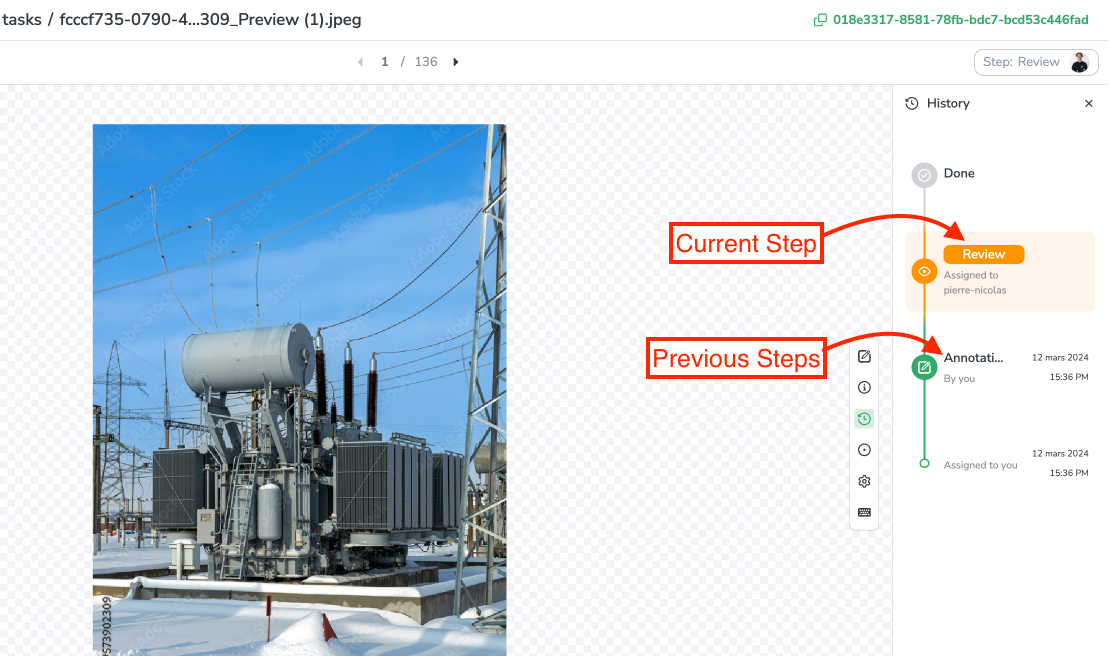
Workflow history
You can see all the steps done or to come of the Annotation Workflow. The current step is highlighted in orange. For each step are displayed, the Assignee and the submission date.
In addition by clicking on any step, you can visualize the Annotation submitted at this step allowing you to see and track how it evolved going through the Annotation Workflow .
b. Creating Issues
To ease the communication between the different workers involved at the different steps of the Workflow, Issues can be raised on the whole Asset or a zone of the Asset.
Issues can for instance be used when a Worker doubts how to annotate an image to request advice from the Worker in charge of the Review. It can also be used to track the justification why an Asset has been skipped and sent back to an Annotation step. More details on the usage of Issues during an Annotation Campaign are available here.
c. Visualizing the Annotation Instructions
As explained here, during the Annotation Campaign initialization, a pdf file can be attached.
This can be used to share the annotation guidelines with all the Workers who will be involved in the Annotation Campaign. During the completion of a Task, a Worker can open the pdf file as shown below:
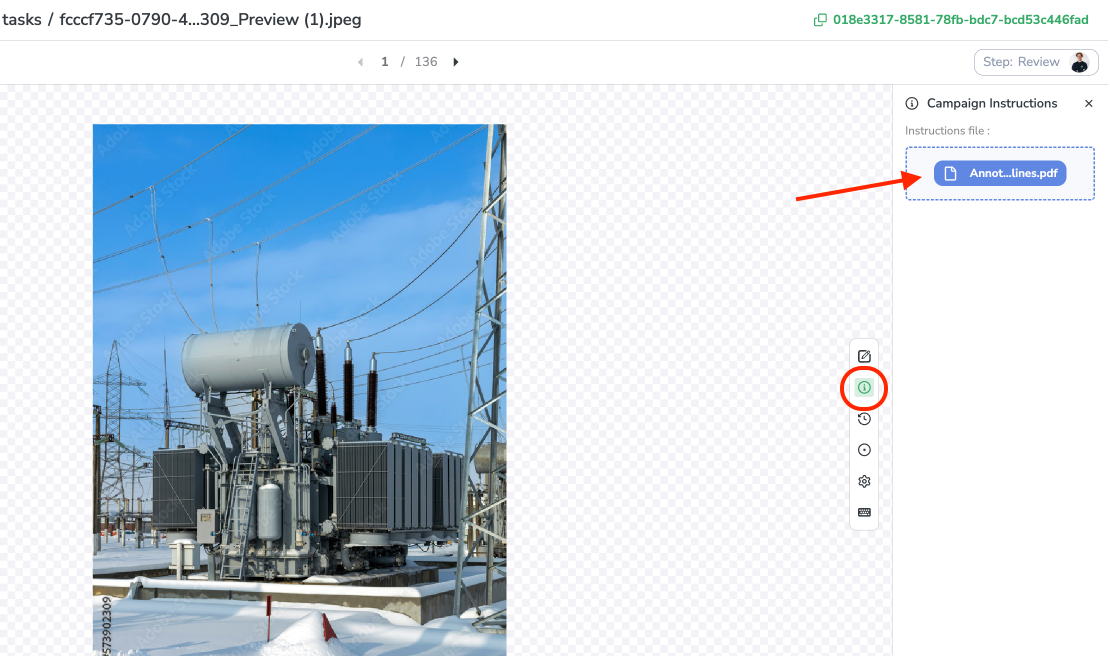
Campaign Instructions
B. Complete a Review task
In case you need to complete a Review Task, the Annotation Tool will open displaying the Asset, the related Annotation to be reviewed and the potential Issues created previously during the Annotation Workflow.
During a Review Task, the Assignee has to review the Annotation done during the previous Annotation step.
During a Review Task, 4 scenarios can occur:
- The
Annotationis correct according to the Assignee, the Task can be submitted as it is by clicking on the Submit button - The
Annotationis not satisfying and the Assignee wants to edit it himself. The Assignee can then use the Annotation Tool to edit the Annotation. Once theAnnotationis considered satisfactory, the Assignee can click on Submit to transition theAssetto the potential next step of the Workflow. - The
Annotationis not satisfying and the Assignee wants to send theAssetback to the previous Annotation step allowing the previous Assignee to rework theAnnotation. Before sending it back, the Assignee will have to create an Issue (Zone or Image Issue) to explain why theAssetis sent back to the previous step, once done, the Assignee of the Review task can click on To Rework, and a new Task will be created and assigned at the previous step of the Workflow. - The Assignee of the Review Task considers that the
Assetshould not keep going through the Annotation Workflow. In this case, the Assignee can click on Skip, then the Assignee will be requested to create an Issue to explain why this one should be skipped.
During the Review step while completing its Task, the Assignee can answer or close the Issues created previously by other Workers and create new Issues that will be handled by the next Assignee (either further in the Workflow if the Asset is Submitted or upstream if the Asset is sent to rework).
4. Manage Annotation Workflow lifecycle
At any moment, you can update, close or delete your Annotation Campaign.
A. Update Annotation Campaign
As explained previously you can manage easily manage your Tasks by transitioning, submitting or reassigning them.
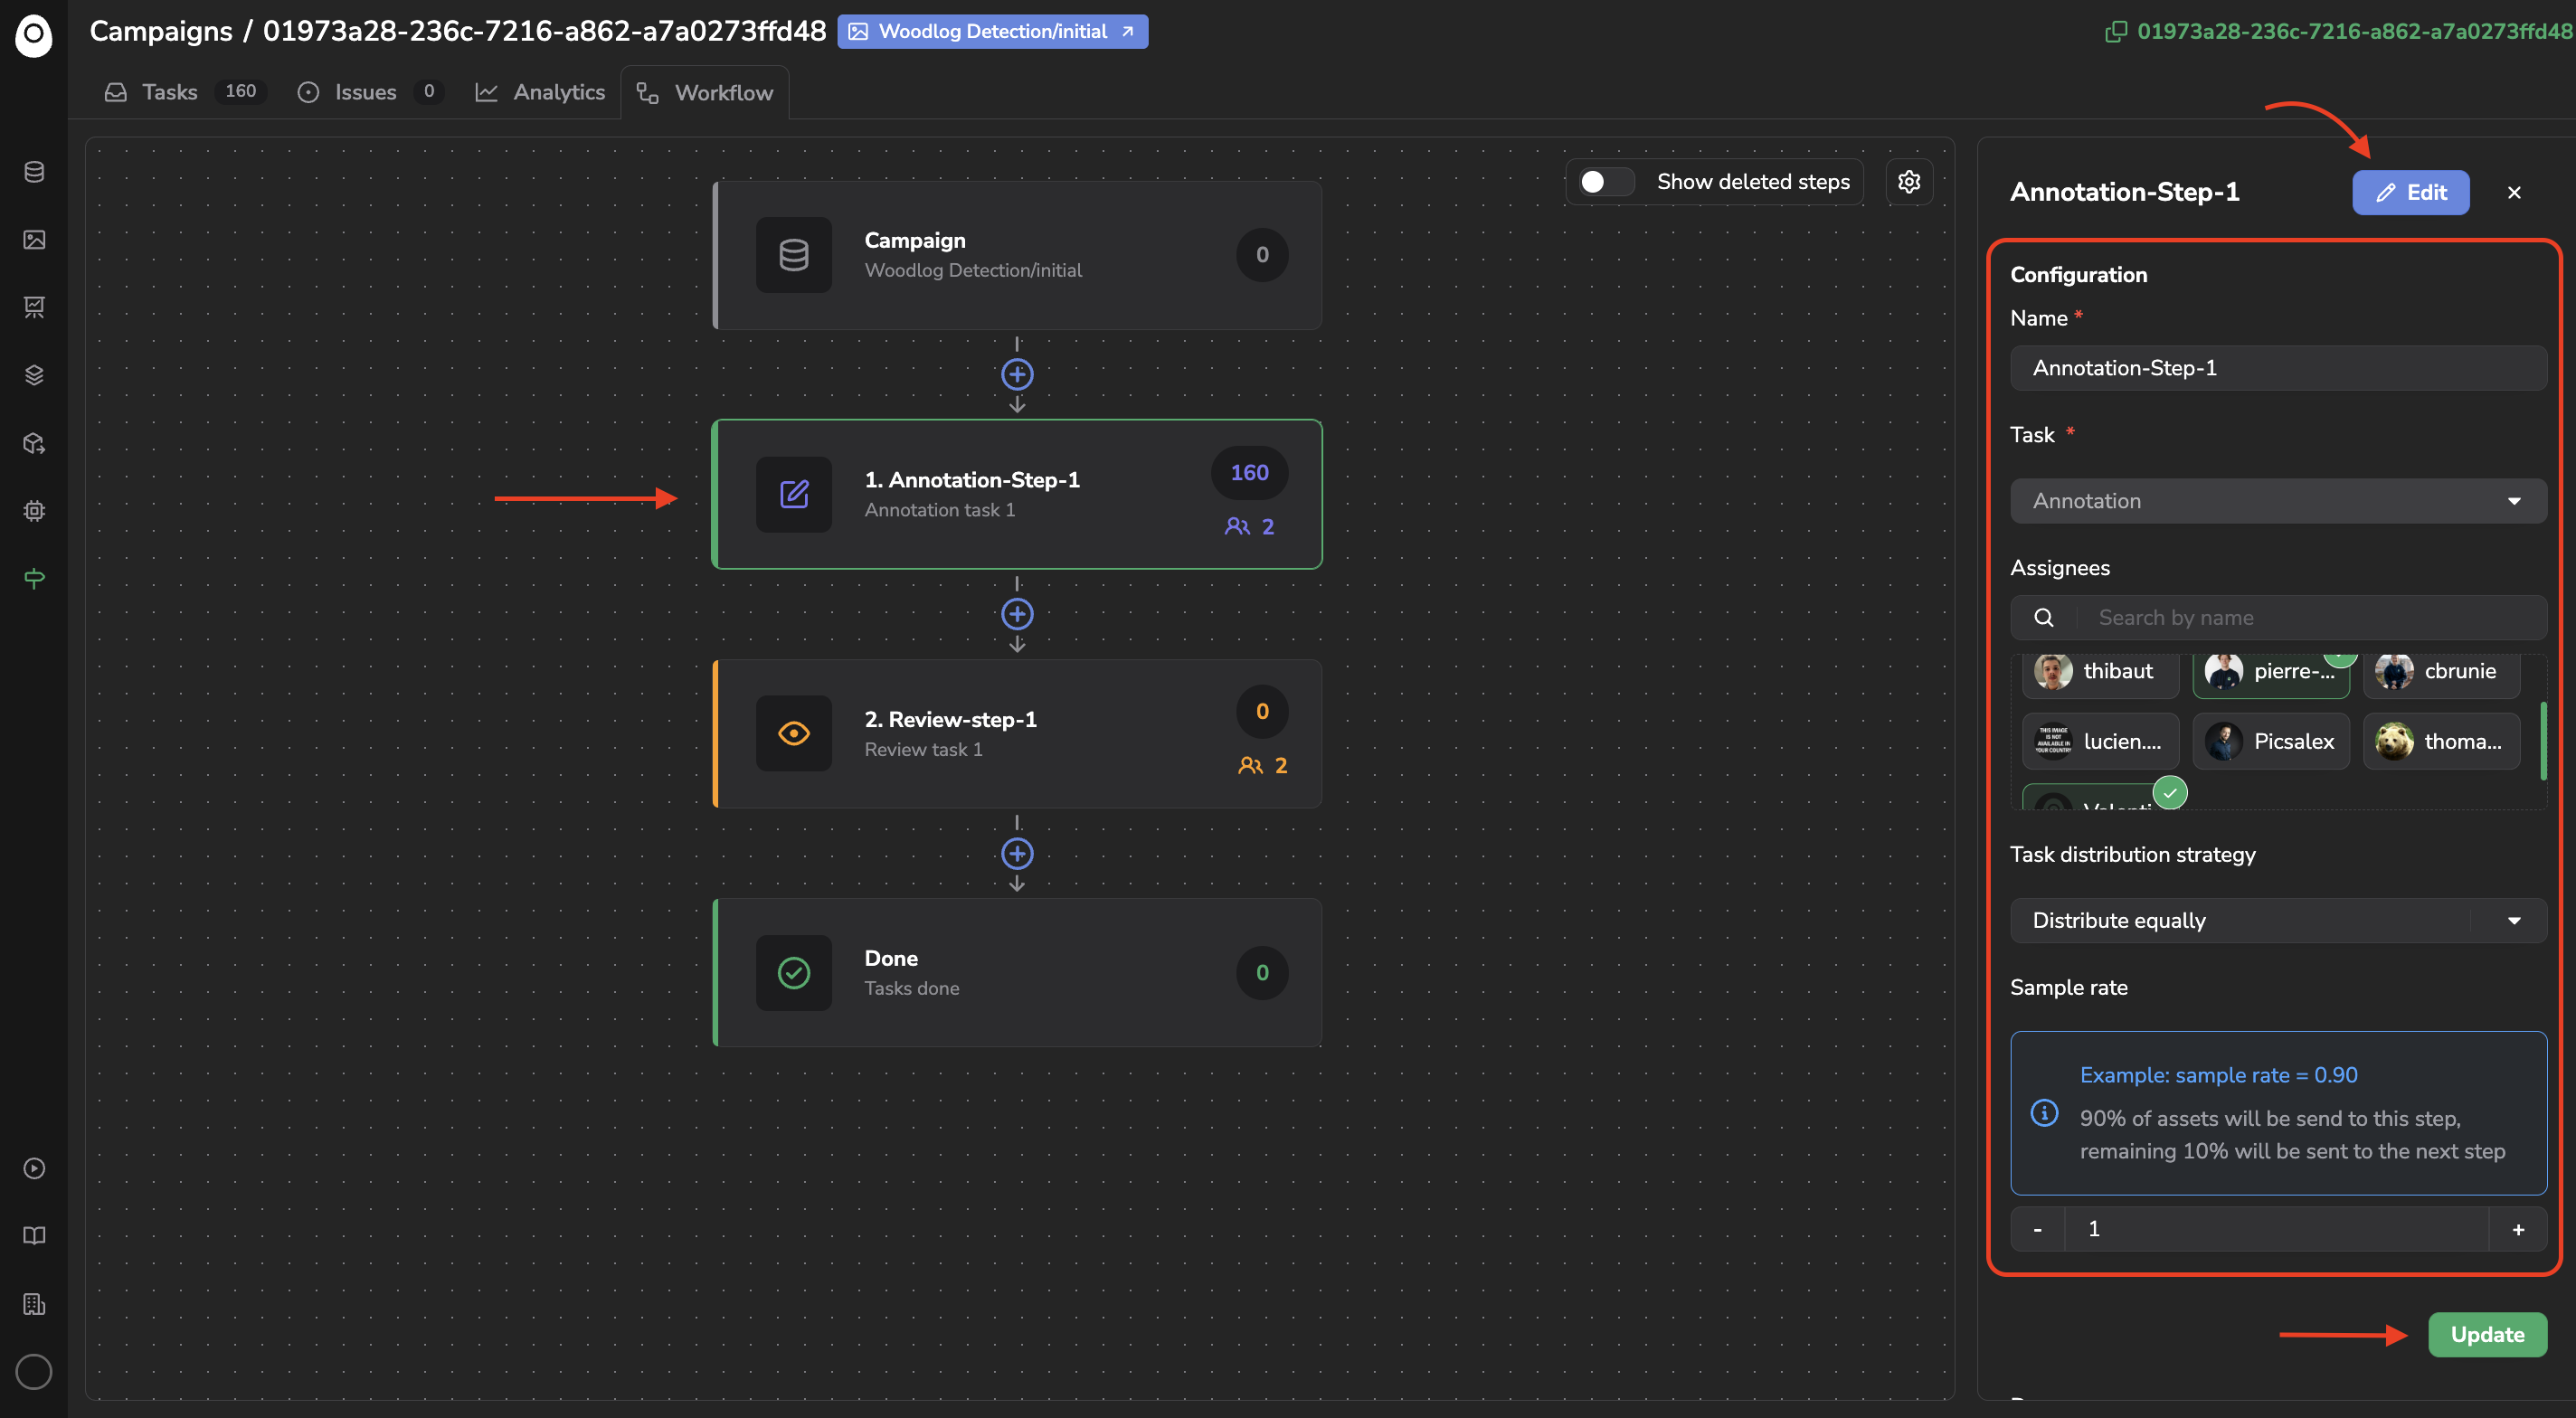
a. Update a Step
But you can also during an Annotation Campaign modify your Workflow. Each step configuration can be updated at any moment by modifying it's name, Sample rate, Assignees, or Asset split strategy.
Step modification
After modification, a summary of the Tasks repartition at this current step is displayed listing the different Assignee their tasks, the theoretical repartition and the real one. The Redistribute button allows you the redistribute the Tasks in order to make the real repartition match the theoretical one.
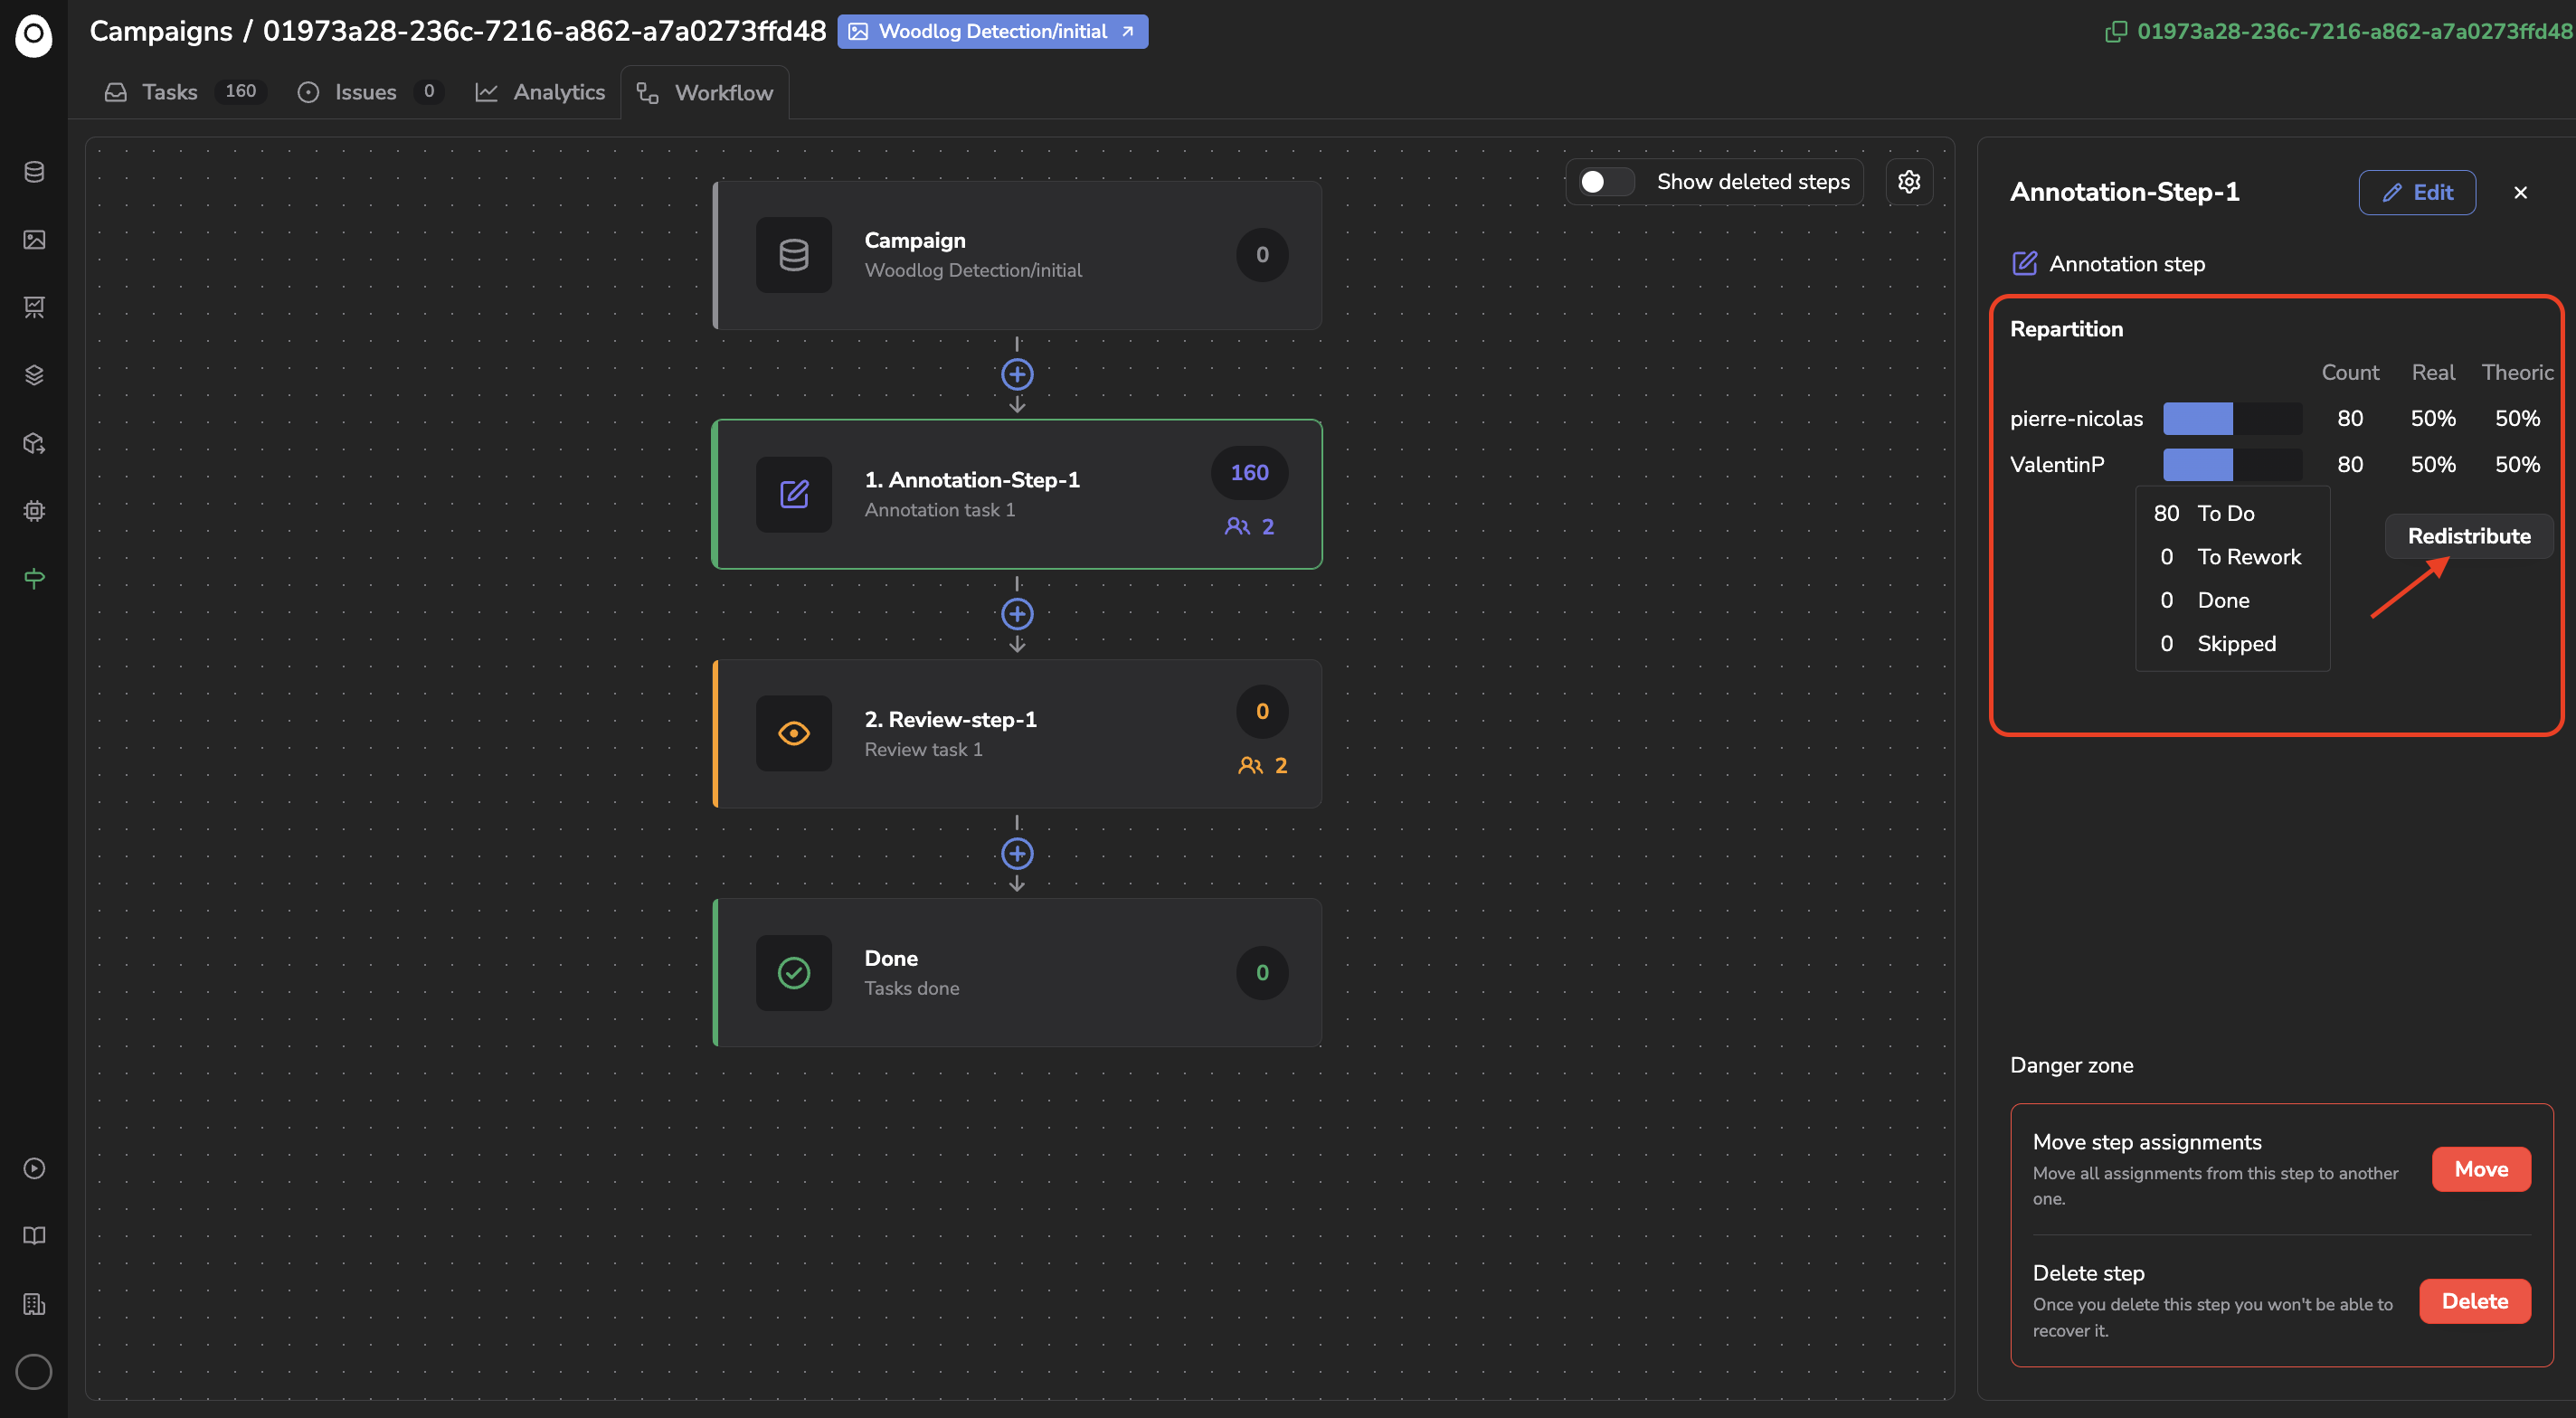
Step summary
b. Add a Step
You can also add a Step at any moment of an Annotation Campaign by clicking on the + at the desired place for your new Step.
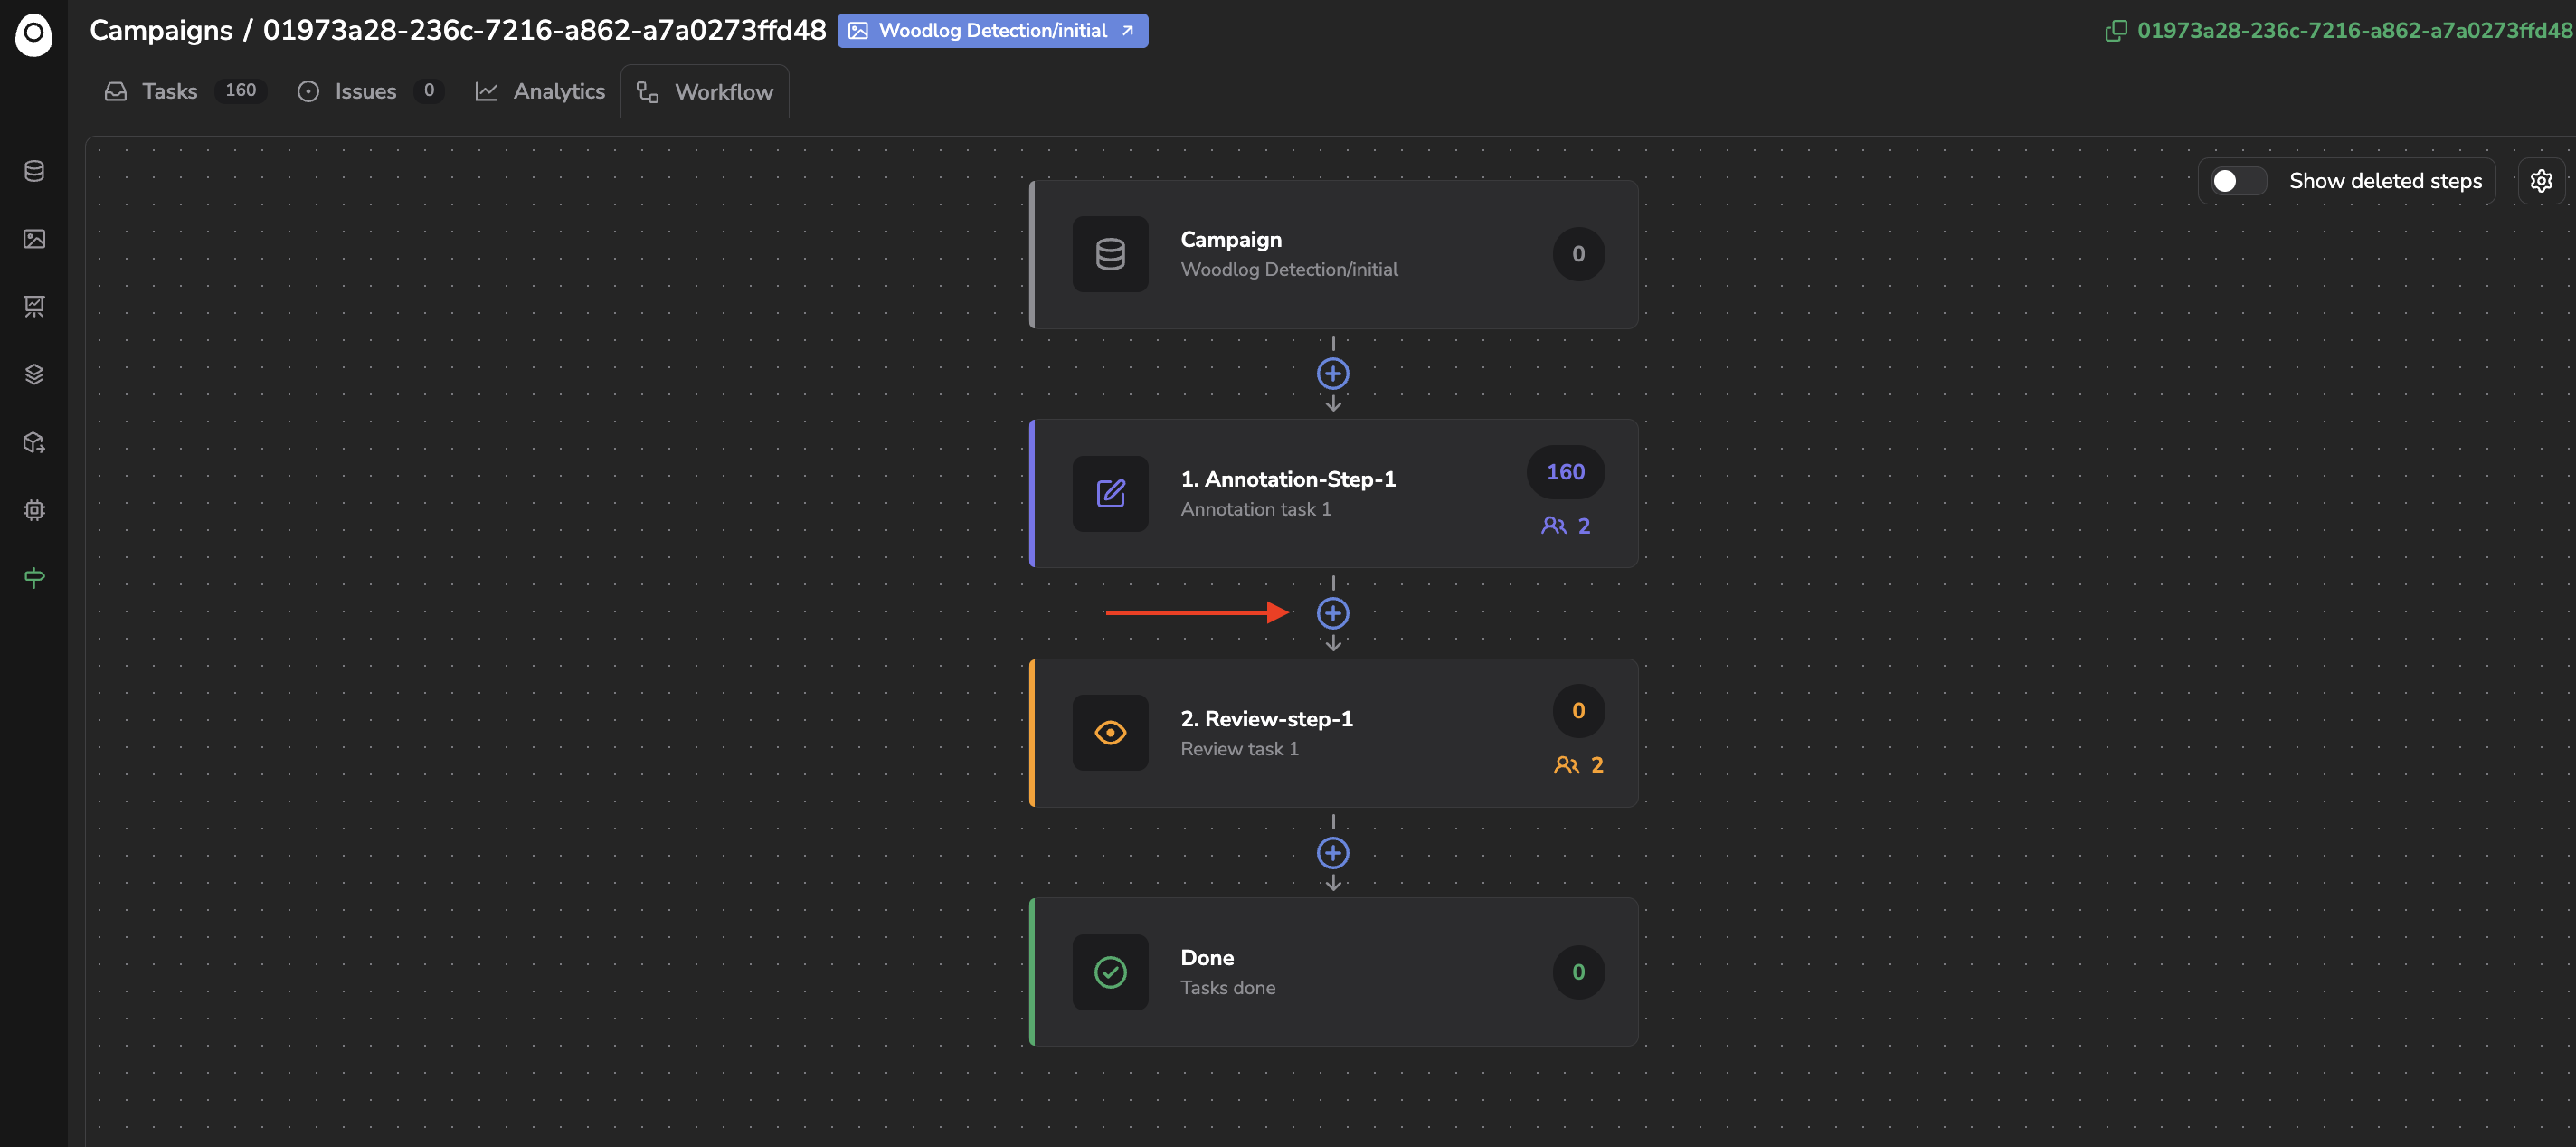
Add a new Step
The Step configuration panel will then open allowing you to configure this new step the same you already did during Worflow initialization.
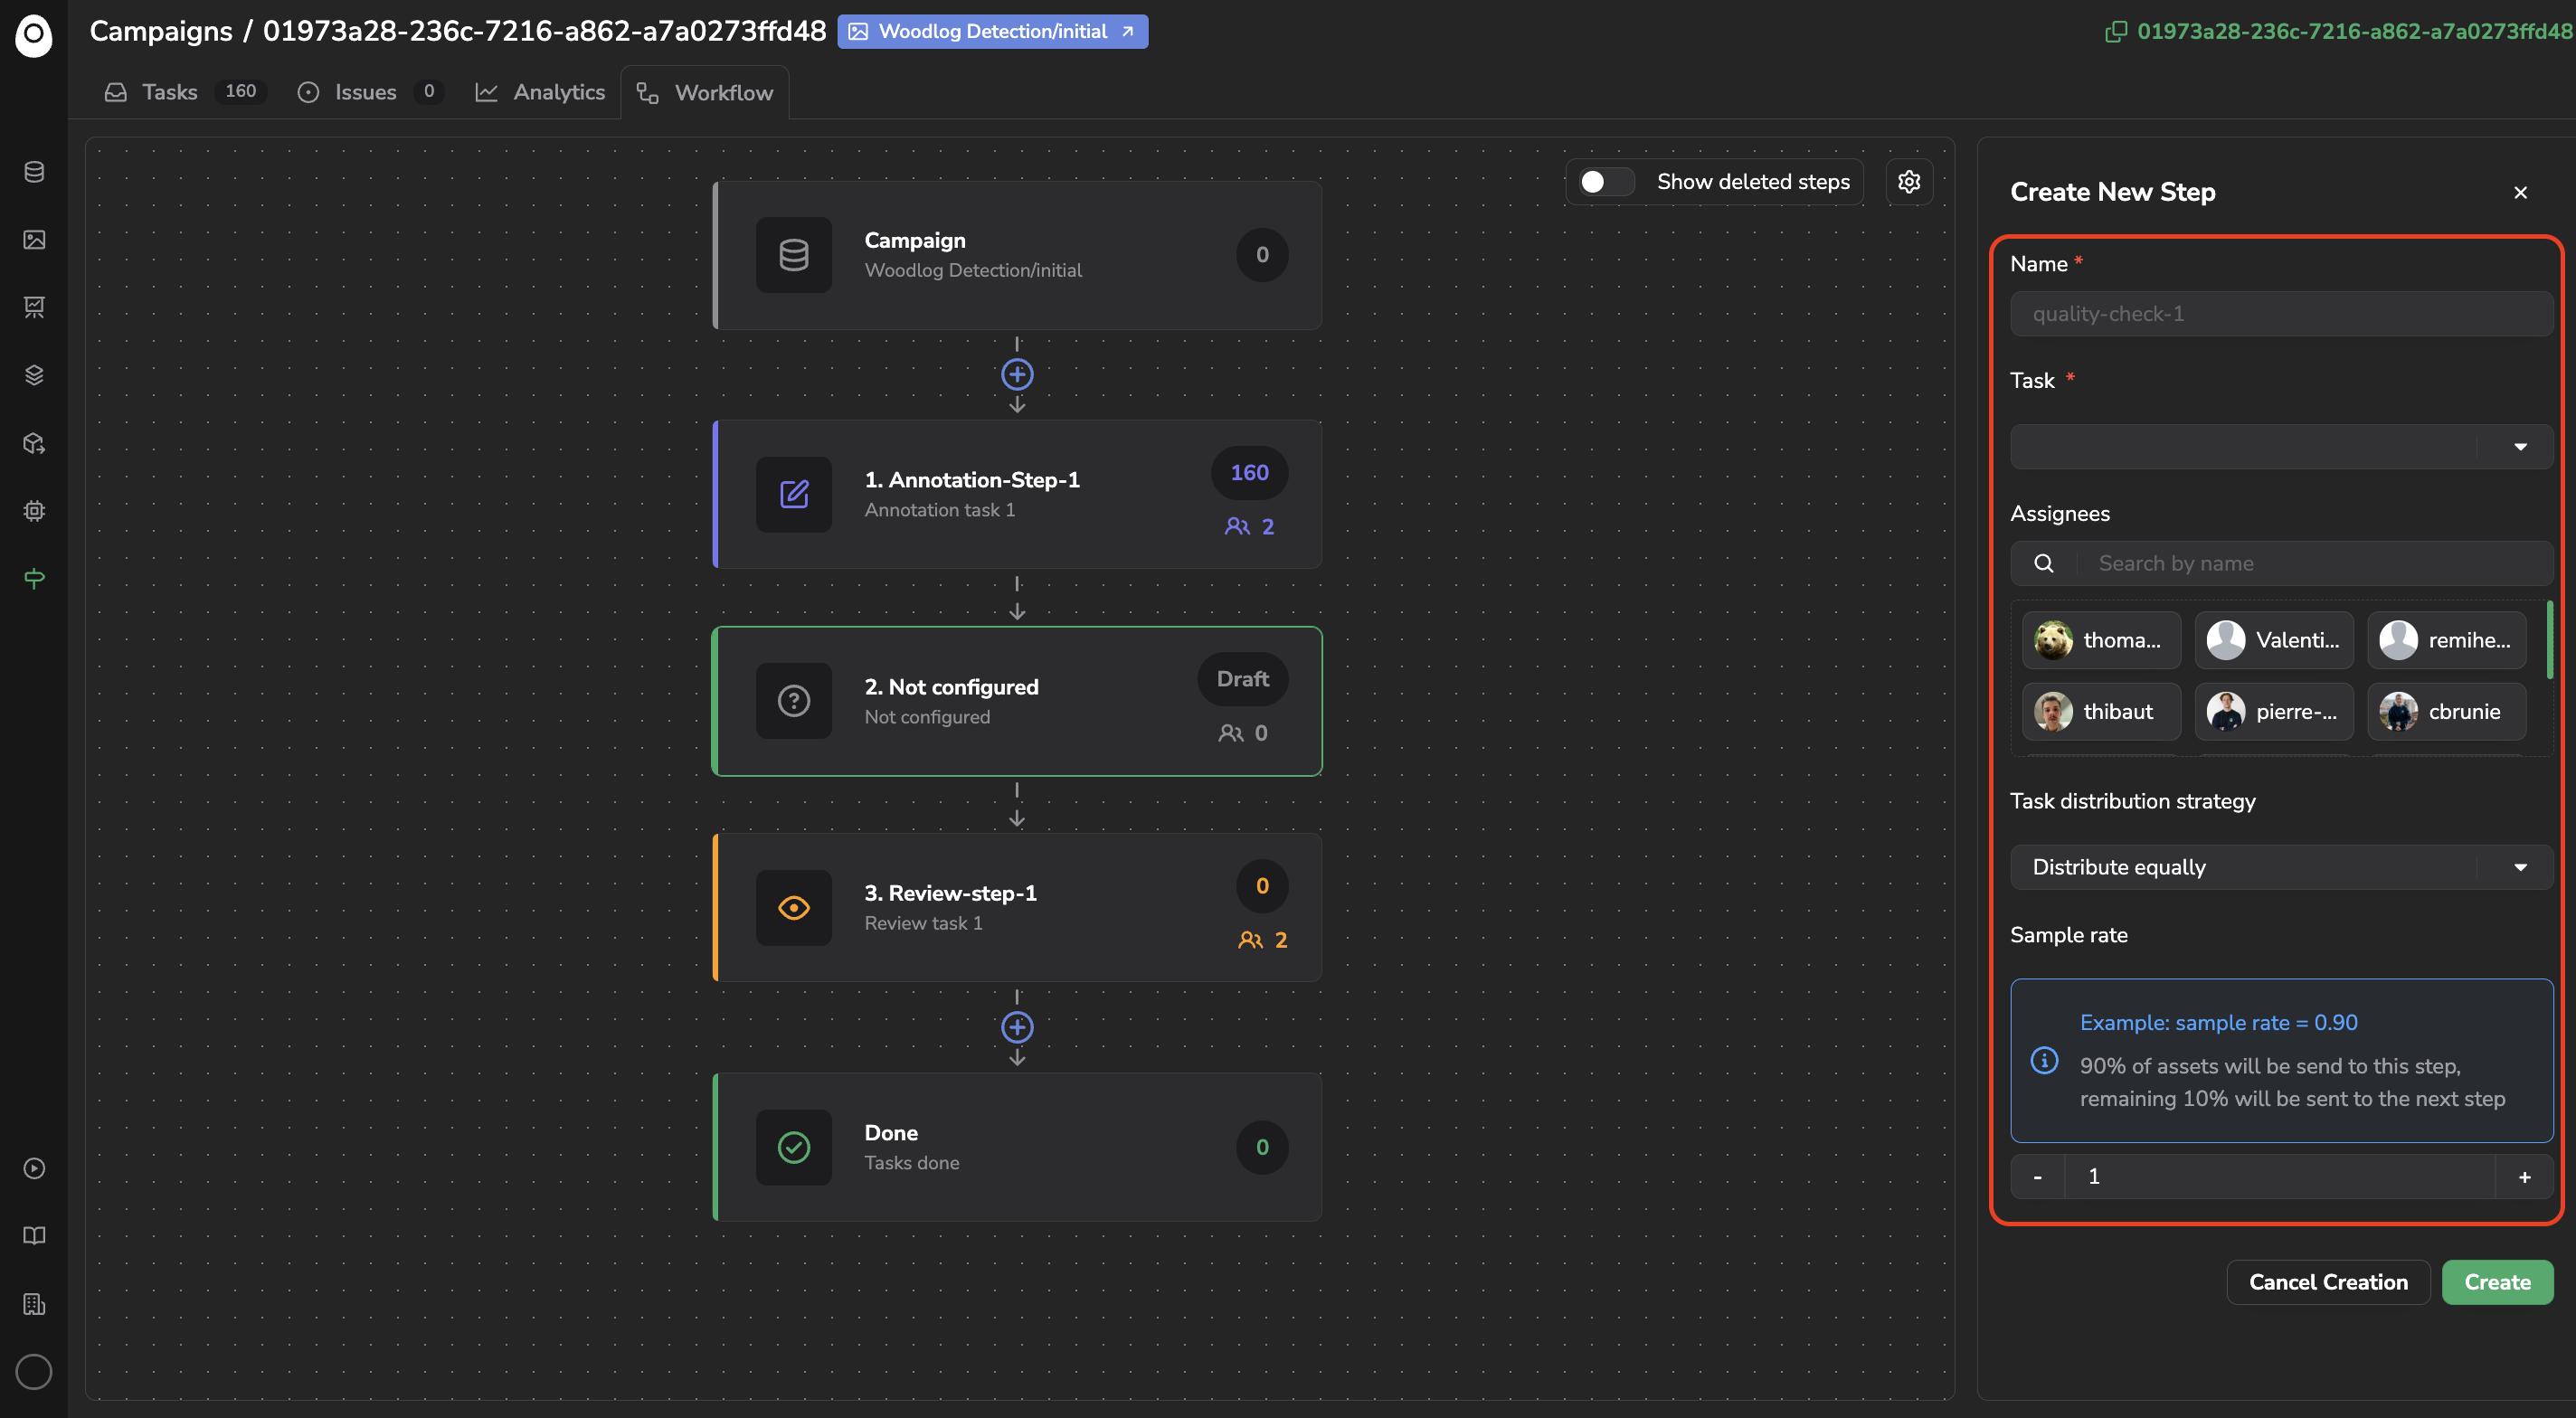
New Step configuration
As soon as you click on Create, the new Step will enter the Workflow. Meaning Asset submitted at the previous one will go through it and that Asset current at any other Step can be move to this one.
c. Delete a step
You can also delete a Step at any moment of an Annotation Campaign by clicking on the Step and Delete.
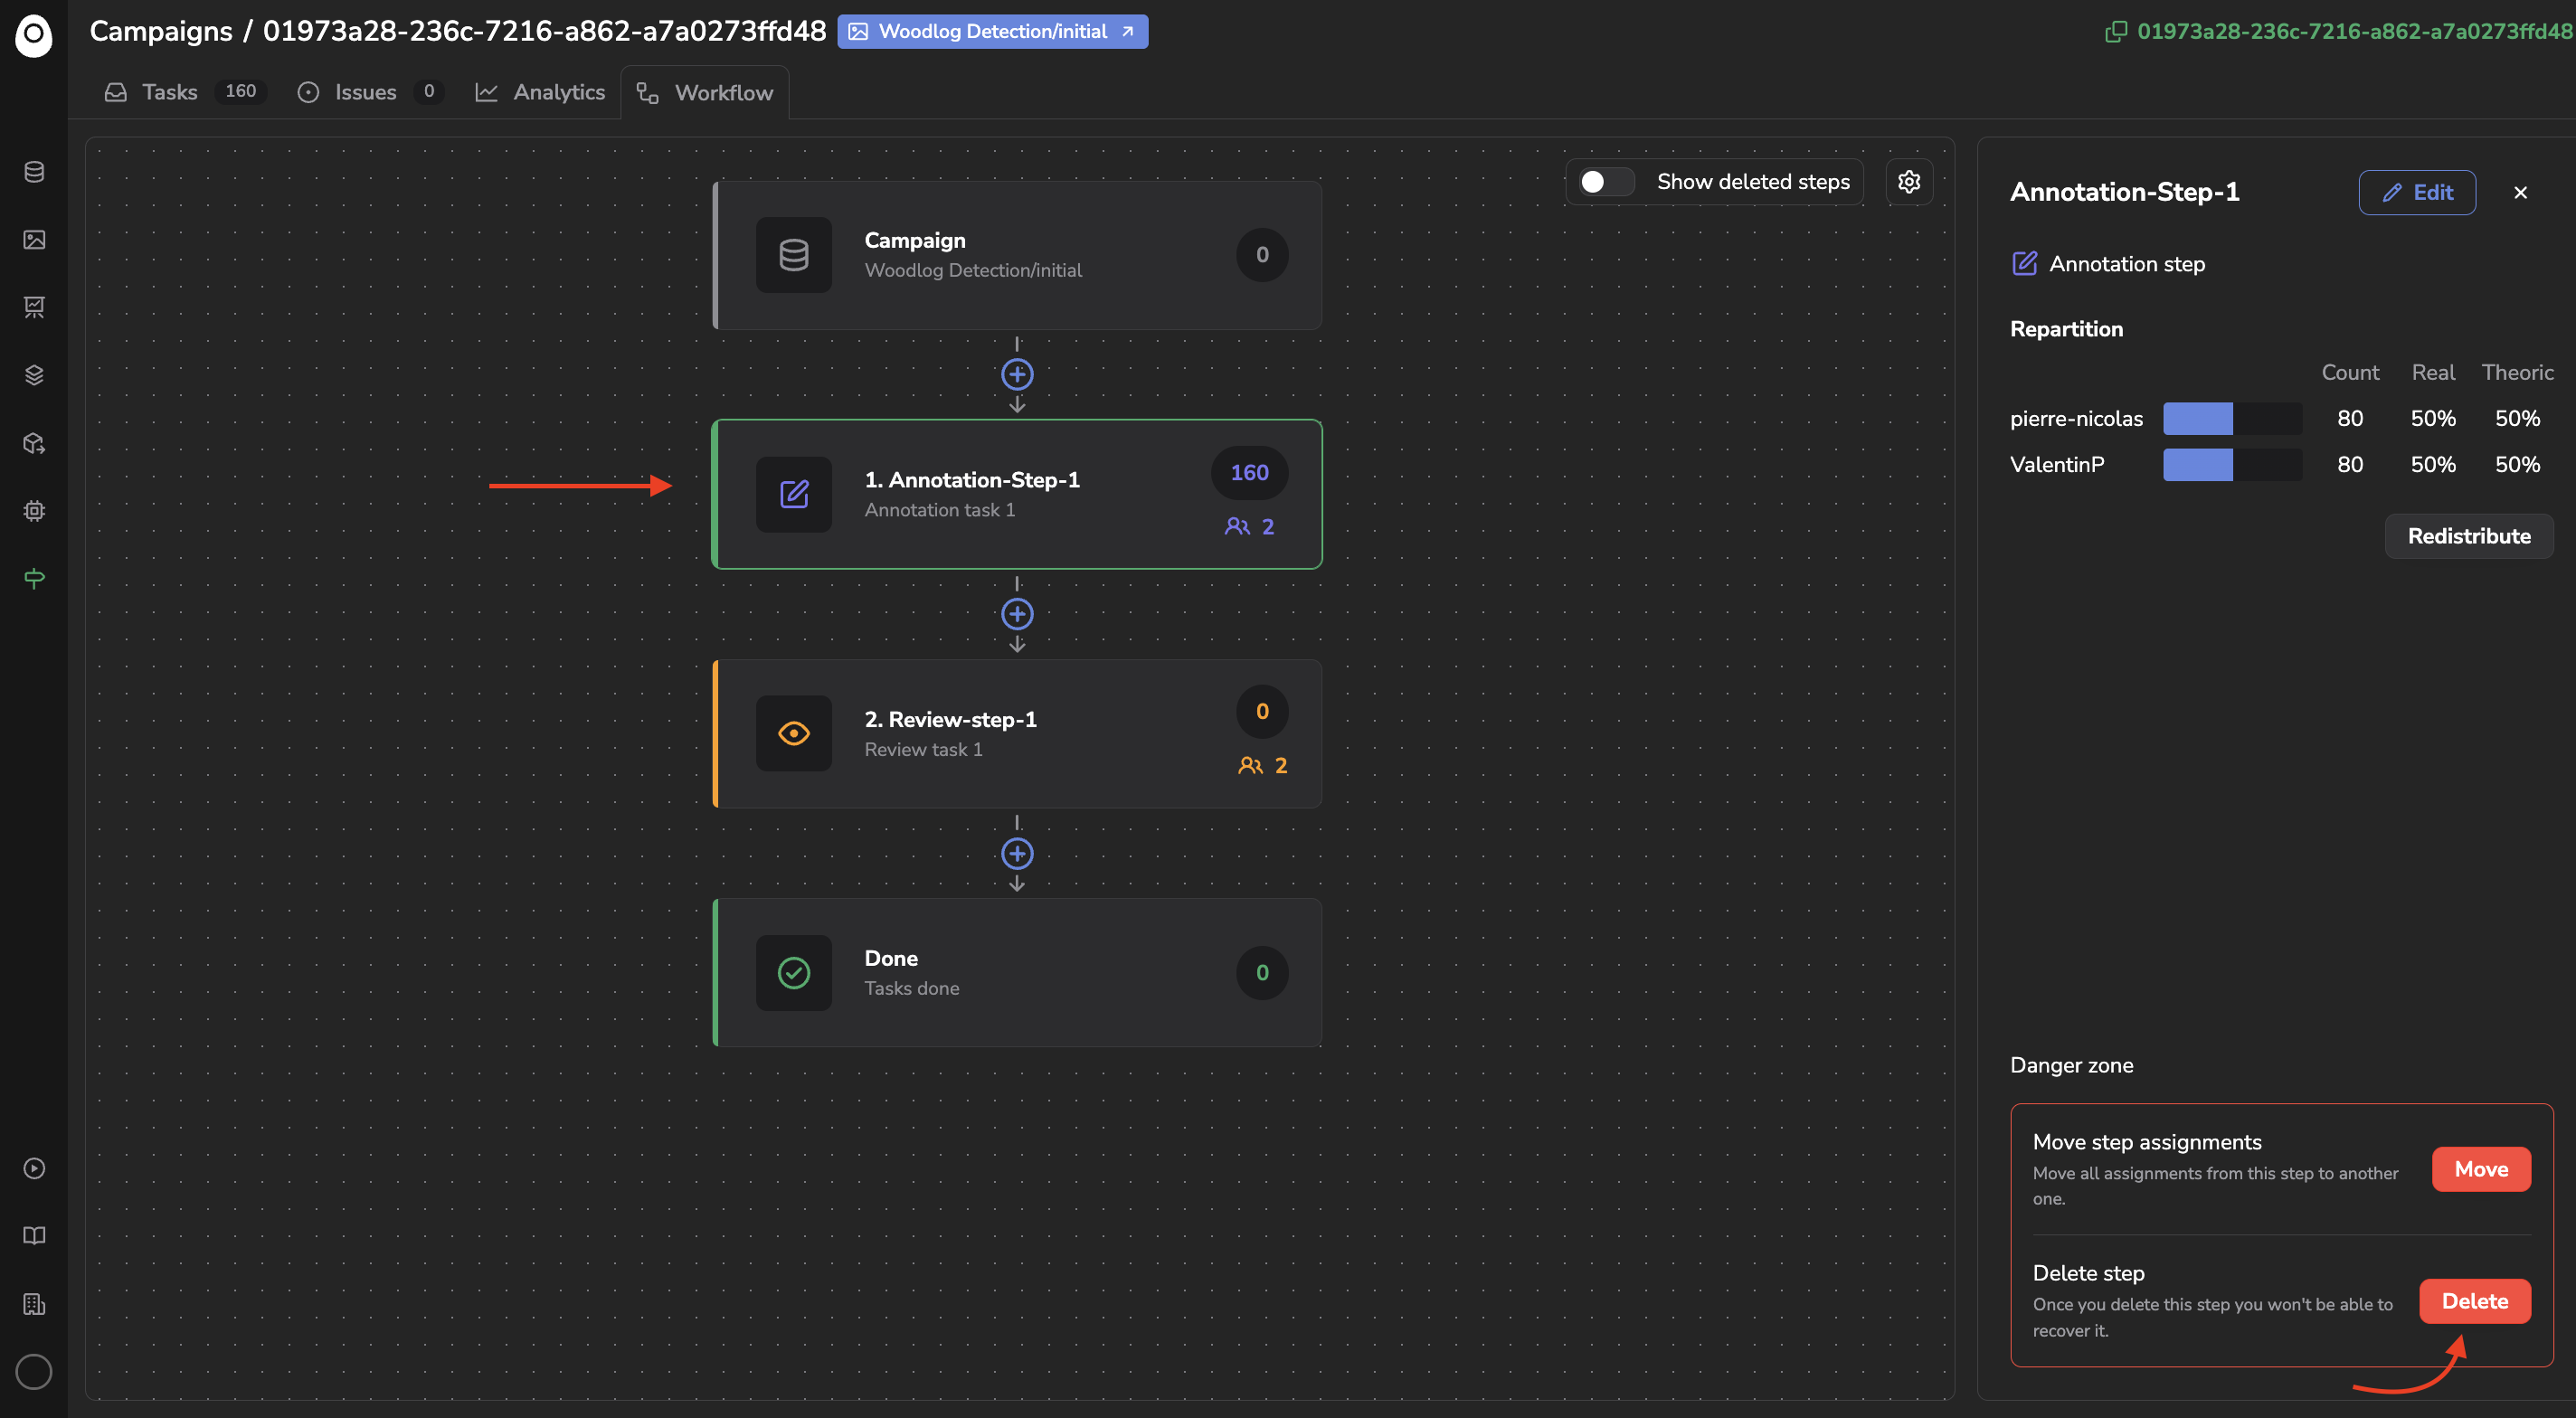
Step deletion
In case, there is currently no Tasks at the Step to be deleted, then no problems, the Step is deleted. However, if there are Tasks at this Step, a pop-up will open asking you to select the Step those Tasks should be sent to.
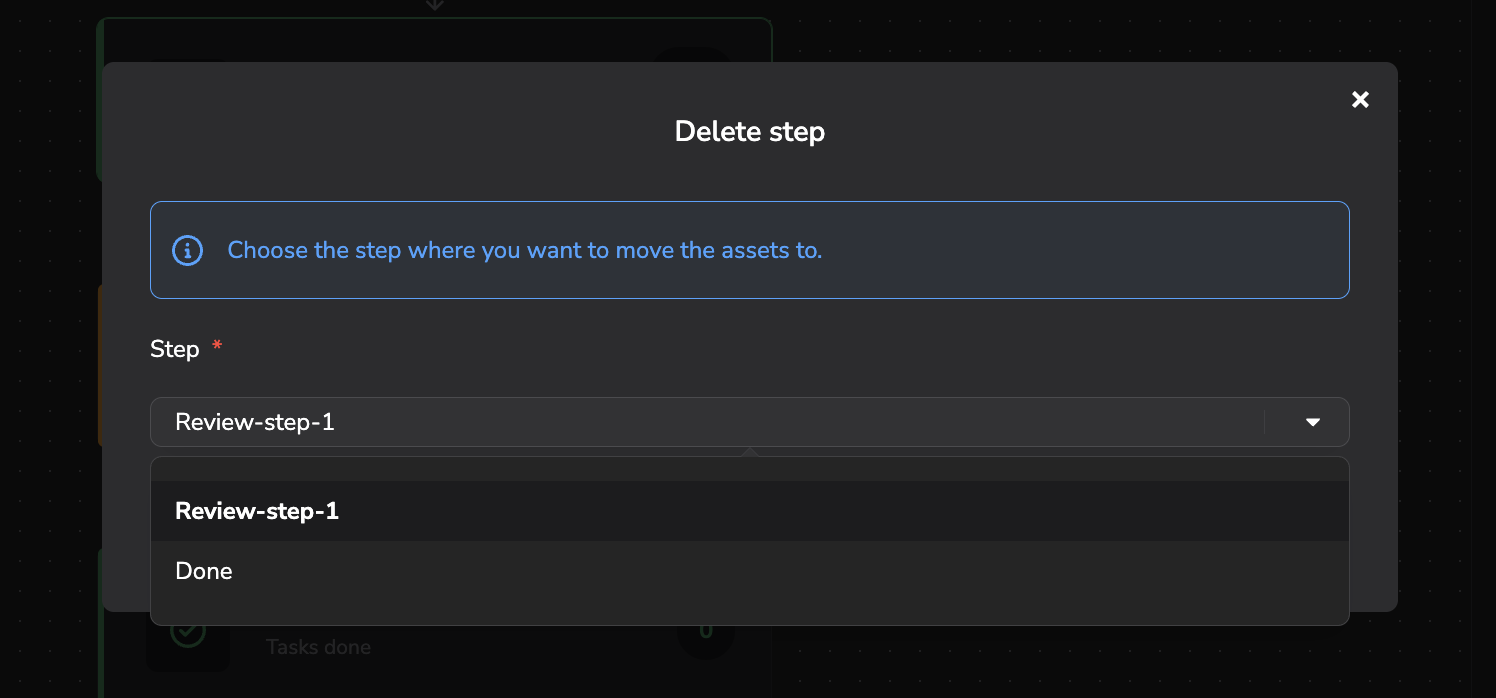
Task management of a to-be-deleted Step
This way you can delete a Step while ensuring there is no impact on its related Tasks.
You can anyway always display the deleted Tasks using the radio button as shown below:
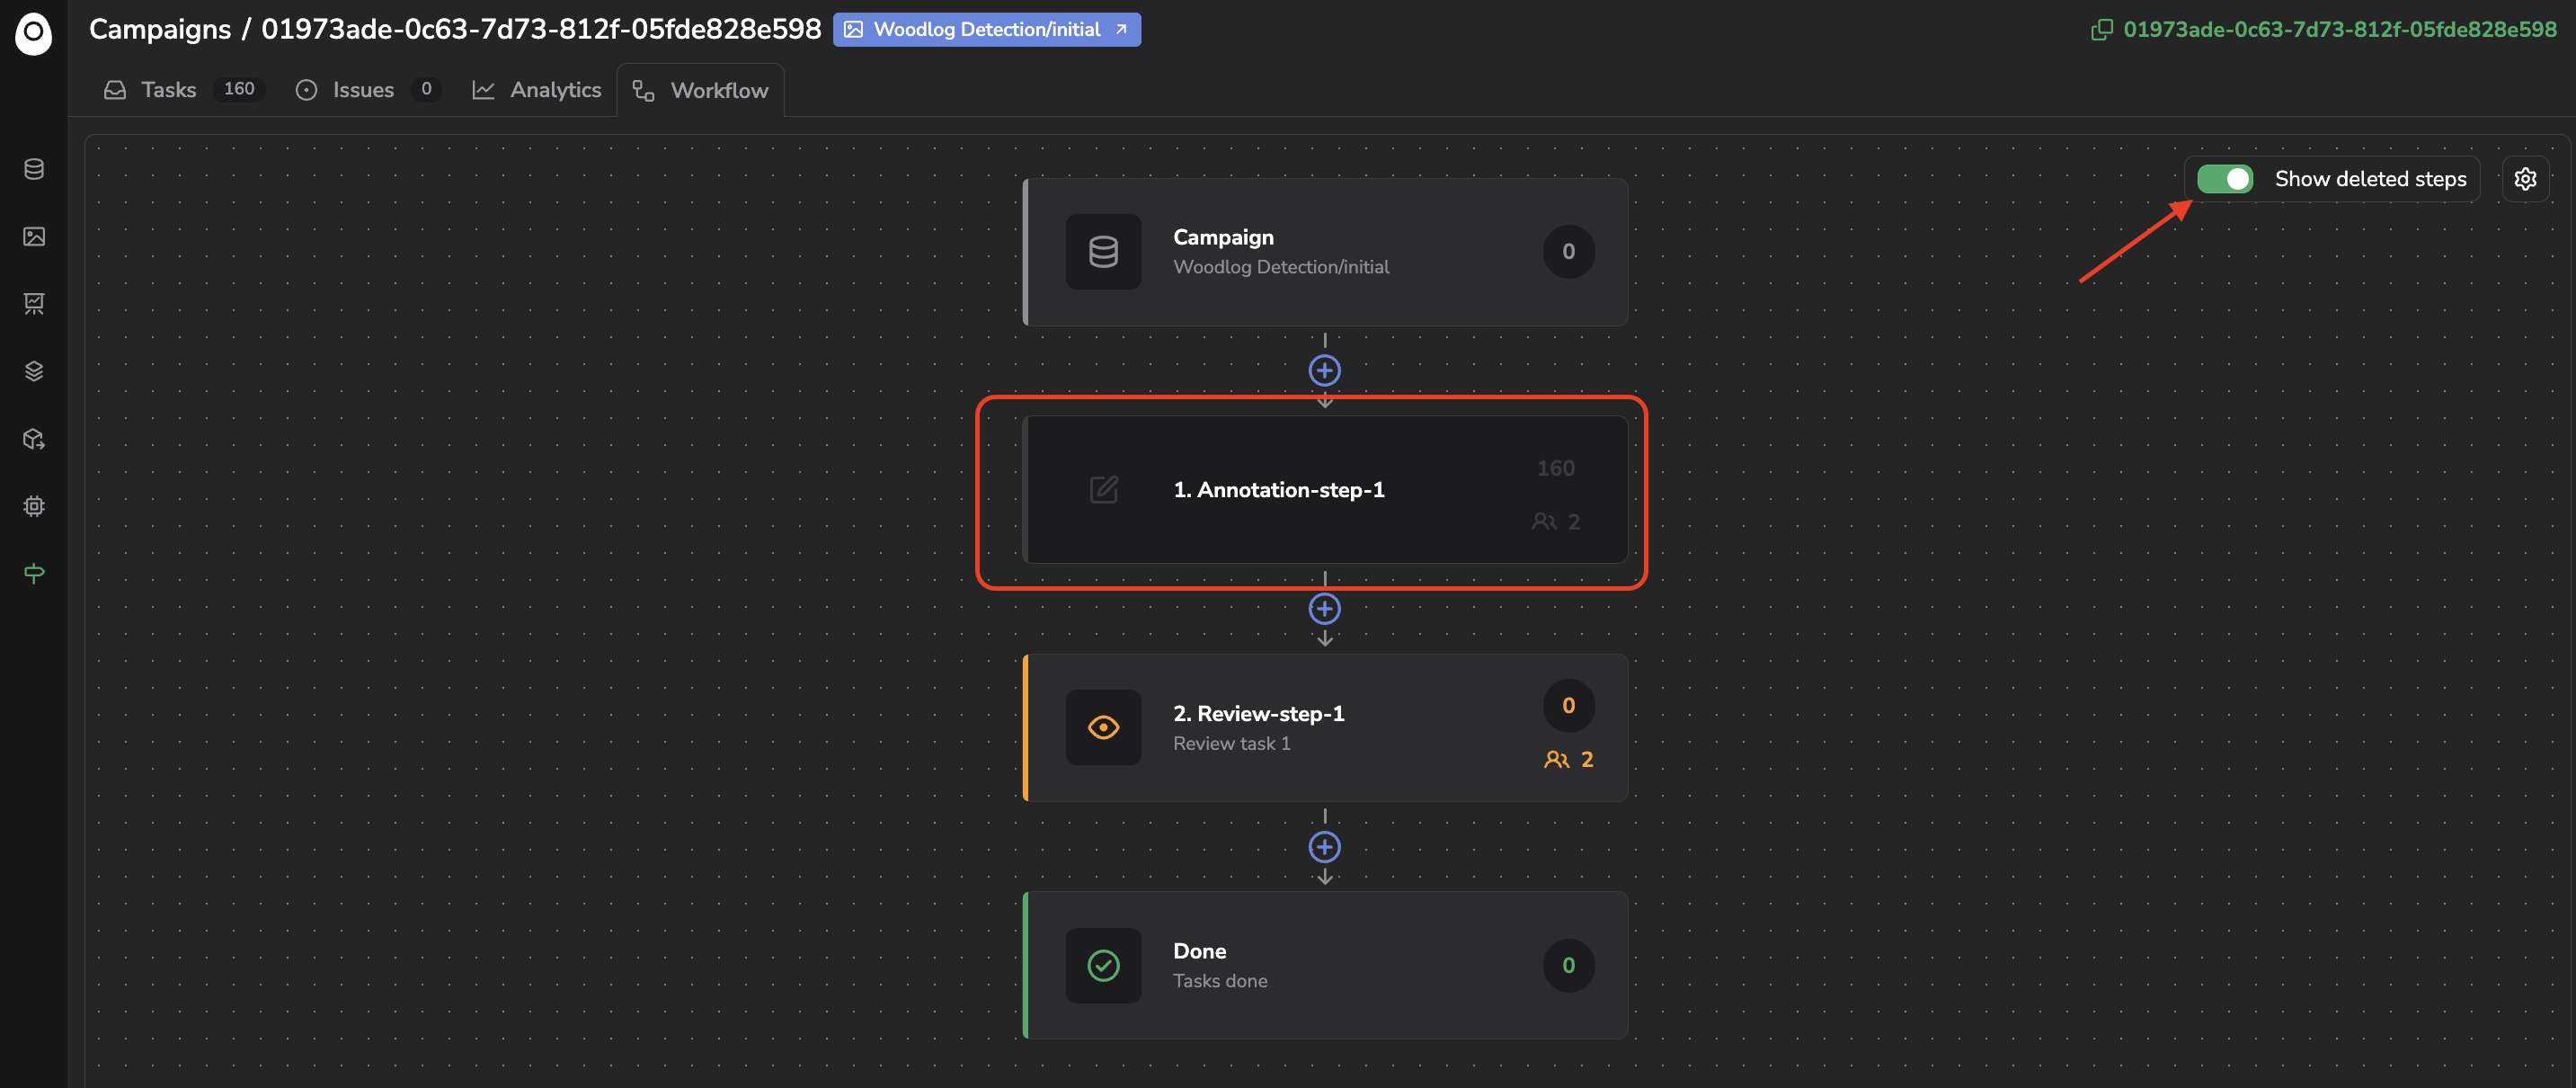
Show deleted steps
For traceability purposes, even if a Step is deleted, all the work done at this one when it was alive is kept and can be visualized in the History tab of the Annotation Studio.
This way you can delete Steps of your Annotation Workflow without losing any information
B. Close an Annotation Campaign
For historization and organisation purposes, a Worker with Admin right on the parent Dataset can decide to Close an ongoing Annotation Campaign.
It can be made from the Annotation Campaign Settings page, as shown below:
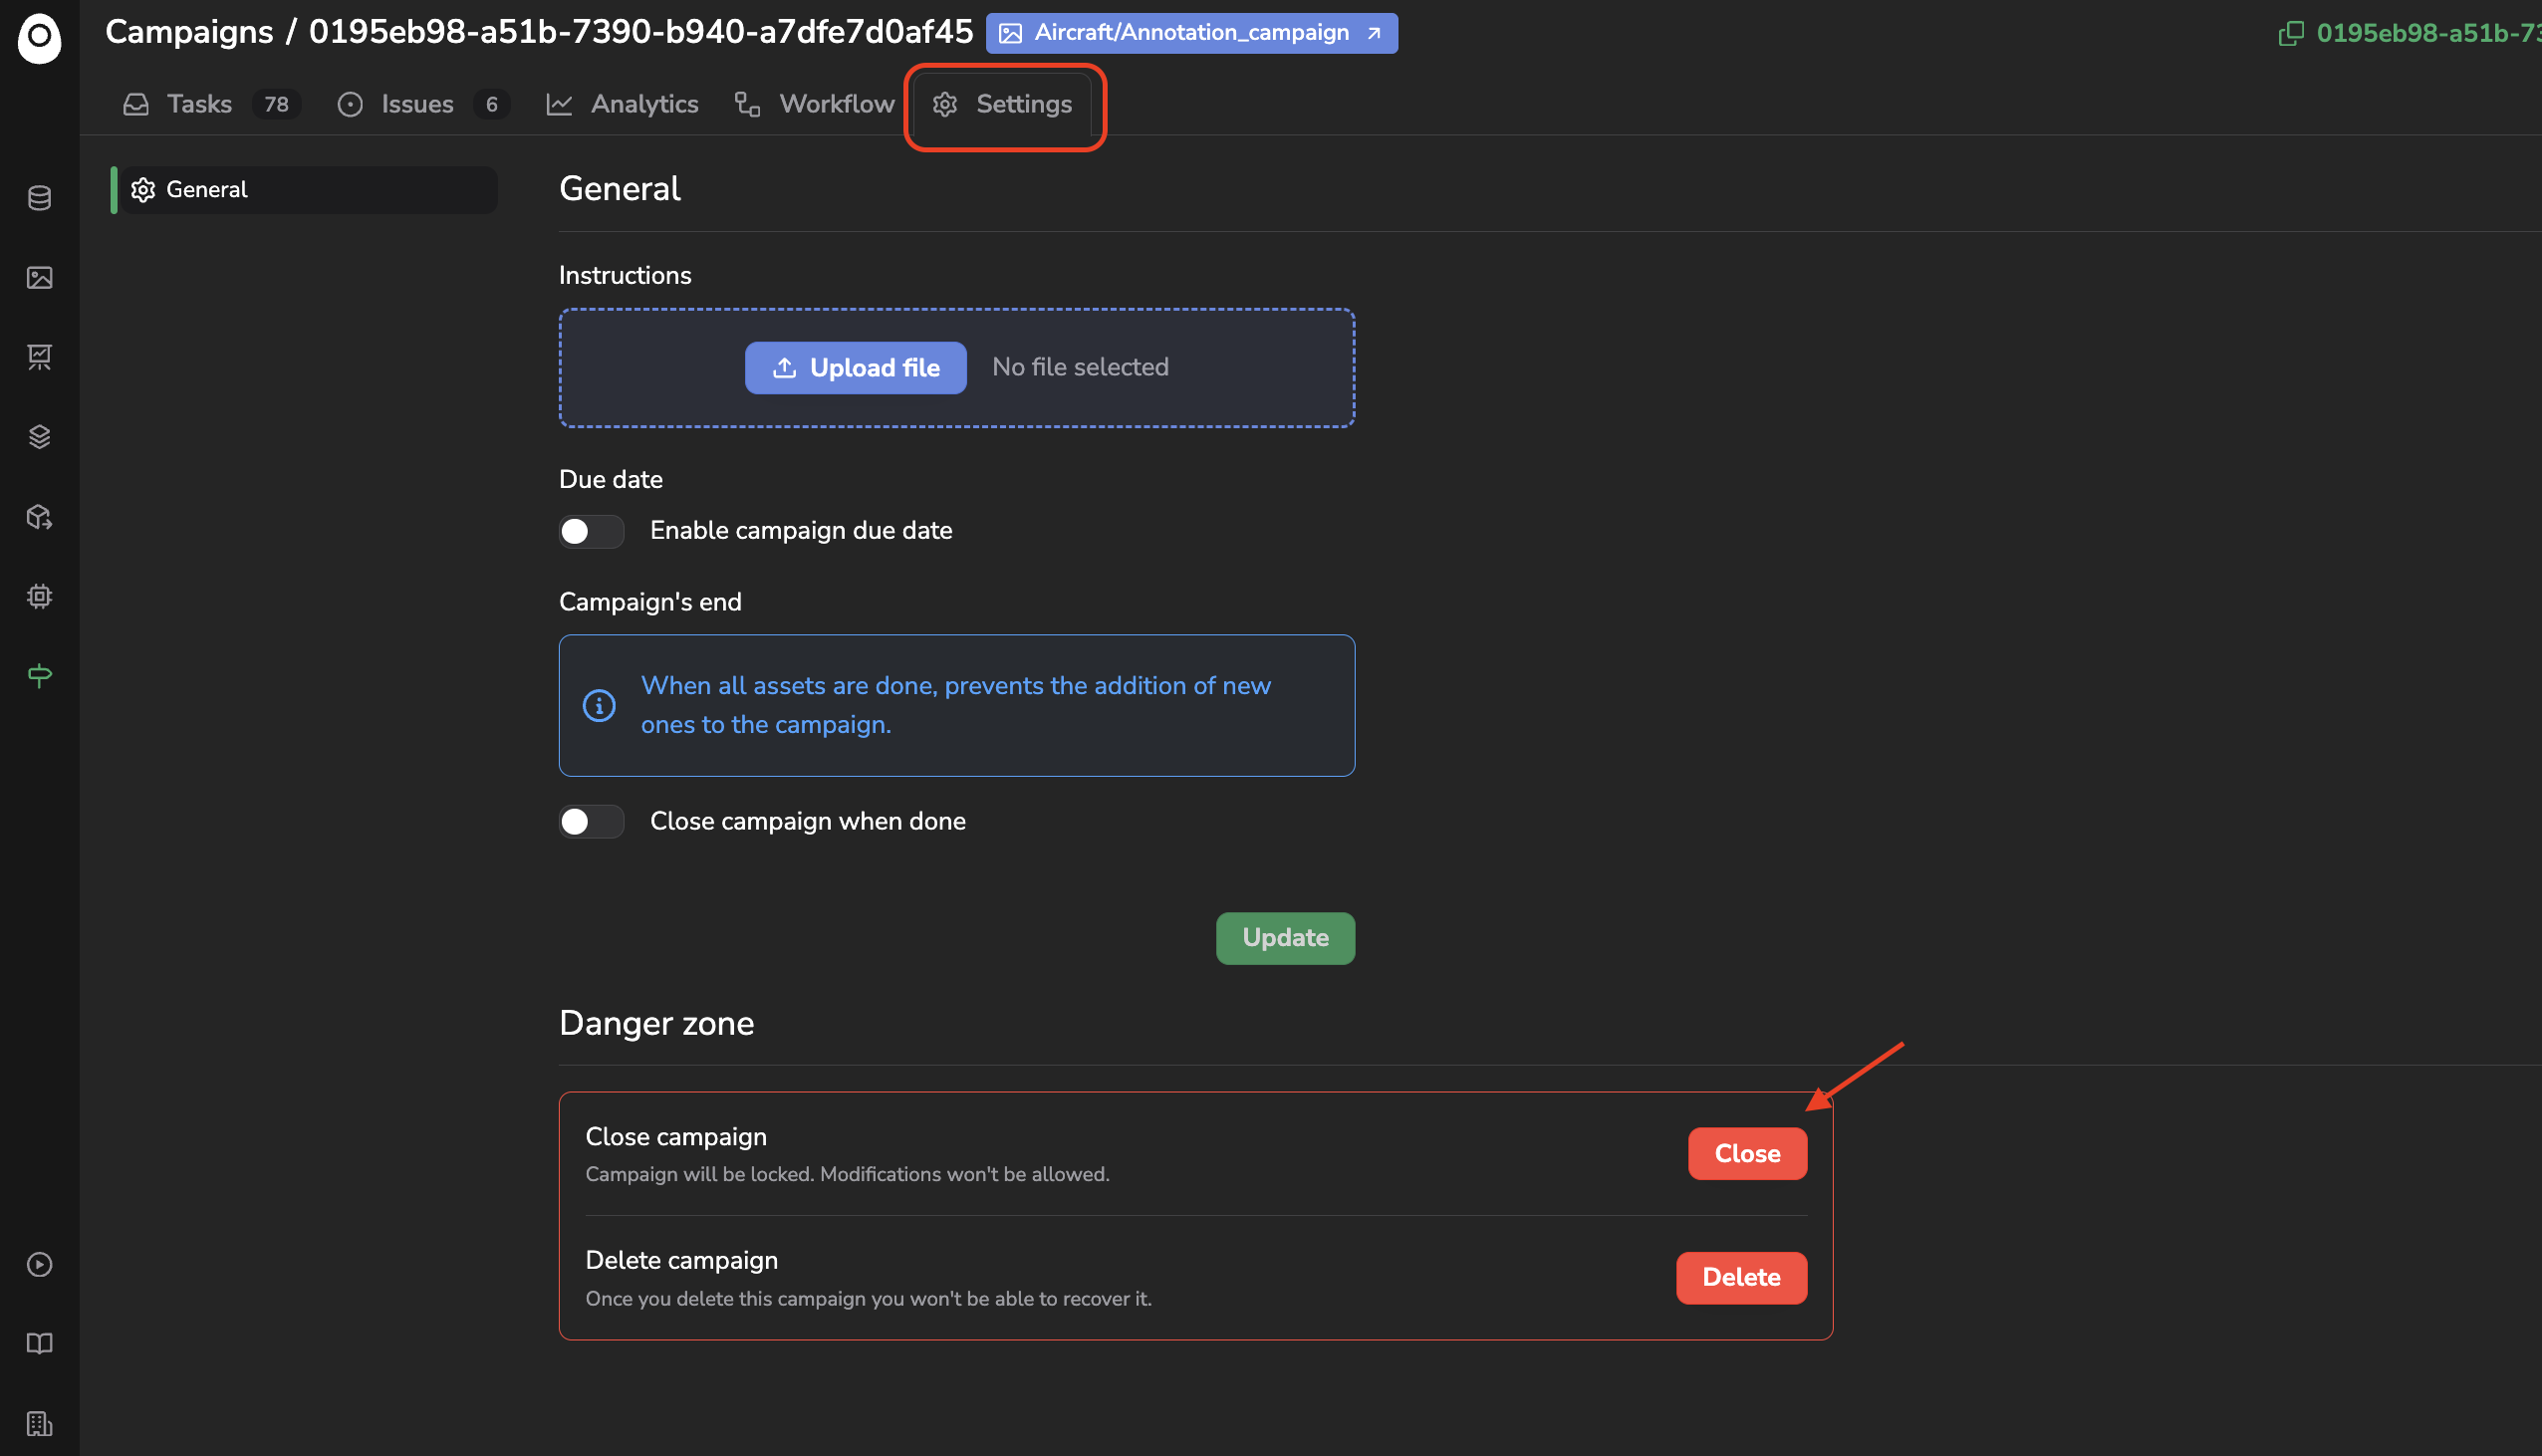
Close an Annotation Campaing
This action will make all the active Tasks frozen in their current state, meaning that no Tasks can be completed anymore as soon as the Campaign is closed.
Nevertheless, for traceability purpose, you can still browse the existing Tasks, navigate them and open them in the Annotation Tool. On the tool, you will be able to visualize the latest Annotation version, browse the Annotation history at each step of the Workflow but you won't access the Annotation edition tools.
Annotation visualization on a closed Campaing
In addition, the badge will be updated to show everyone the Campaign on the current DatasetVersion is closed.
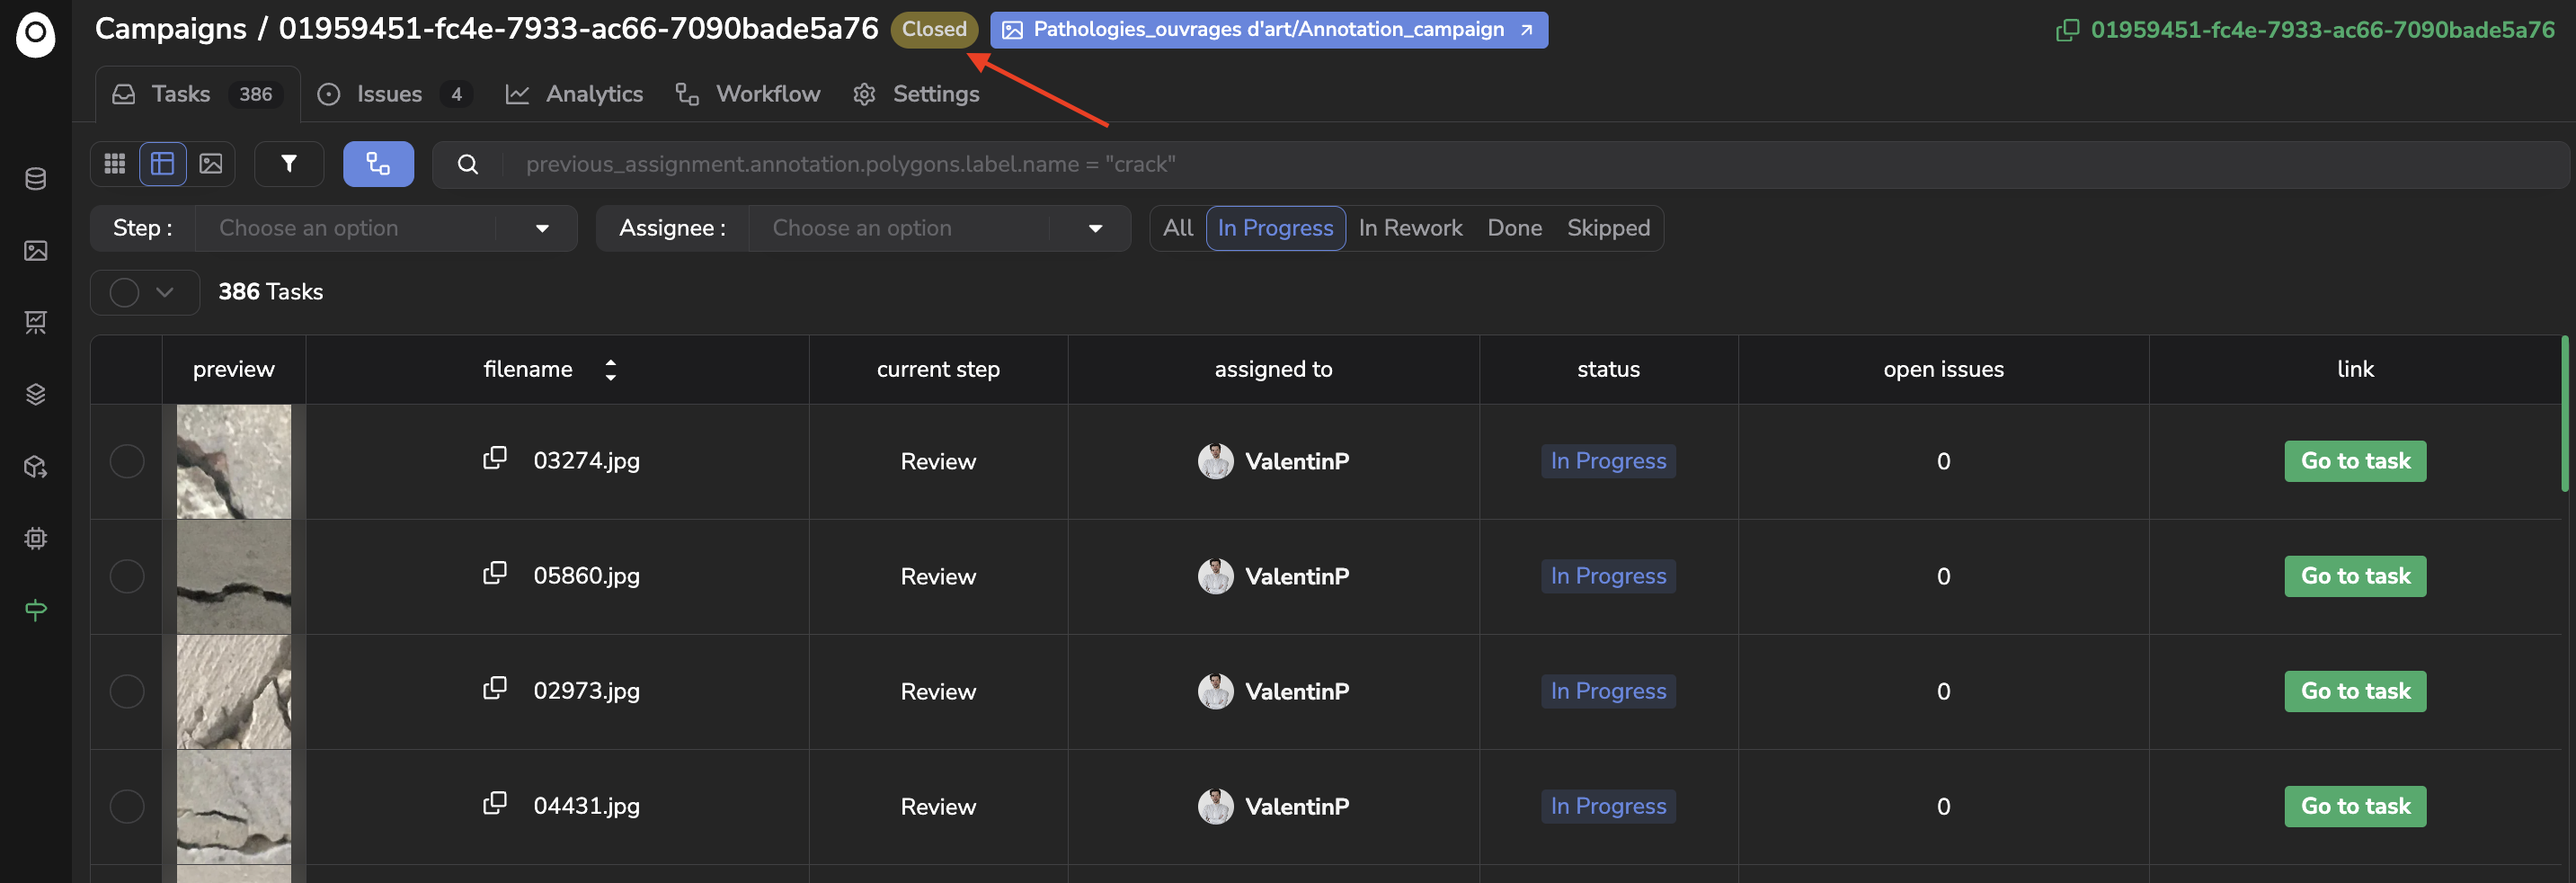
Closed Annotation Campaign
Once the Annotation Campaign is closed, no matter the Status & Step of the Tasks at Campaign closing, it is the latest version of each Annotation that will be taken into account for further manipulation of Asset.
Please note that an Annotation Campaign cannot be reopened. As a consequence, as soon as a Campaign is closed, the related Annotation will never be editable anymore in the current DatasetVersion. To perfom any further modification on the Annotation, you will be forced to fork the DatasetVersion and perform the modification in a new DatasetVersion.
B. Delete an Annotation Campaign
A Worker with Admin right on the parent Dataset can decide to Delete an ongoing Annotation Campaign.
It can be made from the DatasetVersion Settings page, through the Campaign settings button as shown below:
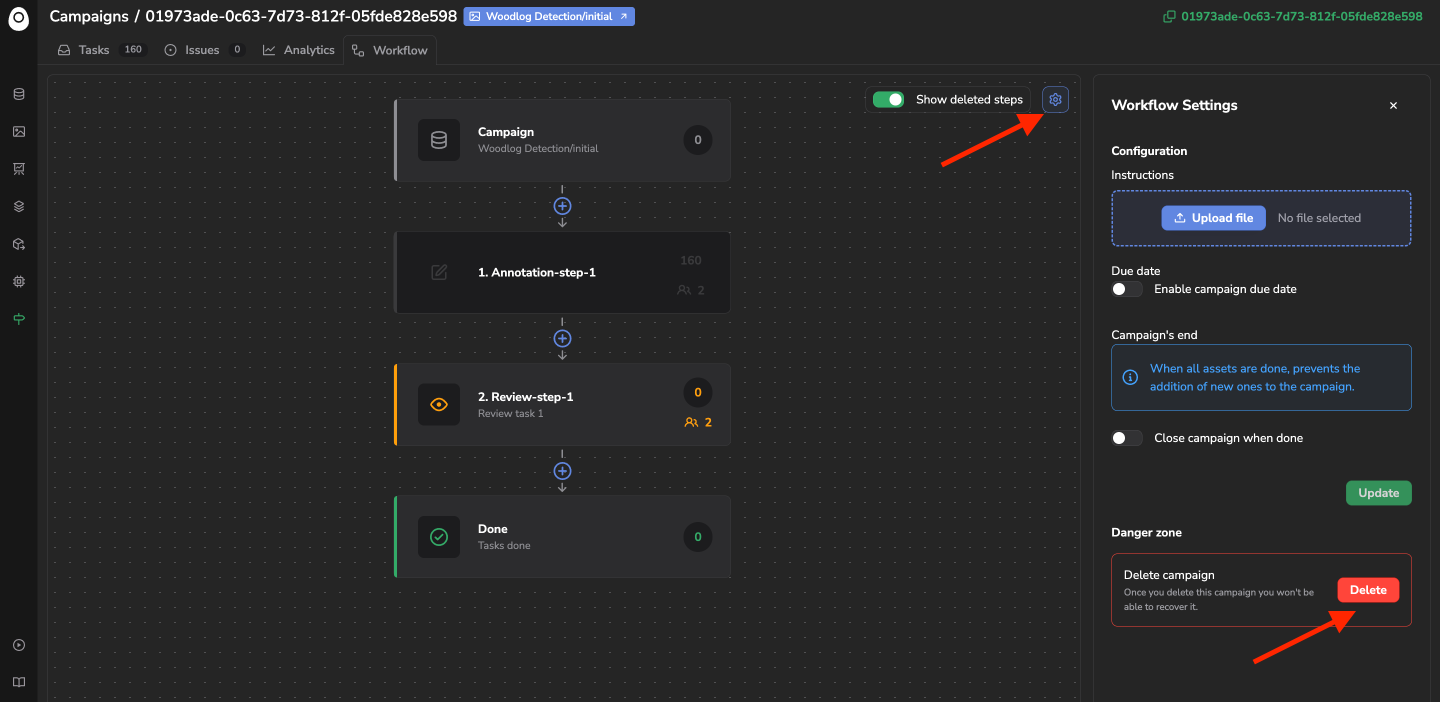
Annotation Campaign deletion
Unlike closing an Annotation Campaign, the deletion of an Annotation Campaign is irreversible and for each existing Asset, only the latest version of the related Annotation will be kept. In other, words you will lose all the history of the Annotation Campaign and won't be able to access to the Tasks & Issues tabs anymore.
Therefore we strongly recommend you to be very cautious while deleting an Annotation Campaign.
Once the Annotation Campaign is deleted, the DatasetVersion is back to its initial state but each Asset still has the latest version of the Annotation created through the deleted Annotation Campaign.
For sure, from this point you can create brand new Annotation Campaign.
5. Issues Management
As already mentioned previously, within an Annotation Campaign, any Assignee can create an Issue while completing its Task. The Issue system aims at facilitating communication between the different Assignees for a given Asset along its transition through the Annotation Workflow.
Once an Issue is created the different Workers can chat and comment on this one until it is closed. All the open and closed Issues related to an Asset are accessible by authorized Workers at any step of the Workflow.
Please note that the Issue system is only available for DatasetVersion with an Annotation Campaign ongoing.
There are two types of Issues:
- Zone issue: Related to a specific area of the
Asset - Image Issue: Related to the whole
Asset
A. Create a Zone Issue
This Issue can be related to the whole Asset or to a specific zone on the Asset.
When completing a Task on the Annotation tool, as an Assignee you can create a Zone Issue by clicking on the Create a zone Issue button as shown below. Then draw on the image a rectangle on the zone affected by the Issue you want to raise.
Please note that any Worker who can access the Task (even without being the Assignee) can create a Zone Issue on the Asset.
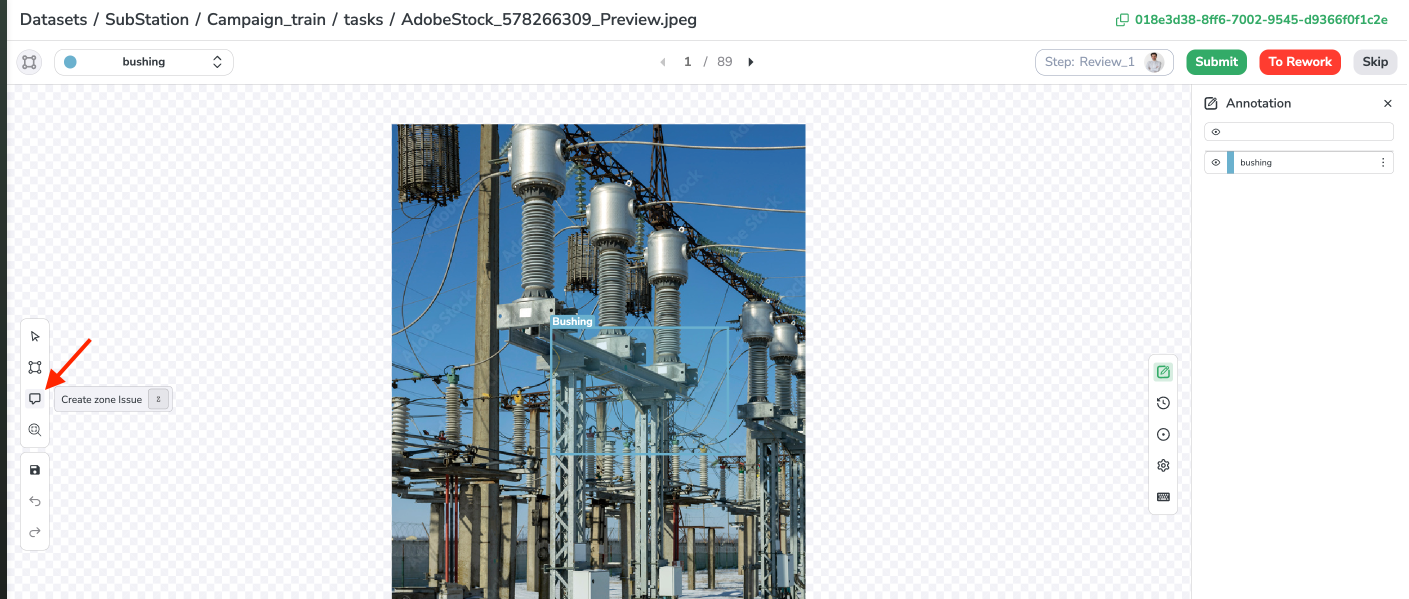
Create a Zone Issue
Once the zone has been created, the Issues Panel will open in the right panel of the Annotation Tool. You can then describe your Zone Issue and click on Create Issue.
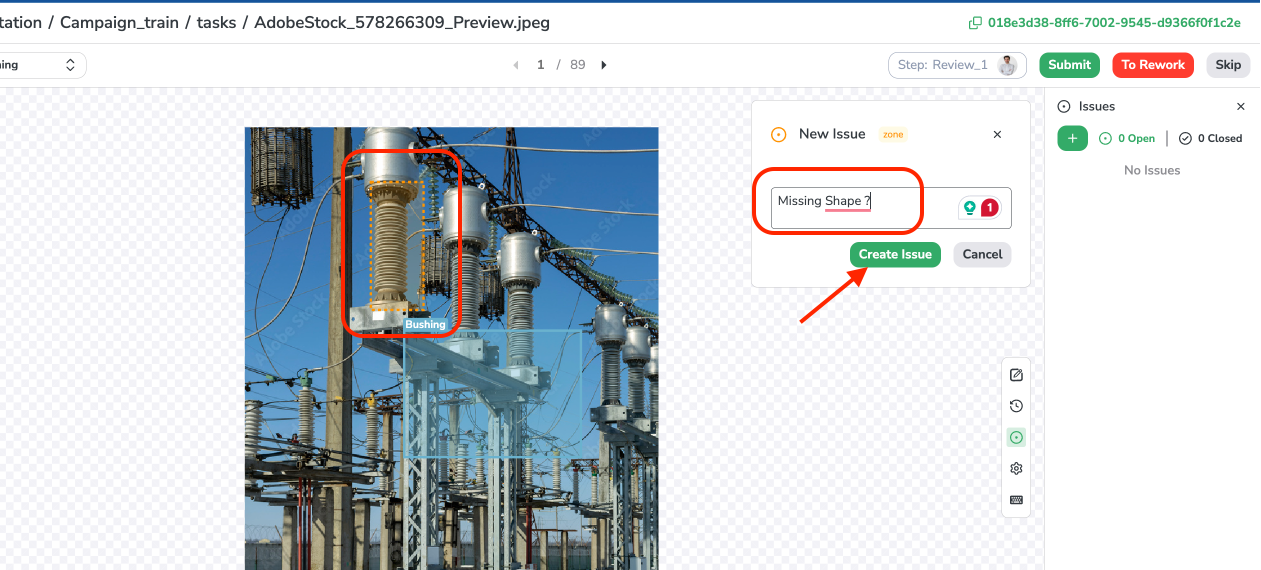
Zone Issue creation
Once created, your Issue will appear on the Issues panel related to the current Asset.

Issues panel
B. Create an Image Issue
An Image Issue is not related to a specific area but to the whole Asset.
An Image Issue can be created directly from the Issues Panel as shown below:
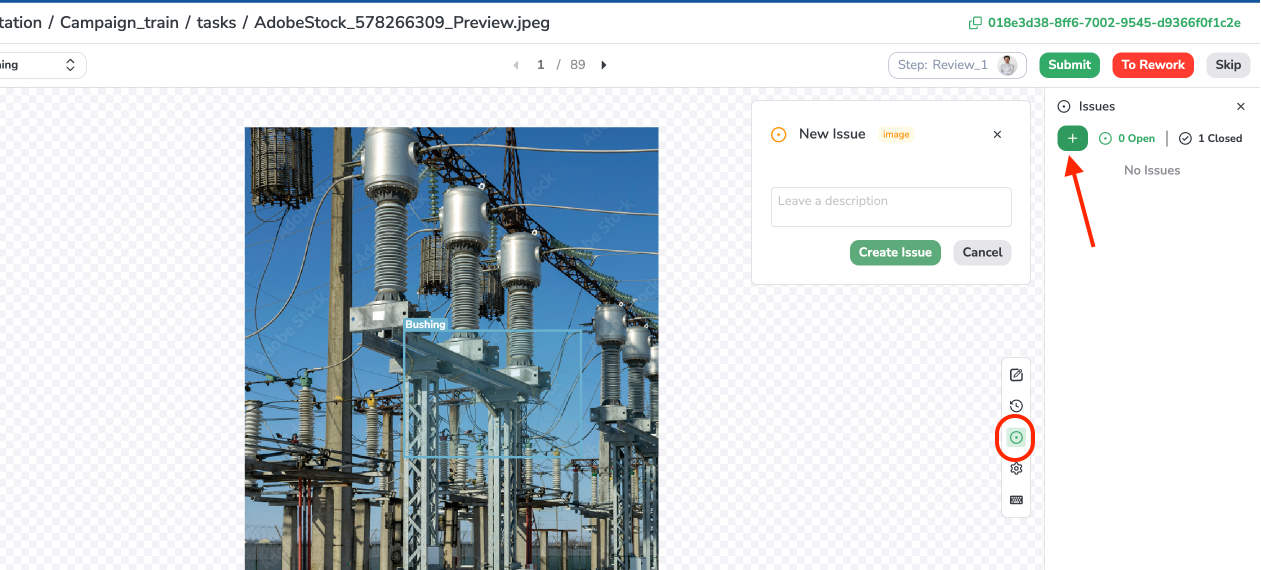
Image Issue creation
Once the description is prompted the Image Issue will be created after clicking on Create Issue. This new Issue will be also accessible at any time from the Issues panel .

Issues panel
Please note also that the Assignee will be forced to create an Image Issue before Skipping or sending an Asset for Rework if nor Image or Zone Issue is existing on the current Asset. There is a way to track this Asset has been Skipped or sent To Rework.
As it is the case for Zone issues, from this Issue Panel, Workers can comment, resolve or re-open the Image Issue.
C. Issues panel
After opening any Asset from the Tasks list, you can access the Issues panel as shown below on the right side of the Annotation Tool.
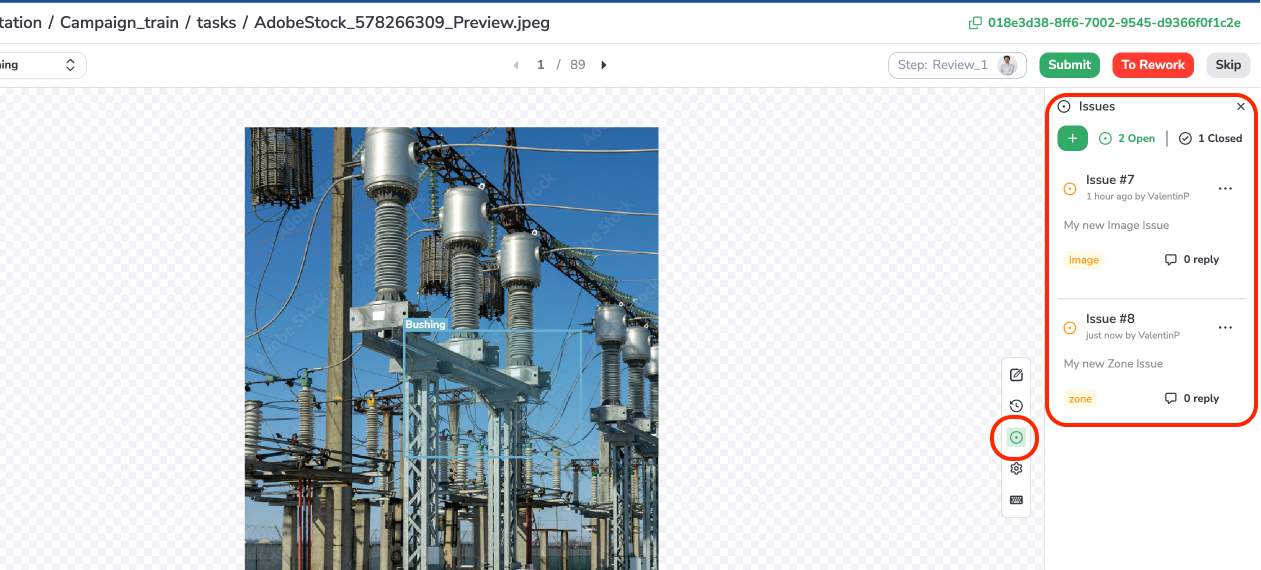
Issues panel
Here are displayed all the Issues (Zone or Image) related to the current Asset created during the Annotation Campaign. You can switch between the still-open Issues and the closed ones.
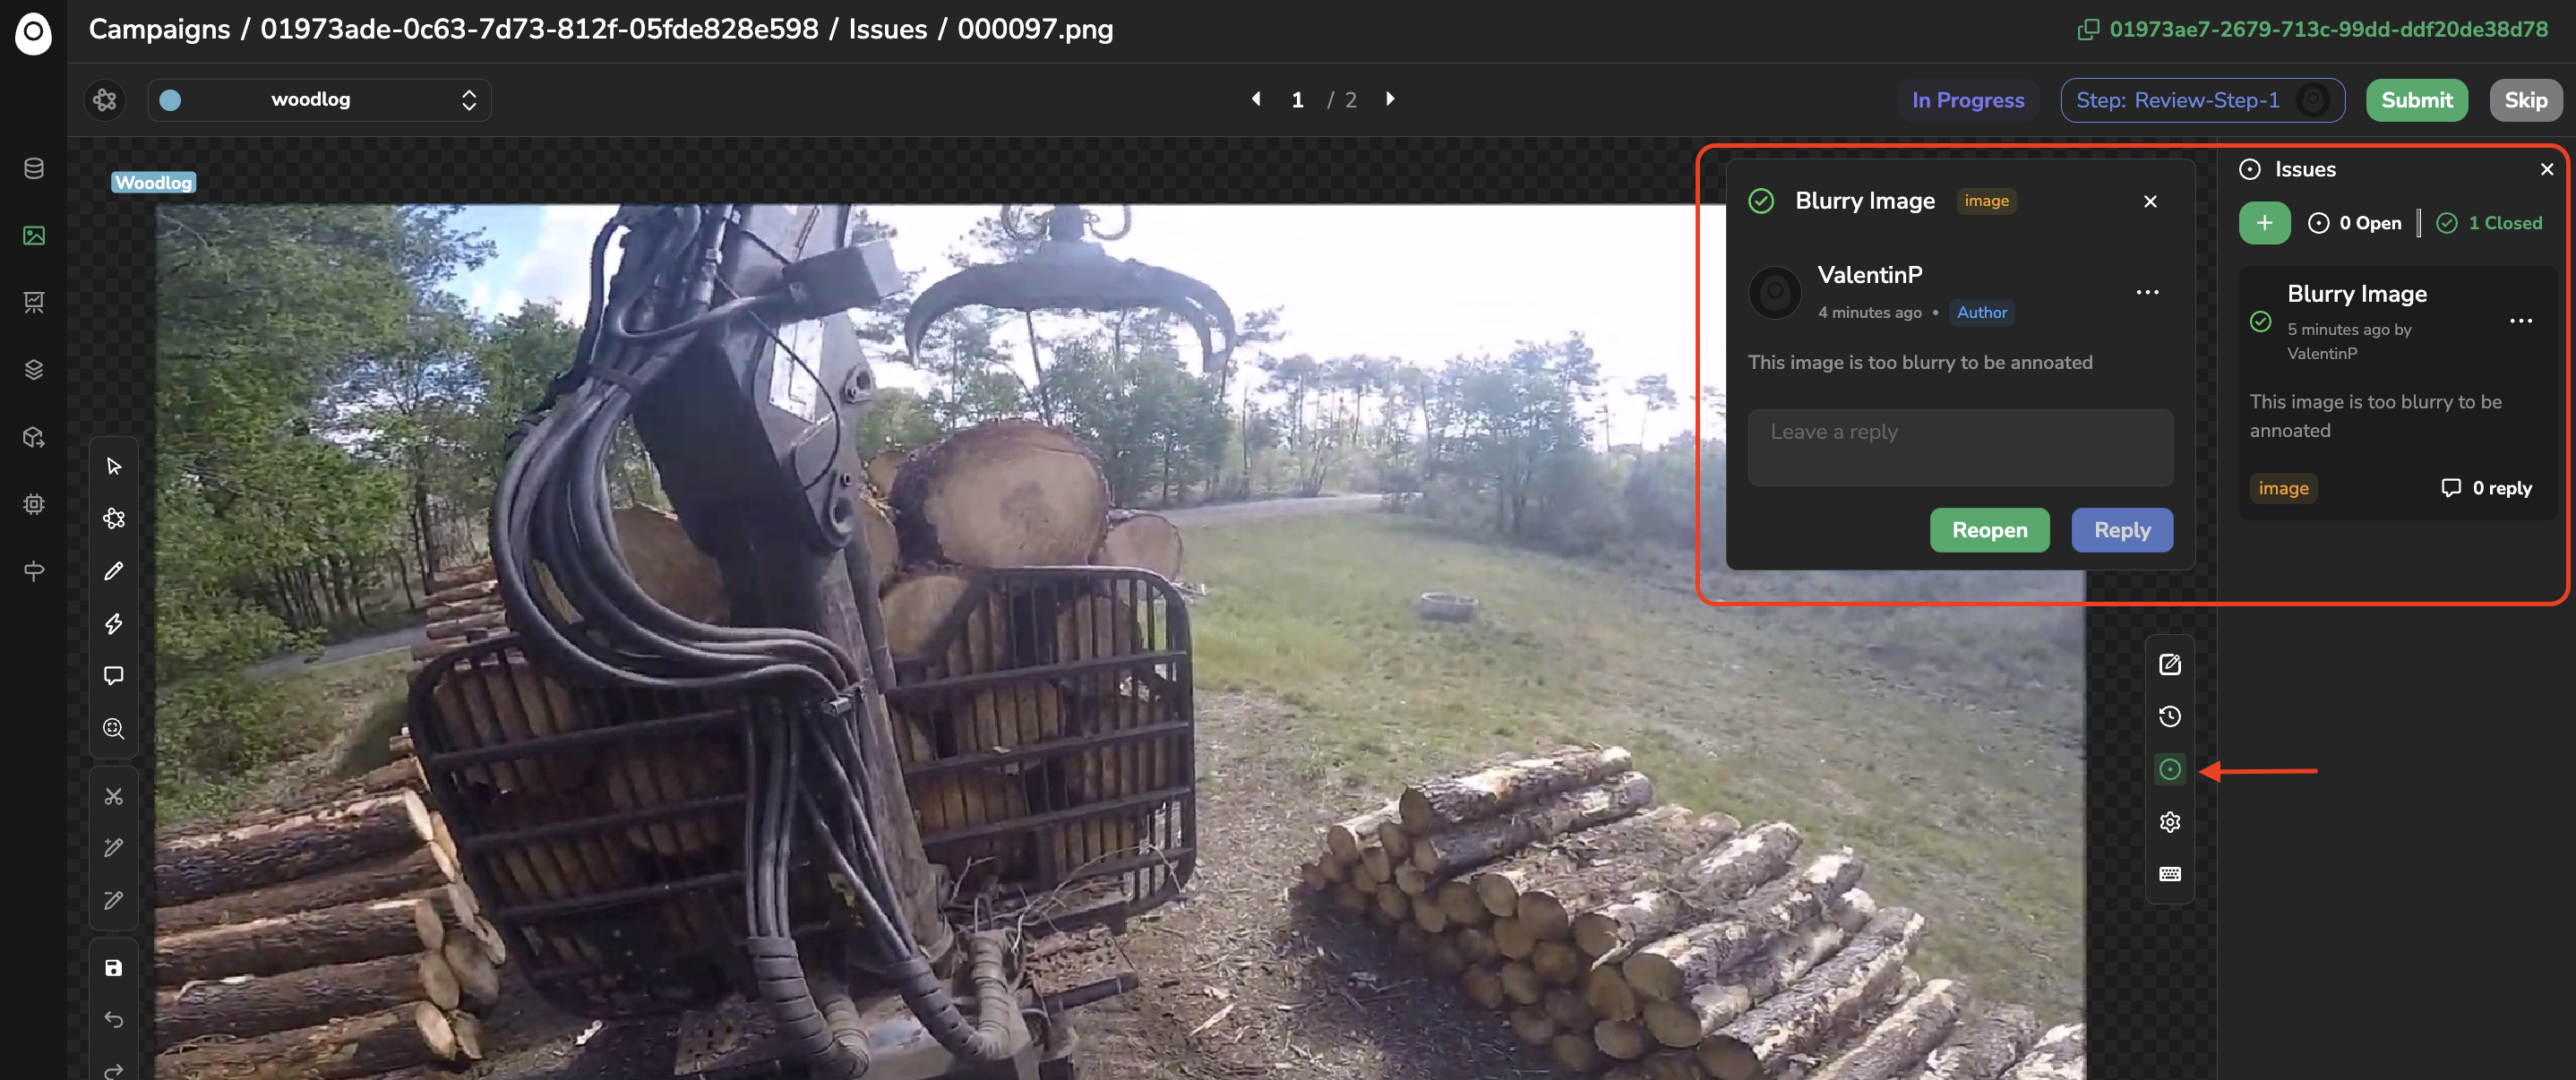
By clicking on any Issue (Open or Closed), you will access the conversation thread allowing you to see the conversation related to this issue, add a Reply, Resolve it, or Re-Open it.

Reply and/or Resolve an Issue
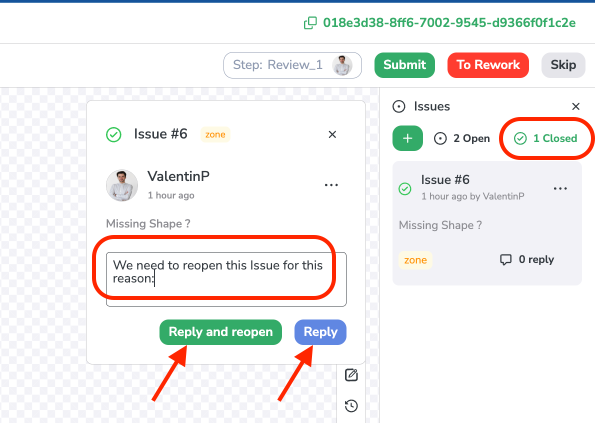
Reply and/or Reopen an Issue
Please note that any Worker that can access the Task (even without being the Assignee) can interact with an Issue in the Issue Panel.
Please note that any Issue opened will remain until a Worker with the necessary rights closes it.
AnAssetcannot turn in Done status with still open IssuesTo make an
Assetturn in the Done status, meaning submitting theAssetat the last step of the Workflow, all the Issues related should be closed. In a few words, you won't be able to submit the very last Task of the Workflow is some Issues are still open.
D. Issues list
From the Campaign interface you can access the Issues tab that lists all the Issues created during the current Annotation Campaign.
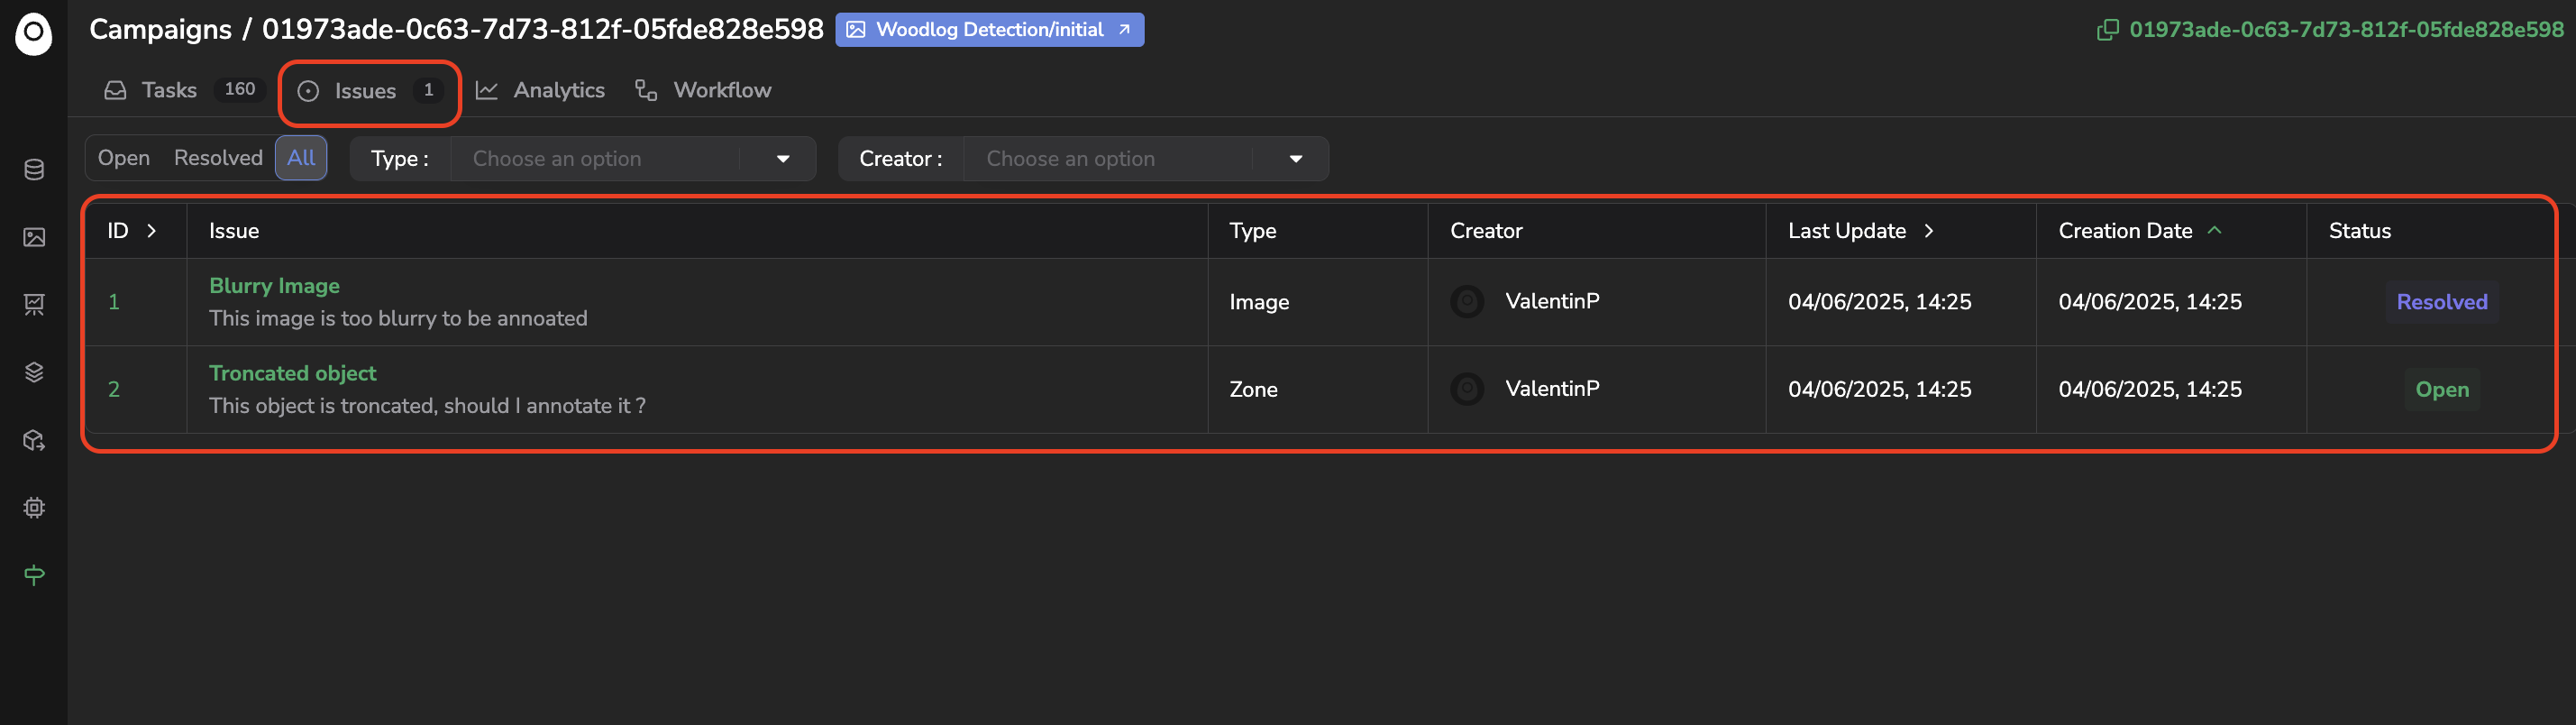
Issues list
For each issue are displayed, its title, its description, its type, its creator, its creation date and status.
The issues can be also filtered on the status, type or creator:
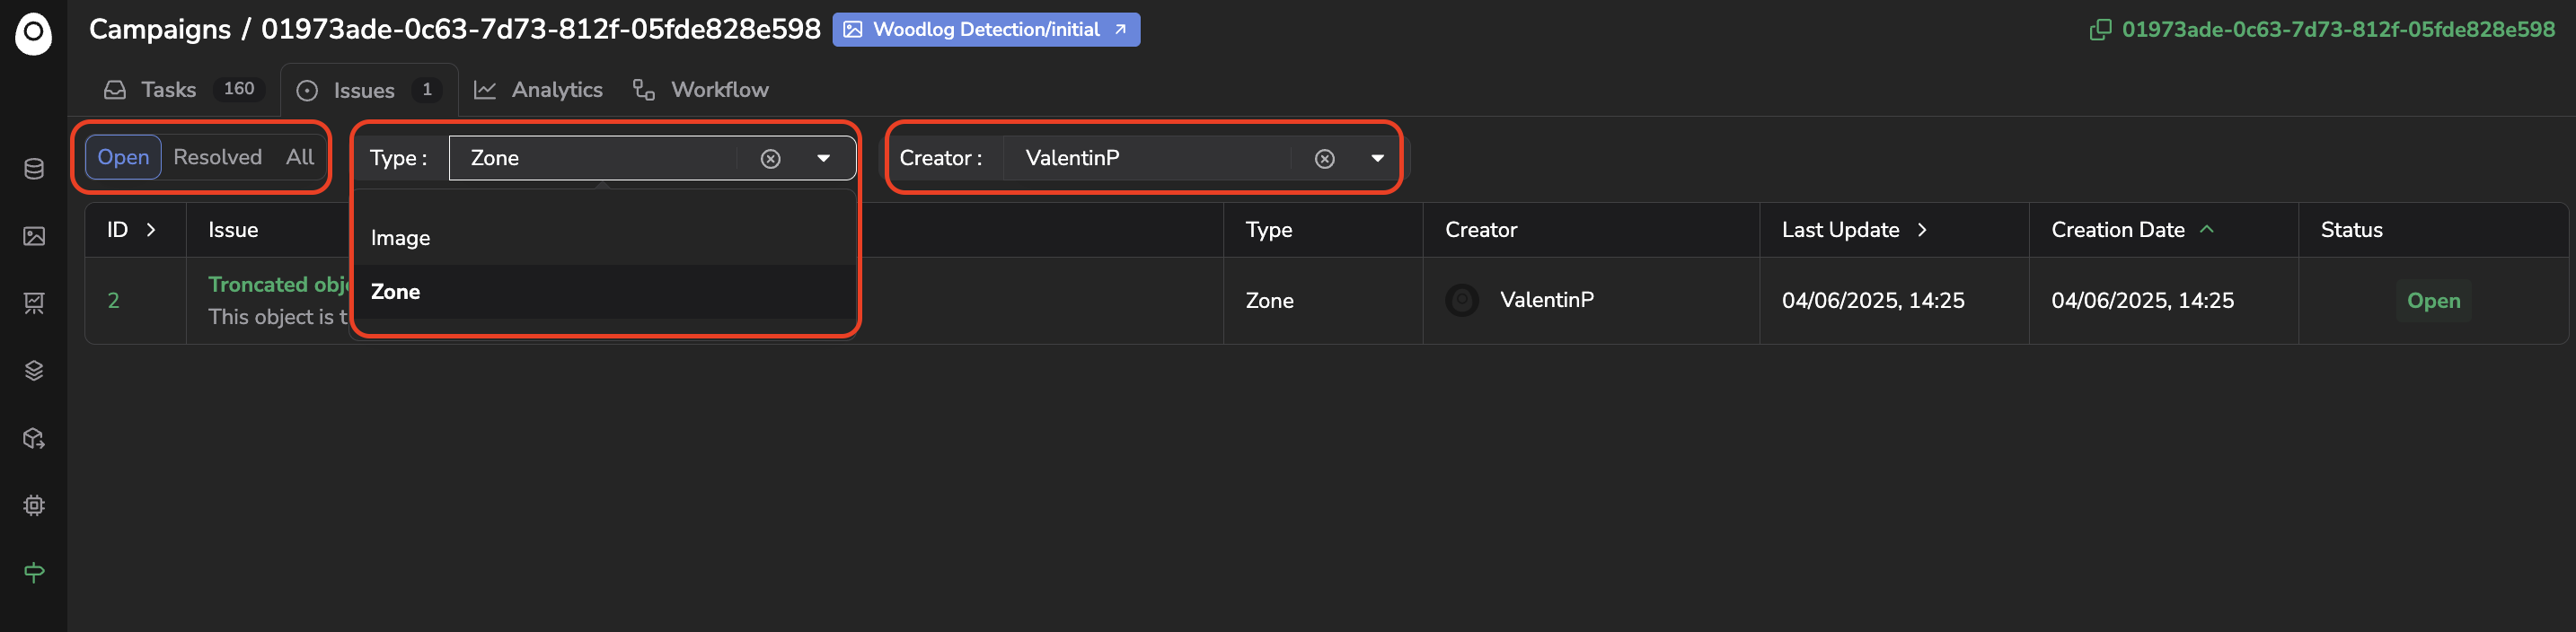
Filter on Issues
Clicking on them will open the Asset to which this one is related on the Annotation tool alongside with the issue panel:
Issue panel opens in the Annotation Tool after clicking on an Issue from the Issues list
6. The Labeller role
In case you need to involve some members in your Annotation Campaign but willing them only to complete the Tasks they get attributed without letting them visualize or manipulate any other object related to your Organization, you can add them as Unpriviliedged and add them with the Labeler role in the Dataset.
a. Add a member as Labeler in your Dataset
DatasetTo involve a member in your Annotation Campaign and let him complete the assigned Tasks without accessing any other object of your Organization, you first need to add this member with the Unpriviledged role to your Organization.
To do so, you need to be Admin in the current Organization, go to Organization Settings > Members and click on Inviter member.
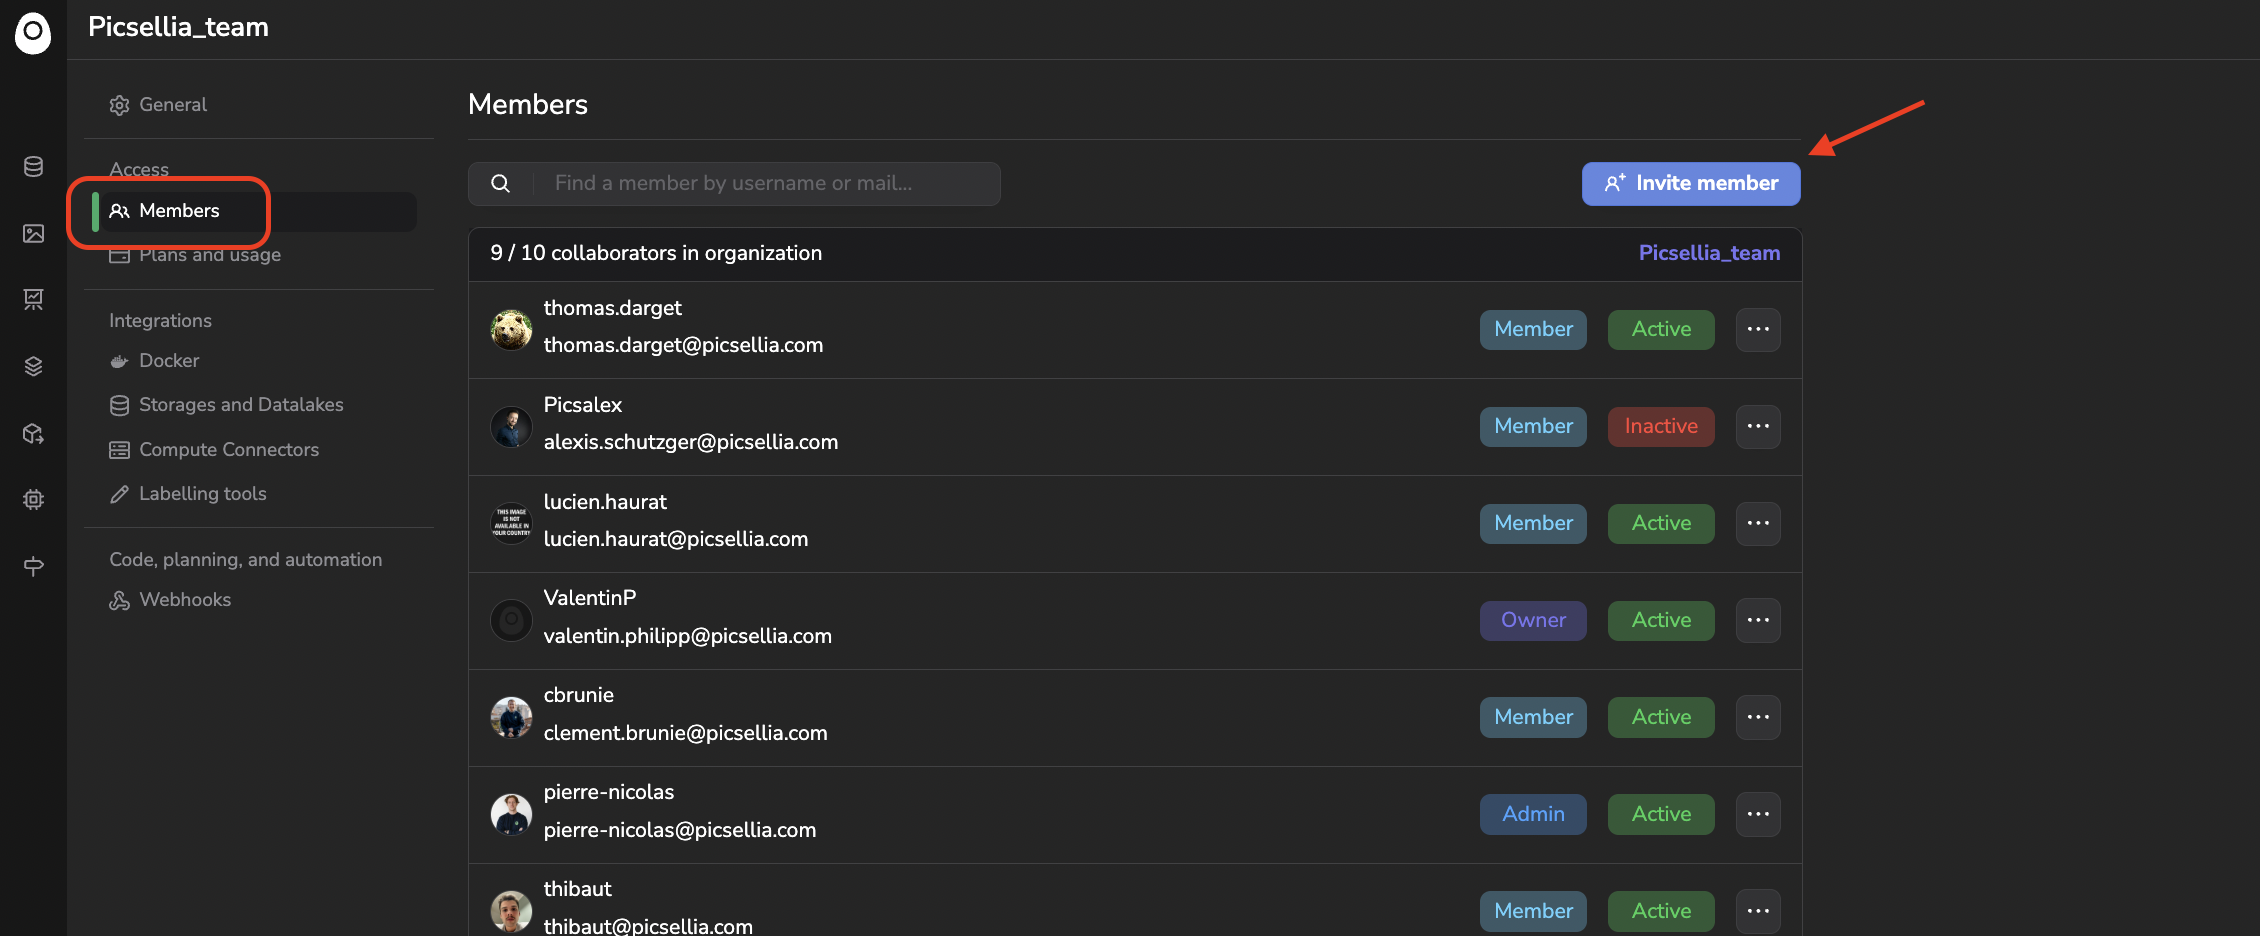
Access members panel of an Organization
You can add members using their username if they already have a Picsellia account or by typing their email address (in this case, they will get an email with a link to create their account), then you need to select Unpriviliedged as Default Permission and click on Invite.
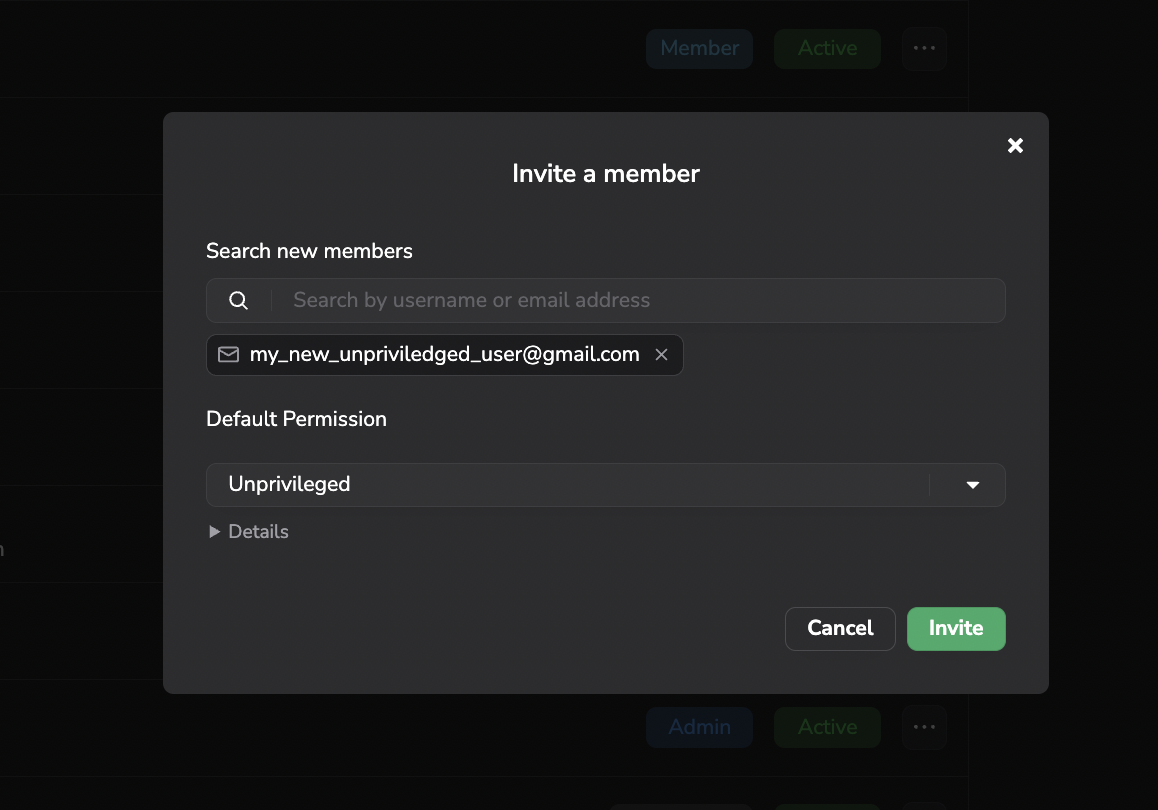
Invite an Unpriviledged member
Then to make sure you can involve the invited Unprivileged member in an Annotation Campaign, you need to add him to the Workers list of the Dataset as shown below:
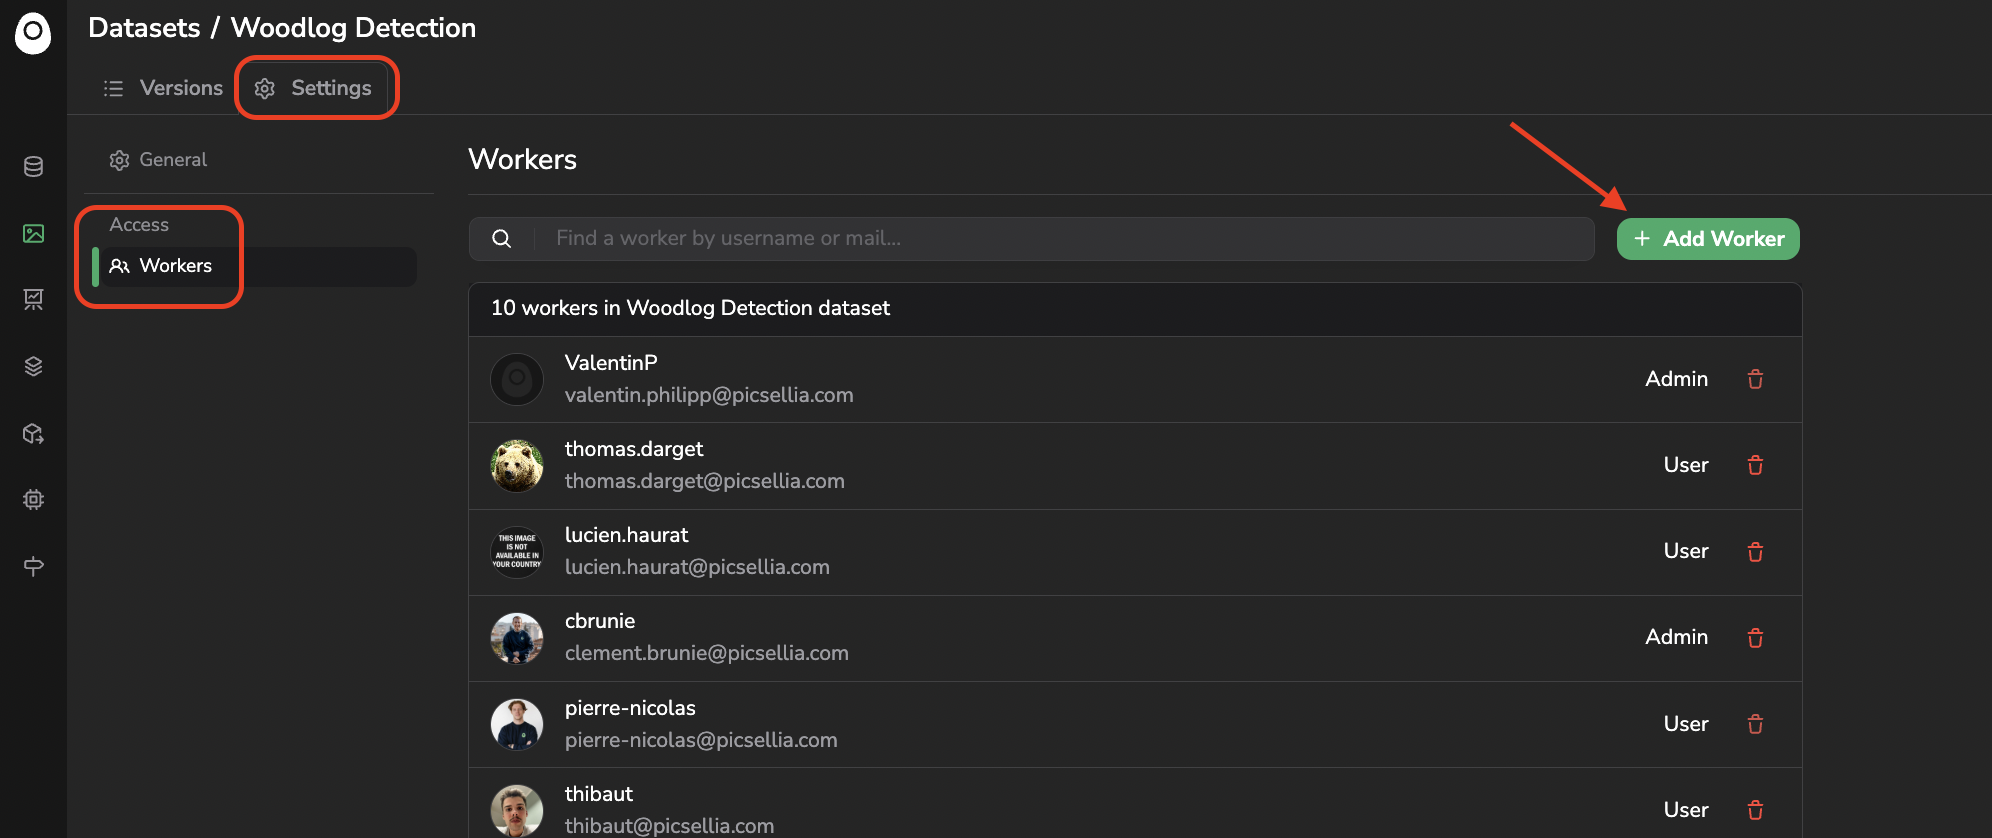
Dataset Workers list
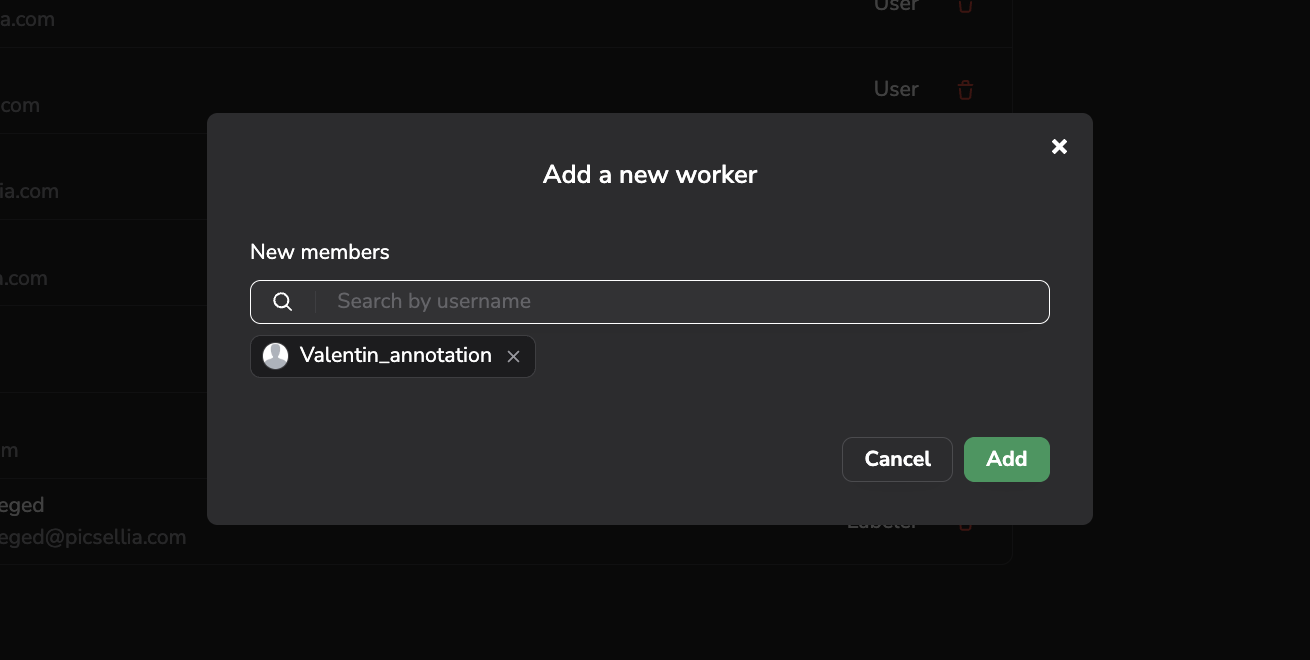
Add a Worker
Once done the Unprivildged member is identified as Labeler in the Dataset and can be involved in Annotation Campaign for any DatasetVersion related.
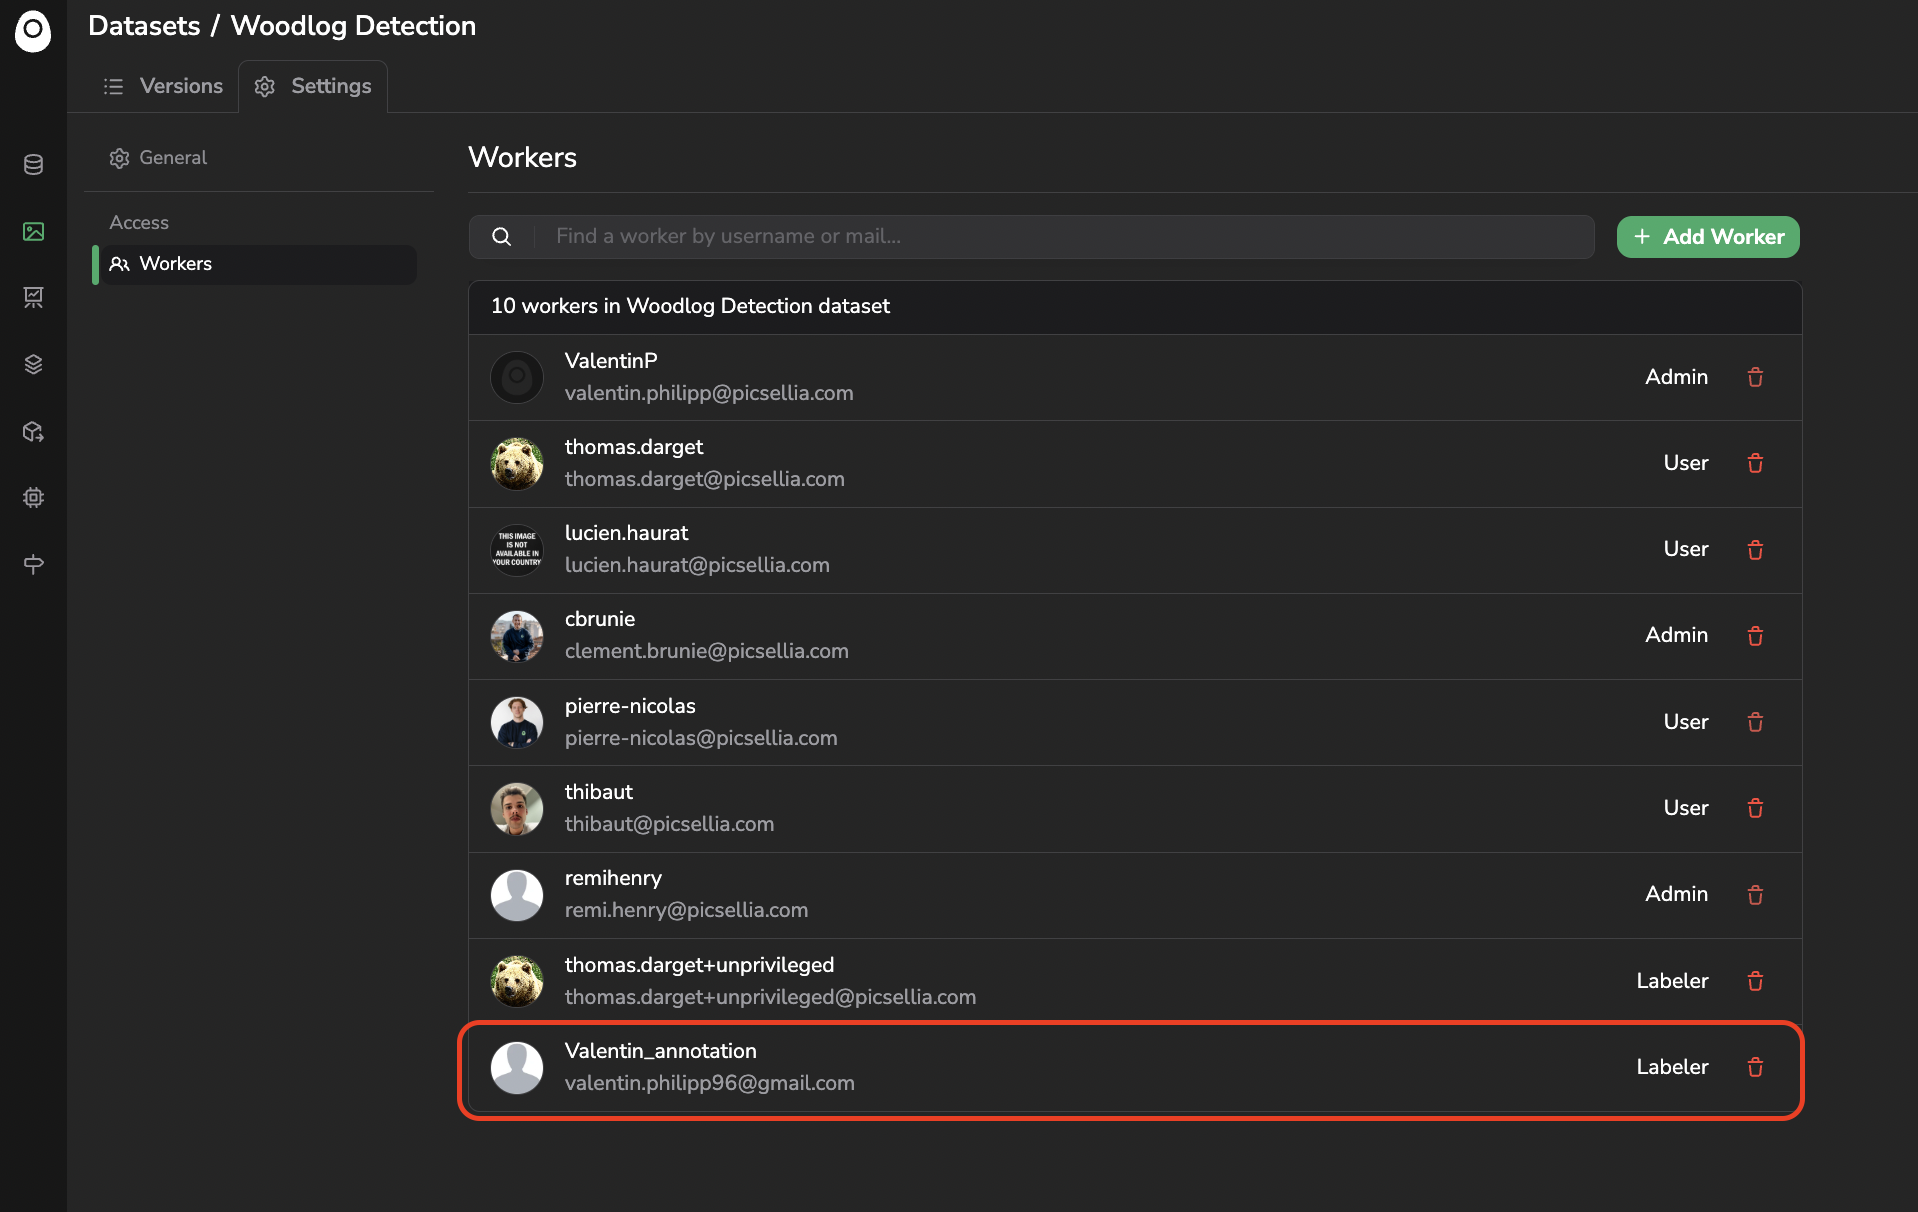
Unpriviledged member added as a Labeler in the Workers list of a Dataset
B. Access an Organization as an Unprivileged member
The members invited to an Organization with Unprivilideged rights, can access the Organization but by default, they won’t be able to access any object (Datalake, Dataset, Project, Model…). They will only be able to visualize the Campaign list.
In the Campaign list of an Labeler user are listed all the Annotation Campaign in which this user has at least one Tasks assigned to him. For each Annotation Campaign listed are available some global information such as the name of the DatasetVersion impacted, the progress with the details of the Tasks repartition, the number open Issues on the Annotation Campaign, its start and due dates.

Annotation Campaign list for Labeler
After clicking on any Annotation Campaign, the Campaign interface opens:
Tasks list as labeler
This view is the same as for any other member, the only difference is thatLabeler users can only access theTasks andIssues tabs. In addition, they can only visualize theTasks that are assigned to them and are not allowed to perform re-assignations.TheLabeler still has the possibility to filter among the Tasks assigned to him on the Status and Step.
To complete a Task, the Labeler, can click on Go to task and complete the Task (Annotation or Review) as detailed here.
The Labeler can also access a detailed view describing all the Issues raised on any Asset that generates a Task currently assigned to the Labeler.

Issues list for Labeler
Labelers can manage Issues, read instructions and accessAssethistoryFor any
Assetthat generate a Task currently assigned to a given Labeler, this one can access all the Issues management features (Open, Reply, Resolve, Re-open).While completing a Task the Labeler can also access the history of the
Assetint he Annotation Workflow and open the Annotation guidelines file if any.
7. Analytics
The Analytics Dashboard can be access from the Campaign Interface. 2 types of Analytics are available:
- Throughput: This tab will through its metrics detail the progress of the Annotation Campaign.
- Efficiency: This tab will through its metrics detail the time spent by the Assignees on the Annotation Campaign.

Access Analytics
A. Throughput
The Throughput tab displays graphs that are related to the progress of the Annotation Campaign. From this tab, you will have a clear view of how the Asset of the DatasetVersion are going through the Annotation Workflow in real-time.
In detail, the following metrics are displayed:
- Annotation Campaign Progress: A percentage of Annotation Campaign completion based on the Tasks already submitted compared to the total number of Tasks to submit to complete the Annotation Campaign
- Tasks Distribution: A pie chart showing the total number of active Tasks grouped by step.
- Total Annotation Assignments: A bar chart showing the total number of Annotation Tasks submitted. The time range depends on the selected filter.
- Total Review Assignments: A bar chart showing the total number of Review Tasks submitted. The time range depends on the selected filter.
- Assignment Count By Worker: A bar chart detailing the total number of Tasks currently to each Worker involved in the Annotation Campaign.
- Issues Quantity: A bar chart detailing the total number of Issues created until now during the Annotation Campaign grouped by Creation Date. The time range depends on the selected filter as explained below.
- Issues Type Distribution: A pie chart detailing the total number of Issues created until now during the Annotation Campaign grouped by Issues Type(Zone or Image). The time range depends on the selected filter.
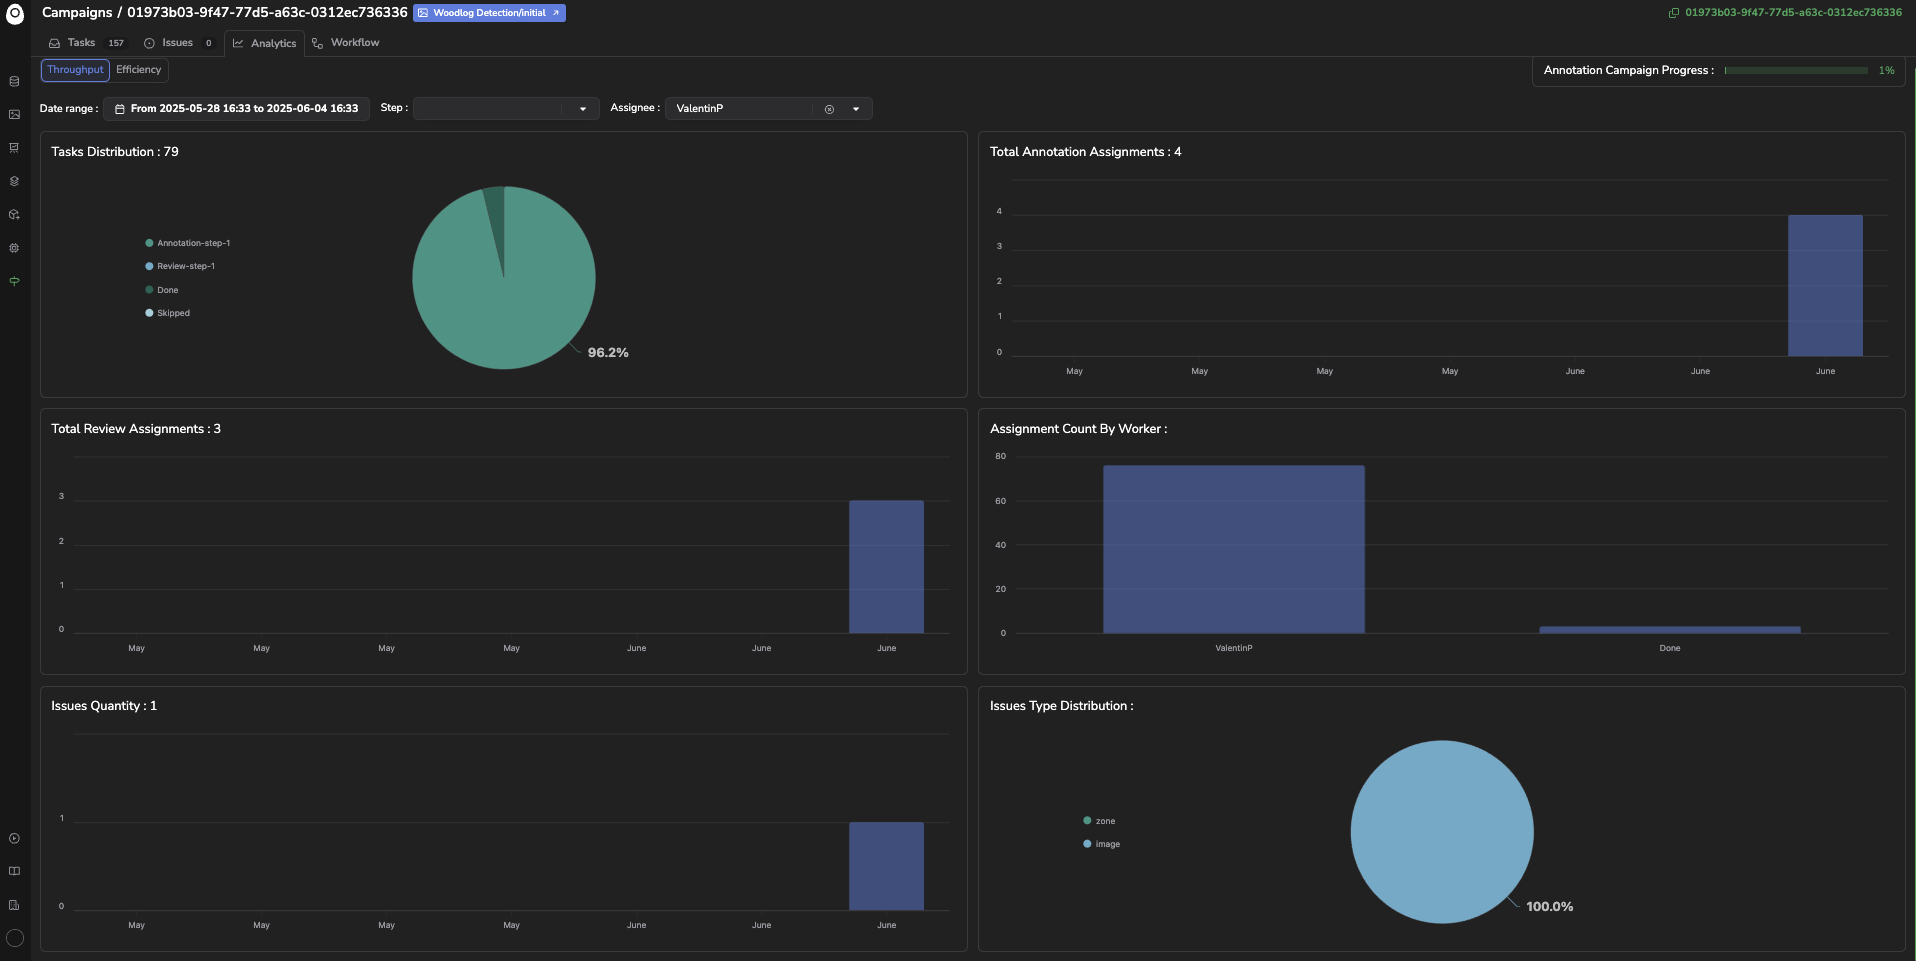
Throughput Analysis
For each chart, you can change the Date Range of the data displayed as shown below:
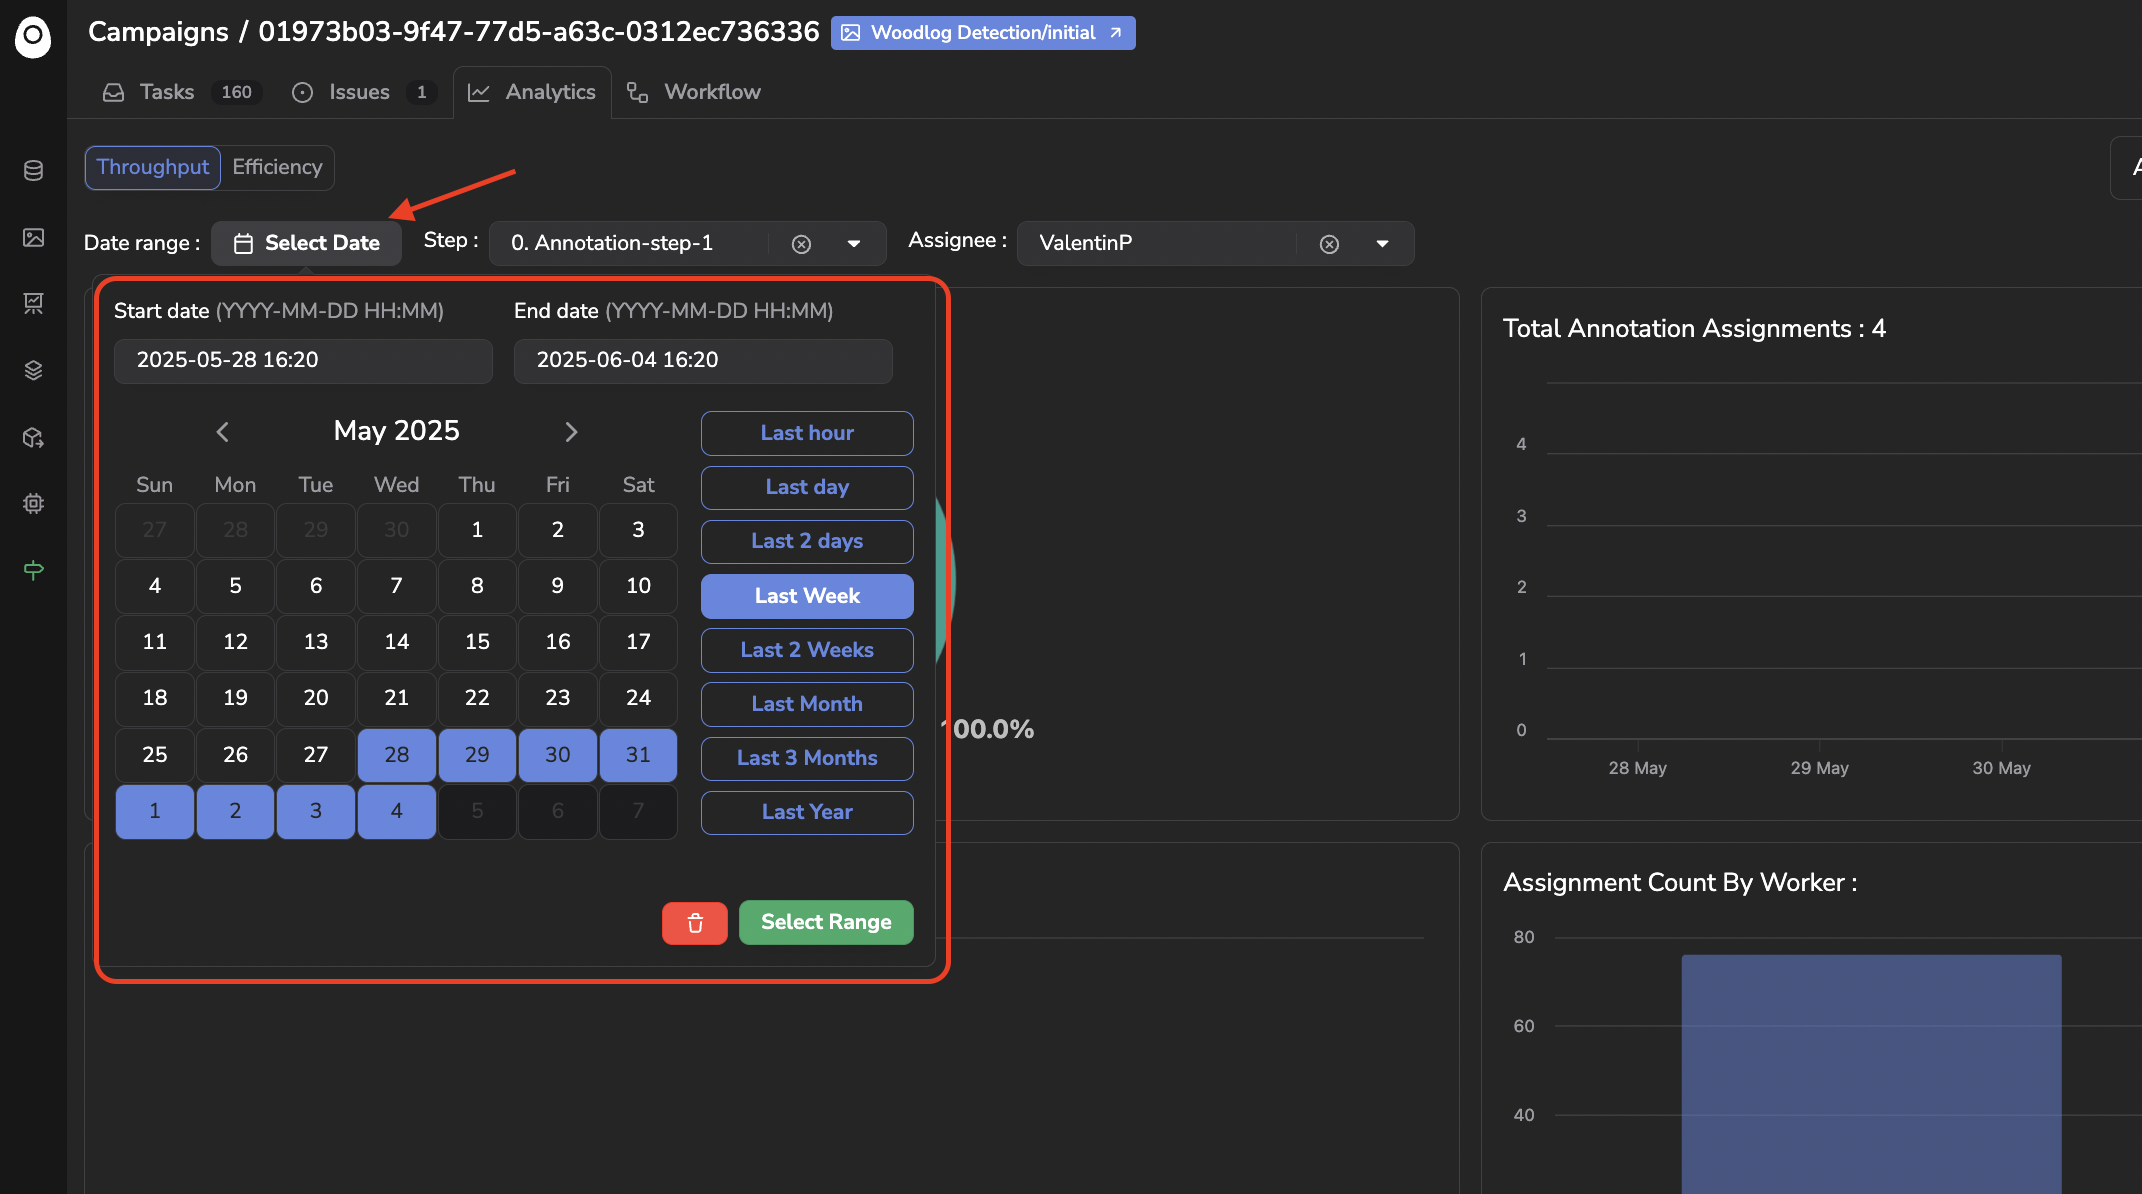
Date Range
In addition, you can filter the data displayed based on a given step of the Annotation Workflow or by Assignee.
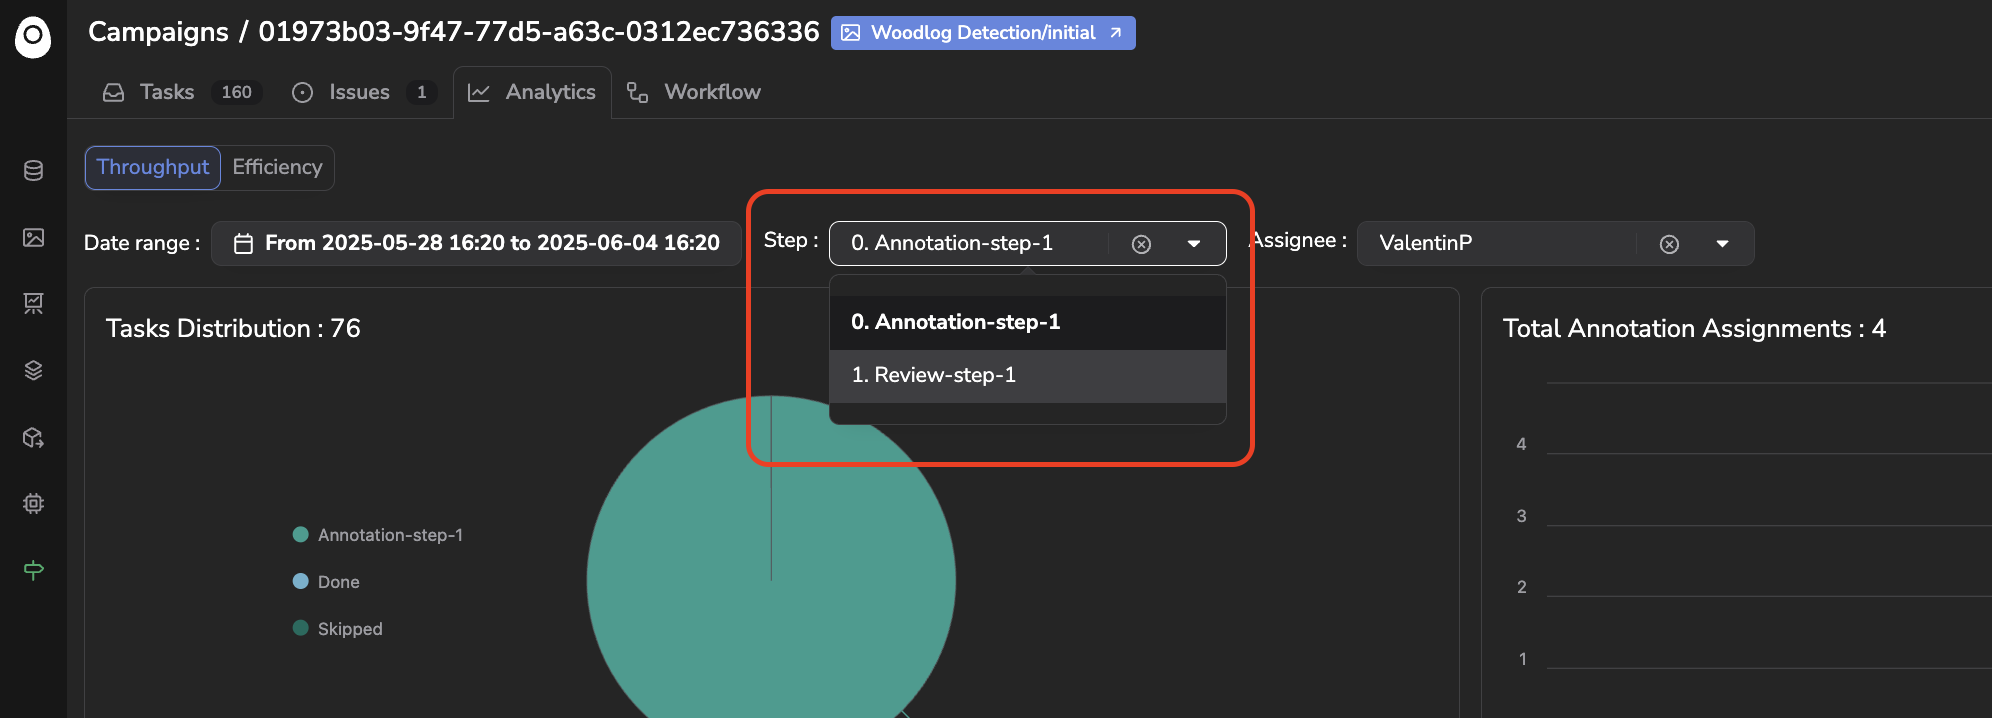
Filter by Step
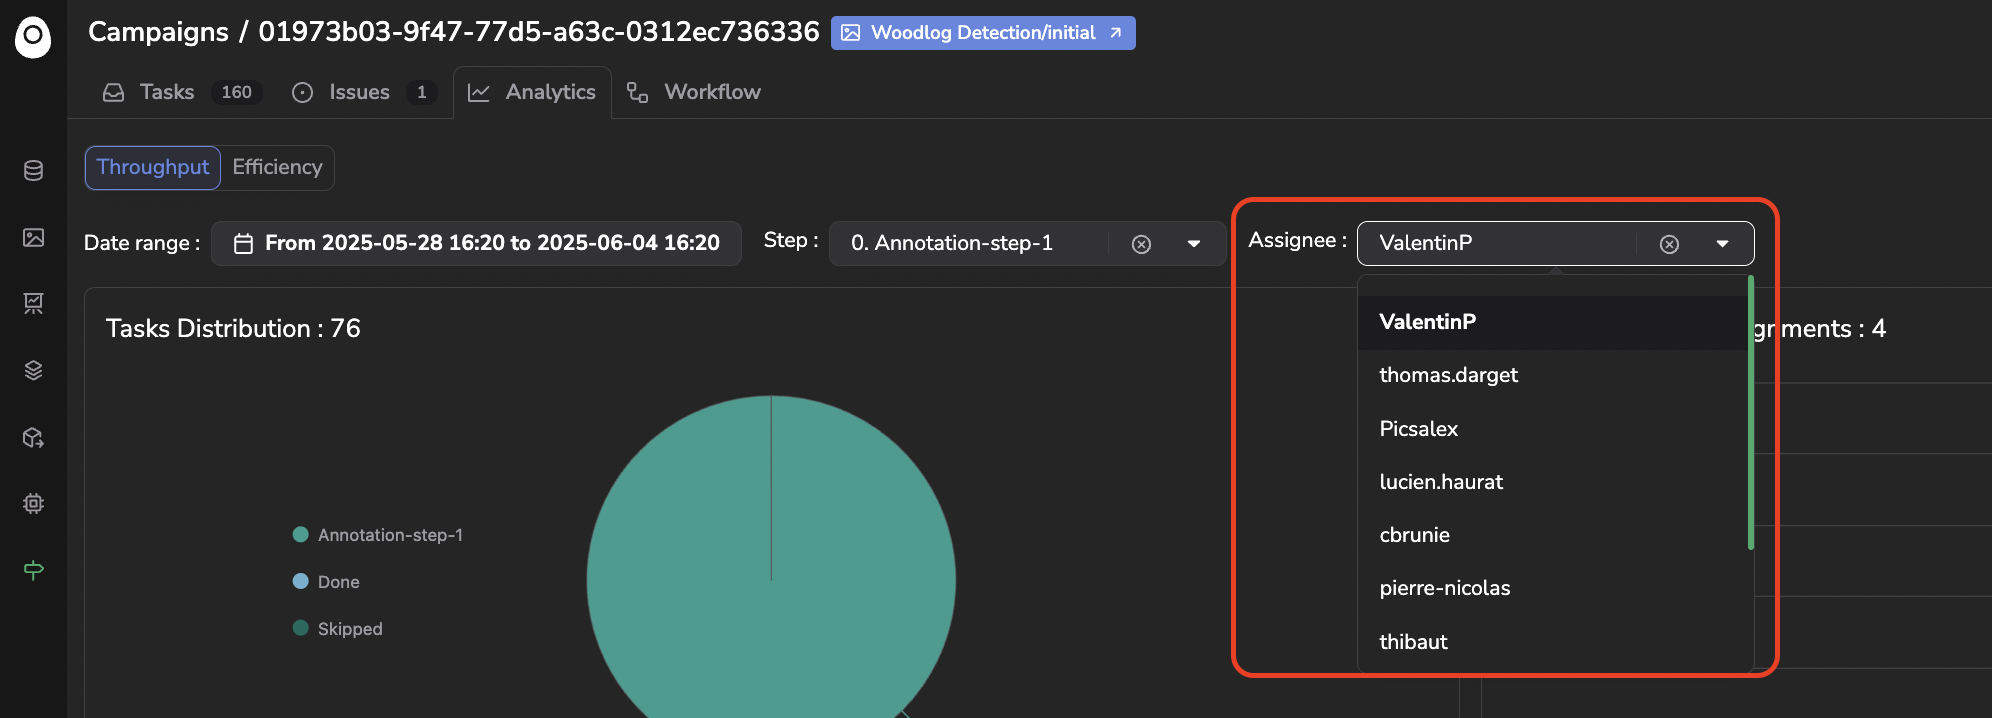
Filter by Assignee
B. Efficiency
The Efficiency tab displays graphs that are related to the time dedicated to the different steps of the Annotation Campaign in real-time.
In detail, the following metrics are displayed:
- Task Duration: Globalized time information on all the Tasks, the average time to complete a Task, and the minimum and maximum time of Task completion on the whole current Annotation Campaign.
- Closed Issues: The total number of Issues closed during the current Annotation Campaign.
- Opened Issues: The total number of Issues opened during the current Annotation Campaign
- Total Annotation Time: The total time spent on Annotation Tasks until now. A bar chart displays this duration on the selected Date Range based on the filter.
- Average Annotation Time: The average time spent on one Annotation Task until now. A bar chart displays this duration on the selected Date Range based on the filter.
- Total Review Time: The total time spent on Review Tasks until now. A bar chart displays this duration on the selected Date Range based on the filter.
- Average Review Time: The average time spent on one Review Task until now. A bar chart displays this duration on the selected Date Range based on the filter.

Efficiency Analysis
Once again, for each chart, you can filter the data displayed on the Date Range, the Step and the Assignee as shown below:
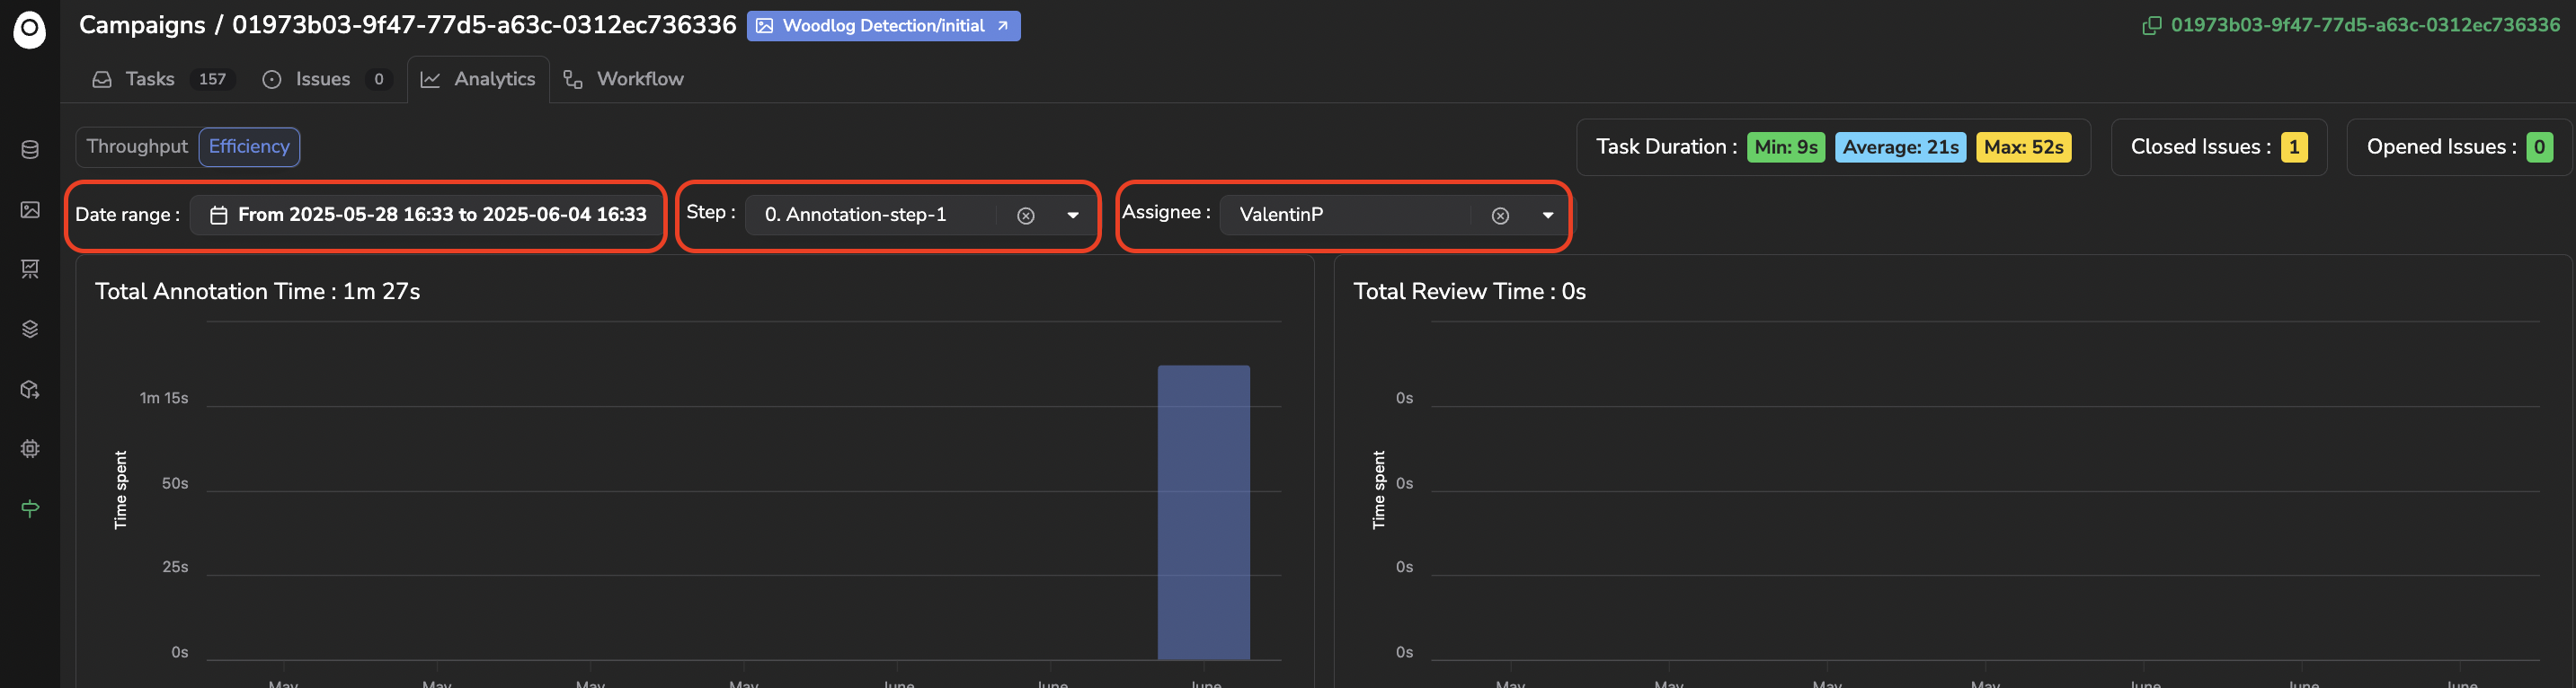
Filter Efficiency charts on data range, Step and Assignee
Updated about 1 year ago