Pipelines on Picsellia have been created to implement and automatize the Continuous Learning philosophy on a ModelVersion that is deployed in a given Deployment.
The main idea is to add PredictedAsset and associated Prediction (that needs to be validated by a human) in the DatasetVersion that has been used to train the currently deployed ModelVersion. With these additional Asset, the DatasetVersion will likely be more qualitative and if we retrain the ModelVersion with this improved DatasetVersion, the output ModelVersion will be more performing.
As you can imagine by implementing this philosophy we will really leverage the versioning systems offered by Picsellia on Models and Datasets. This way you will keep a clear and precise trace of DatasetVersion & ModelVersion after each retraining
To automatize this complex procedure, Picsellia allows you to create and personalize your own Pipeline. A Pipeline is composed of:
Training Data: Indicate to the current Deployment the DatasetVersion used to train the deployed ModelVersion. It is for instance used to compute the Oulier score of PredictedAsset
Feedback Loop: Defines the DatasetVersion that will be enriched by the PredictedAsset and reviewed Prediction pushed to the Pipeline.
Continuous Training: Defines when & how the retraining of the ModelVersion should be launched
Continuous Deployment: Defines the deployment strategy to adopt with the retrained ModelVersion
In the end, once Pipelines are fully configured, the idea is that the only manual action needed to retrain a ModelVersion is the review of the Prediction (detailed here) and their submission to the Feedback Loop.
👍
ModelVersion performing over time
With PicselliaPipelines you will be able to easily enrich your DatasetVersion with relevant PredictedAsset coming from the ground (or the production) based on criteria such as Outlier score and retrain frequently your ModelVersion to anticipate any Data Drift and ensure the ModelVersion performances over time!
2. Setup Training Data
The Training Data basically indicates for the current Deployment, which DatasetVersion has been used astraining dataset to train the deployed ModelVersion.
This way Picsellia will be able to compare any further PredictedAsset logged to the Deployment with the DatasetVersion defined as Training Data and this way compute metrics such as Outlier score and KS Drift.
When a Deployment is created, the Training Data is not initialized, and until it is, no Outlier score will be computed for the Deployment. Please also note that this computation is not retroactive this is why it is highly recommended to set it up as soon as theDeployment is created.
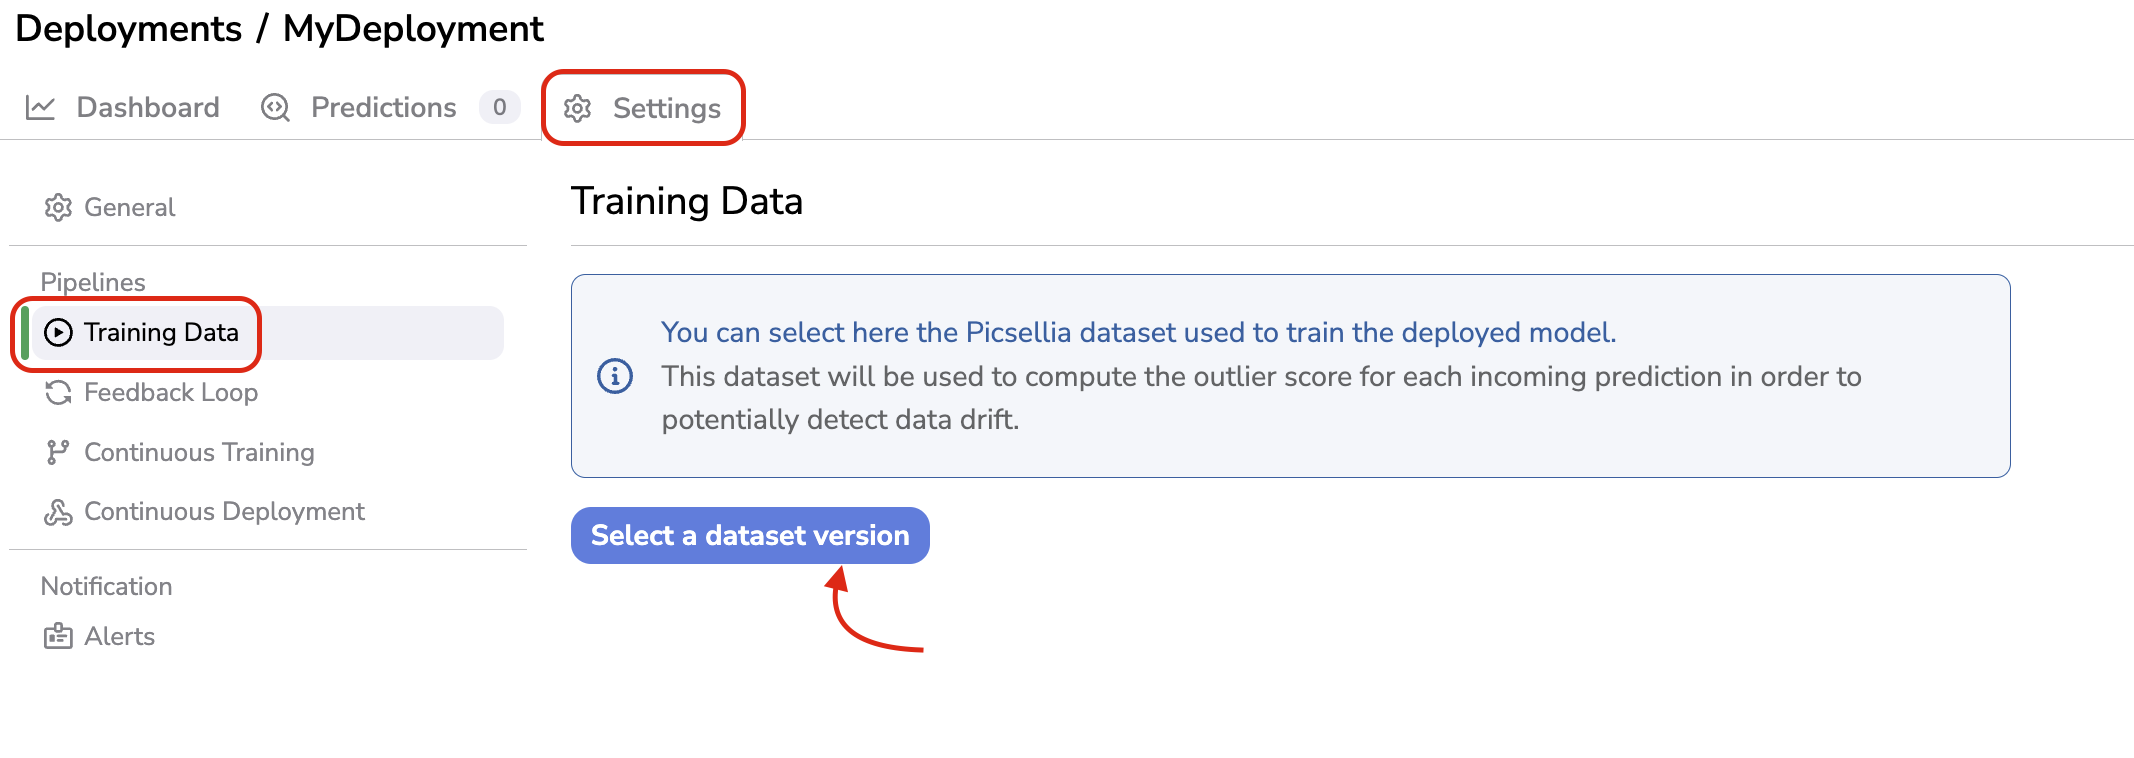
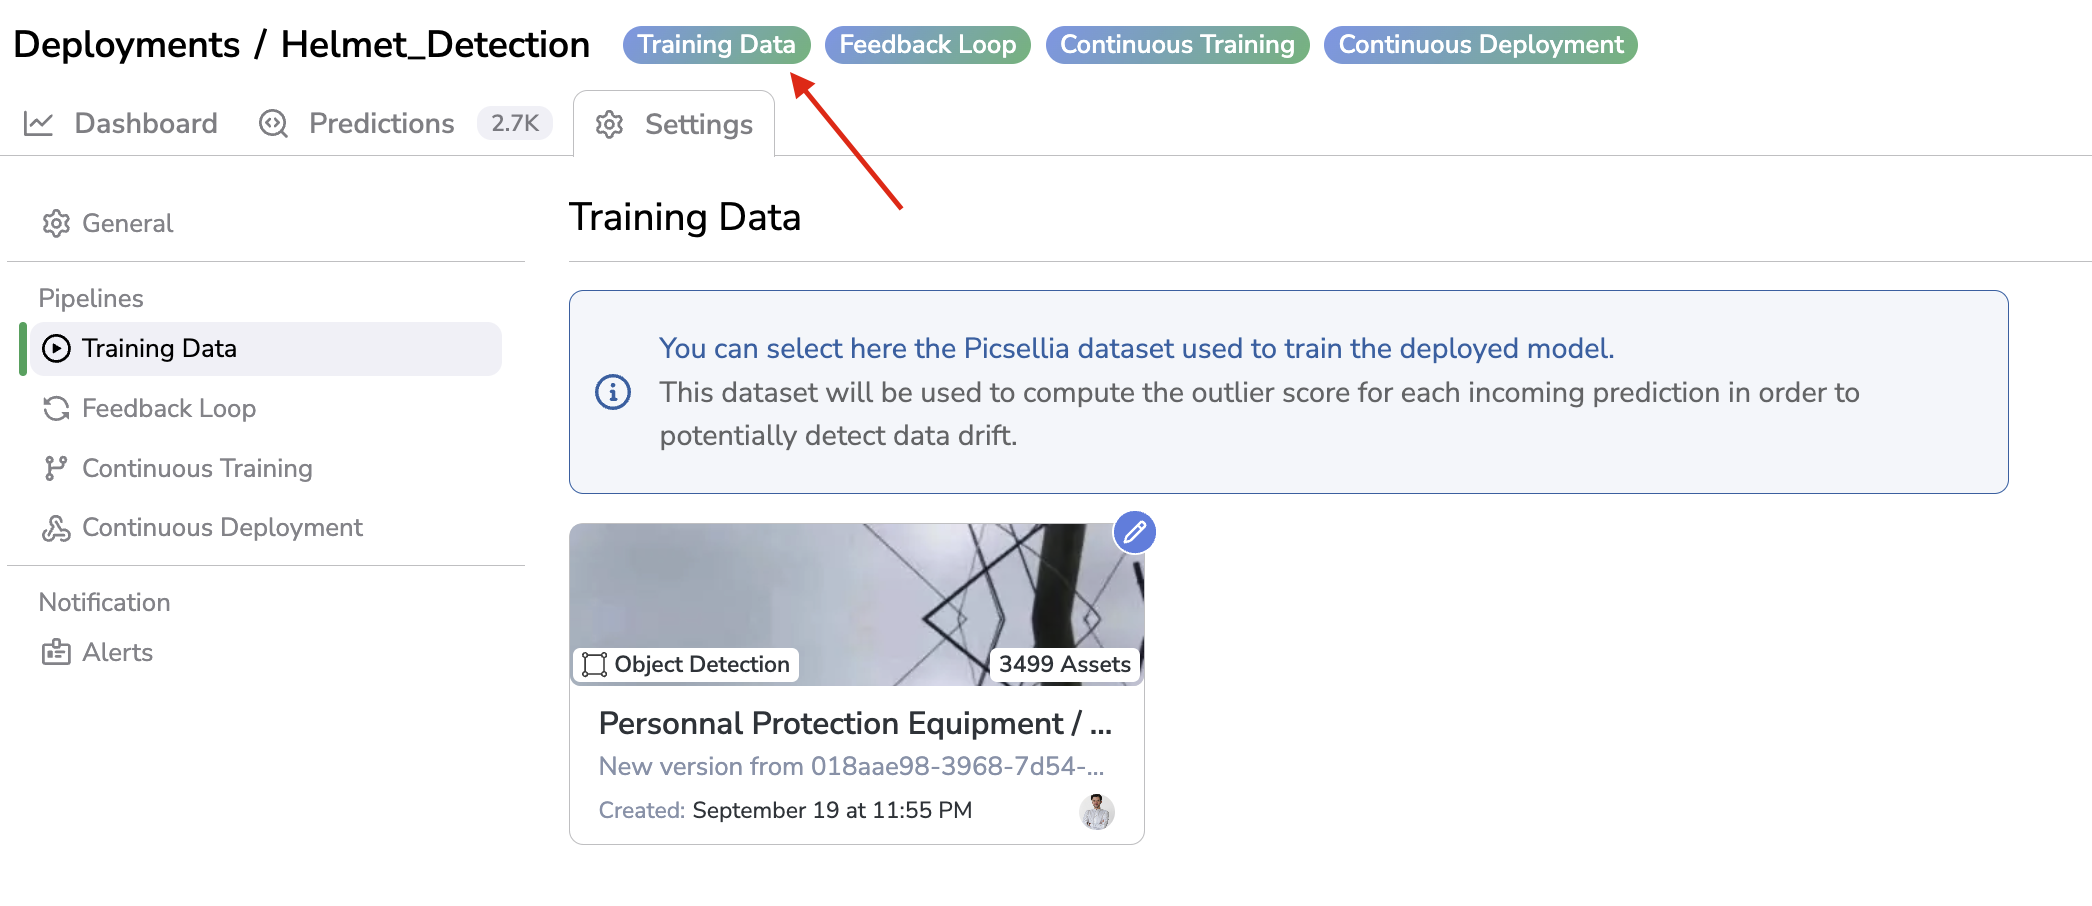
To define the Training Data, you have to go the the Settings of the Deployment, in the Training Data tab and click on Select a dataset version:
Define Training Data
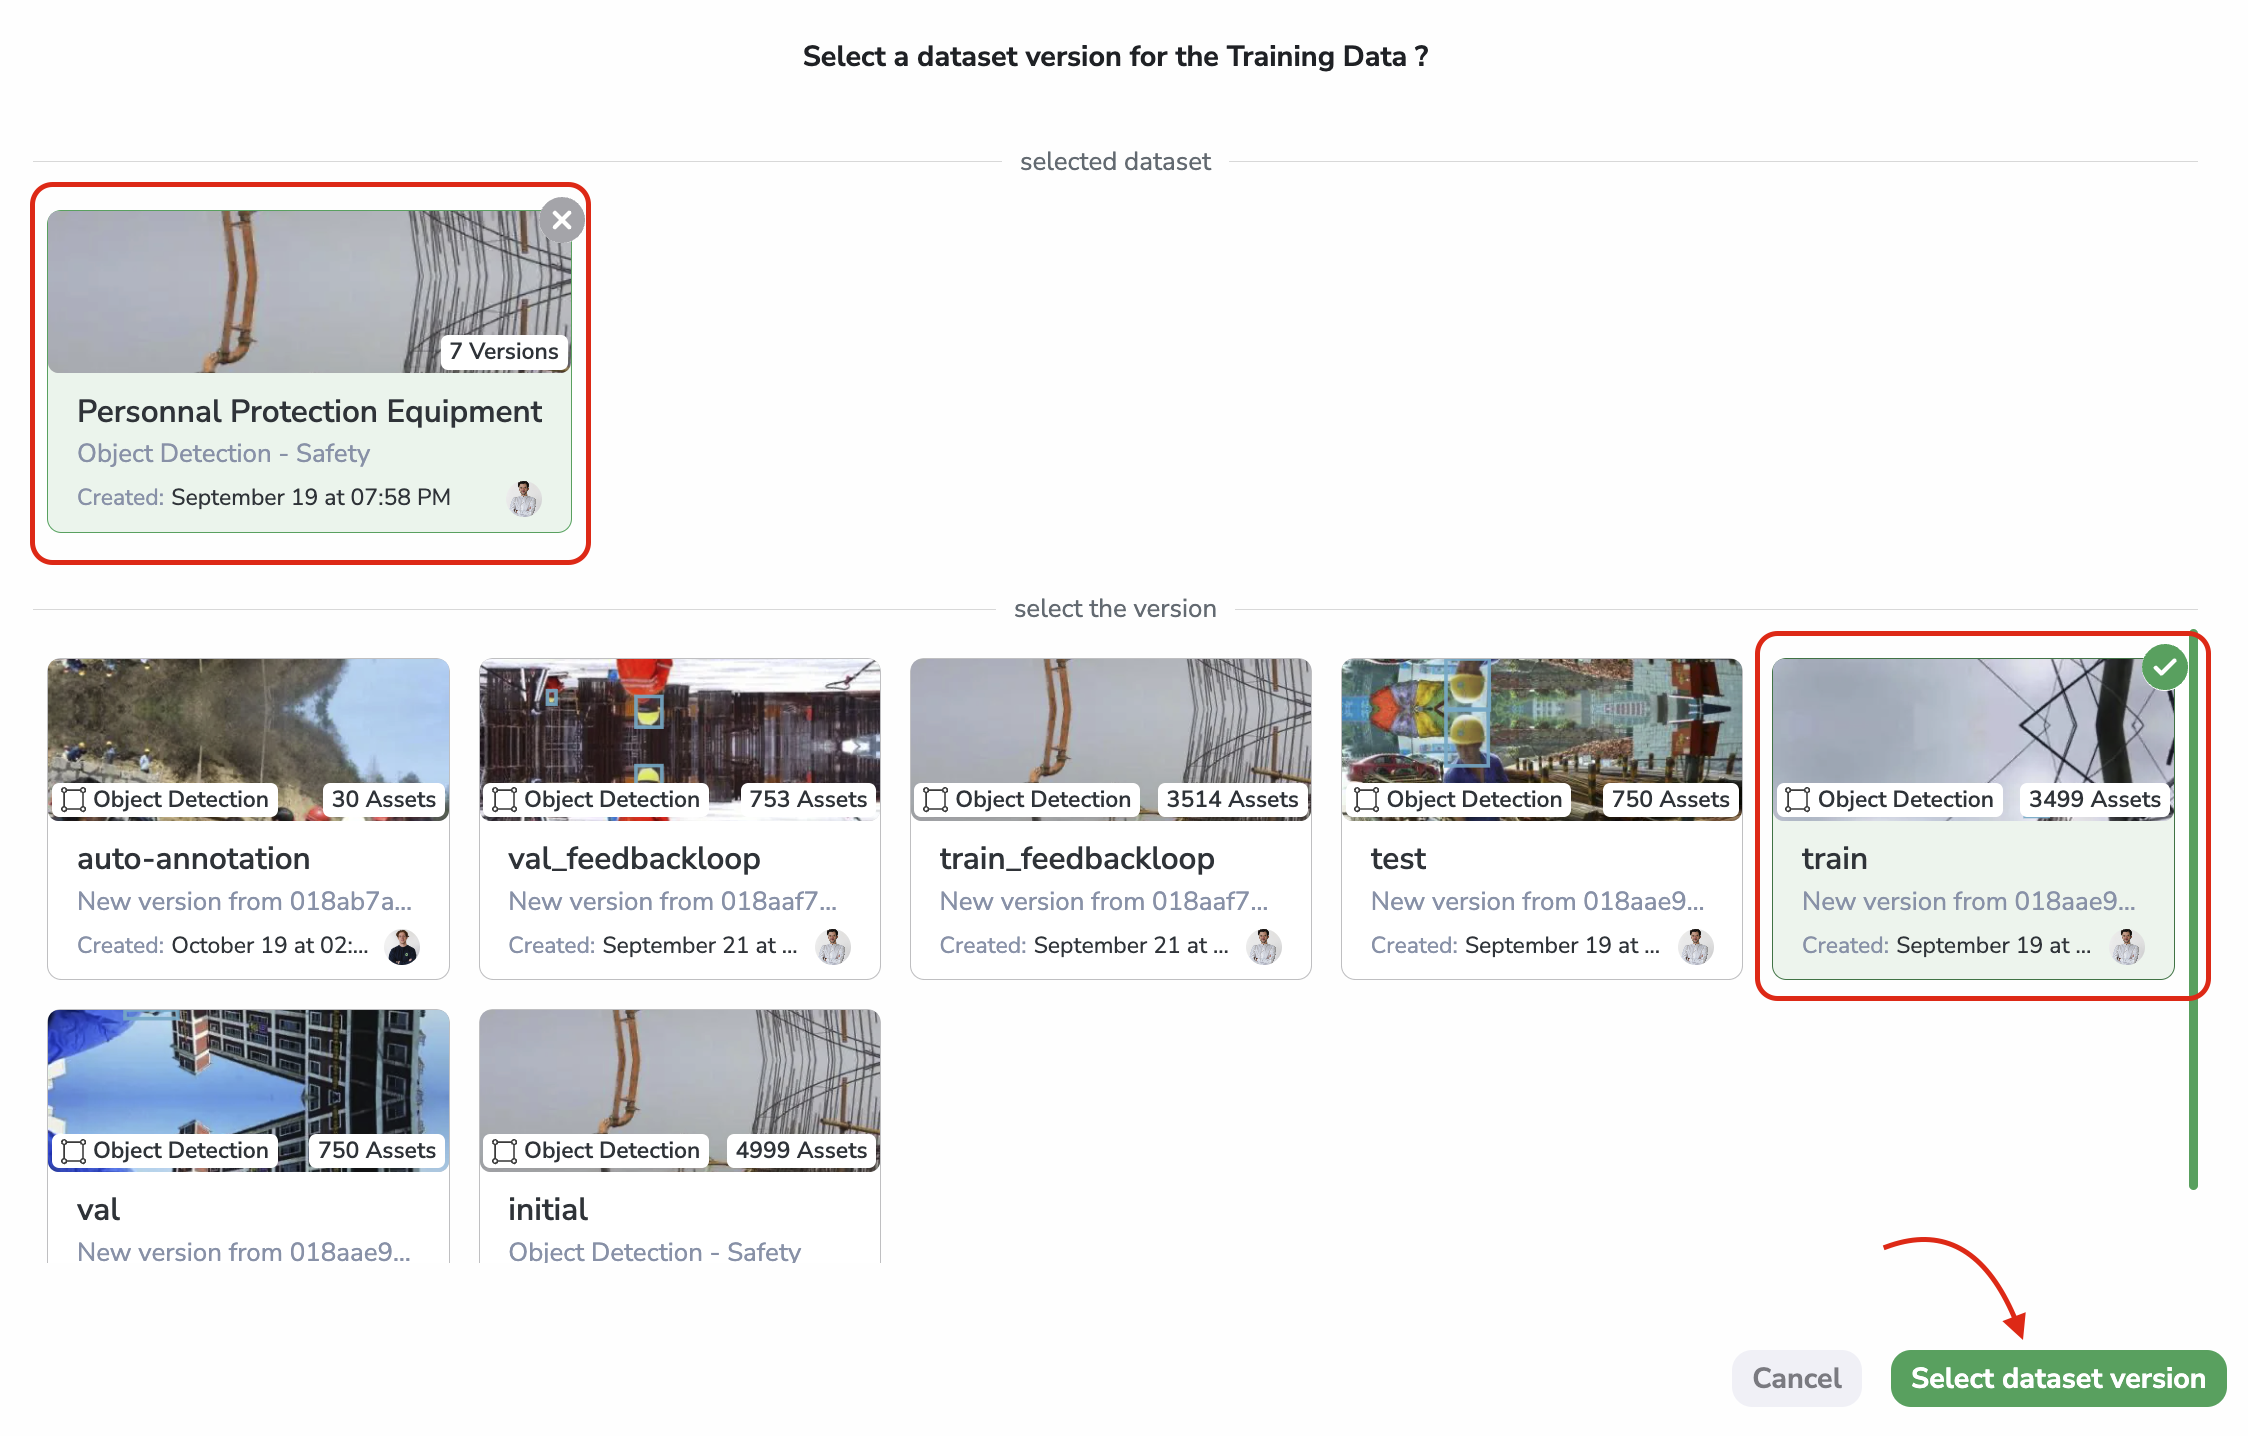
Then, a modal will open allowing you to select the Dataset and DatasetVersion used as a training dataset to train the deployed ModelVersion. To complete it, click on Select dataset version:
Selection of Training Data
🚧
Training dataset
In case several DatasetVersion have been attached to the source Experiment of the deployed ModelVersion, it is the one used to actually train (rather than test or evaluate) that needs to be selected.
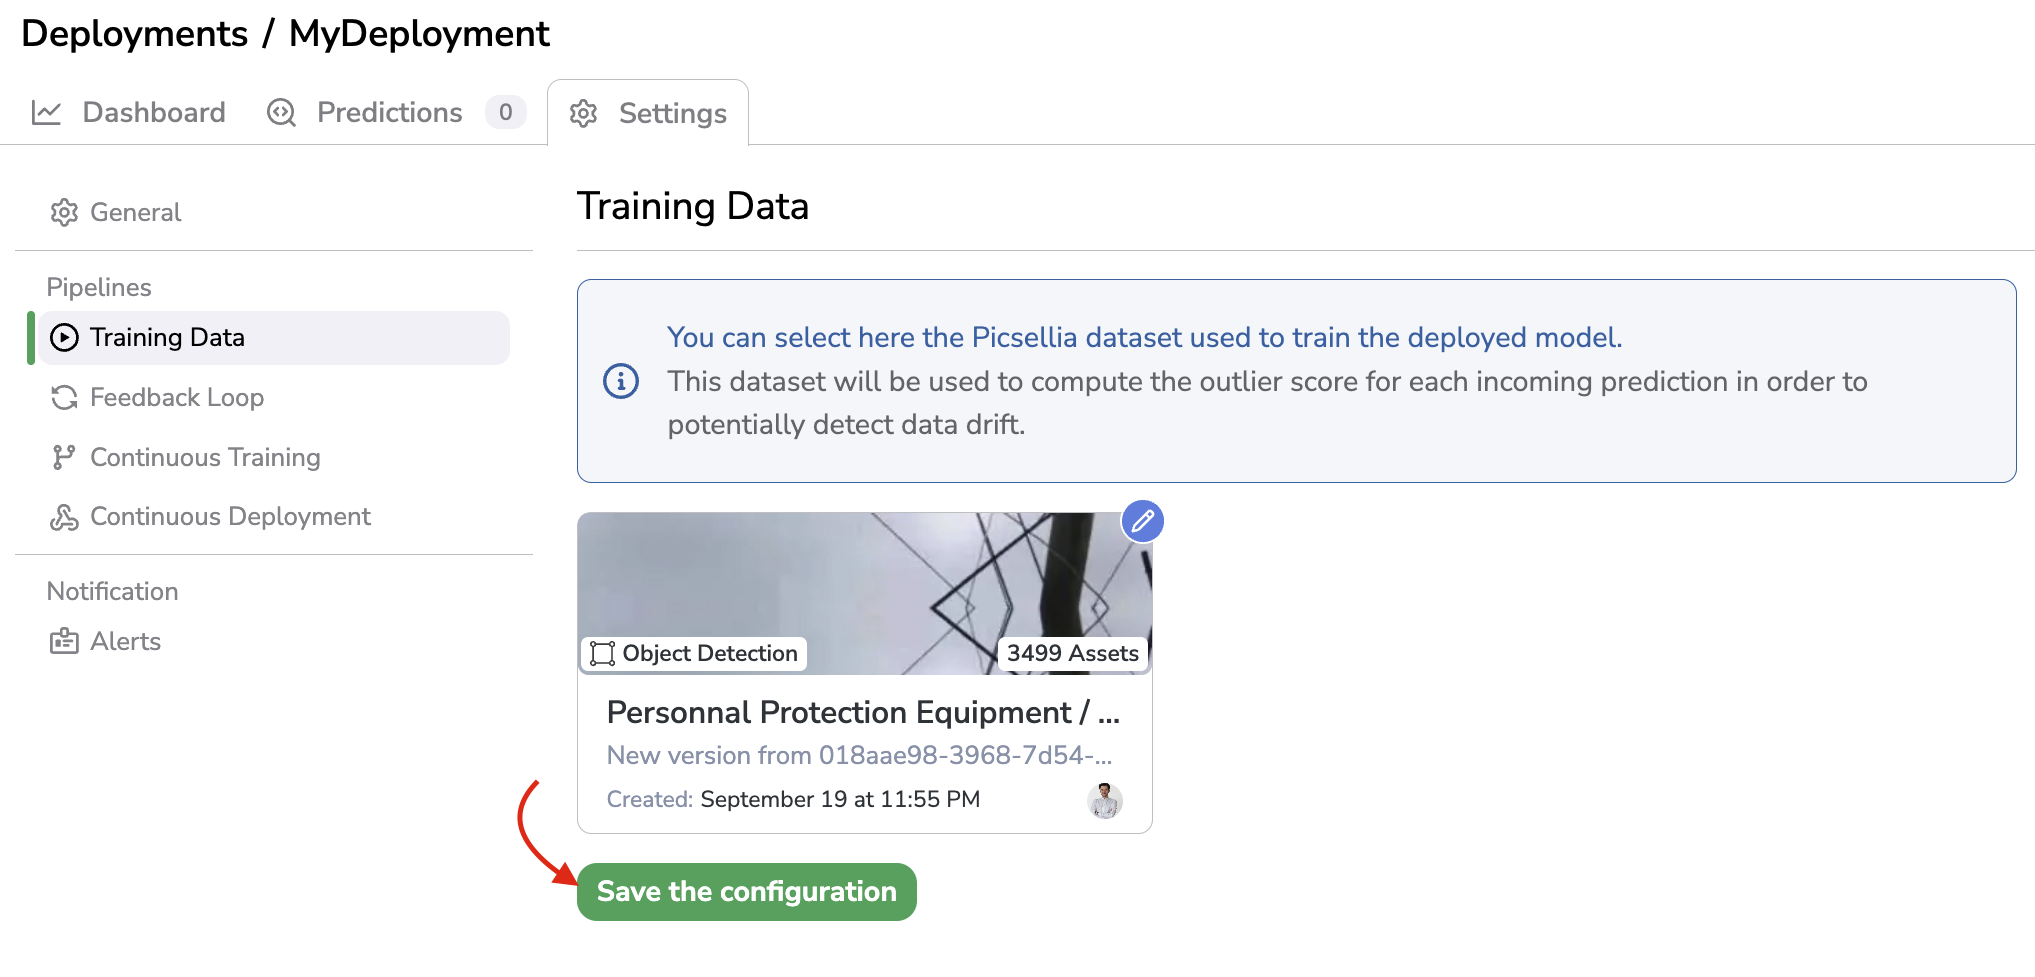
Once the Training Data has been selected, you need to click on Save the configuration to launch the compute.
Save the configuration
This compute is done by Picsellia to process the DatasetVersion designed as Training Data and be able to compare any further PredictedAsset with it and as a consequence provide the related Outlier Score.
🚧
This operation can take up to several minutes
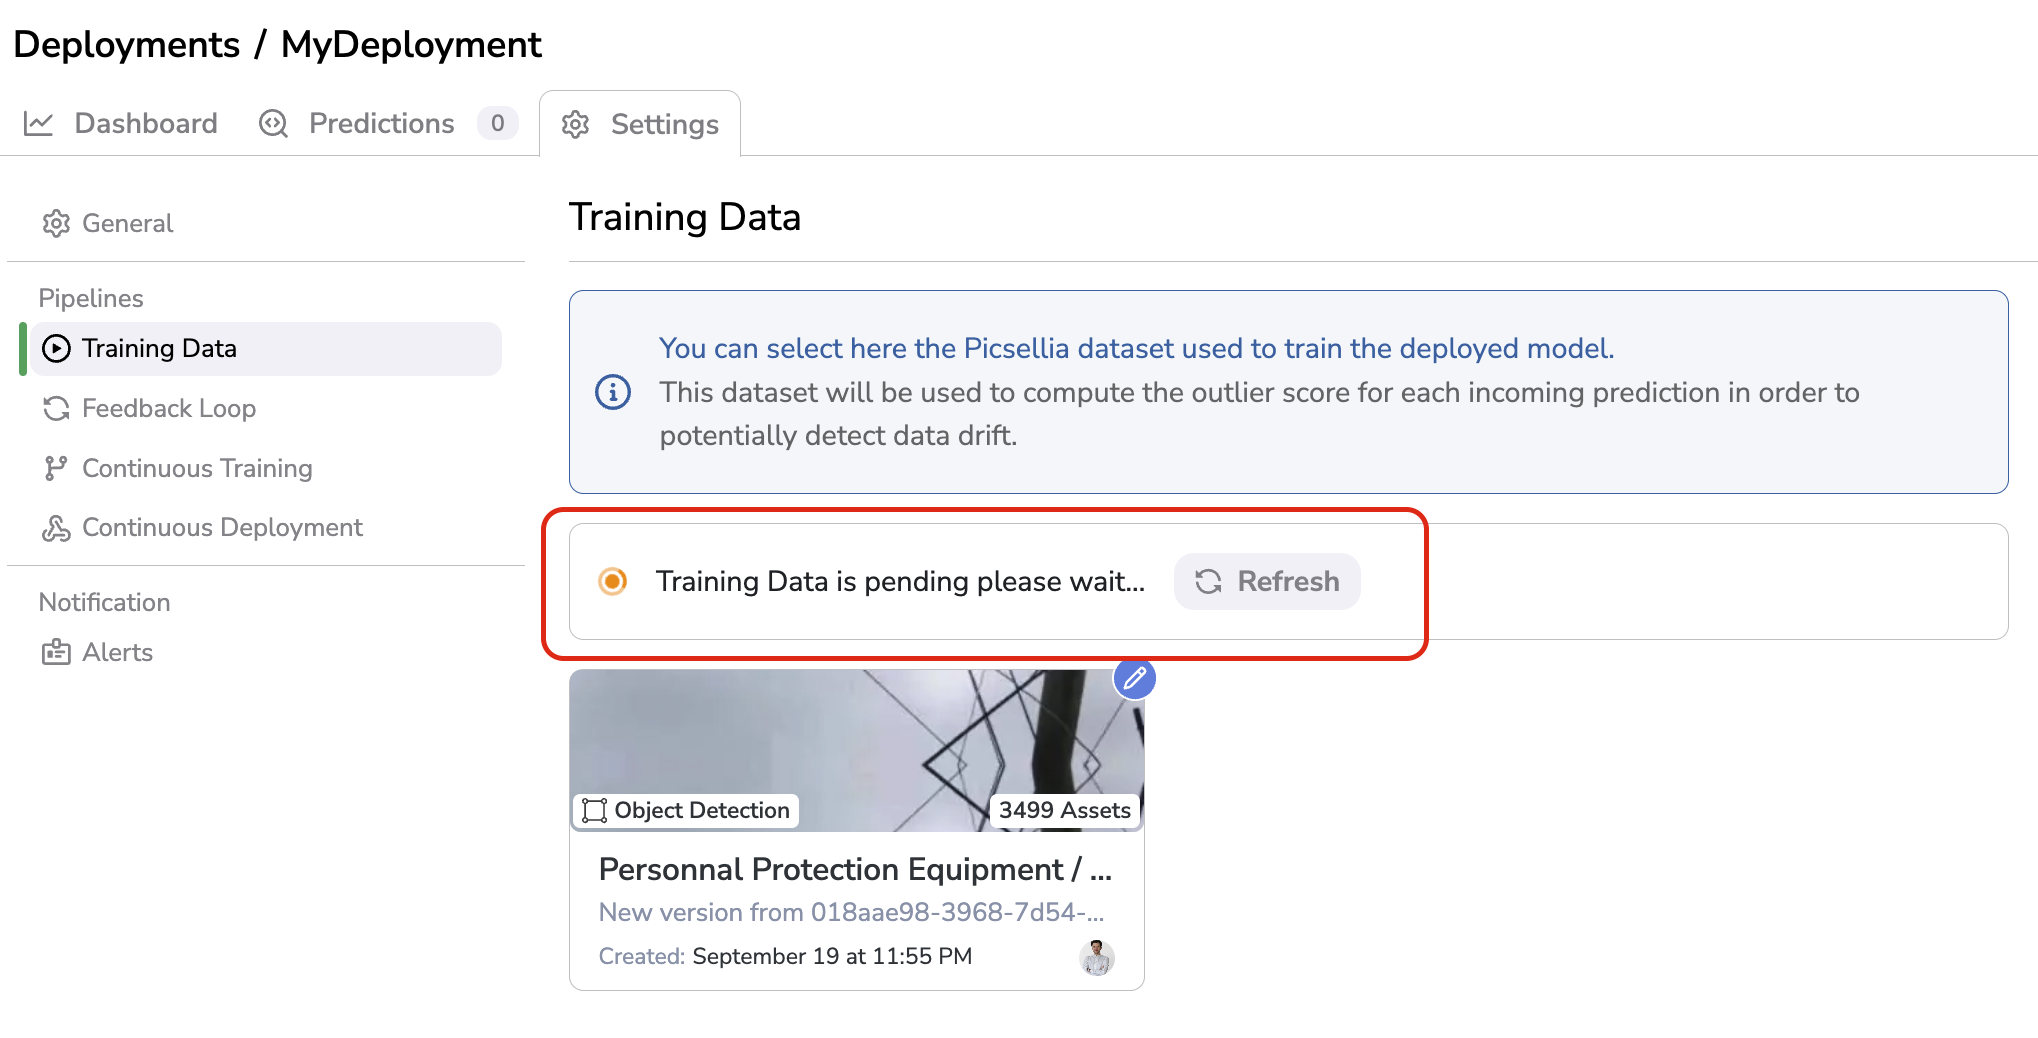
This compute can take up to several minutes depending on the DatasetVersion size. As shown below the status of this compute is clearly displayed:
Training Data computation
However this computation is an asynchronous task, meaning that you can leave the page without stopping the action. You can also follow its completion from the Jobs panel.
Once Training Data is properly initialized, a blue/green badge appears in the header of the Deployment
Training Data badge
3. Setup Feedback Loop
The Feedback Loop is initialized by defining the DatasetVersion that will receive as Asset the PredictedAsset that are pushed through the Pipeline.
To configure the Feedback Loop, you have to go the Settings of the Deployment, in the Feedback Loop tab and click on Select dataset versions:
Configure Feedback Loop
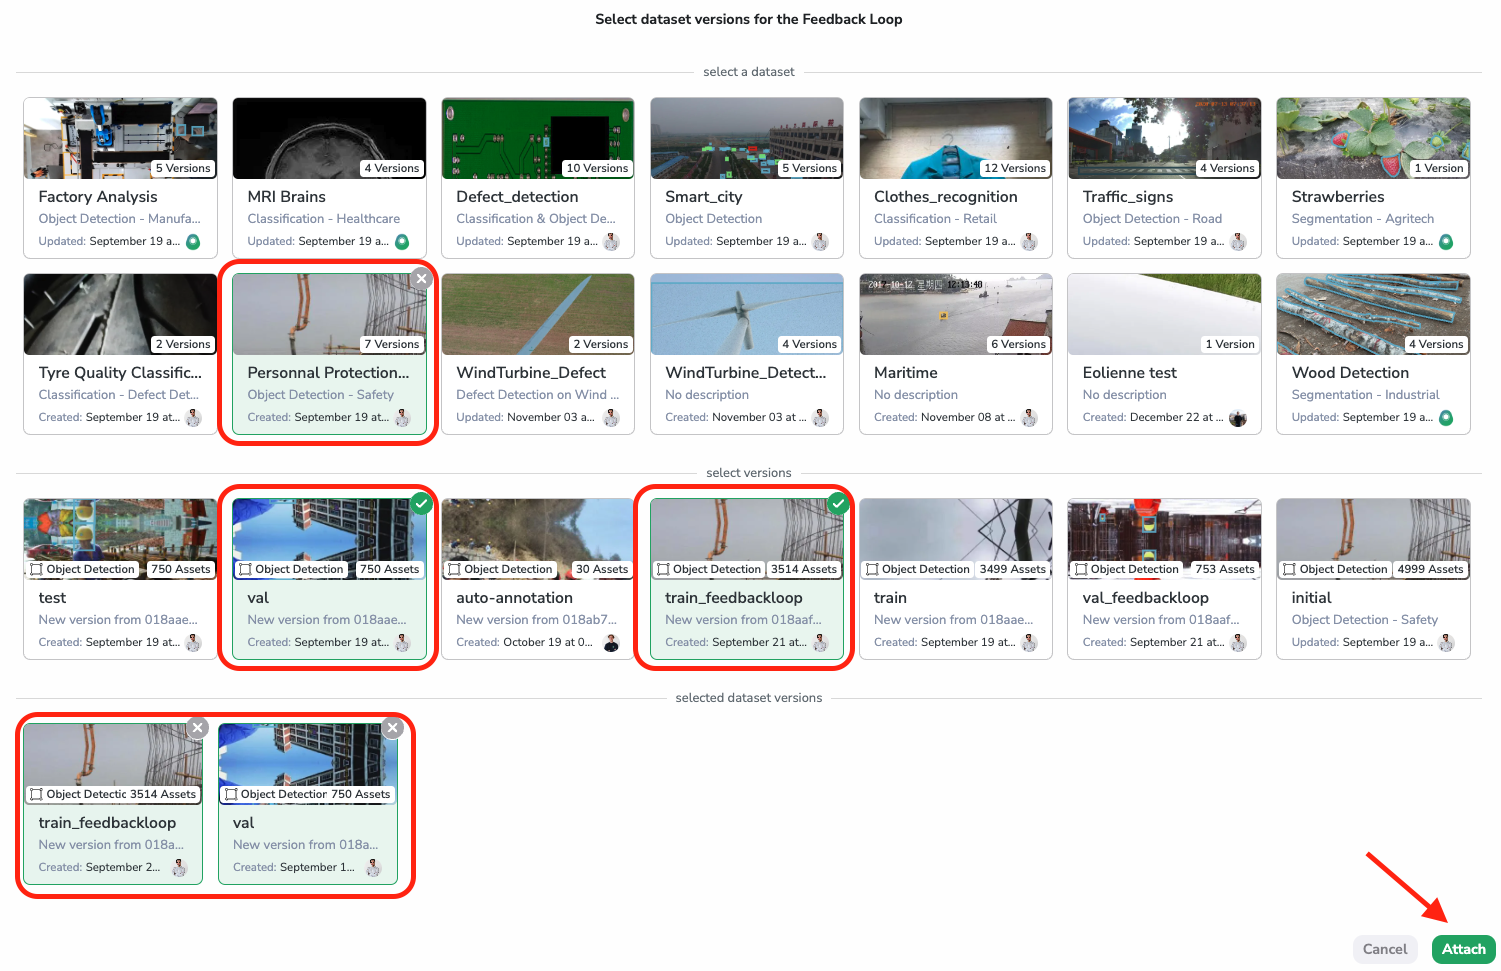
Then, a modal will open allowing you to select the Dataset and DatasetVersion used as training dataset to train the deployed ModelVersion. To complete it, click on Select dataset versions:
Selection of DatasetVersion for Feedback Loop
💡
You can select several DatasetVersion
One Deployment can have several DatasetVersion defined in its Feedback Loop. As you can see above, the modal allows the user to select several DatasetVersion (from the same Dataset or not).
Each time a PredictedAsset is pushed to the Pipeline, the user can choose to send it to all DatasetVersion selected for Feedback Loop or only some of them.
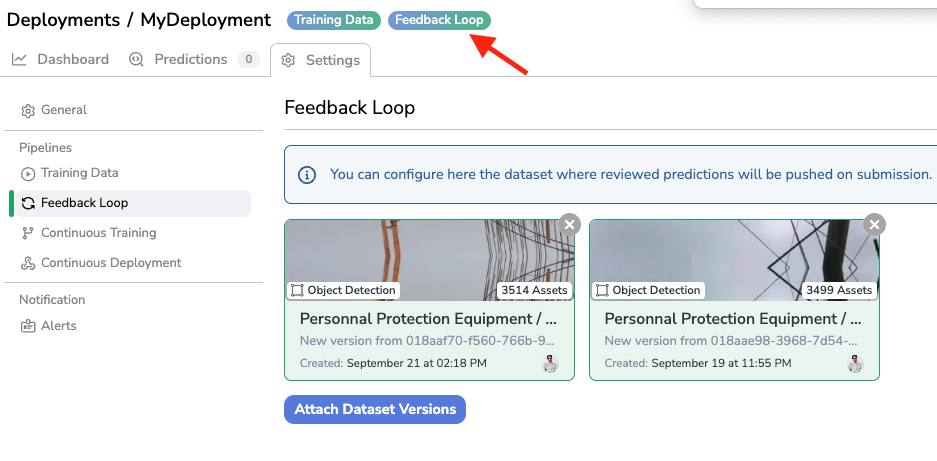
Once properly selected, the DatasetVersion selected for the Feedback Loop are displayed and a new badge appears in the header to indicate that the Feedback Loop has been configured.
Feedback Loop configured
For sure, you can delete or add new DatasetVersion in the Feedback Loop configuration of the current Deployment by clicking again on Attach Dataset Versions.
👍
Leverage Dataset Versionning System
As you might have understood, the DatasetVersion that will be defined in the Feedback Loop configuration is supposed to be enriched over time, this is why for treacbility puprosers, a good practice is to create a new version of thisDatasetVersion and use this new one in the Feedback Loop. The process is detailed here.
This way you will keep the initial version of the DatasetVersion and you will also have another one that will be the one enriched by the Feedback Loop mecanism.
It is also very important to note that consistency is key when defining such a mechanism between a ModelVersion, a Deployment and a DatasetVersion.
Picsellia is making some verification to ensure that the LabelMap or the Detection Type of the deployed ModelVersion and the DatasetVersion defined in the Feedback Loop are the same for instance, but as a user, you are also in charge of ensuring consistency at each step of a Computer Vision project.
Now that the Feedback Loop is properly initialized, PredictedAsset can be submitted to the Pipeline and be added as Asset in the defined DatasetVersion, as detailed here.
4. Setup Continuous Training
The Continous Training is initialized by defining when and how the retraining of the deployedModelVersion should be launched.
Basically in this part, we will define the Experiment that will be created and executed once the defined trigger is launched.
ThisExperiment will take a Base architecture the ModelVersion deployed in the current Deployment.
From the Continous Training tab, you can define:
The Project in which the Experiment should be created
The DatasetVersion to be attached to the Experiment
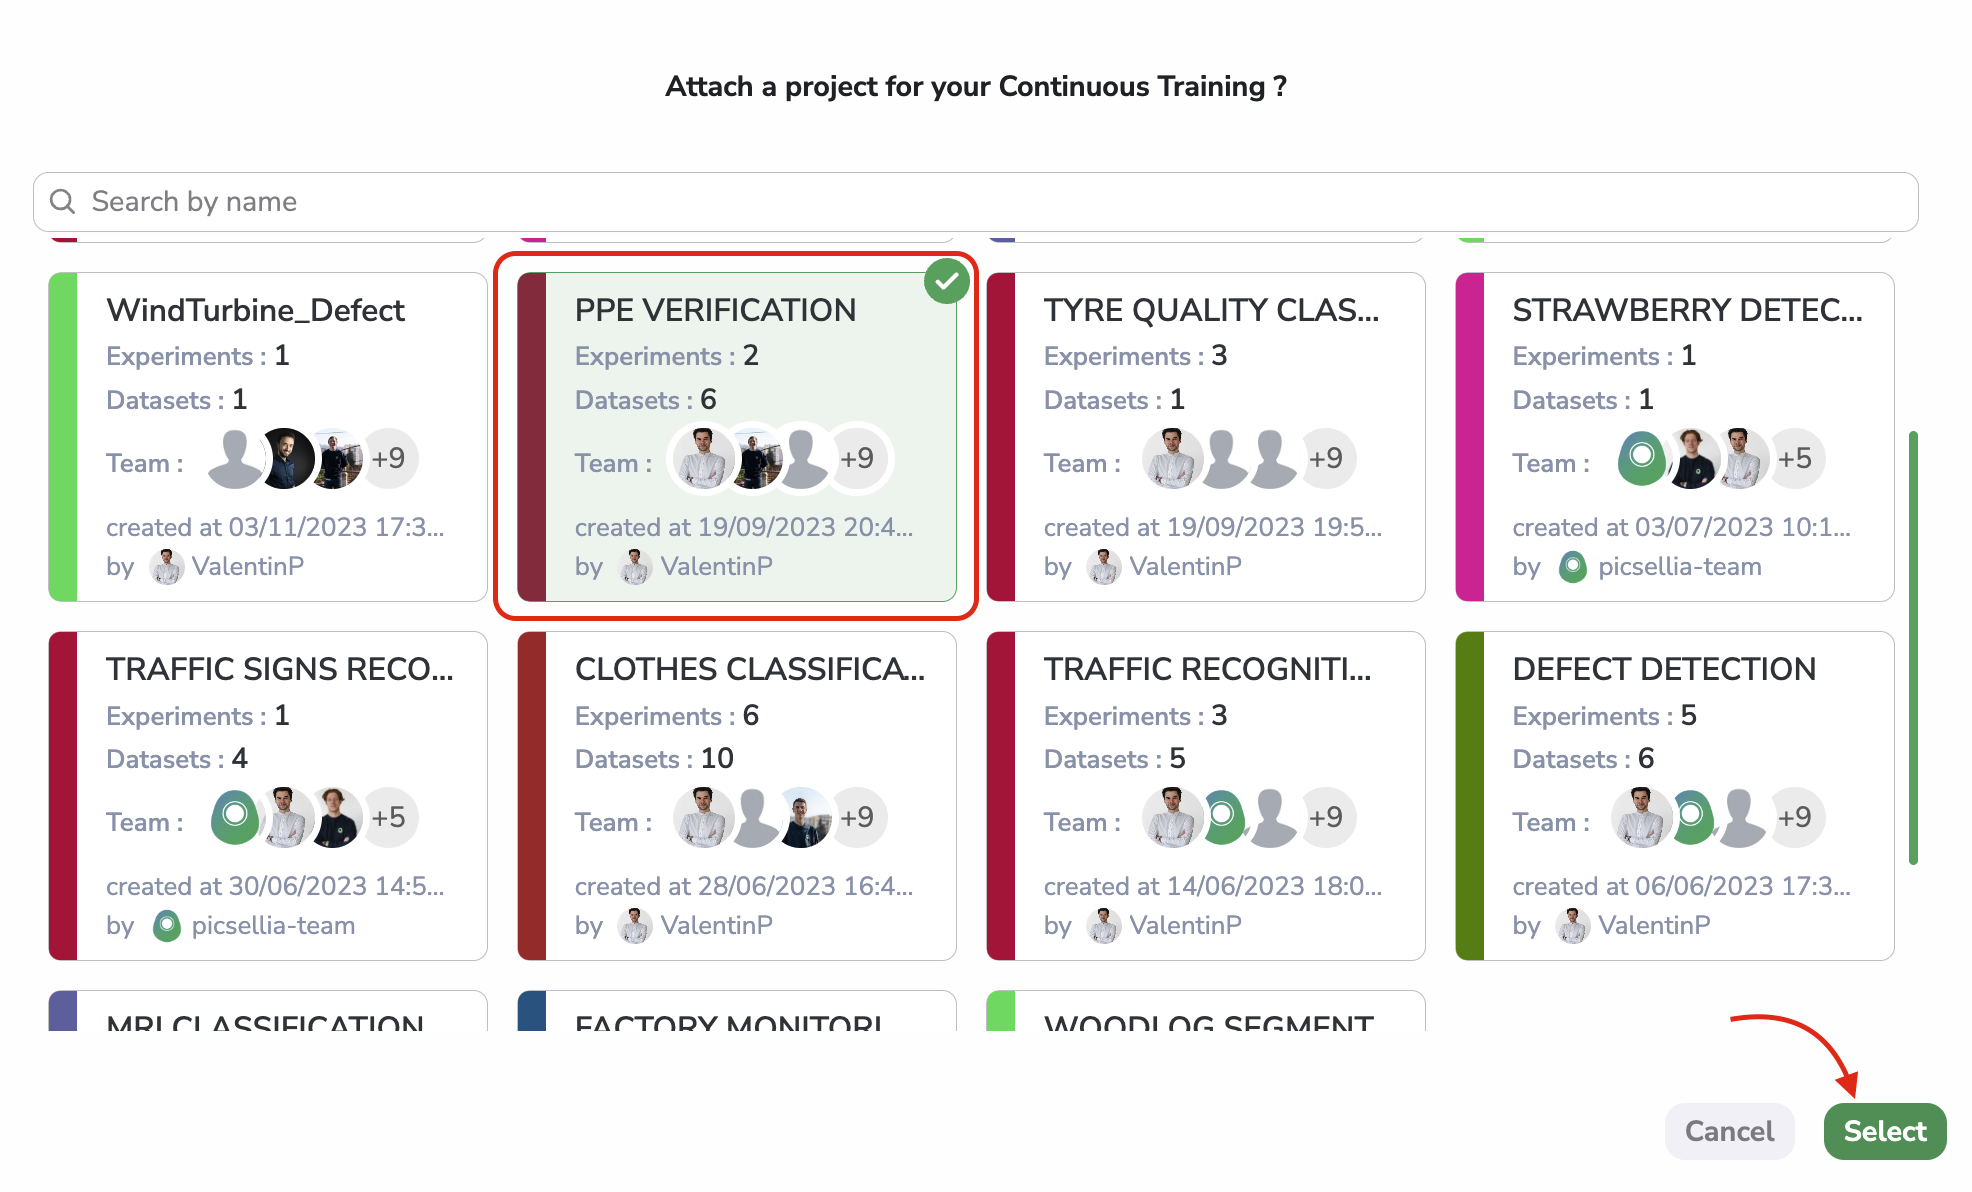
First of all, you can select the Project in which the Experiment should be created by clicking on Select a project and selecting the Project in the modal. A good practice is to select the same Project as the one containing the source Experiment of the deployed ModelVersion.
Project selection
B. DatasetVersion
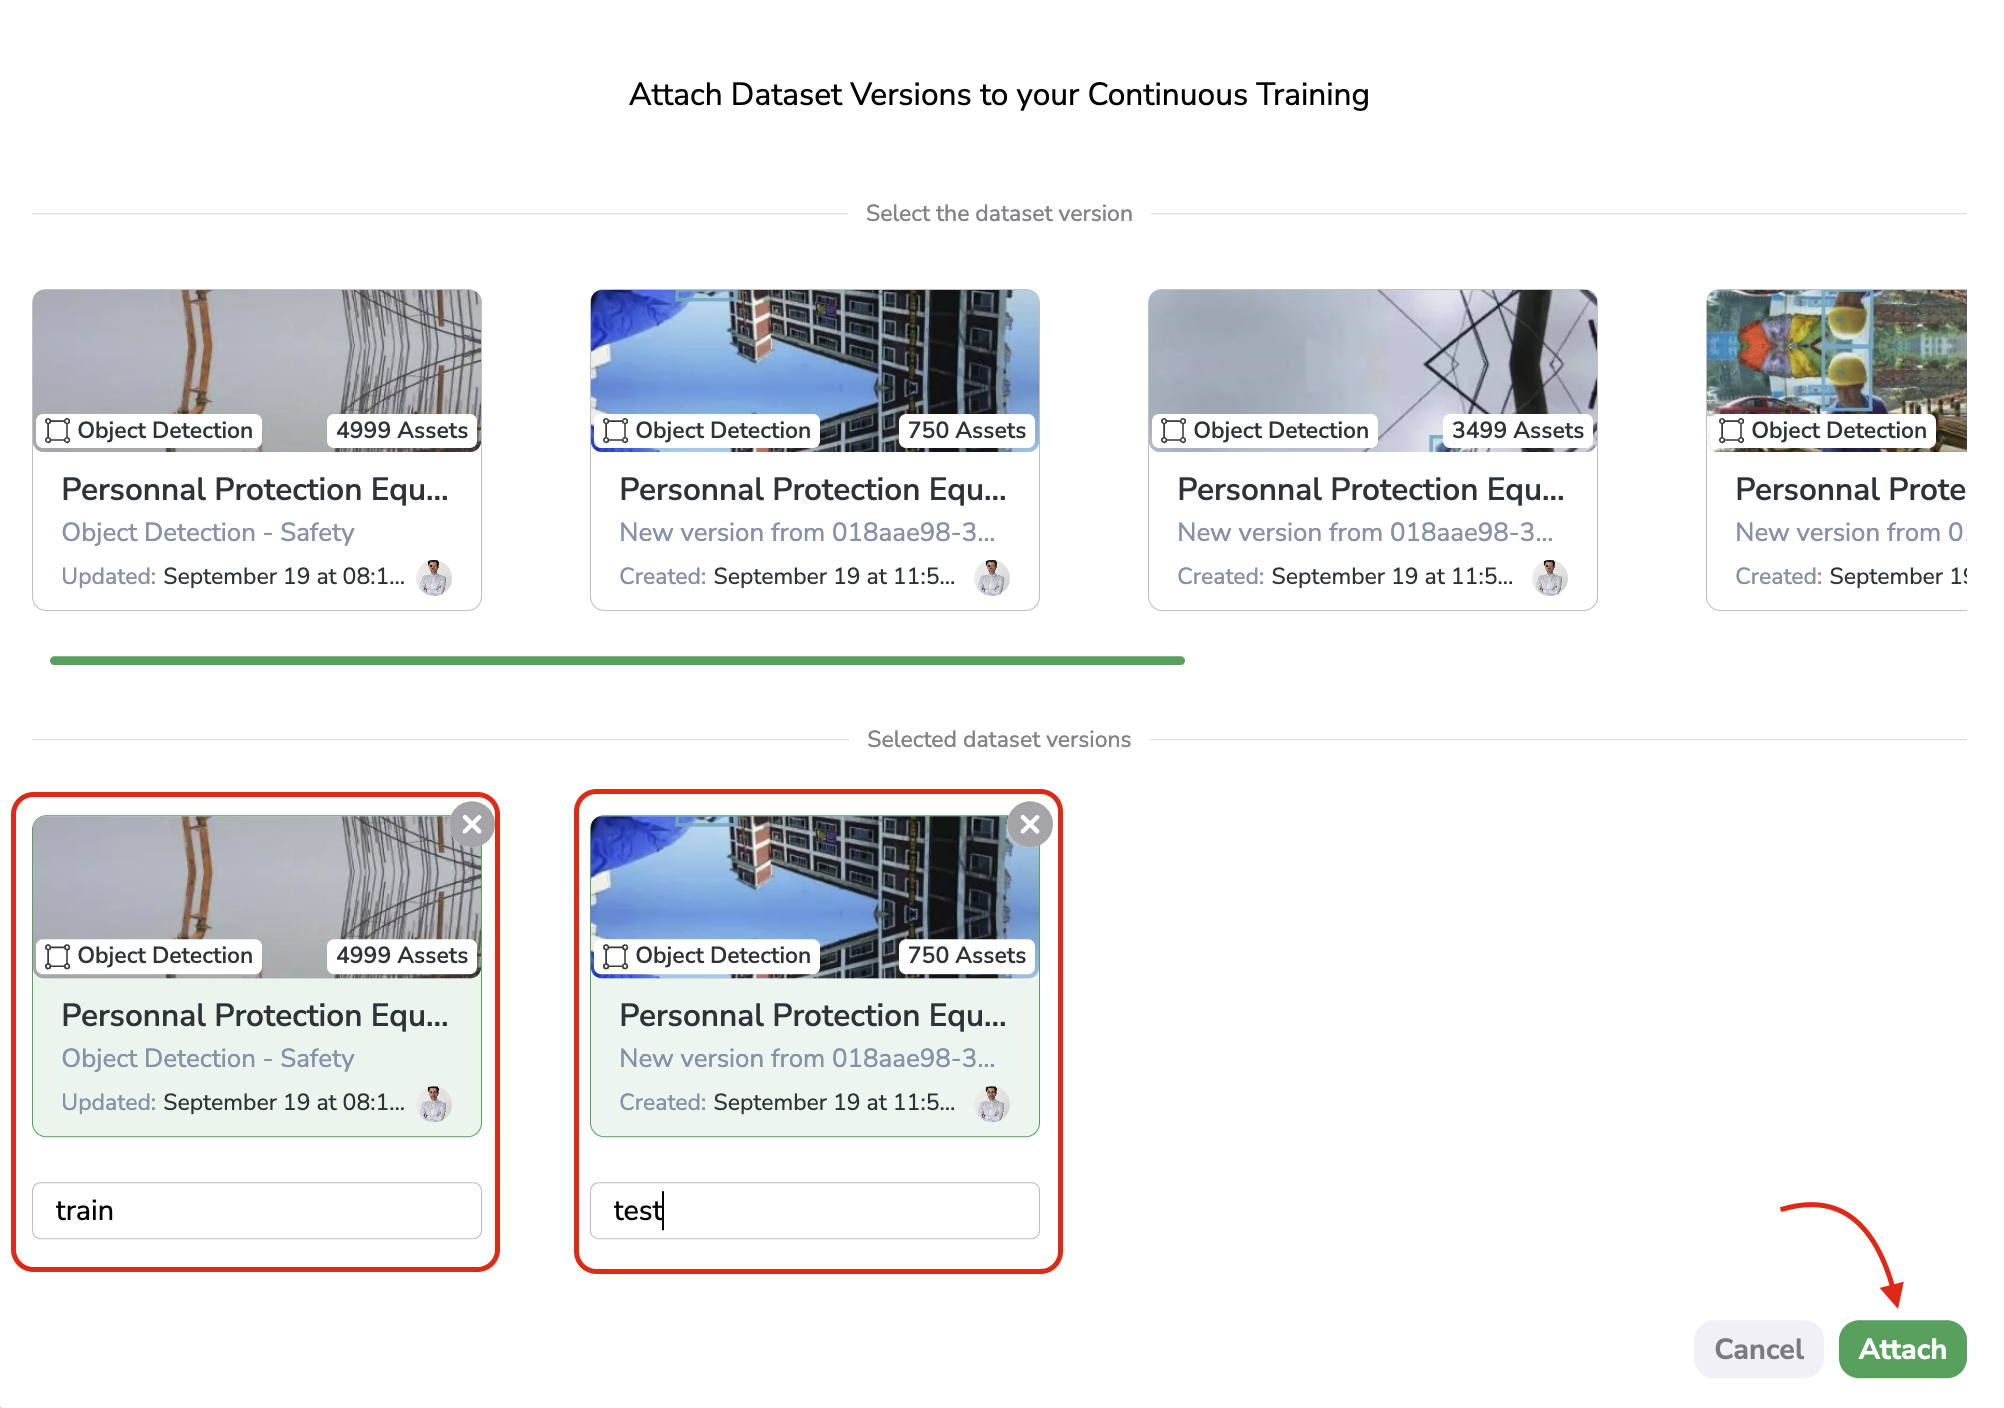
Then, you will be able to select the DatasetVersion to attach to the Experiment that will be created by the Continous Training once the trigger is reached. You can choose your DatasetVersion among the ones attached to the Project selected before by clicking on Attach Dataset versions.
As is the case when creating an Experiment manually, you need to select the DatasetVersion that will be attached and also prompt an Alias for all of them. Please note that if the deployed ModelVersion owns some Dataset Constraints the modal will be adapted accordingly. Please refer to this page for further details on the attachment of DatasetVersion in Continuous Training configuration as it is almost the same as in the Experiment Creation Form.
DatasetVersion selection
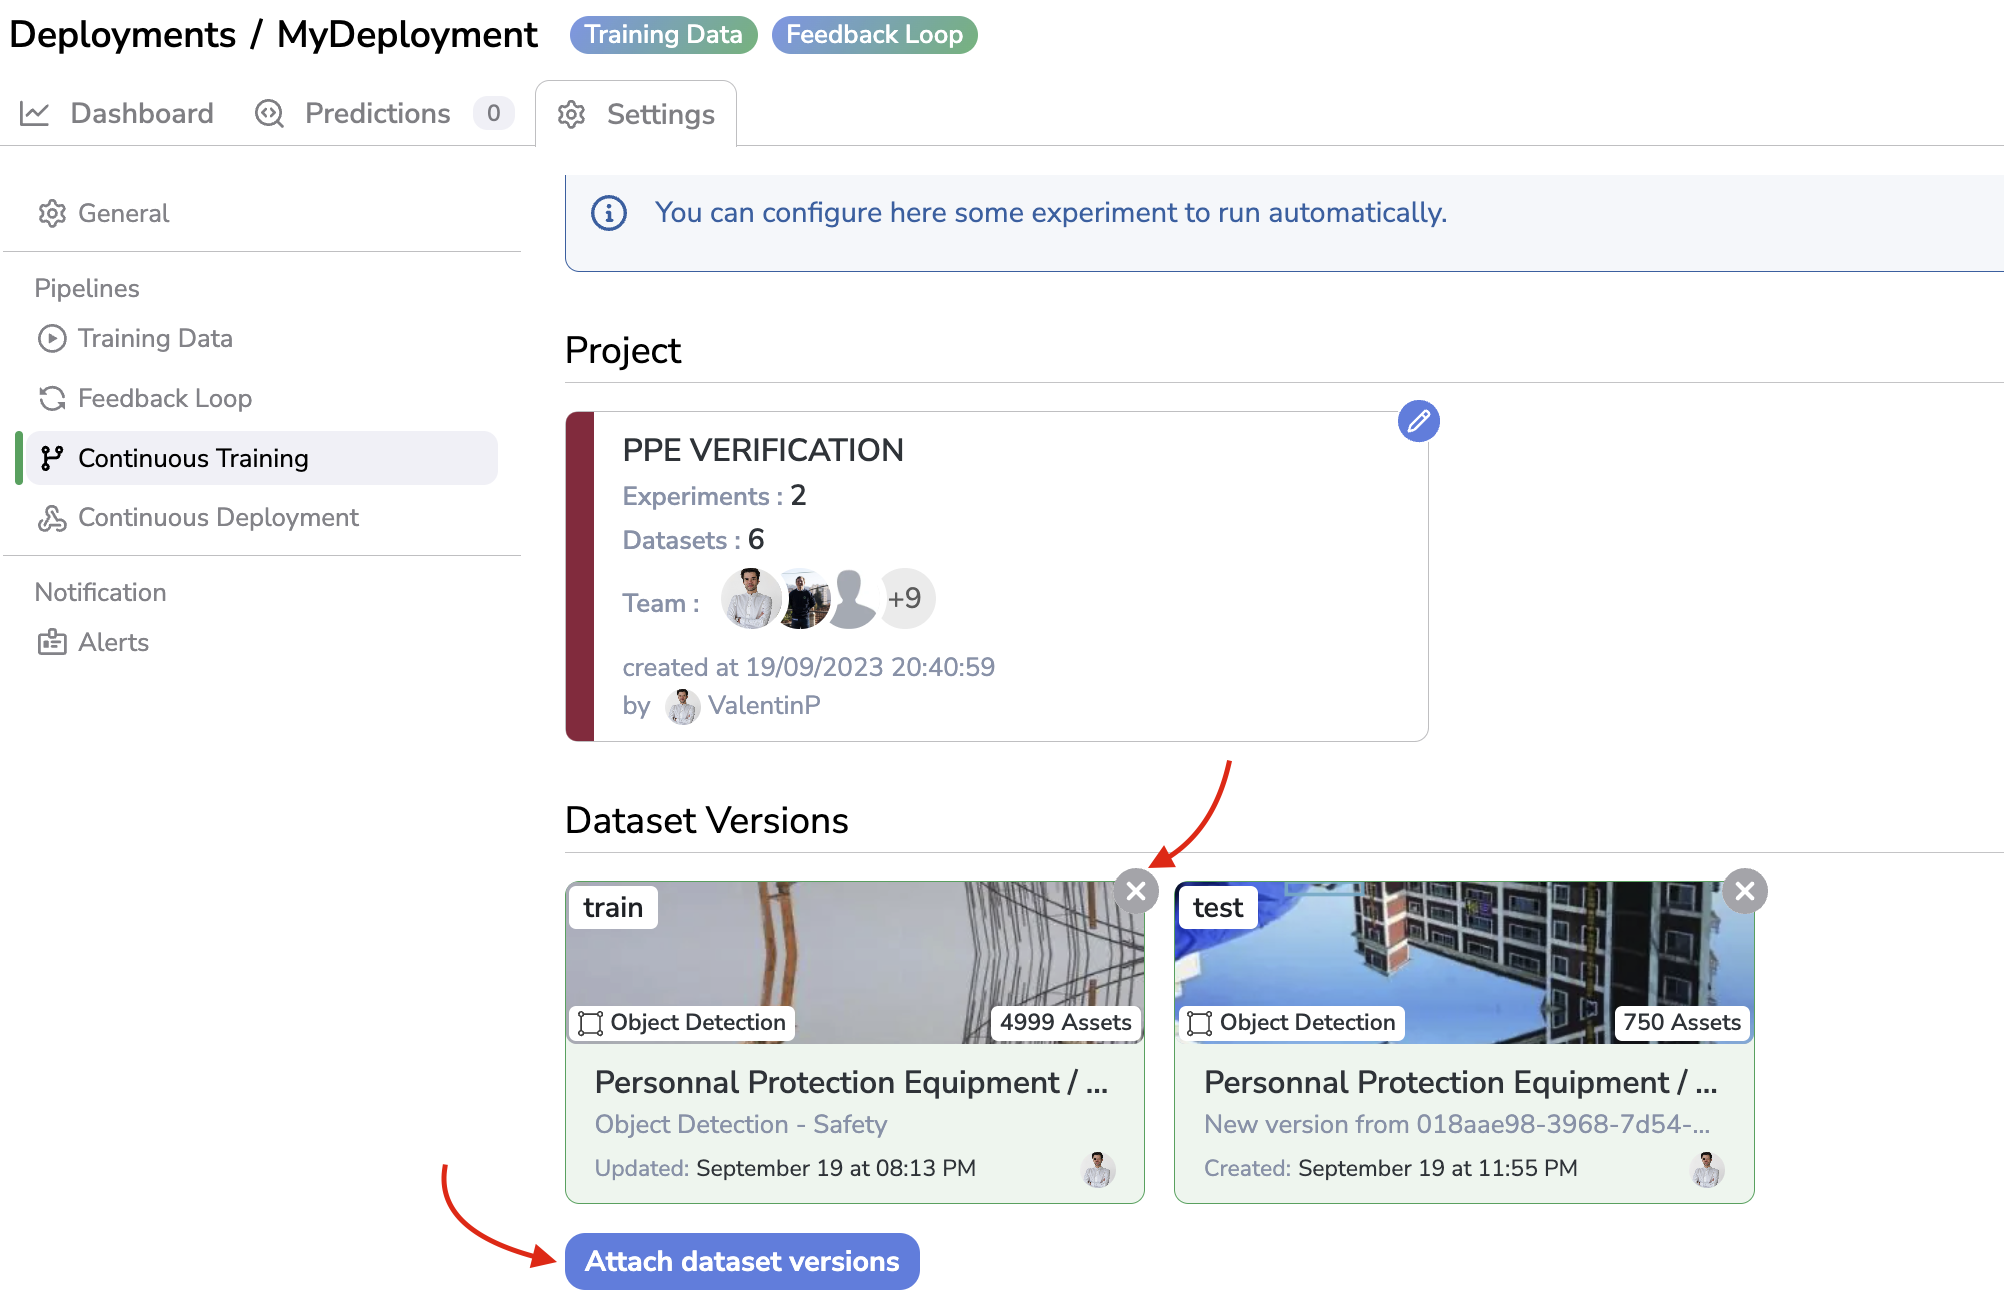
For sure attached DatasetVersion can be deleted with the x icon or modified by clicking again on Attach Dataset versions:
Edit attached DatasetVersion
C. Training Parameters
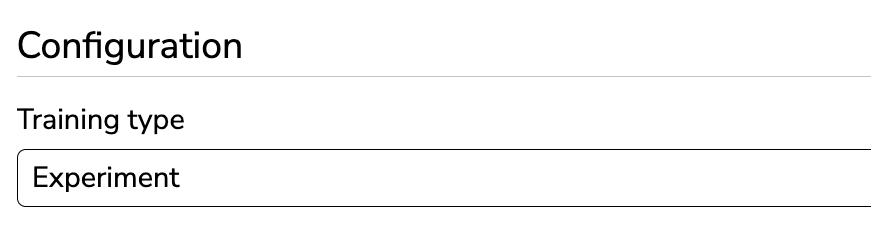
In the Configuration section, you can define the type of Training that need to be executed once the trigger is reached. For the moment, the only available value is Experiment.
Training type selection
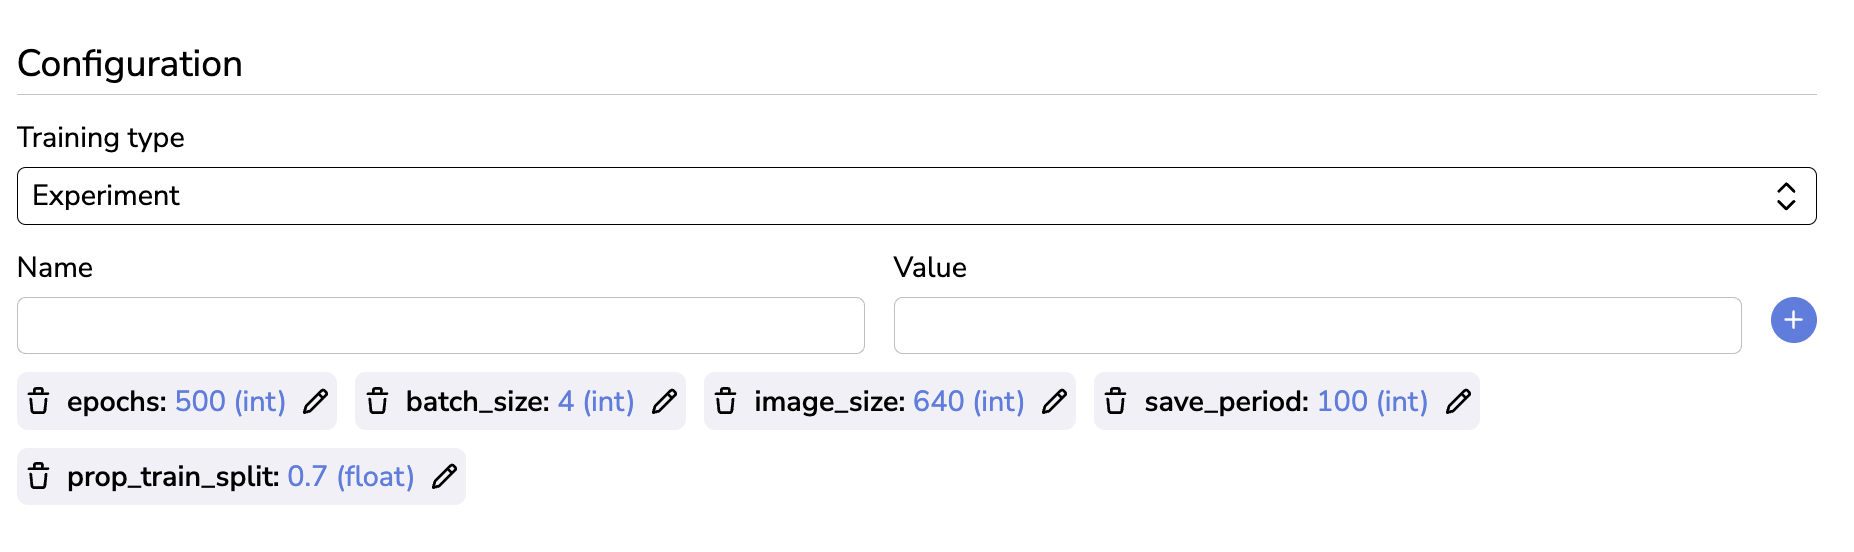
Then, you can edit the Training Parameters of the Experiment that will be created. As it is the case when creating a Experiment manually, the Training Parameters and their default value is inherited from the Base architecture selected, in this particular case, it is the deployed ModelVersion.
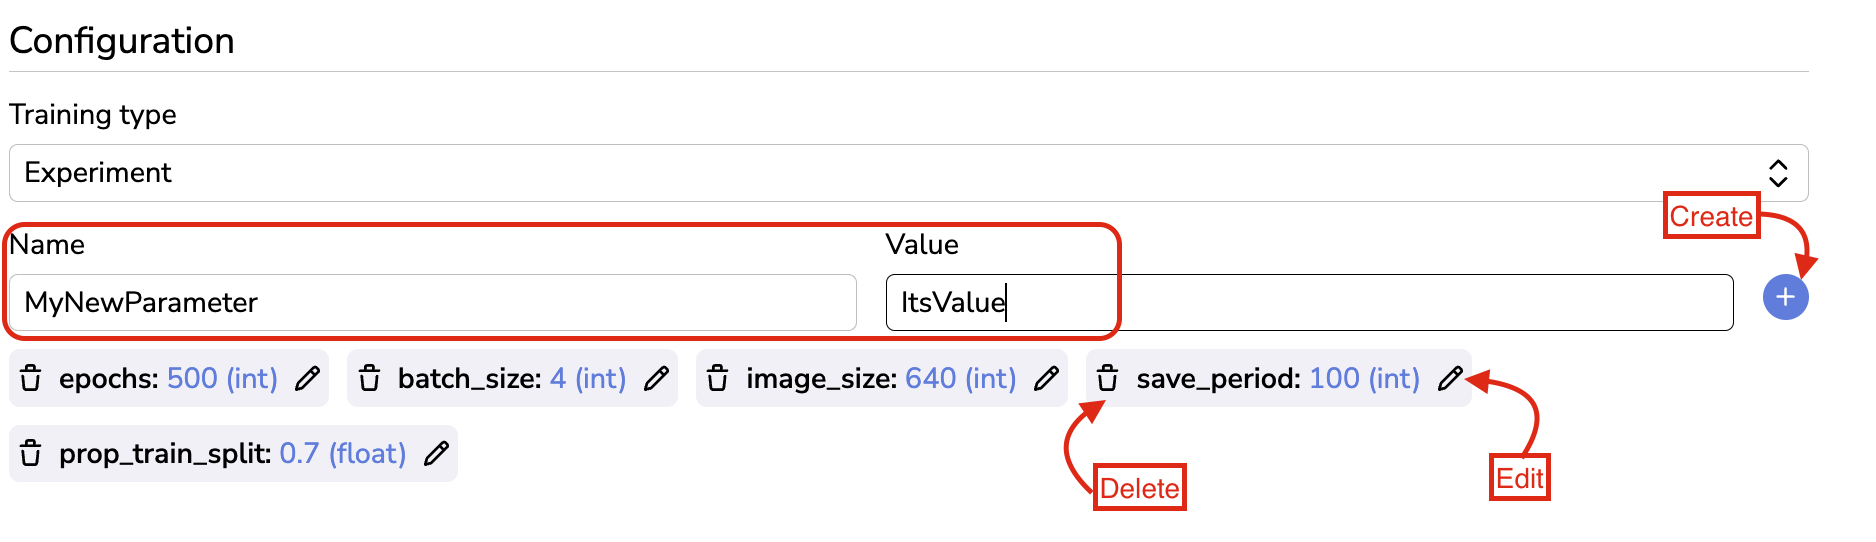
Training Parameters configuration,
For sure those Training Parameters can be edited through the Pen icon, and deleted with the Trash icon. The user can also create a brand new Training Parameter using the Name and Value fields and by clicking then on the blue + button.
Delete, Edit or Create Training Parameters
However, please keep in mind that, once the Continuous Training is triggered, the Training Script associated to the deployed ModelVersion will be executed in the frame of a new Experiment, it means that if the Training Script does not receive the expected Training Parameters, so please be very careful when adding or removing any Training Parameters as it could cause failures while launching the Training Script.
D. Trigger
Now that we have properly defined the details of the Experiment that will be created and executed once the Continuous Training is launched, we can define the trigger that once reached will launch the Continuous Training.
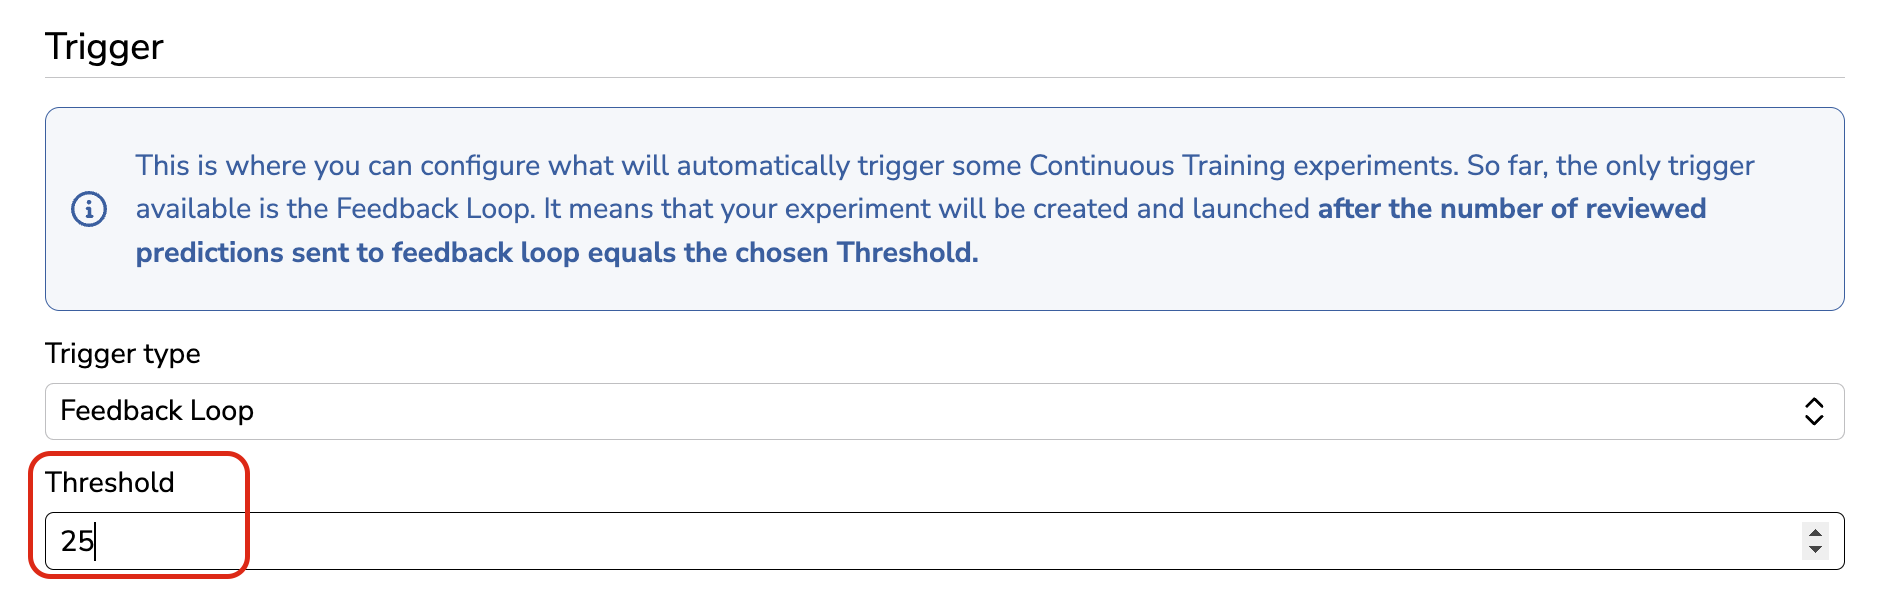
For now, the only available Trigger type is the number of PredictedAsset pushed to the Pipeline through the Feedback Loop. This number can be defined in the Trigger section under the Threshold field as shown below:
Define Threshold
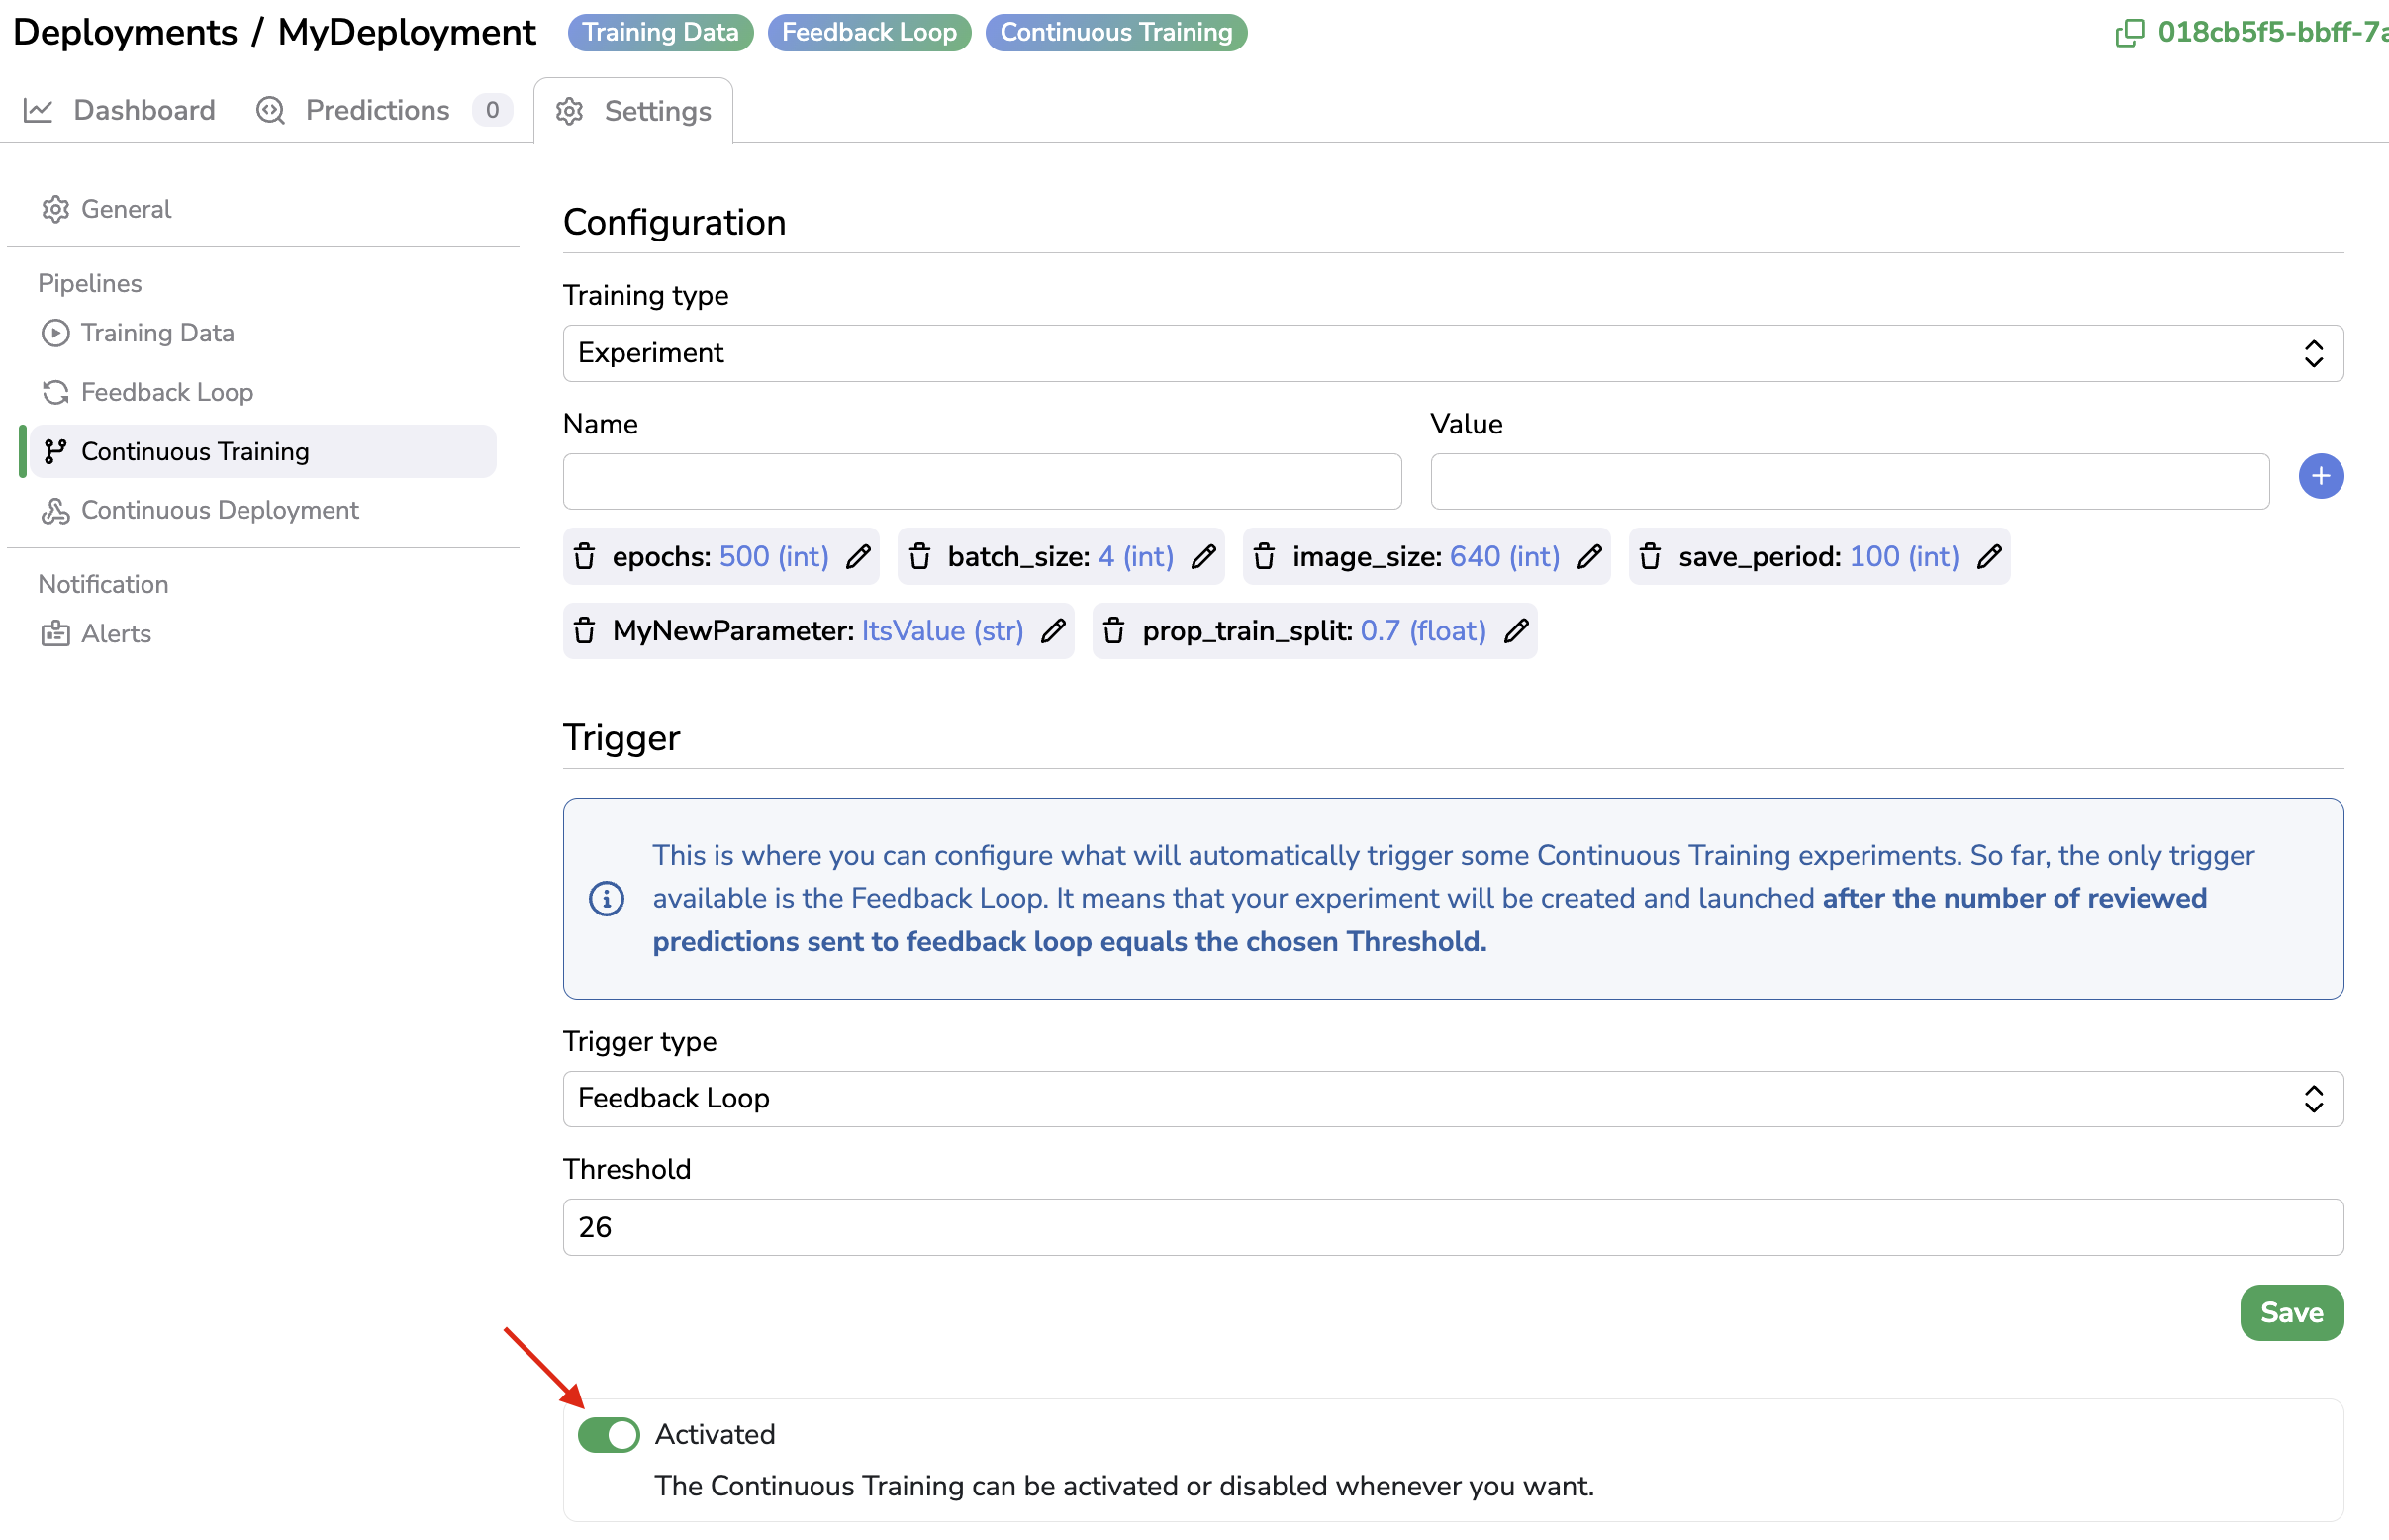
All the required elements have now been defined properly, it means that the Continuous Training is ready to be triggered, and create and execute an Experiment in order to retrain the currently deployed ModelVersion.
To activate the Continuous Training, you just need to click on Save and Activate. Once properly activated, a new badge appears in the header to indicate that the Continous Training has been configured.
Continuous Training badge
Obviously, the Continuous Training configuration can be modified at any moment, modifications are taken into account once the Save button located at the bottom of the page is clicked.
Furthermore, the Continuous Training mechanism can be put on hold at any moment by deactivating it manually as shown below:
Deactivate Continuous Training
5. Setup Continuous Deployment
The Continous Deployment is initialized by defining what to do when theExperiment created and launched in by the Continuous Training is over.
First of all, the Continous Training should have been configured and activated properly before configuring the Continuous Deployment.
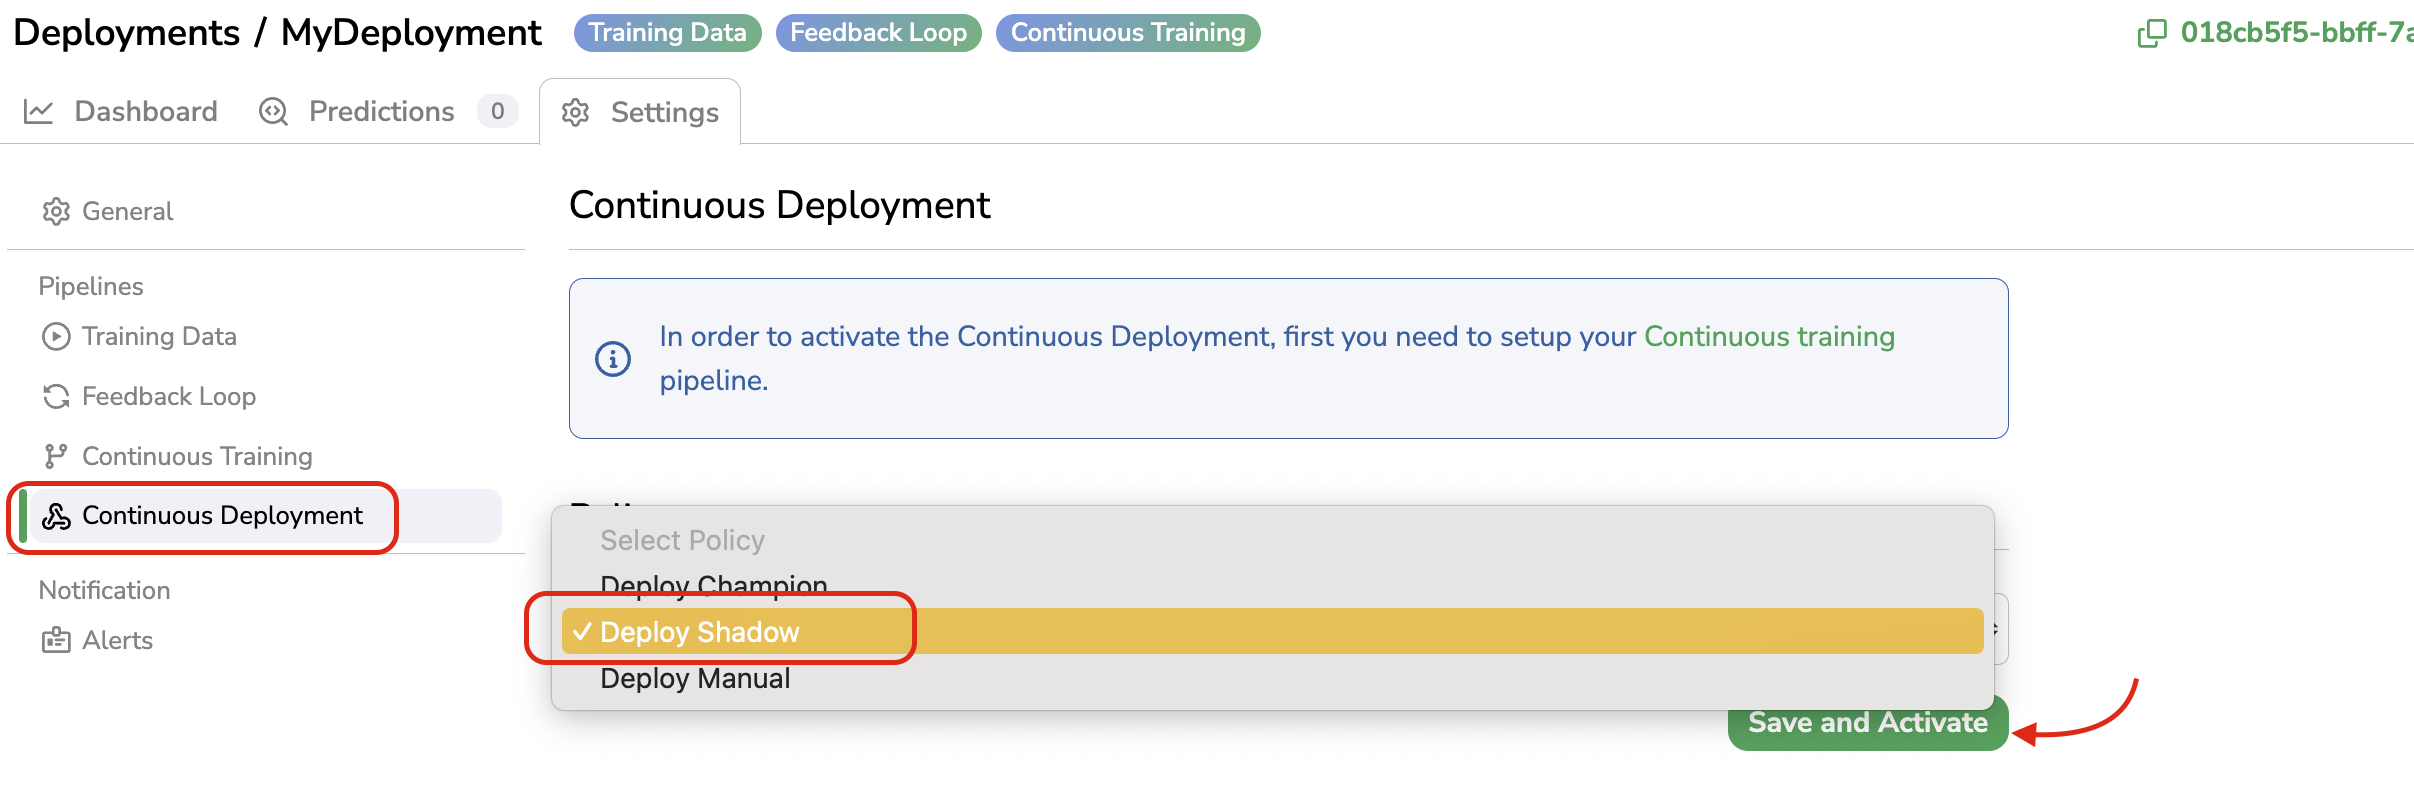
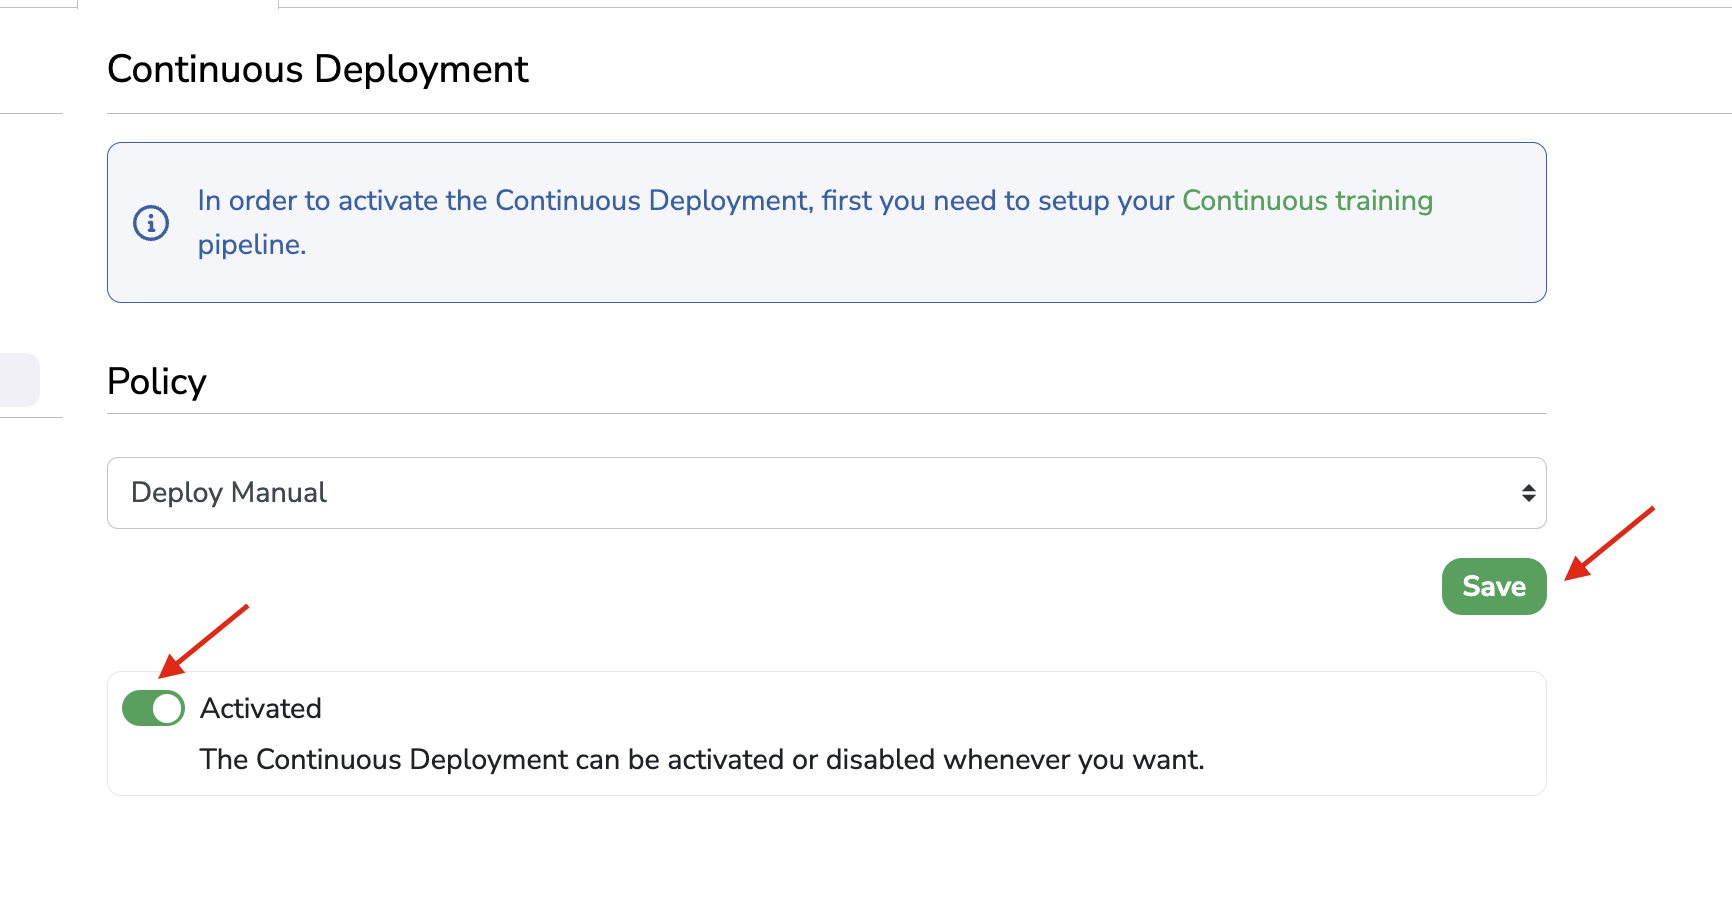
There are 3 different policies available for the Continous Deployment:
Deploy Champion: Export automatically as a new ModelVersion of the deployed one, the Experiment created and launched by the Continuous Learning when this one is over. Then the new ModelVersion is deployed in the current Deployment and replace the previously deployed one. Further inferences will be done by the newly created ModelVersion.
Deploy Shadow: Export automatically as a new ModelVersion of the deployed one, the Experiment created and launched by the Continuous Learning when this one is over. Then the new ModelVersion is deployed as Shadow Model in the current Deployment. It means that Champion and ShadowModelVersion will make Prediction for further inferences. It is the best way to assess that the new ModelVersion is over-performing the previous one before turning it into the champion.
Deploy manual: Export automatically as a new ModelVersion of the deployed one, the Experiment created and launched by the Continuous Learning when this one is over. The ModelVersion is not deployed automatically by the Continuous Deployment, it has to be done manually by a user.
Once you have made your choice, you just need to click on Save and Activate as shown below:
Continuous Deployment
If the Continuous Deployment is well activated, a badge will appear in the header of the Deployment.
Continuous Deployment badge
Obviously, the Continuous Deployment configuration can be modified at any moment, modifications are taken into account once the Save button located at the bottom of the page is clicked.
Furthermore, the Continuous Deployment mechanism can be put on hold at any moment by deactivating it manually as shown below:
Edit Continuous Deployment
Now your Pipeline is supposed to be fully configured and operational, we will see how to push PredictedAsset and reviewed Prediction into it to perform Continusous Learning on a ModelVersion.
6. Submit a PredictedAsset reviewed Prediction to the Feedback Loop
For this part, let's consider that you have a Deployment where the Pipeline has been properly configured as explained above. In addition, let's consider that after the Pipeline configuration, some Inferences have been made, meaning that PredictedAsset and associated Prediction have been logged in the Deployment.
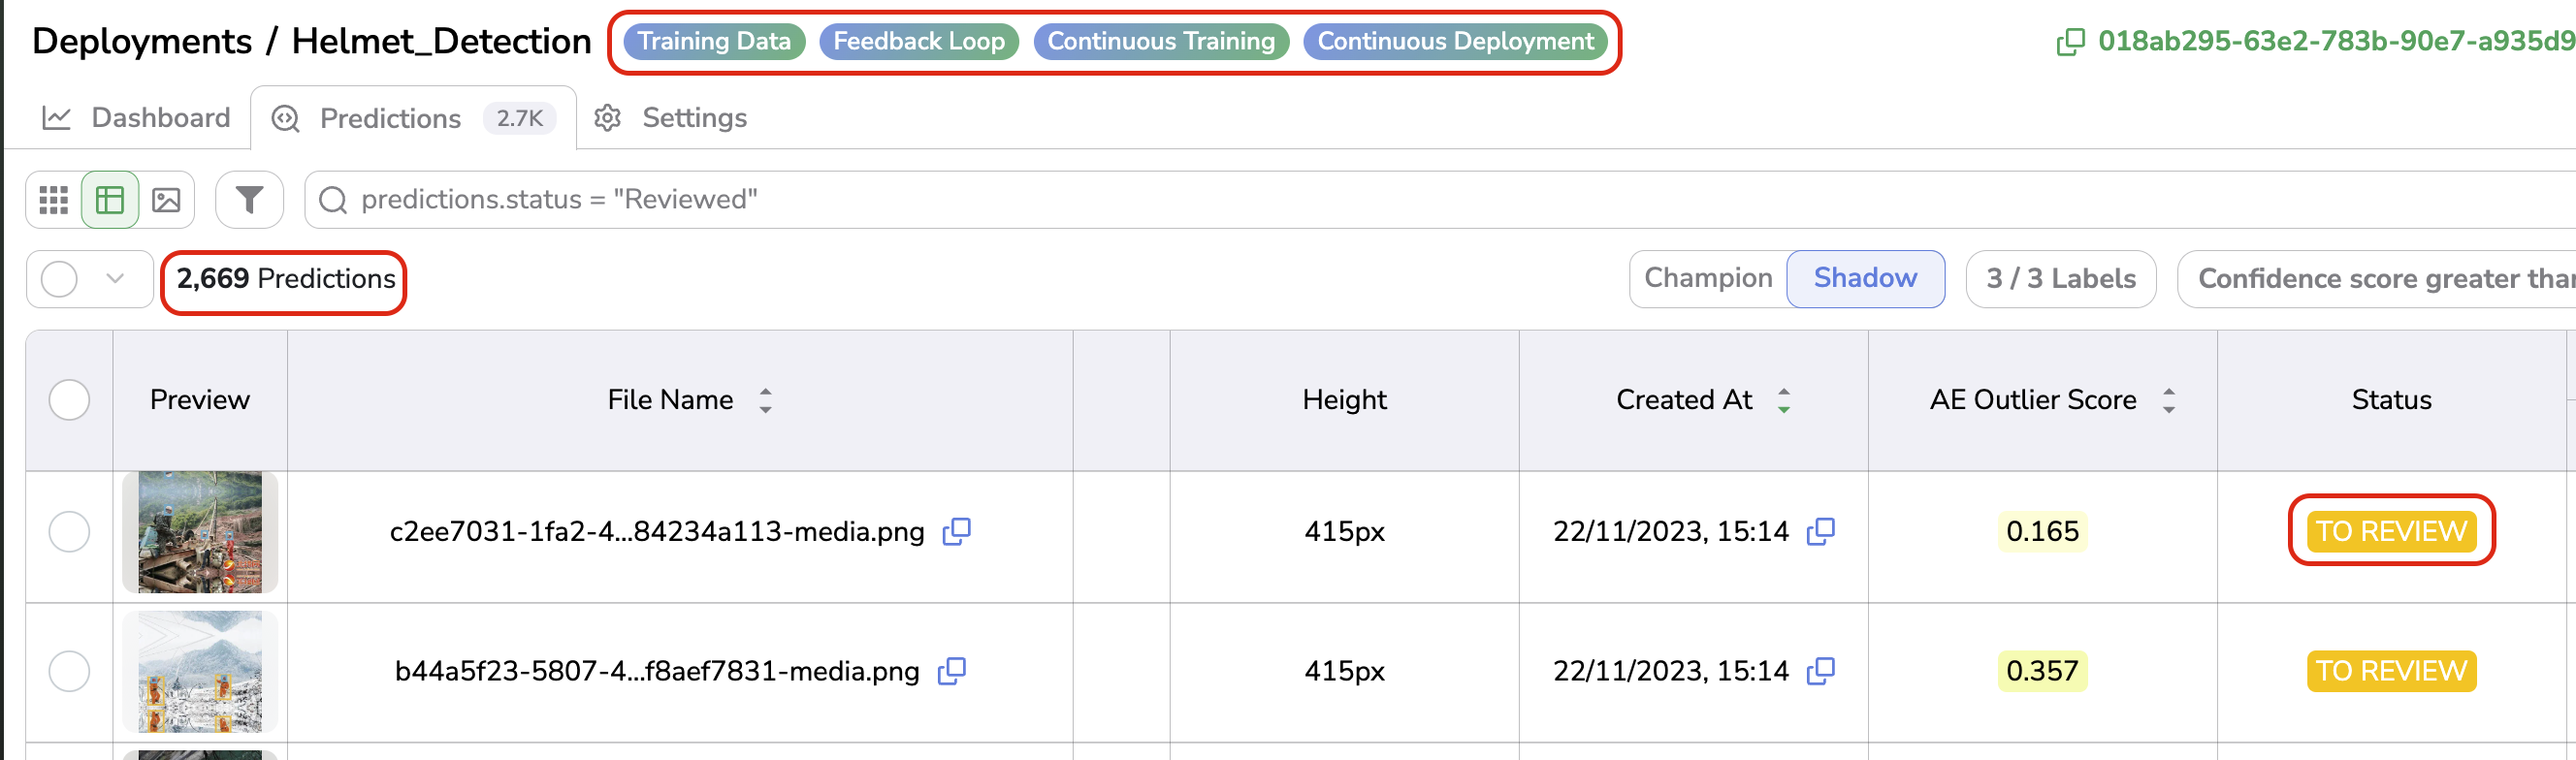
By default, all the Prediction logged should stand with the status TO REVIEW, as shown below:
Pipeline configured and Prediction logged with status TO REVIEW
This TO REVIEW status means that the Prediction is displayed as initially predicted by the ModelVersion deployed.
Picsellia allows you to review any Prediction logged in the current Deployment using the Prediction Review tool. Further details on this tool are available here.
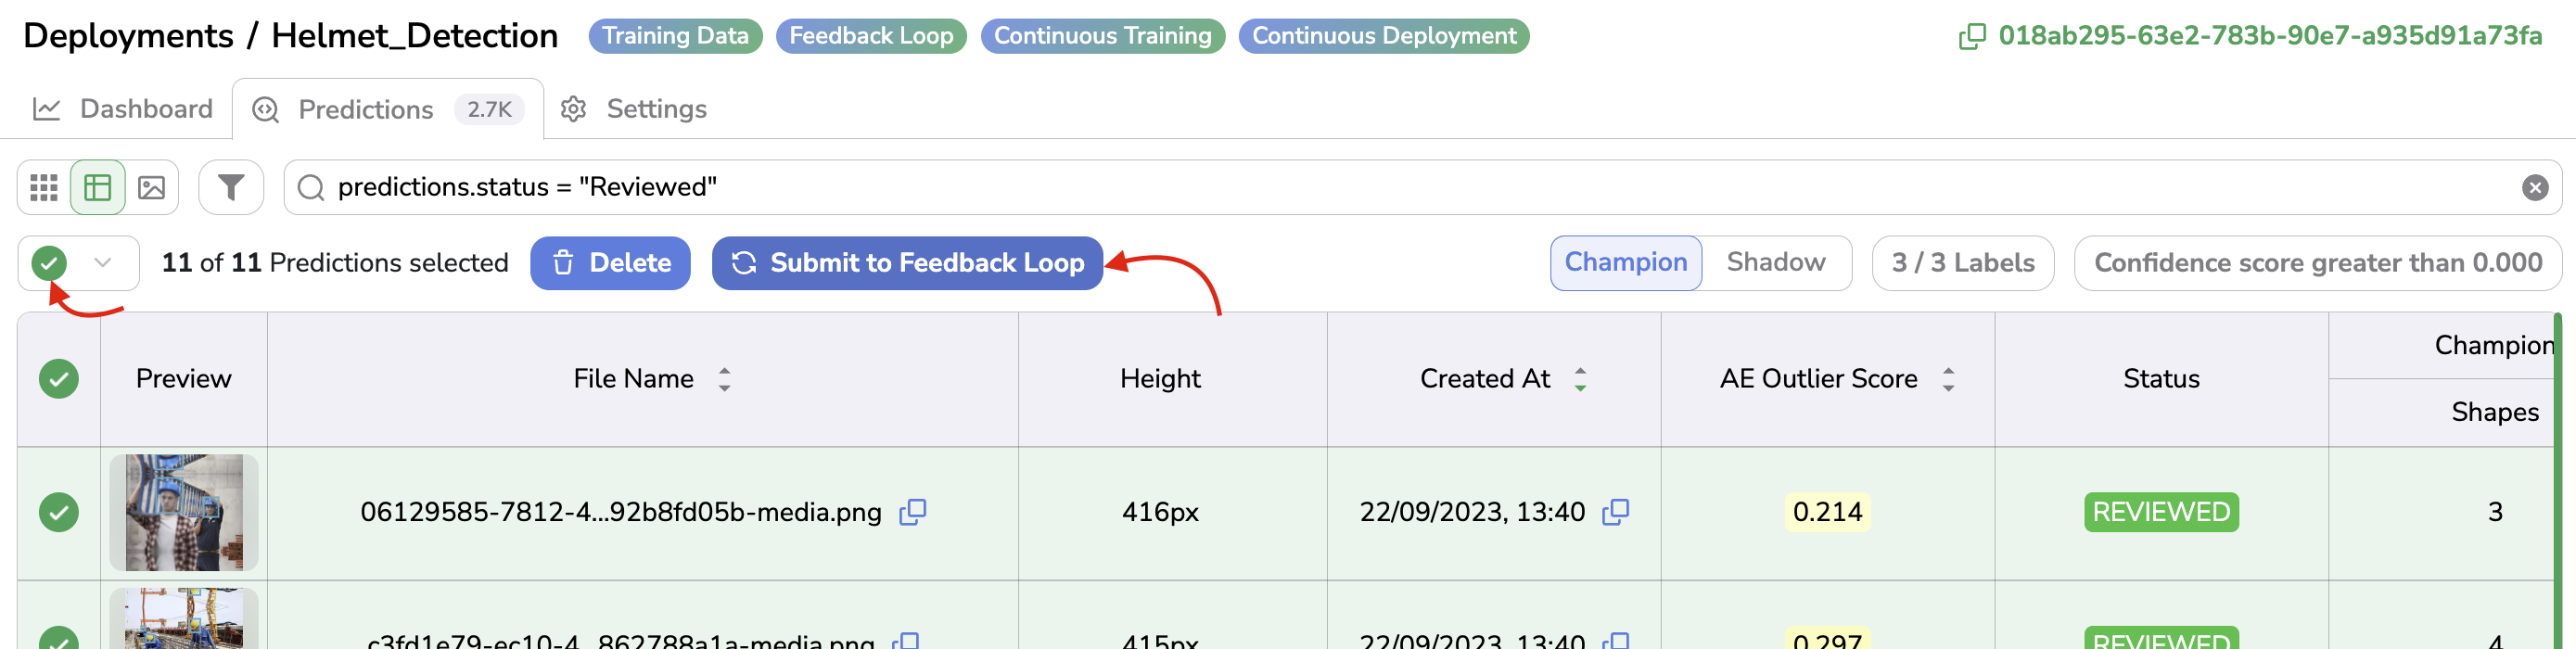
Once reviewed, a Prediction turns into REVIEWED status.
Prediction with REVIEWED status
This status means that the Prediction can now be submitted to the Pipeline defined for the current Deployment.
To do so, you simply need to select the PredictedAsset with the associated Prediction in REVIEWED status and click on the Submit to Feedback Loop button:
Submit to Feedback Loop
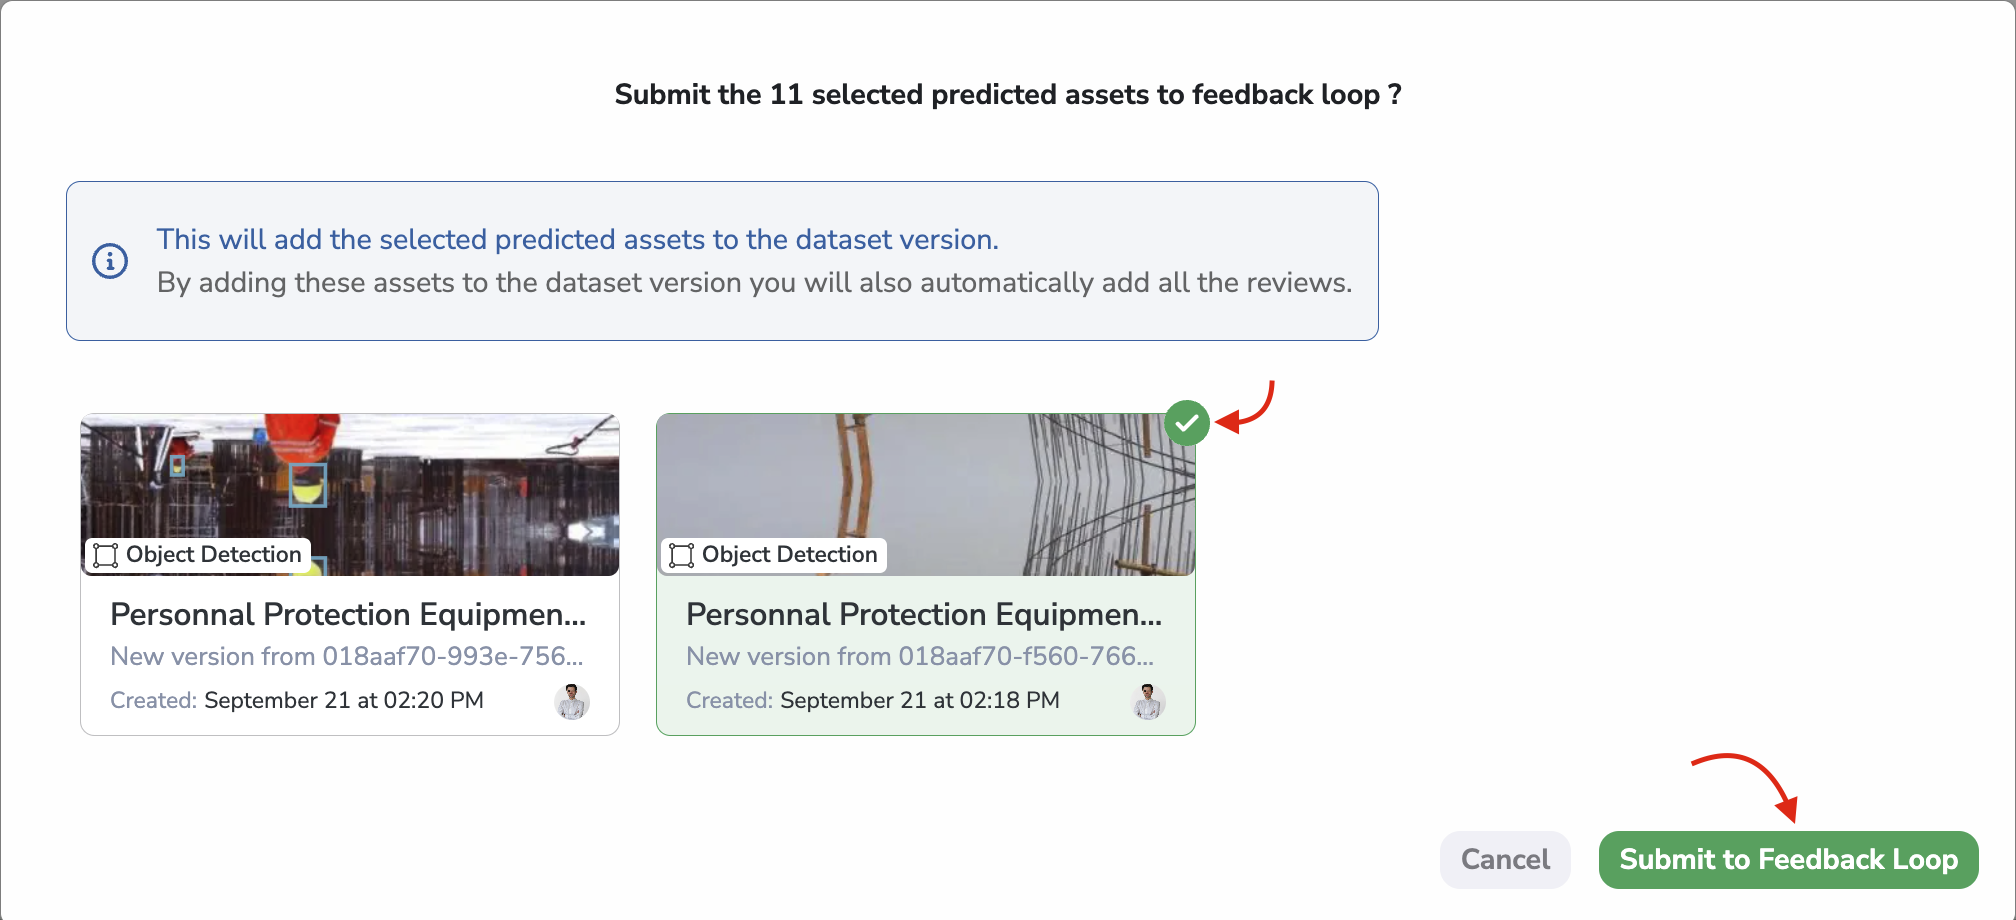
A modal will then open allowing the user to choose the DatasetVersion in which the PredictedAsset and reviewed Prediction will be sent among the ones defined in the Feedback Loop configuration. Please note that only one DatasetVersion can be selected, meaning that the PredictedAsset and reviewed Prediction will be added as Asset in the selected DatasetVersion.
Submit to Feedback Loop modal
👍
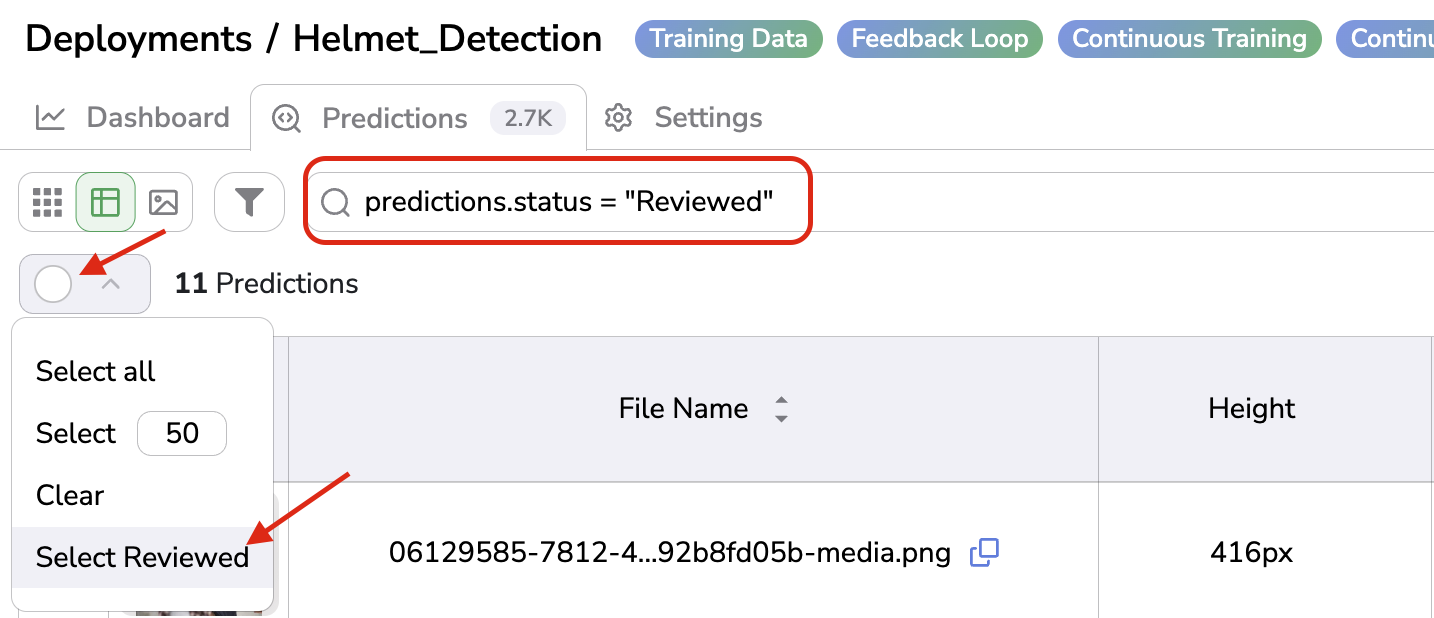
Select all the REVIEWEDPrediction quickly
You can use the Select Reviewed button to quickly select all the PredictedAsset with Prediction in REVIEWED status
The selectedPredictedAsset and the associated Reviewed Prediction have been added as Asset to selected DatasetVersion. In the current Deployment, the Prediction turns in SUBMITTED status:
Submitted Predictions
7. Trigger the Continuous Training & Continous Deployment
We have enriched DatasetVersion by submitting PredictedAsset in our Pipeline through the Feedback Loop. As soon as the number of PredictedAsset and associated reviewed Prediction submitted to the Feedback Loopreached theThreshold defined here, a new Experiment will be created according to the configuration of the Continuous Training.
📘
Where do I retrieve this new Experiment ?
The Experiment will be created in the Project selected in the Continuous Training configuration and named with the name of the current Deployment and the timestamp (to ensure the unicity of the Experimentname).
This Experiment will then be launched (i.e. execution of the Training Script) on the Picsellia Training Engine.
As soon as the training is over, the Experiment will be exported as a new version of the deployed ModelVersion and potentially deployed in the current Deployment according to the Continuous Deployment strategy selected.
Here it is, you have performed the complete Continuous Learning in a structured way!
You have reviewed Prediction performed by the initial ModelVersion, enriched your training DatasetVersion, retrain and redeploy a new ModelVersion. This new version is supposed to overperform the initial one, to make sure of it, youcan still refer to the Dashboard.