

Configure your Labelmap
Now that our DatasetVersion has been created and populated with Asset, it is time to start dealing with Annotation.
Setting up a clean, well-typed Labelmap before annotating is what lets Computer Vision teams later trust their Dataset: it guarantees every Annotation follows the same structure, makes a DatasetVersion directly usable to train a compatible ModelVersion, and avoids relabeling work down the line.
1. DatasetVersion Version Type and Labelmap
DatasetVersion Version Type and LabelmapBefore annotating the Asset composing our DatasetVersion, we need to initialize it by defining its Version Type and its Labelmap so that Picsellia will be able to ensure consistency at each step of the process in the future.
For instance, make sure that the Version Type of a DatasetVersion is the same as the one of the ModelVersion you might be retraining in the frame of an Experiment.
If you plan to importAnnotationthrough an annotation fileThen, you can skip this initialization part as this one will be done automatically by Picsellia while reading the information (Version Type and
Labelmap) contained in your annotation file during the import.
A. Set DatasetVersion Version Type
DatasetVersion Version TypeTo set your properly DatasetVersion, you must go to Settings of the DatasetVersion, then Configuration > Labels. From here, you can first select your Version Type and click on Set dataset version type.
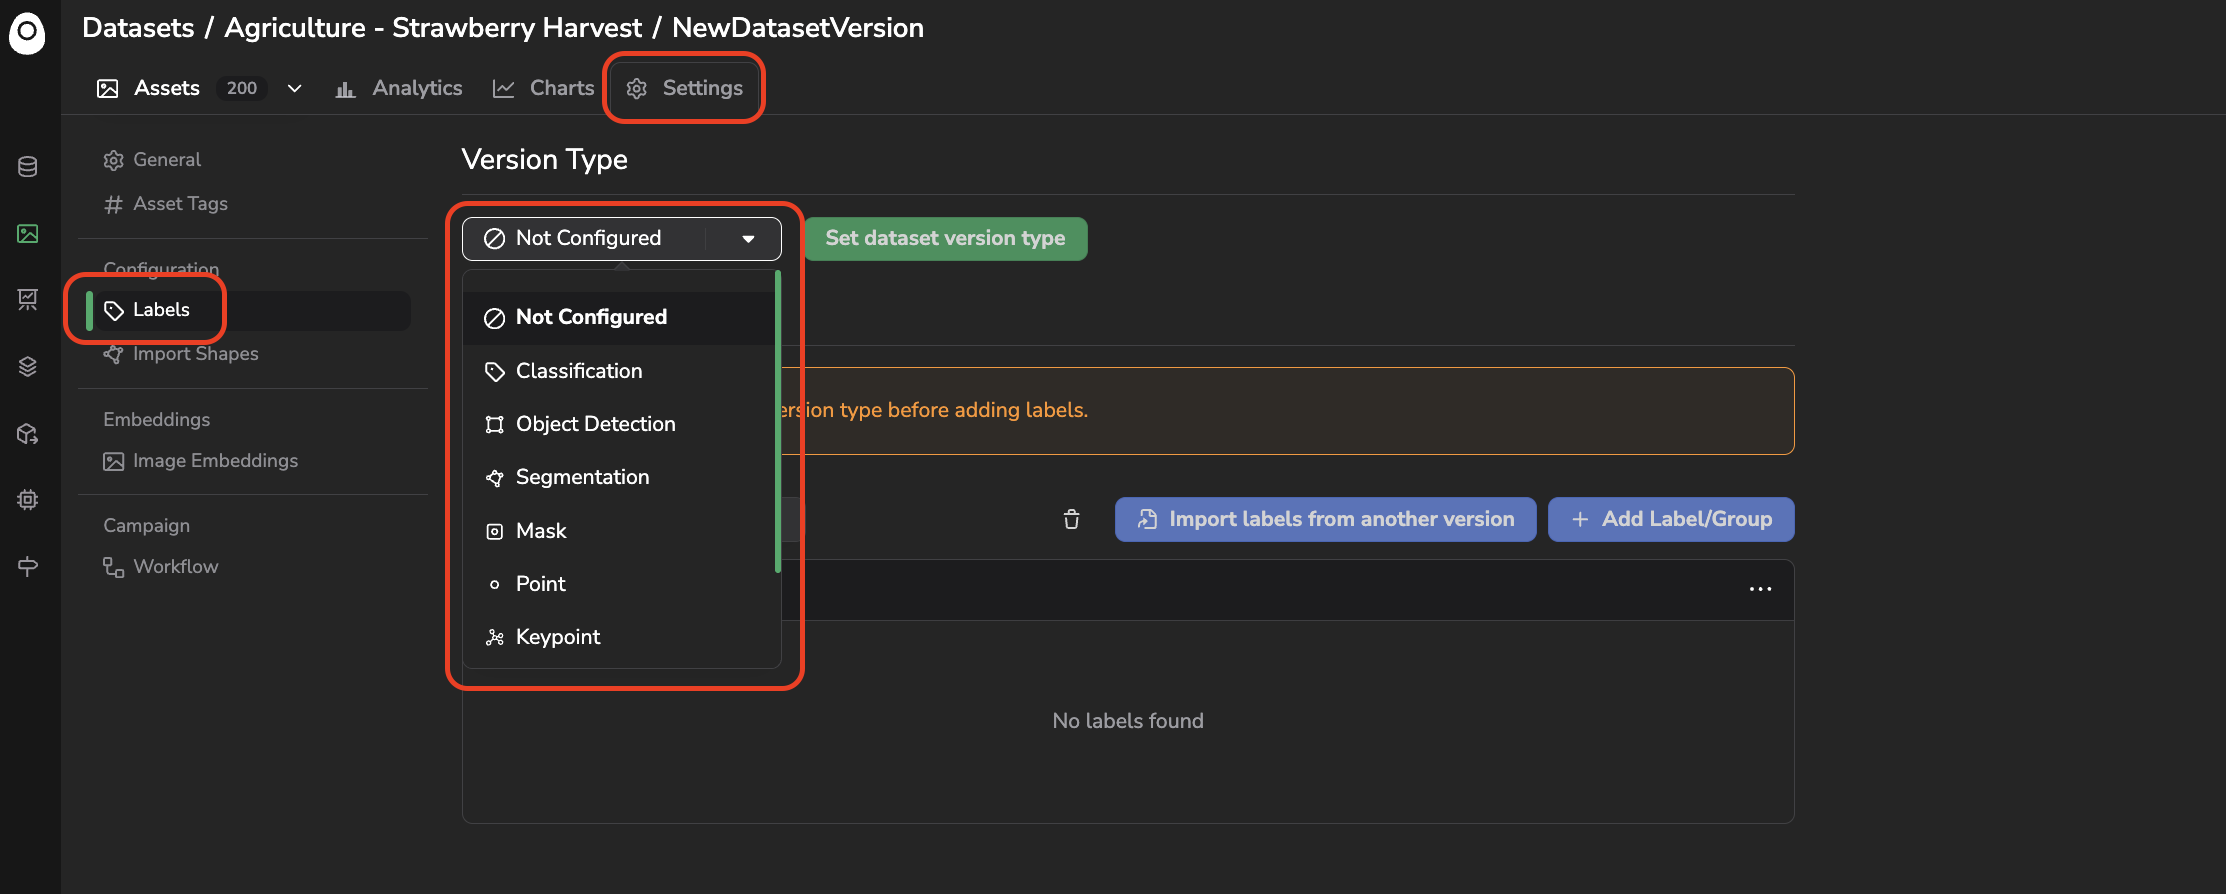
Set type
The available Version Types are:
- Classification
- Object Detection
- Segmentation
- Mask
- Point
- Keypoint (skeletons)
- Line
ChangeDatasetVersionVersion TypeYou can change the Version Type of a
DatasetVersionif already defined, but to do so, theDatasetVersionmust be free ofLabelmeaning deleting all existingLabeland associatedShape. So it is preferable to fork yourDatasetVersionfirst, to keep a safe copy, as detailed here
B. Create your Labelmap
LabelmapA Labelmap is the list of Label attached to a DatasetVersion. Its Label can be left flat or organized into LabelGroup, and each Label can carry its own Attribute. Independently of the Labelmap, Picsellia also lets you attach Attribute directly to the Asset as a whole, detailed below.
Once your Version Type is defined, you can start creating your Label; there are two ways to do it.
a. From Scratch
Thanks to the button + Add Label/Group, you will create a new and empty Label line. For each new line, you will be able to choose:
- The type between
LabelorLabelGroup(in the case ofLabelGroup, you'll then have to create the Label composing theLabelGroupas detailed below) - The name of this new
Label(orLabelGroup) - The color associated with this
Label(not applicable forLabelGroup), all theShapewith that label will then be displayed with that color.
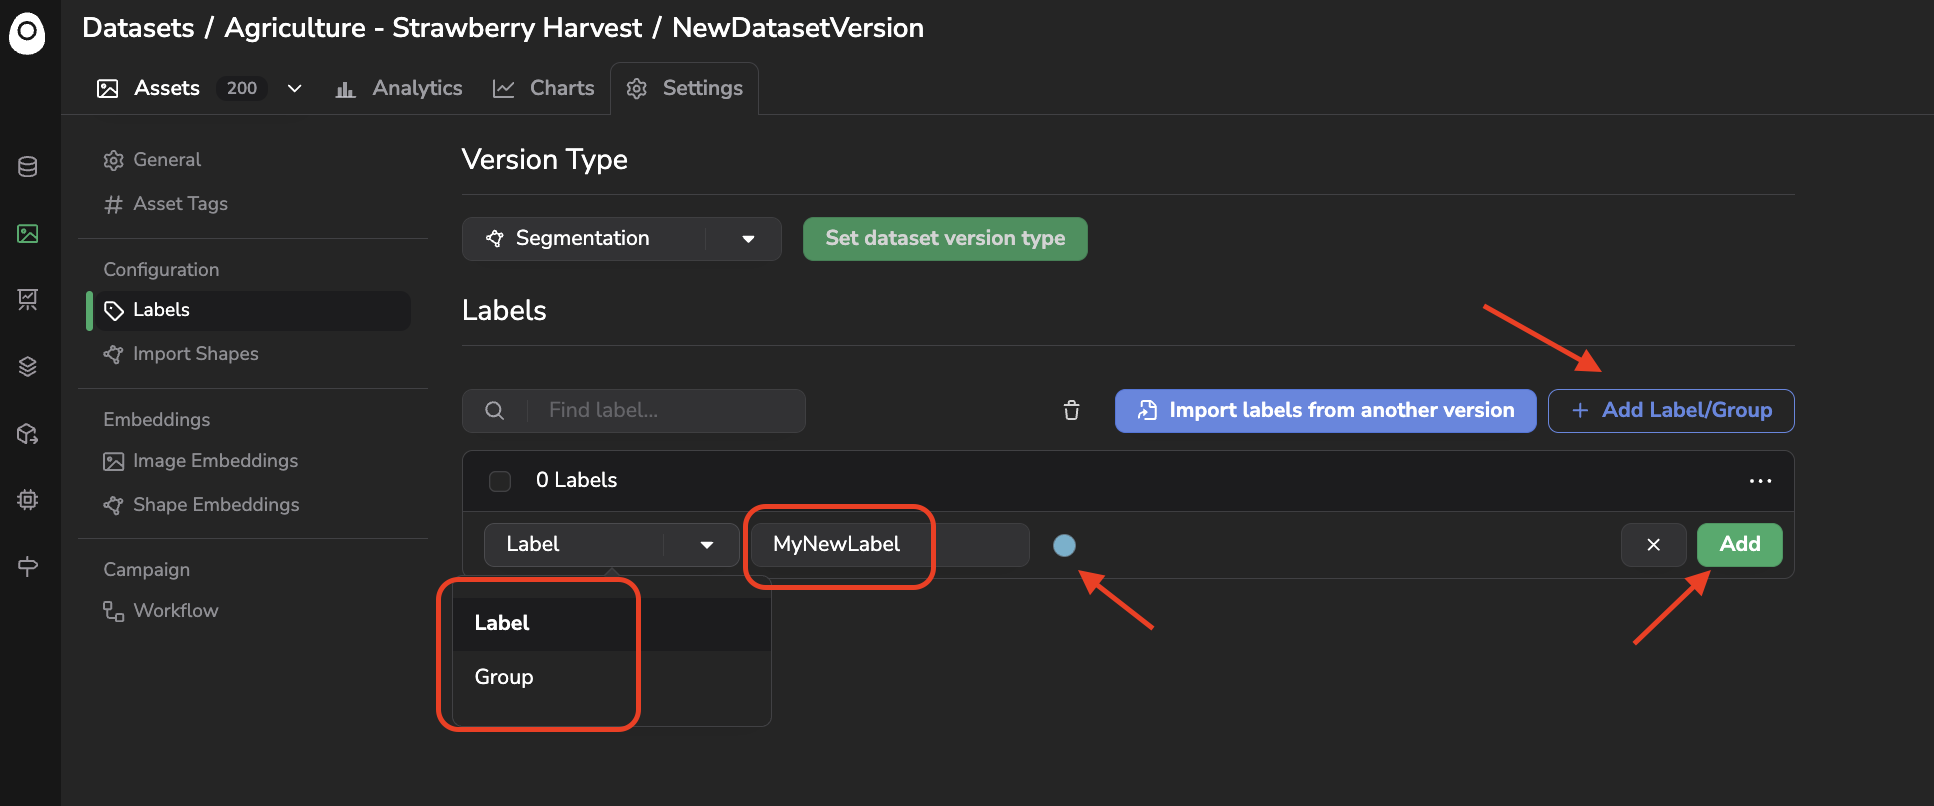
Label creation
At any moment, you can rename a Label or LabelGroup by clicking on its name and confirming with the check mark icon; this updates the Label name or color of every existing Shape using it. You can also delete one or several Label from your DatasetVersion — be aware that deleting a Label deletes all the Shape carrying it from their Annotation (deleting every Label of a DatasetVersion still leaves its Annotation in place, just without any Shape), so use this feature with caution.
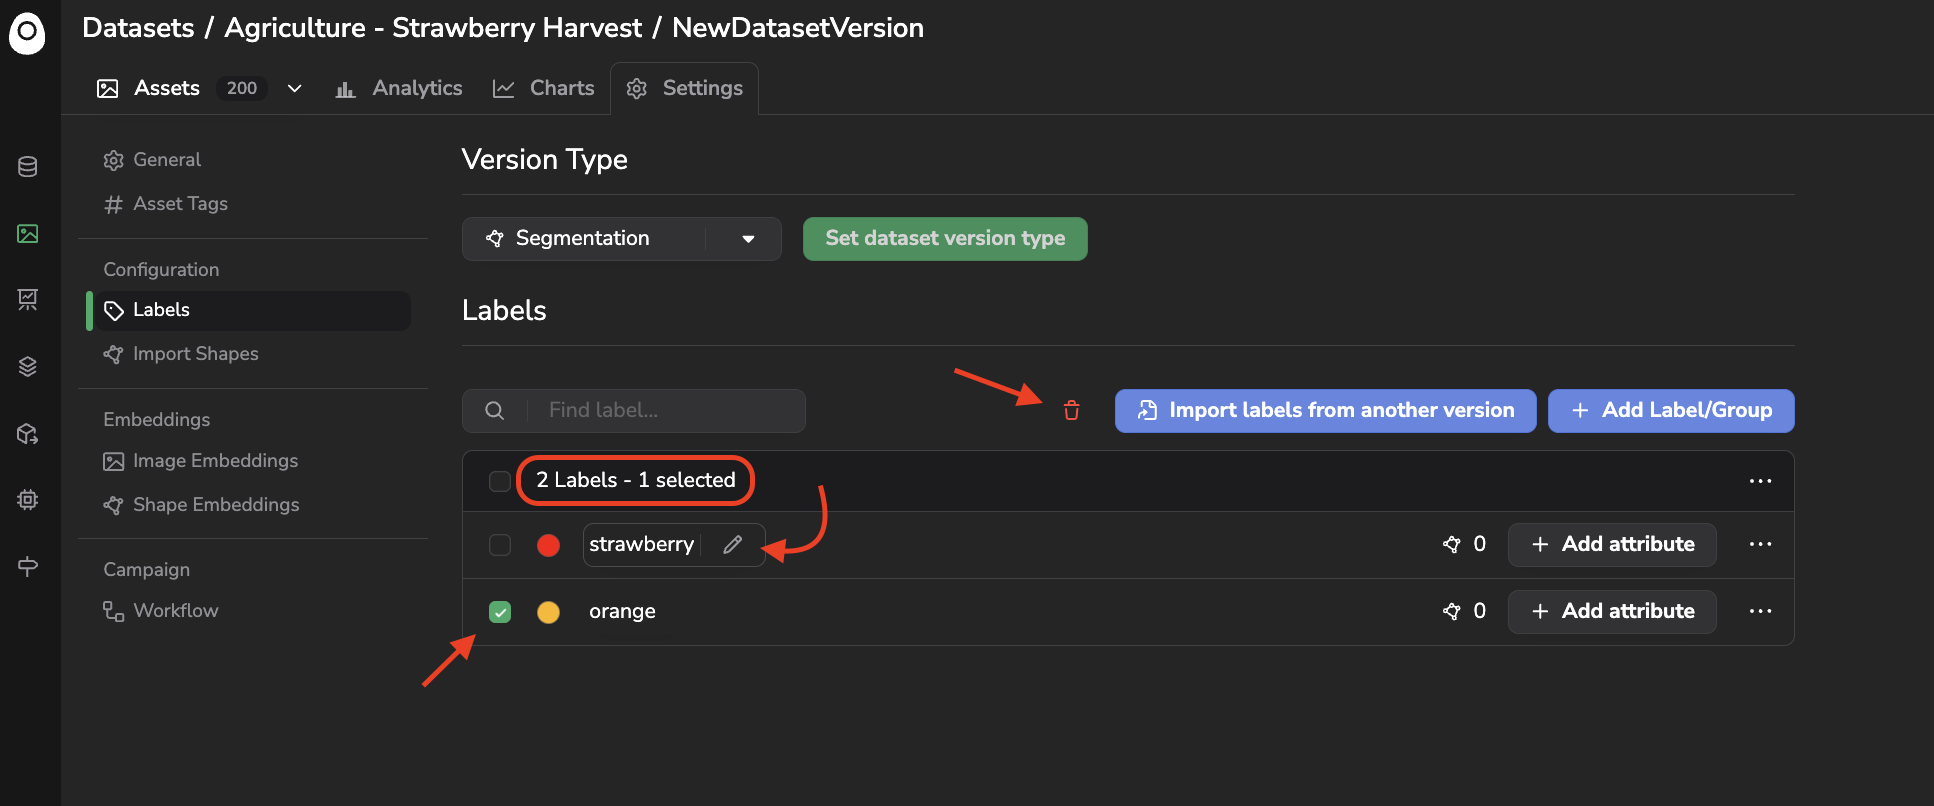
Label edition
b. Importing them from another DatasetVersion
DatasetVersionThanks to the button Import labels from another version, you will be able to browse among the Label of other DatasetVersion of the current Dataset. So you just need to:
-
Select the
DatasetVersionname from which you want to import -
Define if you want to keep the
LabelGroupandAttributestructure of the selectedDatasetVersionin the current one -
Select the
Labelnames andLabelGroupto import in the currentDatasetVersionOnce the Labelmap import is properly configured, click on the import button.
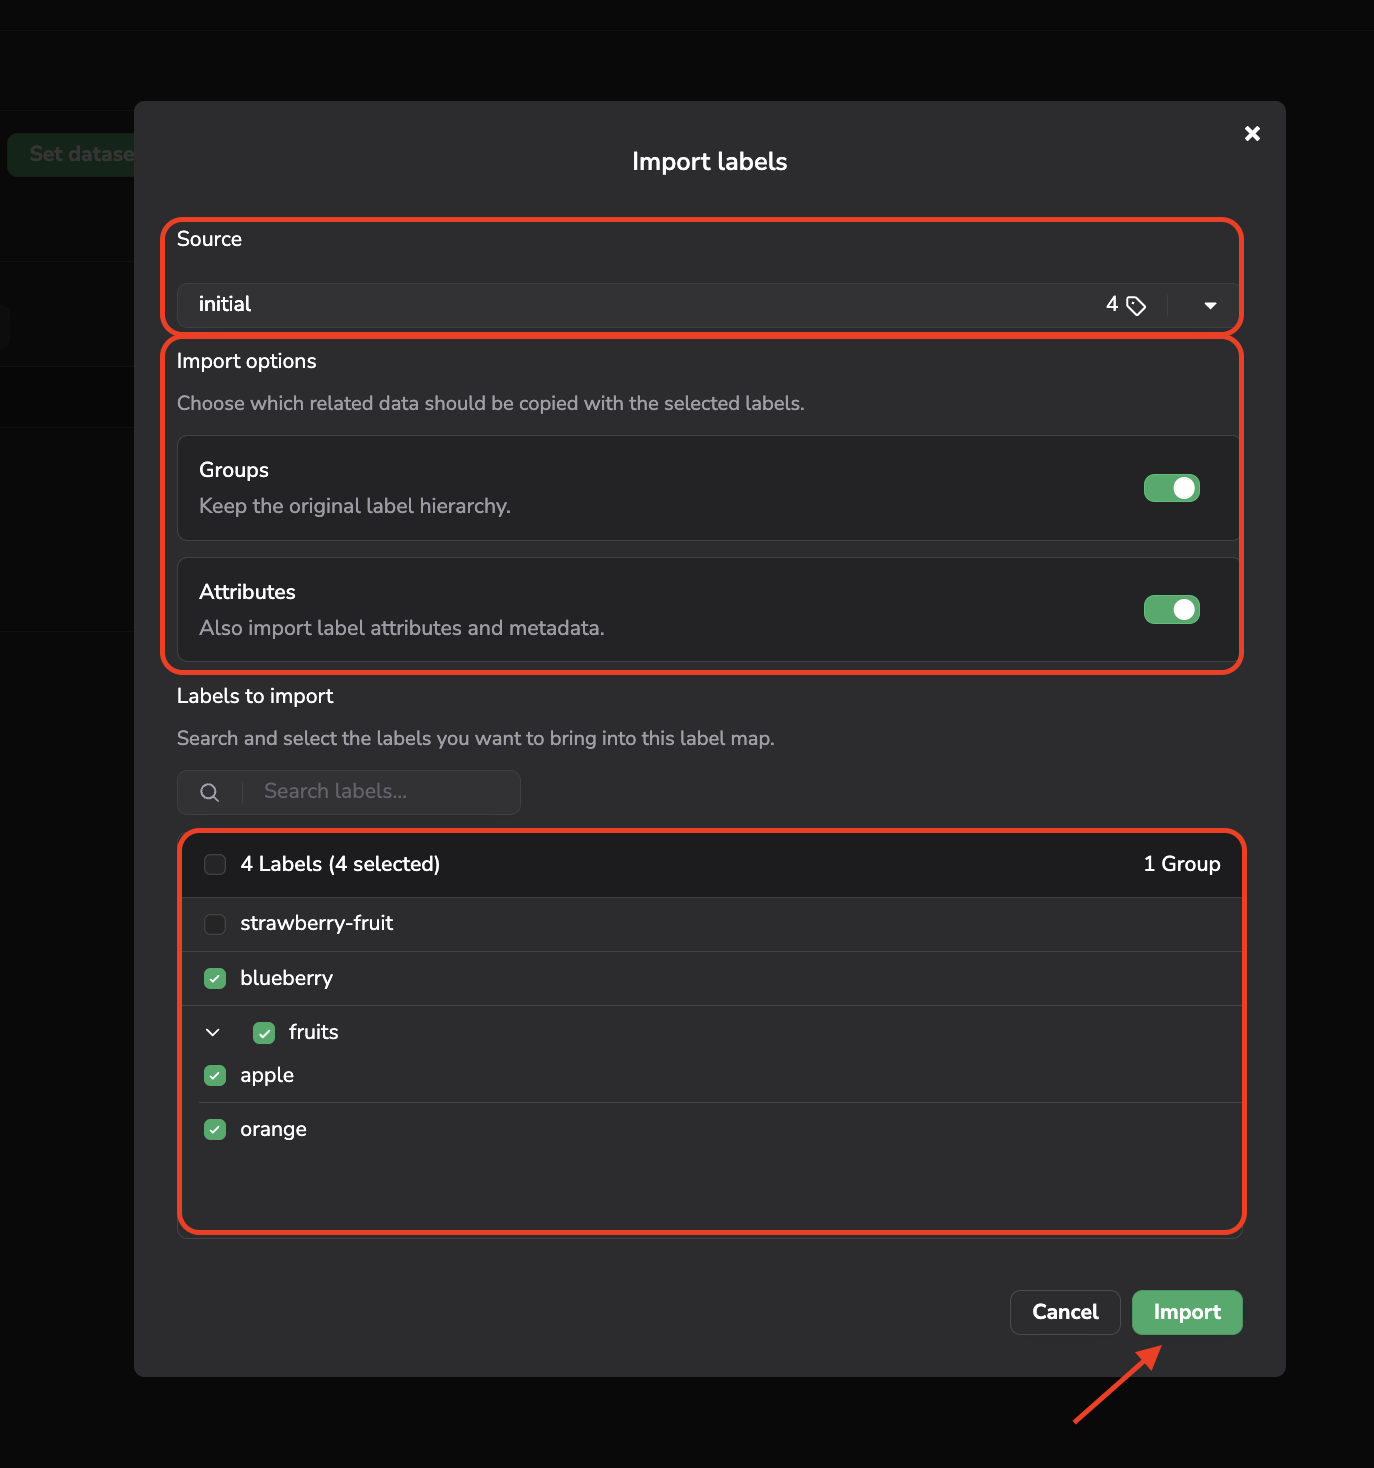
Labelmap import form
This also carries over each Label's Attribute configuration. Since no Annotation is imported at this step, you can import Label from a DatasetVersion that has another Version Type.
c. Organize Label into a LabelGroup
Label into a LabelGroupBesides individual Label, the + Add Label/Group button also lets you create a LabelGroup. A LabelGroup is a named container that can hold several Label, and even other LabelGroup, forming a multi-level hierarchy instead of a single flat Labelmap. In the Label list, a LabelGroup shows up as an expandable row that you can fold and unfold to reveal the Label (or nested LabelGroup) it contains.
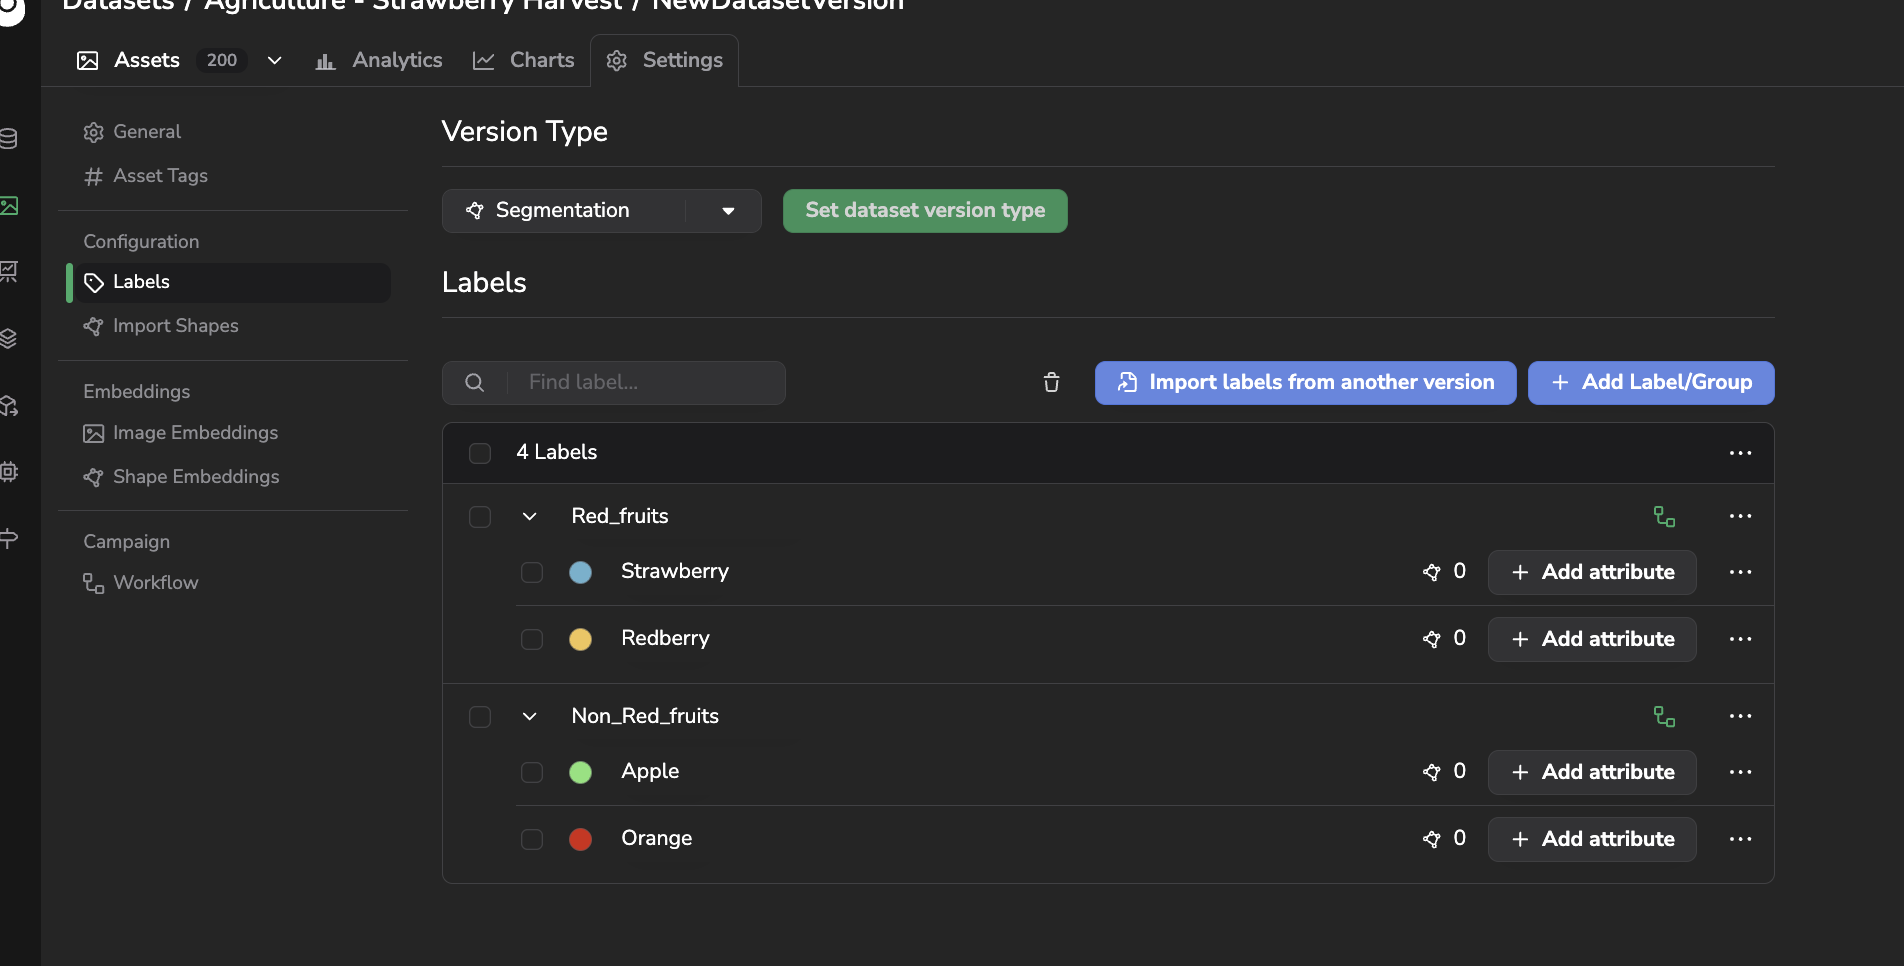
Example of LabelGroup
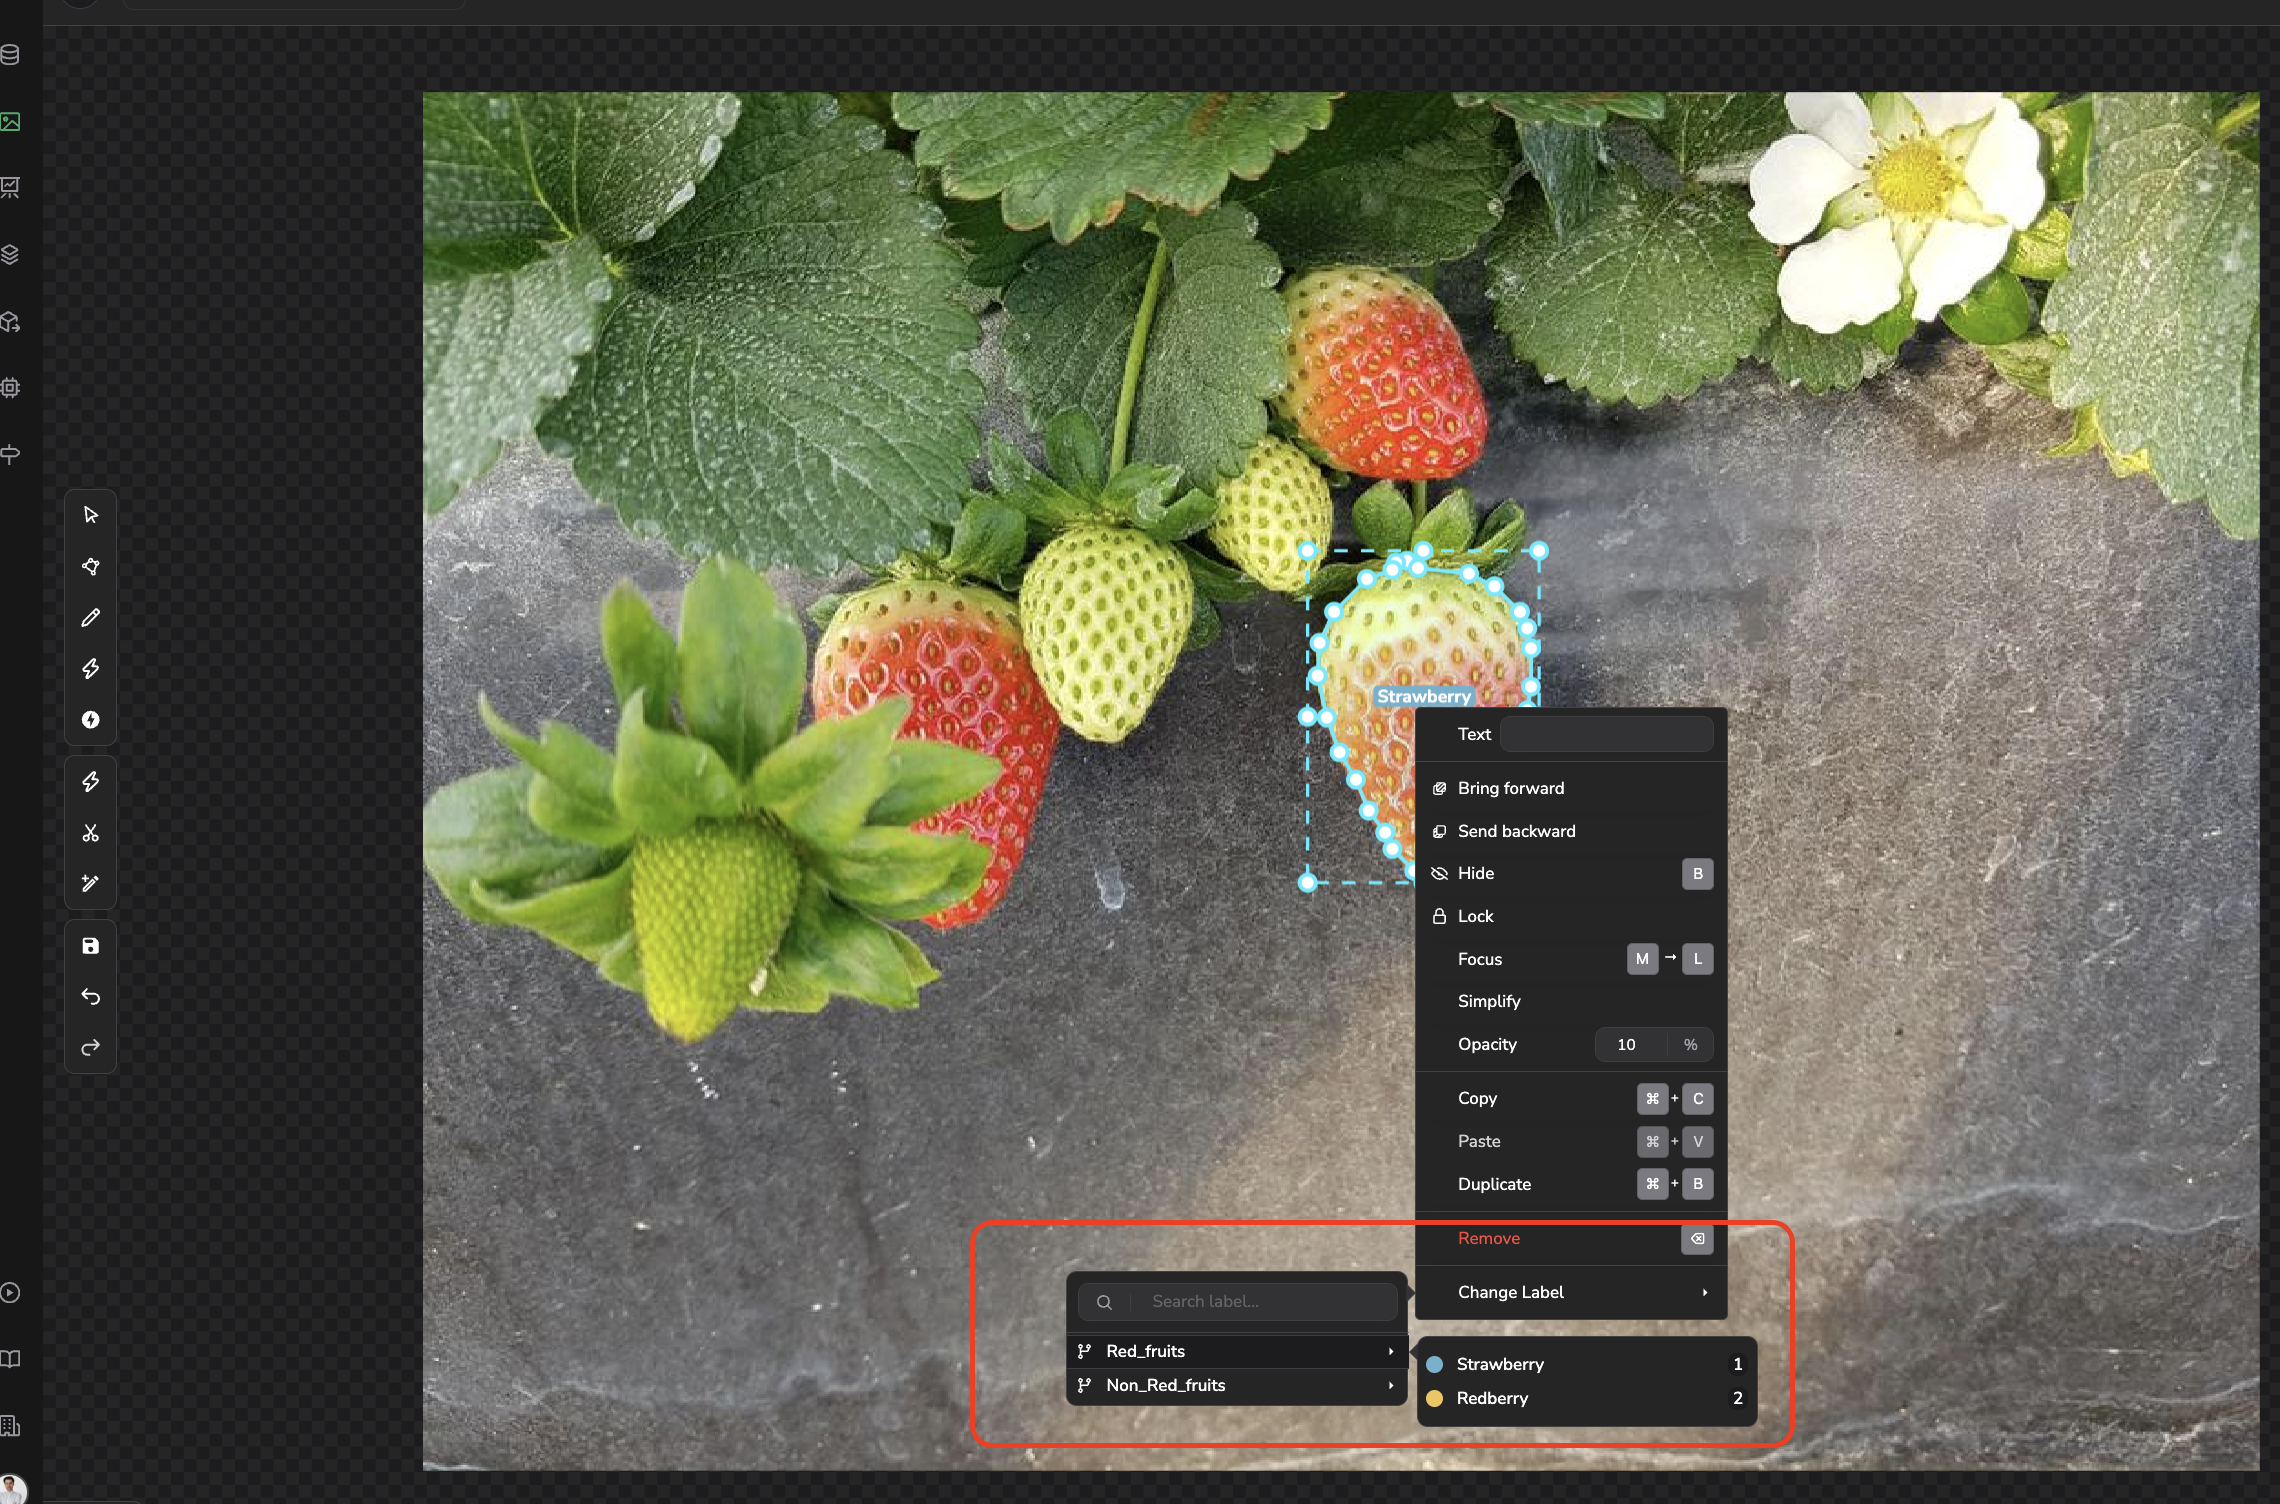
Usage of LabelGroup in the Annotation Tool
This becomes especially valuable once a Dataset grows a large number of fine-grained Label: organizing them under a handful of broader LabelGroup (for instance, grouping car, truck, and bus under a vehicle LabelGroup) keeps the Labelmap structured and easy to navigate, both from the UI and through the SDK, which exposes the same hierarchy via create_label_group, list_label_groups, and Label.get_group() / Label.set_group().
You can create a LabelGroup as shown below:
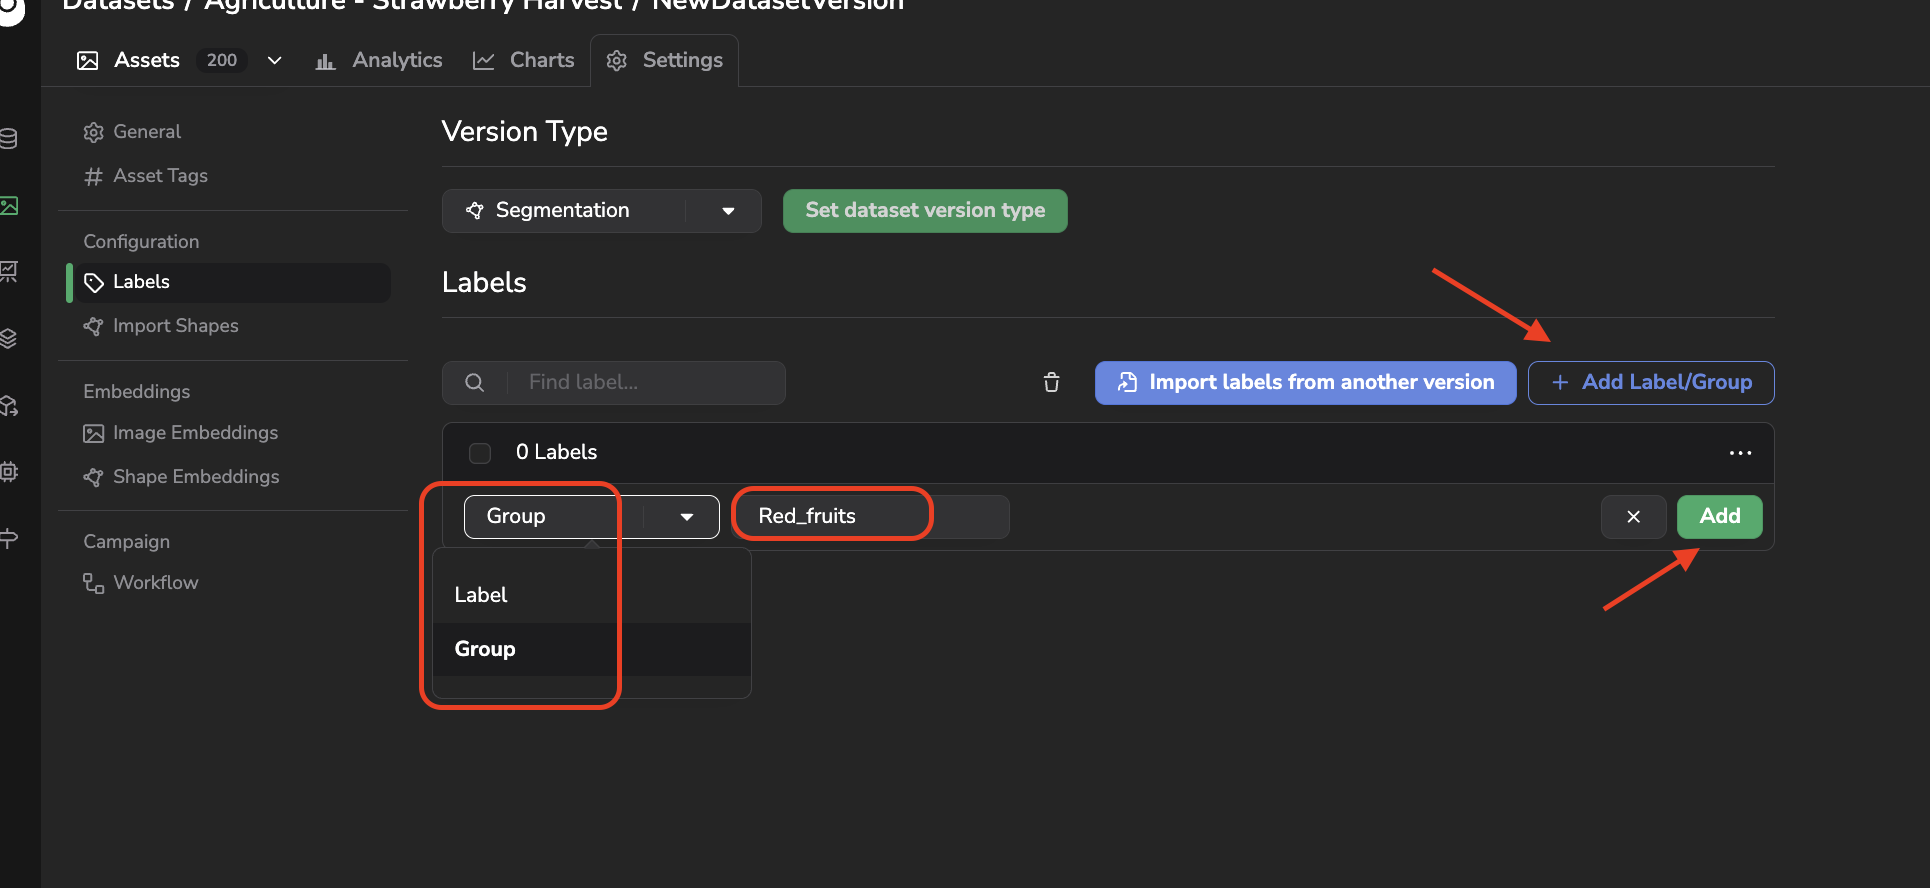
LabelGroup creation
Once a LabelGroup is created, you can add under this one either a proper Label or another LabelGroup to create a multi-level hierarchy:
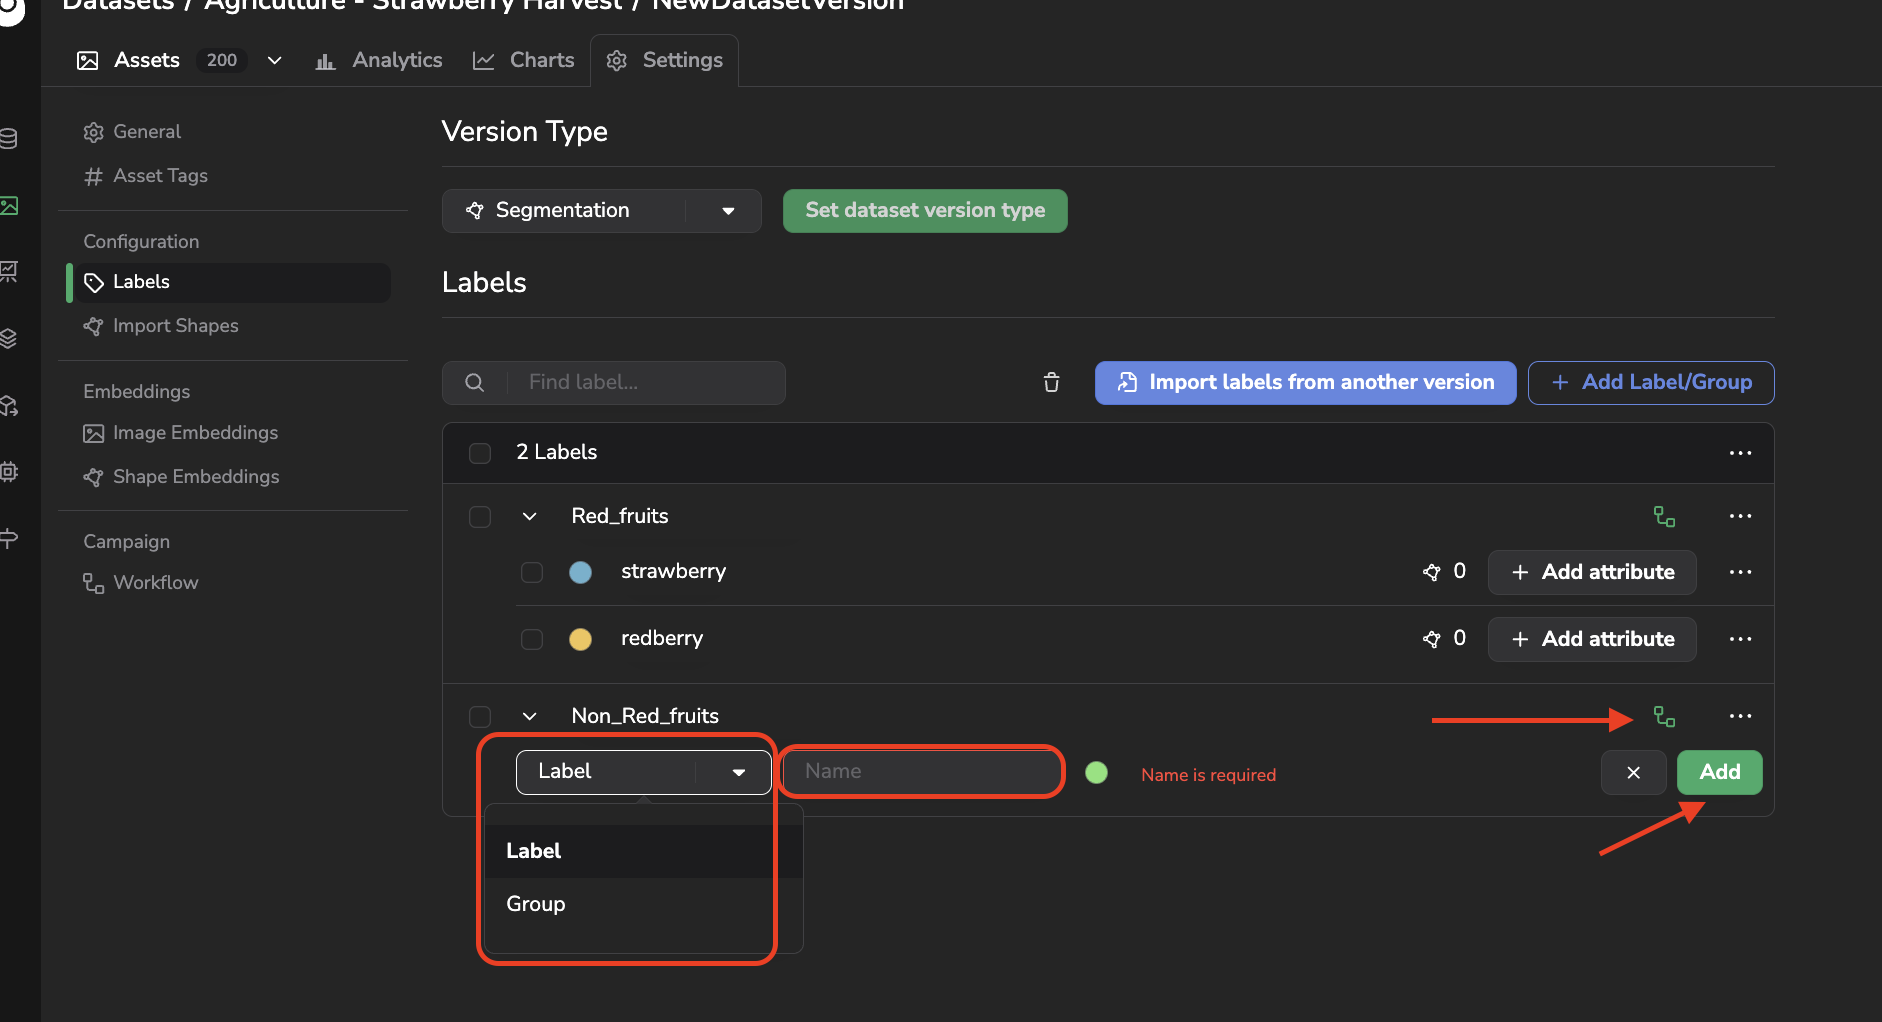
Label or LabelGroup creation under a LabelGroup
Please note that at the end of the day, any Shape that will be created will have a specific Label, not a LabelGroup. LabelGroup are just there to group actual Label together, improve visibility and structure of your Labelmap.
Once created LabelGroup names can be edited, as is the case for Label, by clicking on the pen icon.
You can move a Label in or out of a LabelGroup, or change which LabelGroup it belongs to, at any time, the same way you created it.
d. Add Attribute to a Label
Attribute to a LabelEach Label can also carry one or several Attribute, using the + Add attribute button next to it. Unlike Custom Metadata, which is attached to a Data/Asset as a whole, an Attribute is attached to a Label, and is filled in for each individual Shape using that Label when annotating. This is what lets Computer Vision teams capture structured information beyond the Label name itself, directly on each Shape (for instance, a color or a severity Attribute on a defect Label), instead of relying on free-text or on separate spreadsheets kept outside Picsellia.
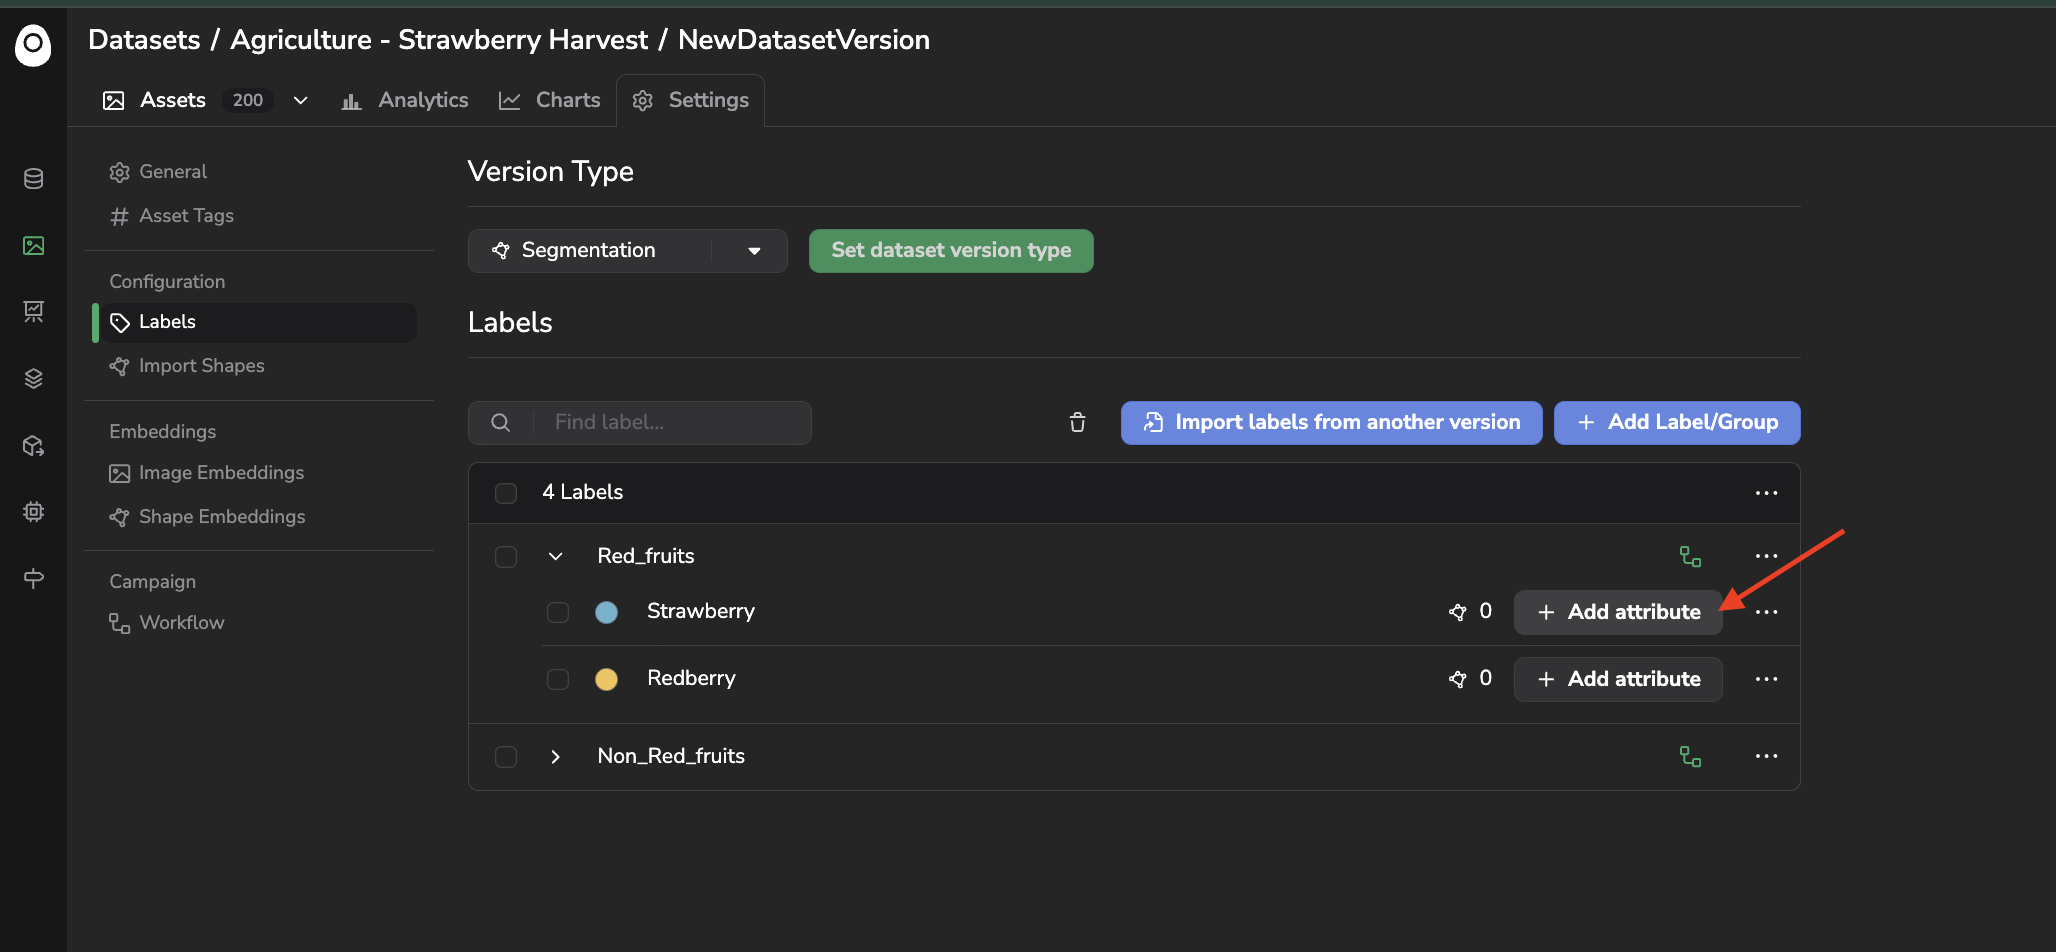
Creation of an Attribute for a Label
For each Label Attribute, you'll be asked to define its type, make it required or not, and potentially define the range of possible values (depending on the type)
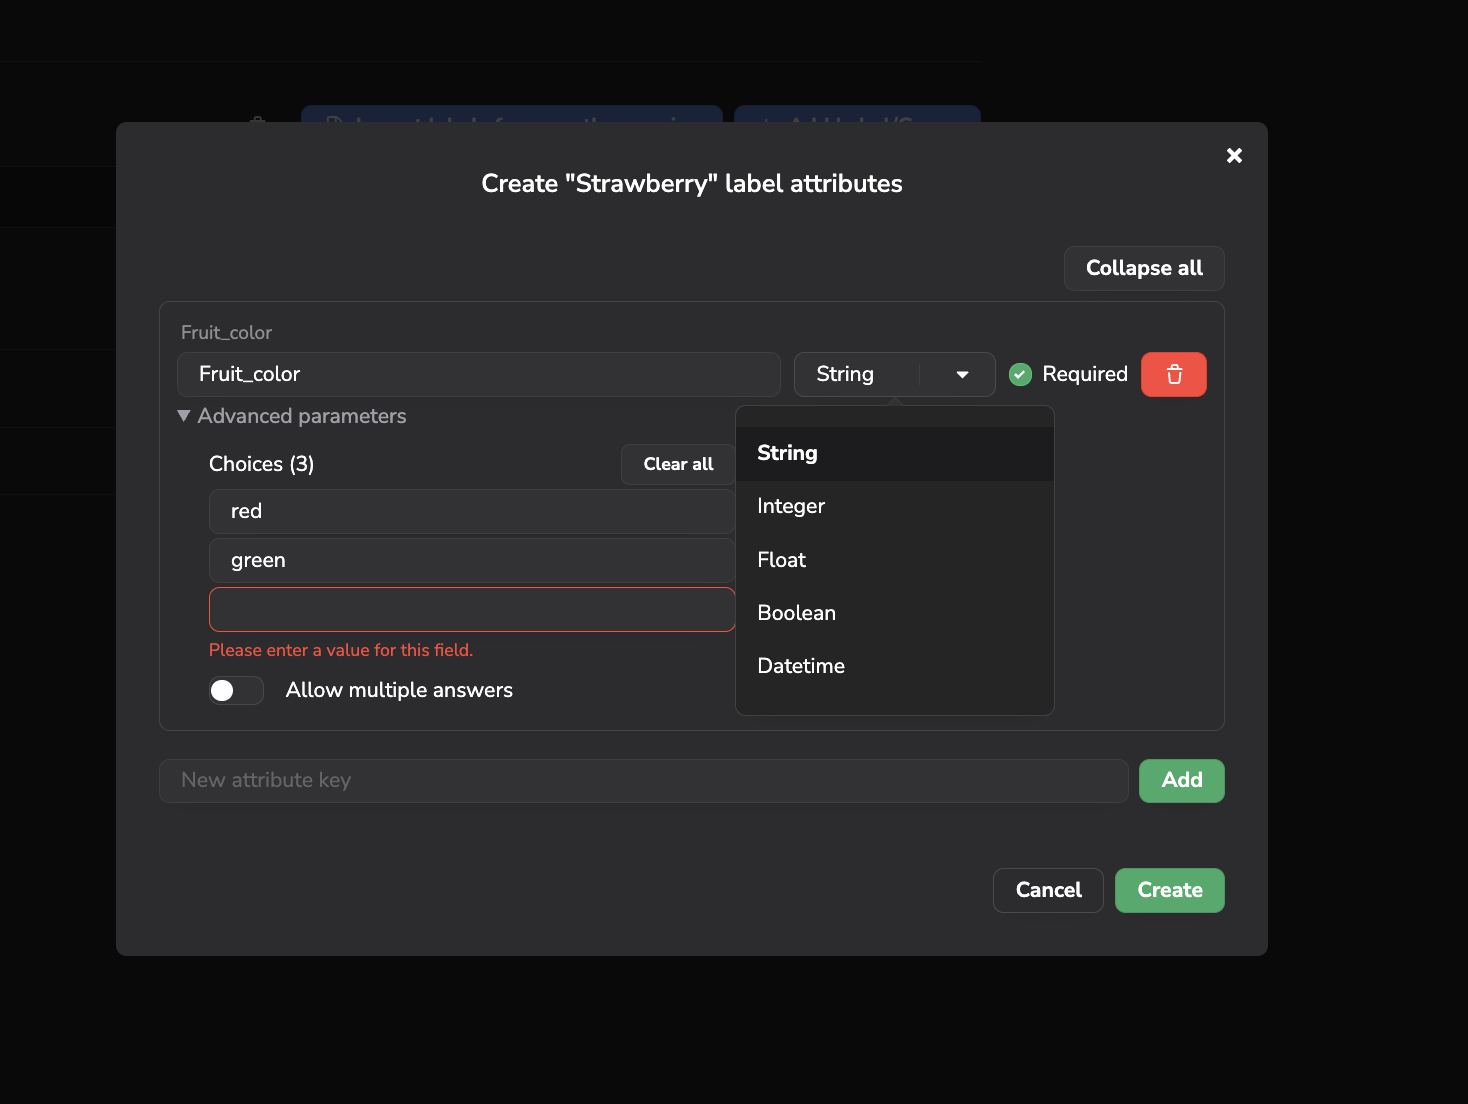
Label Attribute definition
You can also edit or delete an existing Attribute at any time, the same way you created it. Attribute are only briefly mentioned here — detailed on a dedicated page here.
e. Asset Attribute
Asset AttributeBeyond Shape-level Attribute, Picsellia also supports Asset Attribute, attached directly to the Asset as a whole rather than to a single Shape. This lets you capture information that describes the entire Asset rather than one specific object within it, for instance the weather conditions or the acquisition device for an image, independently of how many Shape it ends up being annotated with.
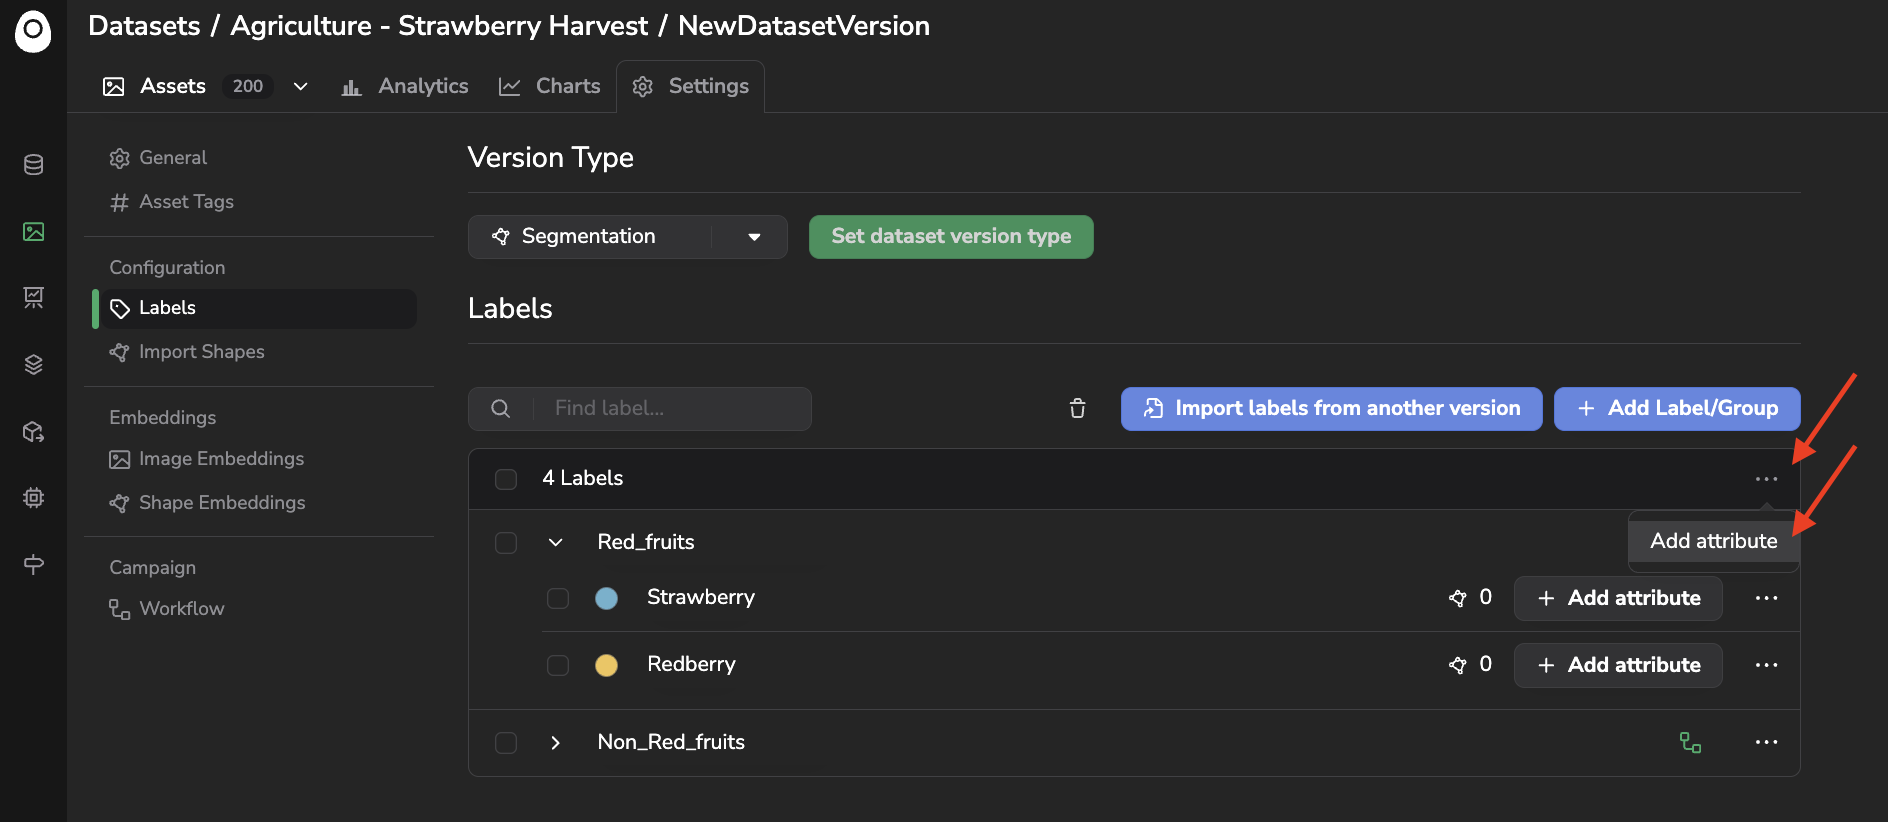
Asset Attribute creation
For each Asset Attribute, you'll be asked to define its type, make it required or not, and potentially define the range of possible values (depending on the type)
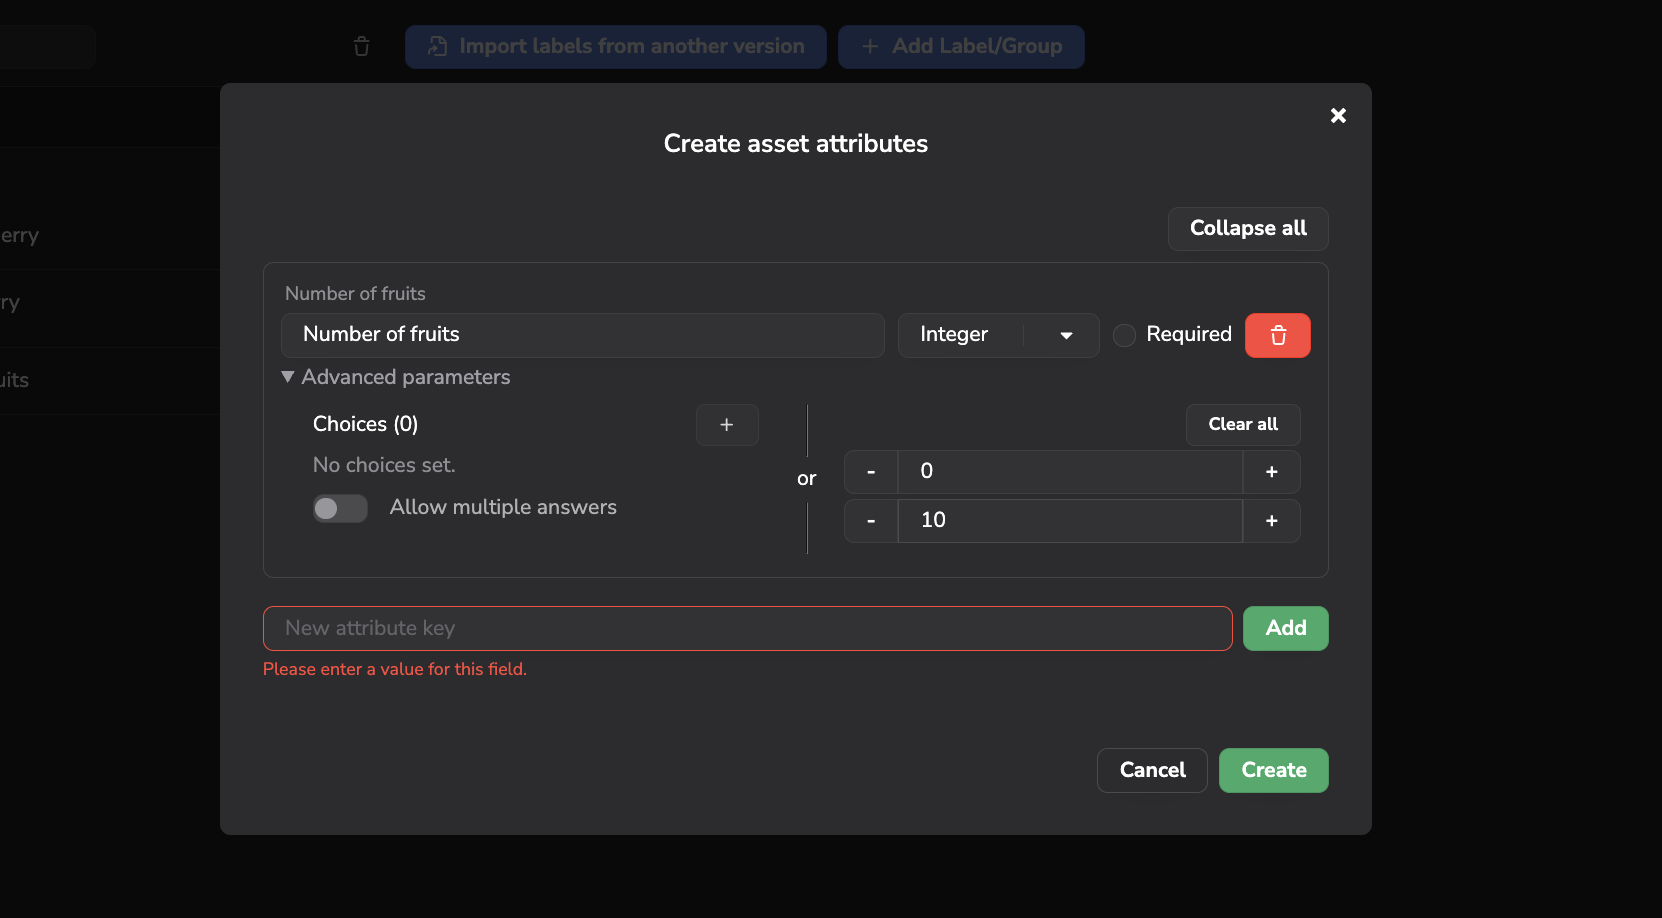
Asset Attribute definition
Asset Attribute are only briefly mentioned here — detailed alongside Shape-level Attribute in a dedicated page here.
When all your Label are created, you can visualize them and the number of Shape in the current DatasetVersion with this Label. The set of Label attached to a DatasetVersion is called the Labelmap.
2. How to create Annotation
AnnotationAn Annotation is a set of Shape that are linked to an Asset in a DatasetVersion. Depending on the DatasetVersion's Version Type, a Shape can be a Classification, Rectangle, Polygon, Mask, Point, Keypoints, or Line.
A Shape always has a Label among the ones defined previously, which may itself belong to a LabelGroup. Depending on that Label, a Shape can also carry values for its Attribute, and, for OCR use cases, a free text field used to transcribe the text it contains.
There are four ways to create or modify Annotation on Picsellia:
- Import Annotation file
- Annotation tool
- Import Annotations from another Dataset Version
- Processing, notably a pre-annotation
Processingthat runs aModelVersionover yourAssetto generateAnnotationautomatically
In summary, an Asset of a DatasetVersion has up to one associated Annotation. Each Annotation can have several Shape, each Shape has a Label among the Labelmap defined in the DatasetVersion Settings.
3. Visualize Annotation
AnnotationNow let's consider our DatasetVersion as already annotated.
Thanks to the different views proposed in your DatasetVersion, you can see the Properties related to Annotation (number of Shape, status, annotated at/by) in Table and Details views, detailed here:
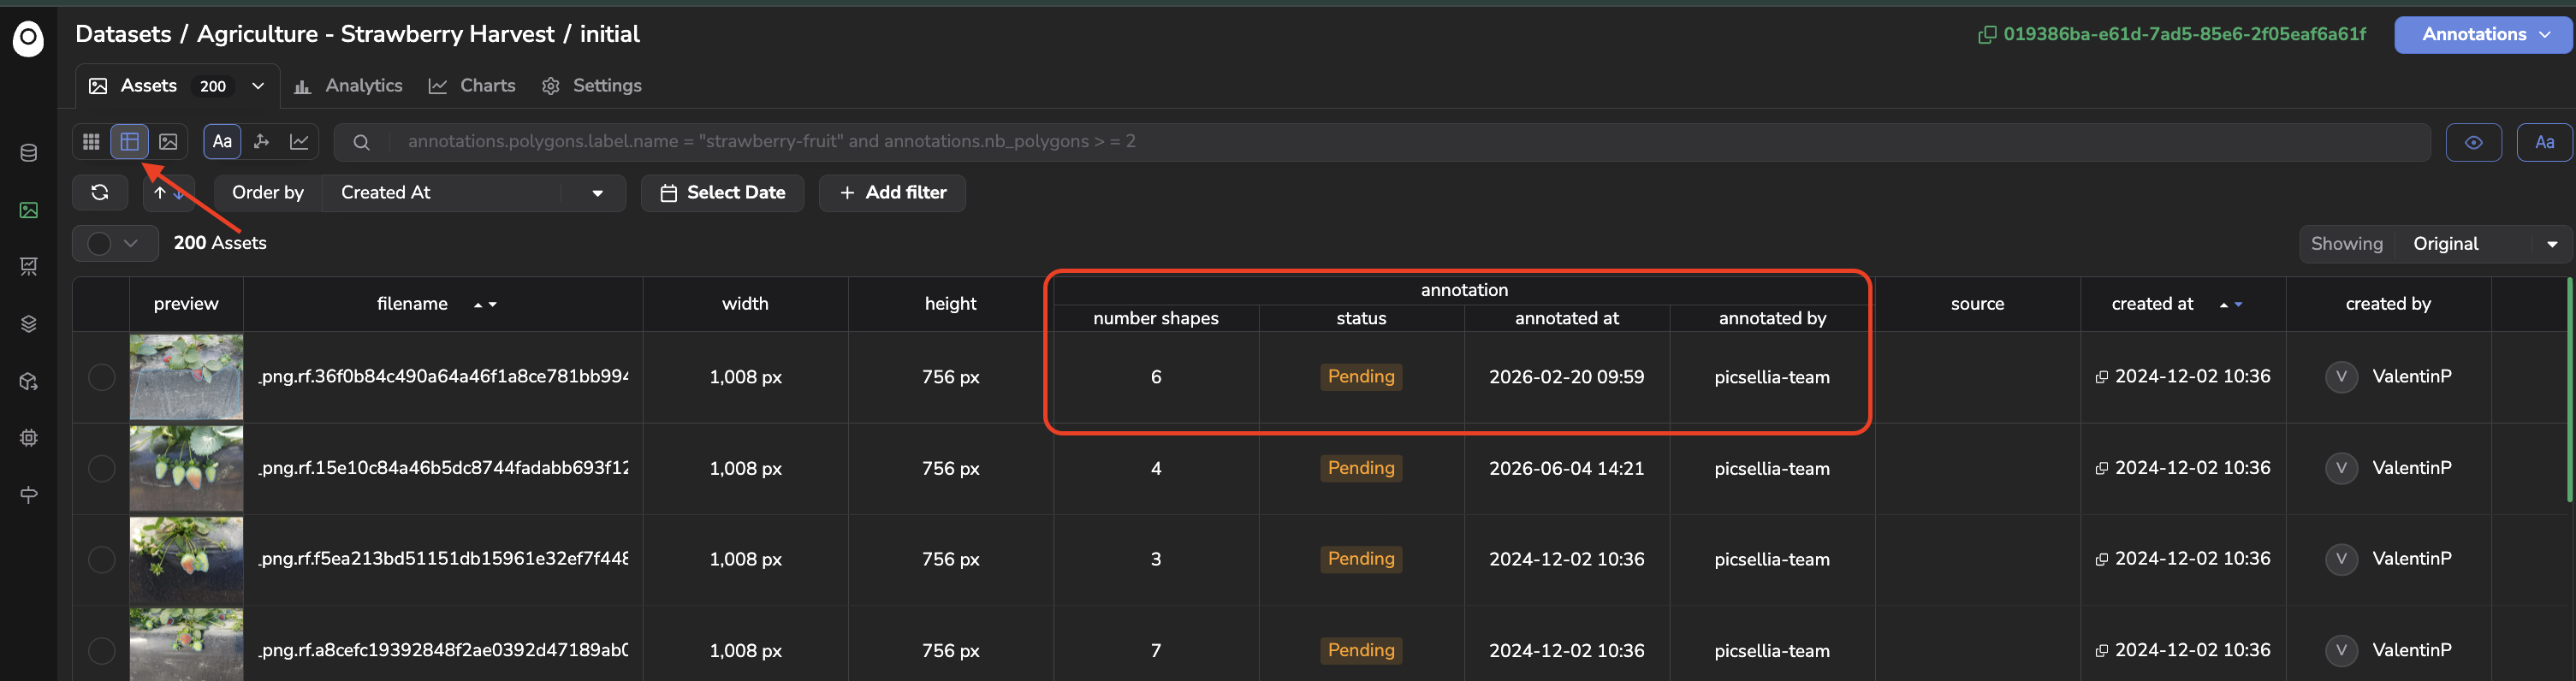
Annotation details in Table view
And visualize the different Shape displayed on the image of your Asset through the Grid and Details views:
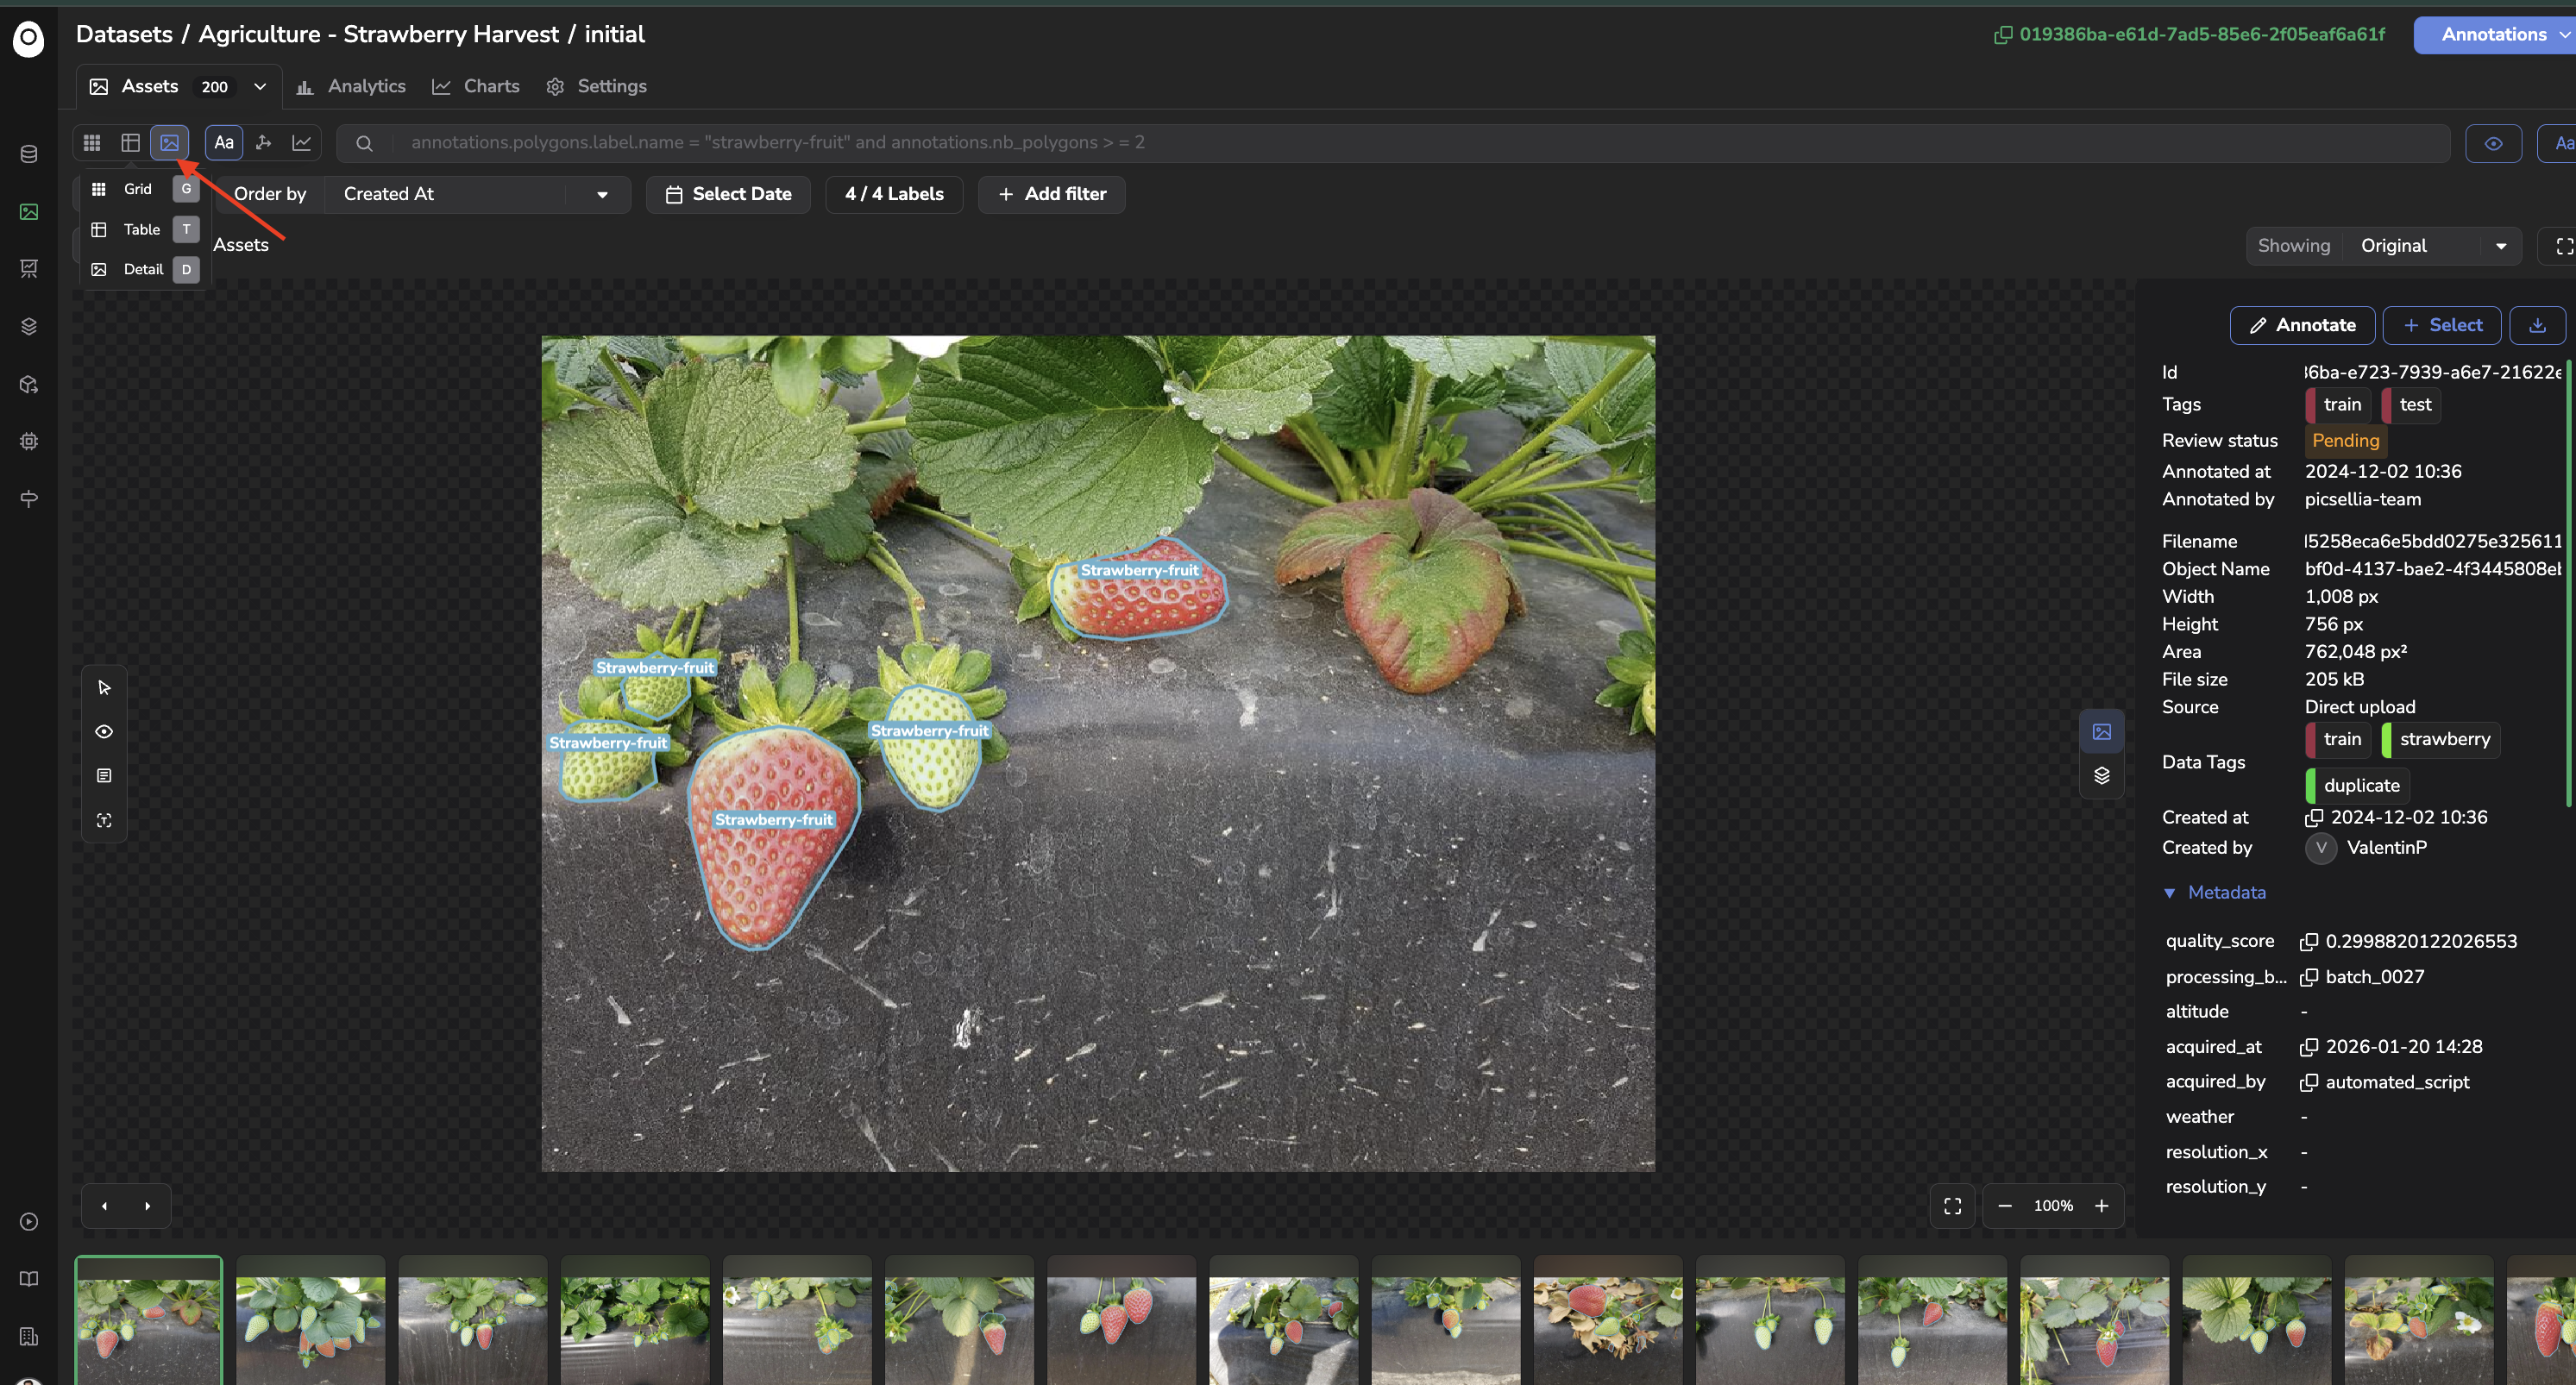
Annotation in the Details view
4. Delete Annotations
AnnotationsYou can delete all the Annotation related to one or several Asset, by selecting them, and clicking on More > Delete annotations.
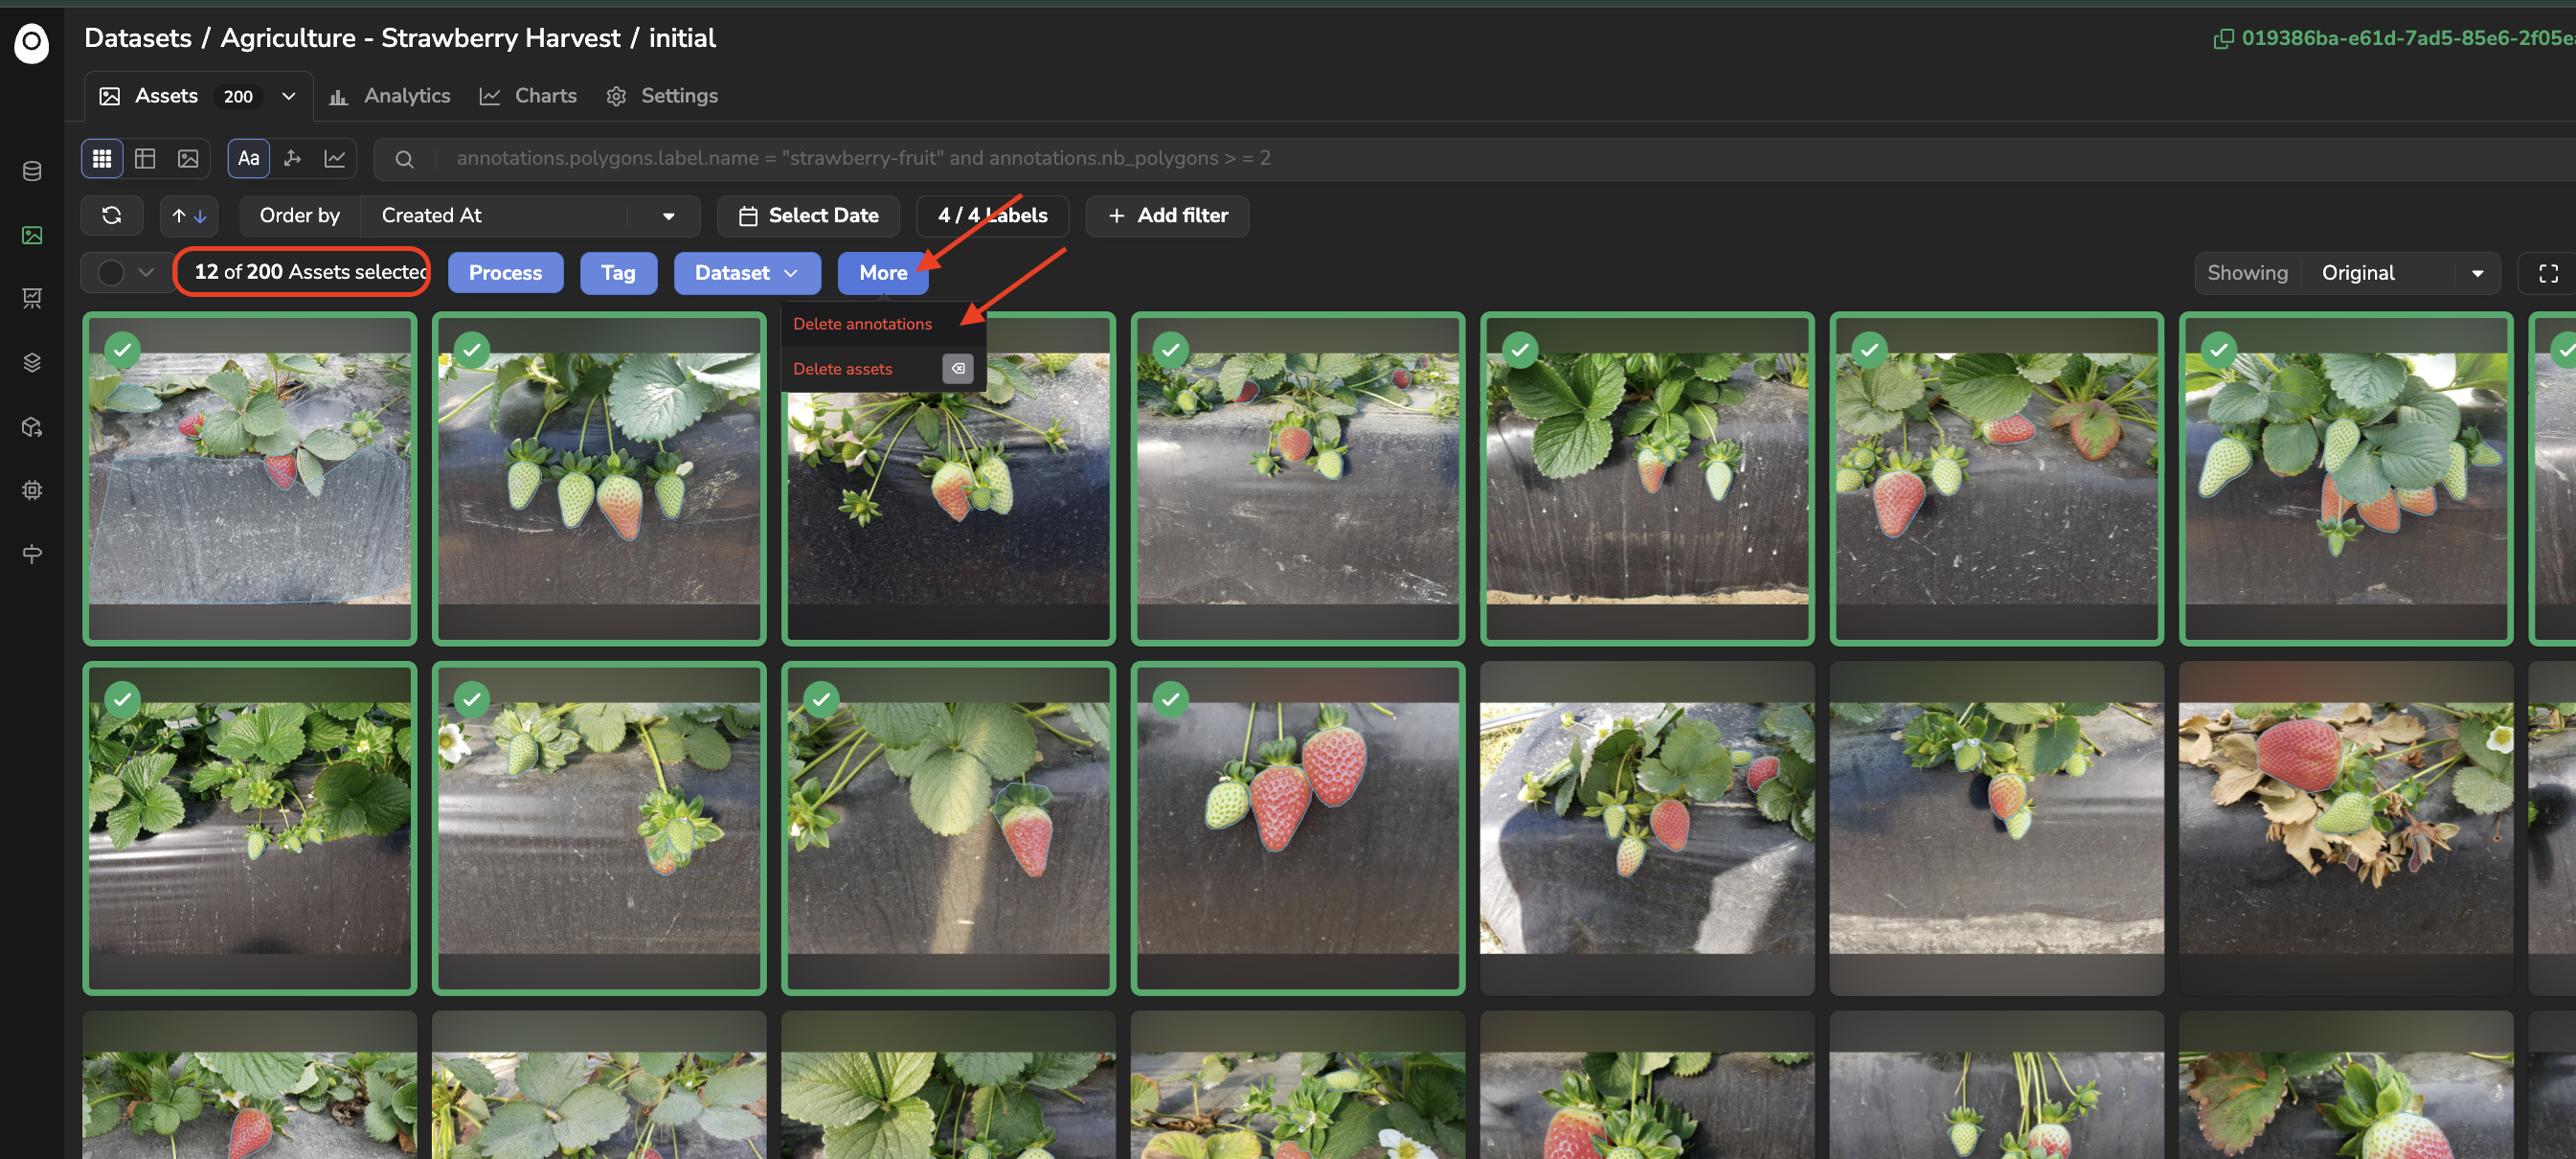
Delete Annotations
Once yourDatasetVersionis annotatedPicsellia computes analytics and lets you build charts to assess the quality of your
Dataset, detailed here.
Updated about 2 months ago