Registry - Deploy a ModelVersion
At this stage, you are supposed to have at least one Model and ModelVersion in your Private Model Registry, either created from an Experiment or manually imported.
It is now high time to deploy thisModelVersion and make it perform inferences. To do so we will instantiate from the ModelVersion that needs to be deployed a Deployment.
ADeployment is a Picsellia object, linked to a ModelVersion from the Private Model Registry , that allows users to track and monitor the ModelVersion behavior. It has three main features:
- Monitor
ModelVersionbehavior by displaying performance metrics - Visualize the predicted images and associated prediction done by the
ModelVersion - Define a
ModelVersionretraining pipeline
1. Deploy button
To create a Deployment from a ModelVersion, you need to access it in your Private Model Registry.
From the ModelVersion overview, you just need to click on Deploy.
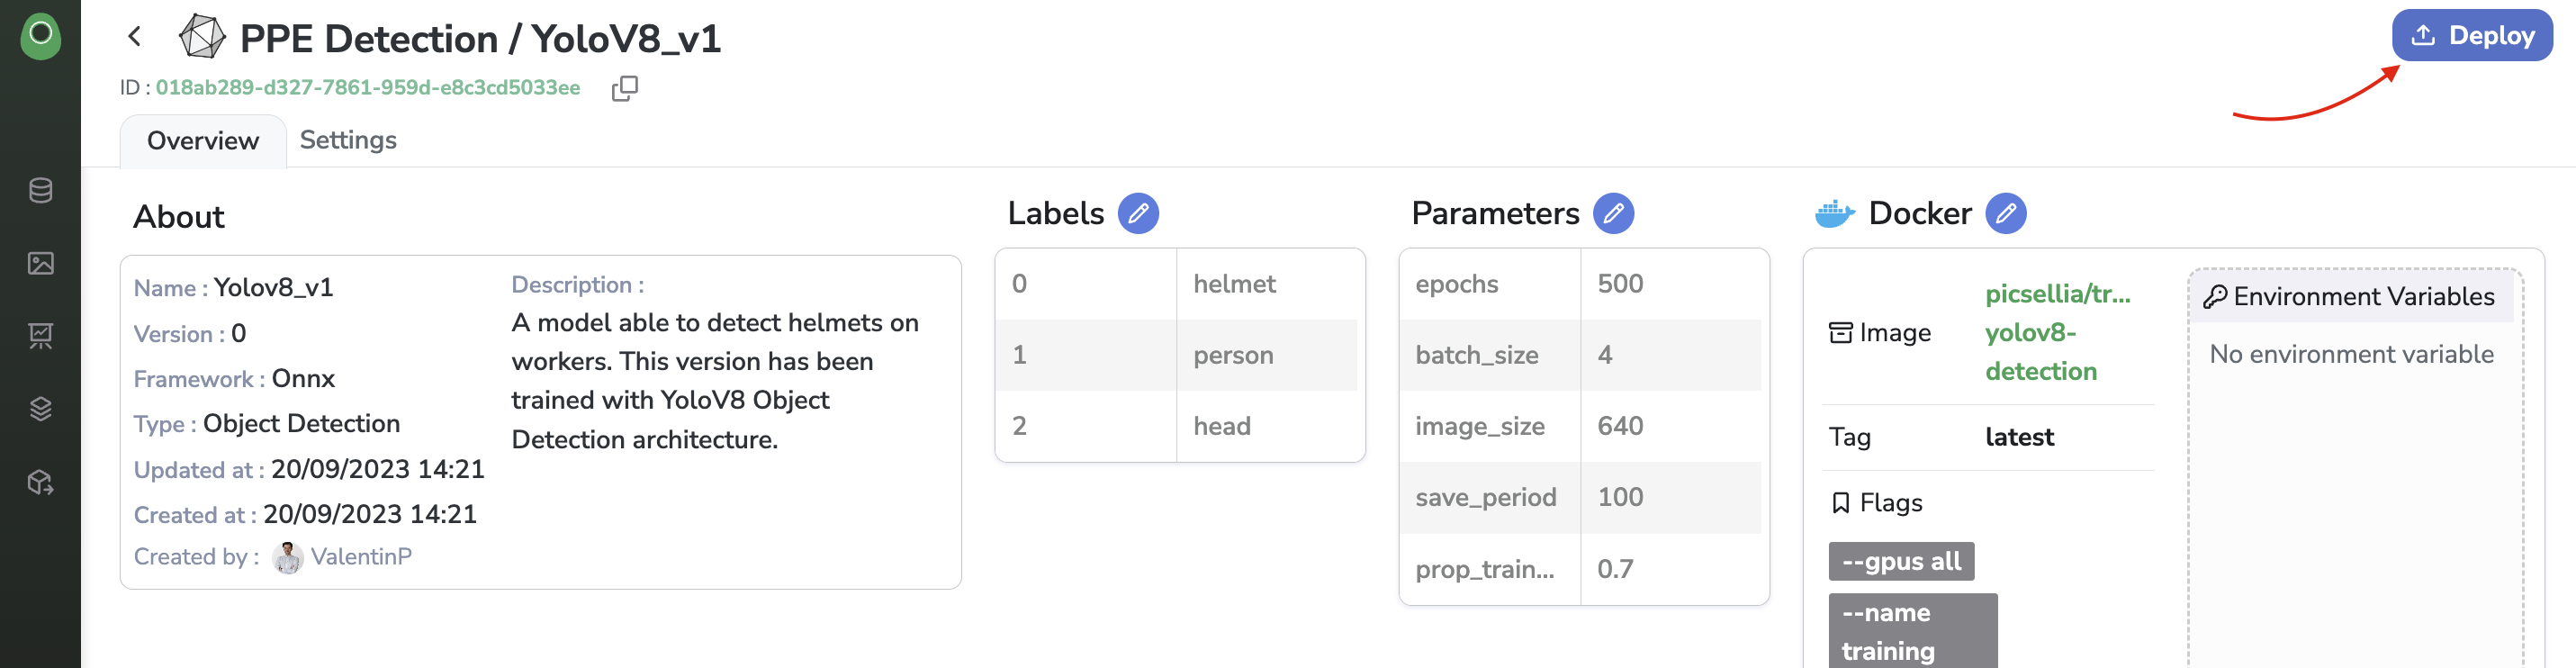
Deploy button from the ModelVersion overview
A modal will then open letting you choose among two deployment strategies as shown below:
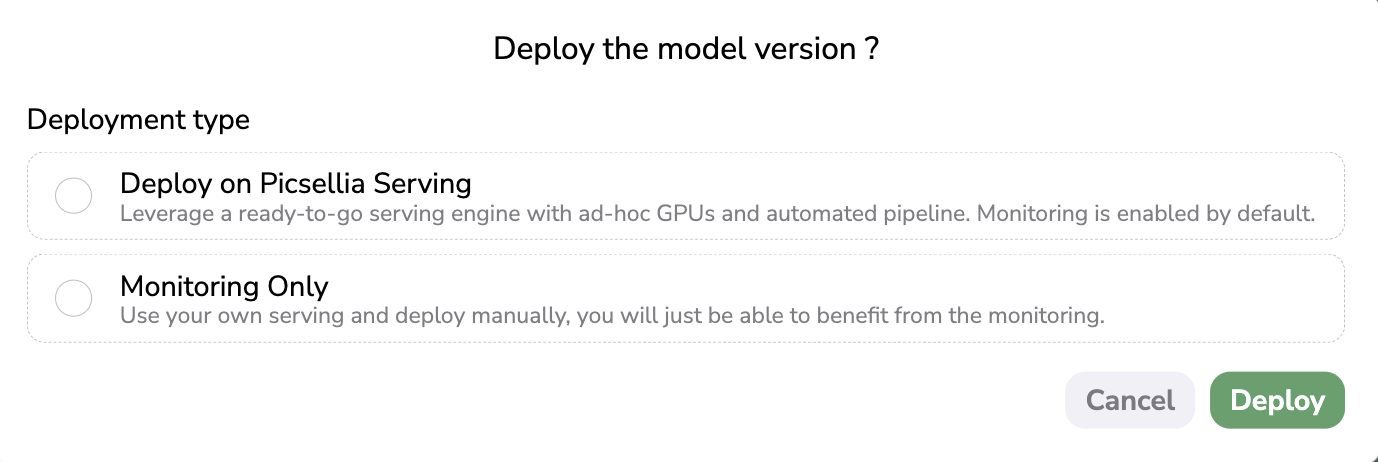
Deployment modal
2. Deployment strategies
At this stage, you need to assess where your ModelVersion will be hosted and served, it means the infrastructure that will operate the ModelVersion and allow it to make Predictions.
As is the case for the training, you can either use the infrastructure provided by Picsellia or use your infrastructure to host your ModelVersion.
In both cases, if you want to leverage the Deployment features of Picsellia, the used infrastructure must be connected to the related Deployment in your Organization so that you can visualize the Predictions done by the ModelVersion and access the performance dashboard.
A. Deploy on Picsellia Serving
In case you want to use the Picsellia infrastructure to host and serve your ModelVersion, you need to select Deploy on Picsellia Serving. In this case, Picsellia is handling the whole deployment workflow, yourModelVersion will be deployed on the Picsellia Serving Engine hosted on OVH Cloud and powered by Tesla V100s GPUs.
This workflow is fully transparent for the user, meaning that aDeployment will be instantiated for you, and the API connection between your ModelVersion hosted on the Picsellia Serving Engine and the Deployment will be done automatically.
This way all the Predictions done by the ModelVersion, will be logged seamlessly in the Deployment and, as a consequence, the performance metrics are computed and displayed in the Dashboard. More details about Deployment are available here.
In the Deployment modal, when selecting the Deploy on Picsellia Serving option, you will be asked to input a Threshold. Only Shape predicted on an image by the ModelVersion with a Confidence score over this Threshold will be considered. A best practice is to set a low Threshold at first to see how the ModelVersion is behaving and modify it later in the Settings of the Deployment.
Please note that no Threshold is requested to deploy a ModelVersion that is doing Classification as Detection Type.
You will also be asked to select a Datalake. Indeed, any predicted image visualized in a Deployment has to be physically stored through a Storage Connector that is linked to a Datalake. So in case the current Organization has several Datalake instances, you can choose among them where the predicted images will be stored and as a consequence in which Datalake they will be visualizable.
Once the Threshold and Datalake have been defined, you just need to click on Deploy to seamlessly deploy your ModelVersion on the Picsellia Serving Engine and initialize a Deployment.
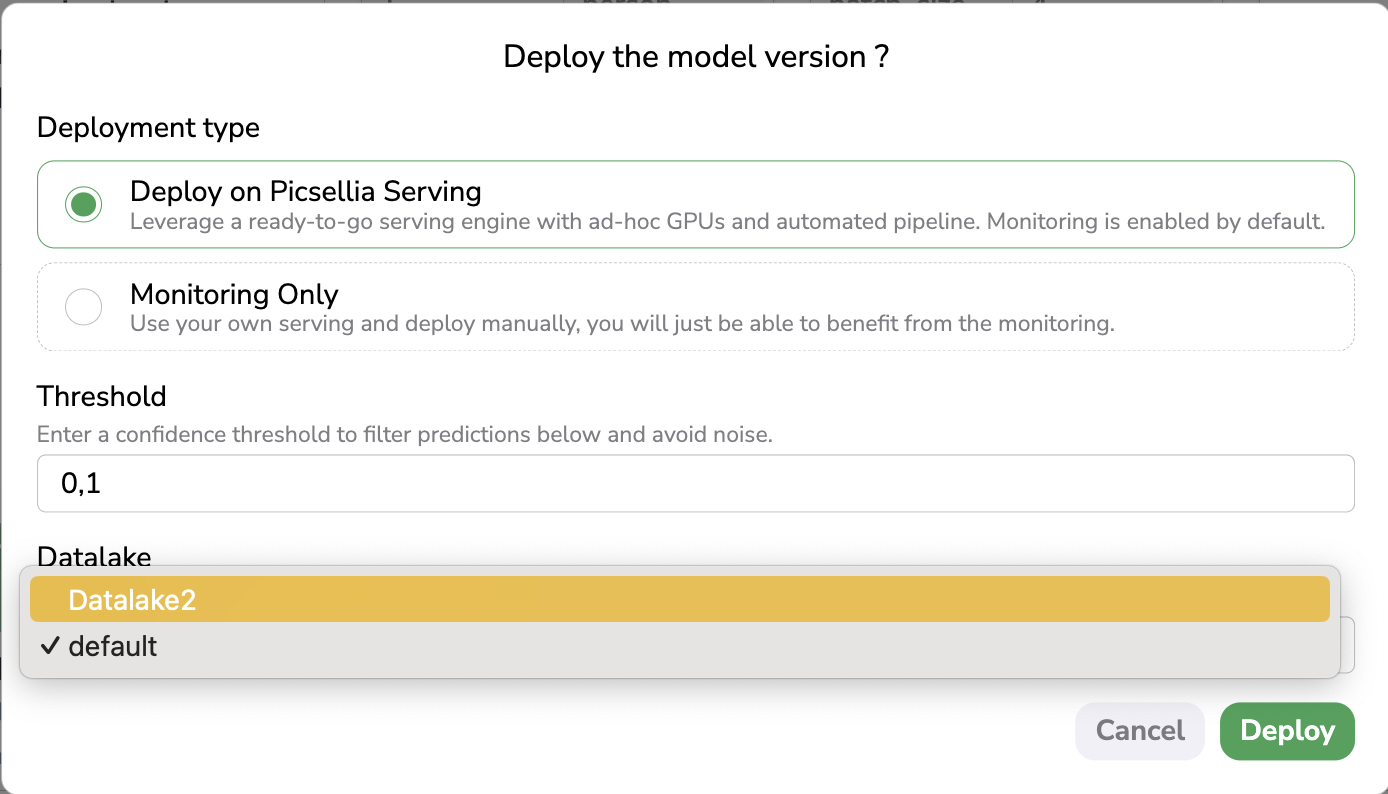
Deploy on Picsellia Serving
After a few seconds, you will be automatically redirected to the freshly created Deployment.
Using Picsellia Serving Engine is tracked by MPUTo use the Picsellia Serving Engine, you need to ensure that you still have MPU availble for the current Organization.
Indeed as doing
Predictionrequires GPU usage, this usage is contractually tracked and billed though MPU. You can track you MPU consumption in the Plans and Usage Dashboard as detailled here.
Please note that the Picsellia Serving Engine has been designed to serve ModelVersion having as framework TensorFlow or Pytorch.
The Picsellia Serving Engine is able to serve properly any ModelVersion that is inherited from a Picsellia Experiment using as Base Architecture a ModelVersion from the Public Model Registry.
However, if you have manually imported theModelVersion to your Private Model Registry, there is no guarantee that this ModelVersion can be properly served by the Picsellia Serving Engine. In this case, it is strongly advised to contact the Picsellia team before deploying this ModelVersion on the Picsellia Serving Engine.
B. Monitoring only
In case you want to deploy your ModelVersion on your own serving infrastructure, you can download all the model files from the ModelVersion overview as explained here and deploy it on your infrastructure.
In order to leverage the Deployment features of Picsellia, you should from the ModelVersion overview click on Deploy, and then in the modal, select Monitoring Only.
In the Deployment modal, when selecting the Monitoring Only option, you will be asked to input a Threshold. Only Shape predicted on an image by the ModelVersion with a Confidence score over this Threshold will be considered. A best practice is to set a low Threshold at first to see how the ModelVersion is behaving and modify it later in the Settings of the Deployment. Please note that no Threshold is requested to deploy a ModelVersion that is doing Classification as Detection Type.
You will also be asked to select a Datalake. Indeed, any predicted image visualized in a Deployment has to be physically stored through a Storage Connector that is linked to a Datalake. So in case the current Organization has several Datalake instances, you can choose among them where the predicted images will be stored and as a consequence in which Datalake they will be visualizable.
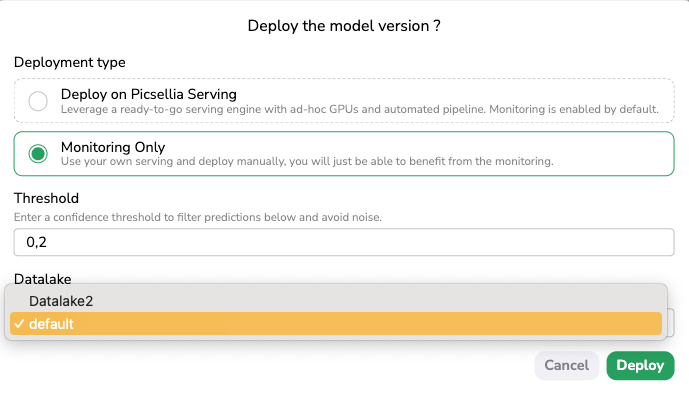
Monitoring Only
After having clicked on Deploy, a Deployment related to this ModelVersion will be created.
Now that the Deployment is created on Picsellia and attached to a ModelVersion from your Private Model Registry, you need to perform the interconnection between your infrastructure that is serving your ModelVersion and the related Deployment created on Picsellia.
Basically, you need to add from your serving infrastructure some API calls (using the Picsellia Python SDK) after each Prediction performed by the ModelVersion on your infrastructure to send back to the related Picsellia Deployment, the PredictedAsset and the associated Prediction. This way, from the Deployment, you will be able to visualize the Predictions, access performance metrics, and review the Prediction for future usage.
Here is the procedure to follow the perform the interconnection between your serving infrastructure and your Picsellia Deployment.
Obviously, by using your own infrastructure to serve your ModelVersion, no MPU quota will be consumed.
Regardless of the deployment strategy chosen, your ModelVersion is now deployed, and the associated Deployment has been created in your Organization. In the next pages, we will dive deep into the different features related to Picsellia Deployment.
Updated about 1 year ago