

Metadata and Custom Metadata
We created a system of Metadata to enhance your Data management. Here is how to use it.
For each Data you push on Picsellia, you can add additional information that you want to keep throughout your pipelines. Two systems coexist:
Metadata: a fixed, predefined schema of keys, available to everyData(detailed below).Custom Metadata: your own arbitrary key/value fields, detailed here.
For a Computer Vision project, this means you can capture the acquisition context of each image or video, GPS position, timestamp, weather, sensor or camera settings, alongside a business reference from your own systems, and later use it to build geographically or temporally balanced Dataset, debug a model's failures against specific shooting conditions, or simply trace a Data back to the batch, site, or inspection it came from.
Please note that even if Metadata and Custom Metadata are linked to a Data at the Datalake level, they will always be displayed, searchable, and editable at every step of the Picsellia platform, for instance in Datalake, DatasetVersion, Annotation Studio, Evaluation, etc.
1. Metadata
Metadata
Metadata creationUnlike
Custom Metadata, the fixedMetadataschema cannot be filled from the UI: it must be set through the SDK when uploadingData, detailed here.
Here is what can be stored in Picsellia and its associated format:
latitude: float
longitude: float
altitude: float
acquired_at: datetime
acquired_by: str = Field(max_length=128)
weather: str = Field(max_length=1024)
resolution_x: float
resolution_y: float
resolution_unit: str = Field(max_length=128)
compression: str = Field(max_length=128)
manufacturer: str = Field(max_length=128)
software: str = Field(max_length=128)
color_space: str = Field(max_length=128)
custom_id: str = Field(max_length=128)
reference: str = Field(max_length=128)
yaw: float
pitch: float
roll: float
focal_length: float
sensor_width: float
brand: str = Field(max_length=128)
region_of_interest: str = Field(max_length=128)
For a given Data the associated Metadata are displayed in the Details view:
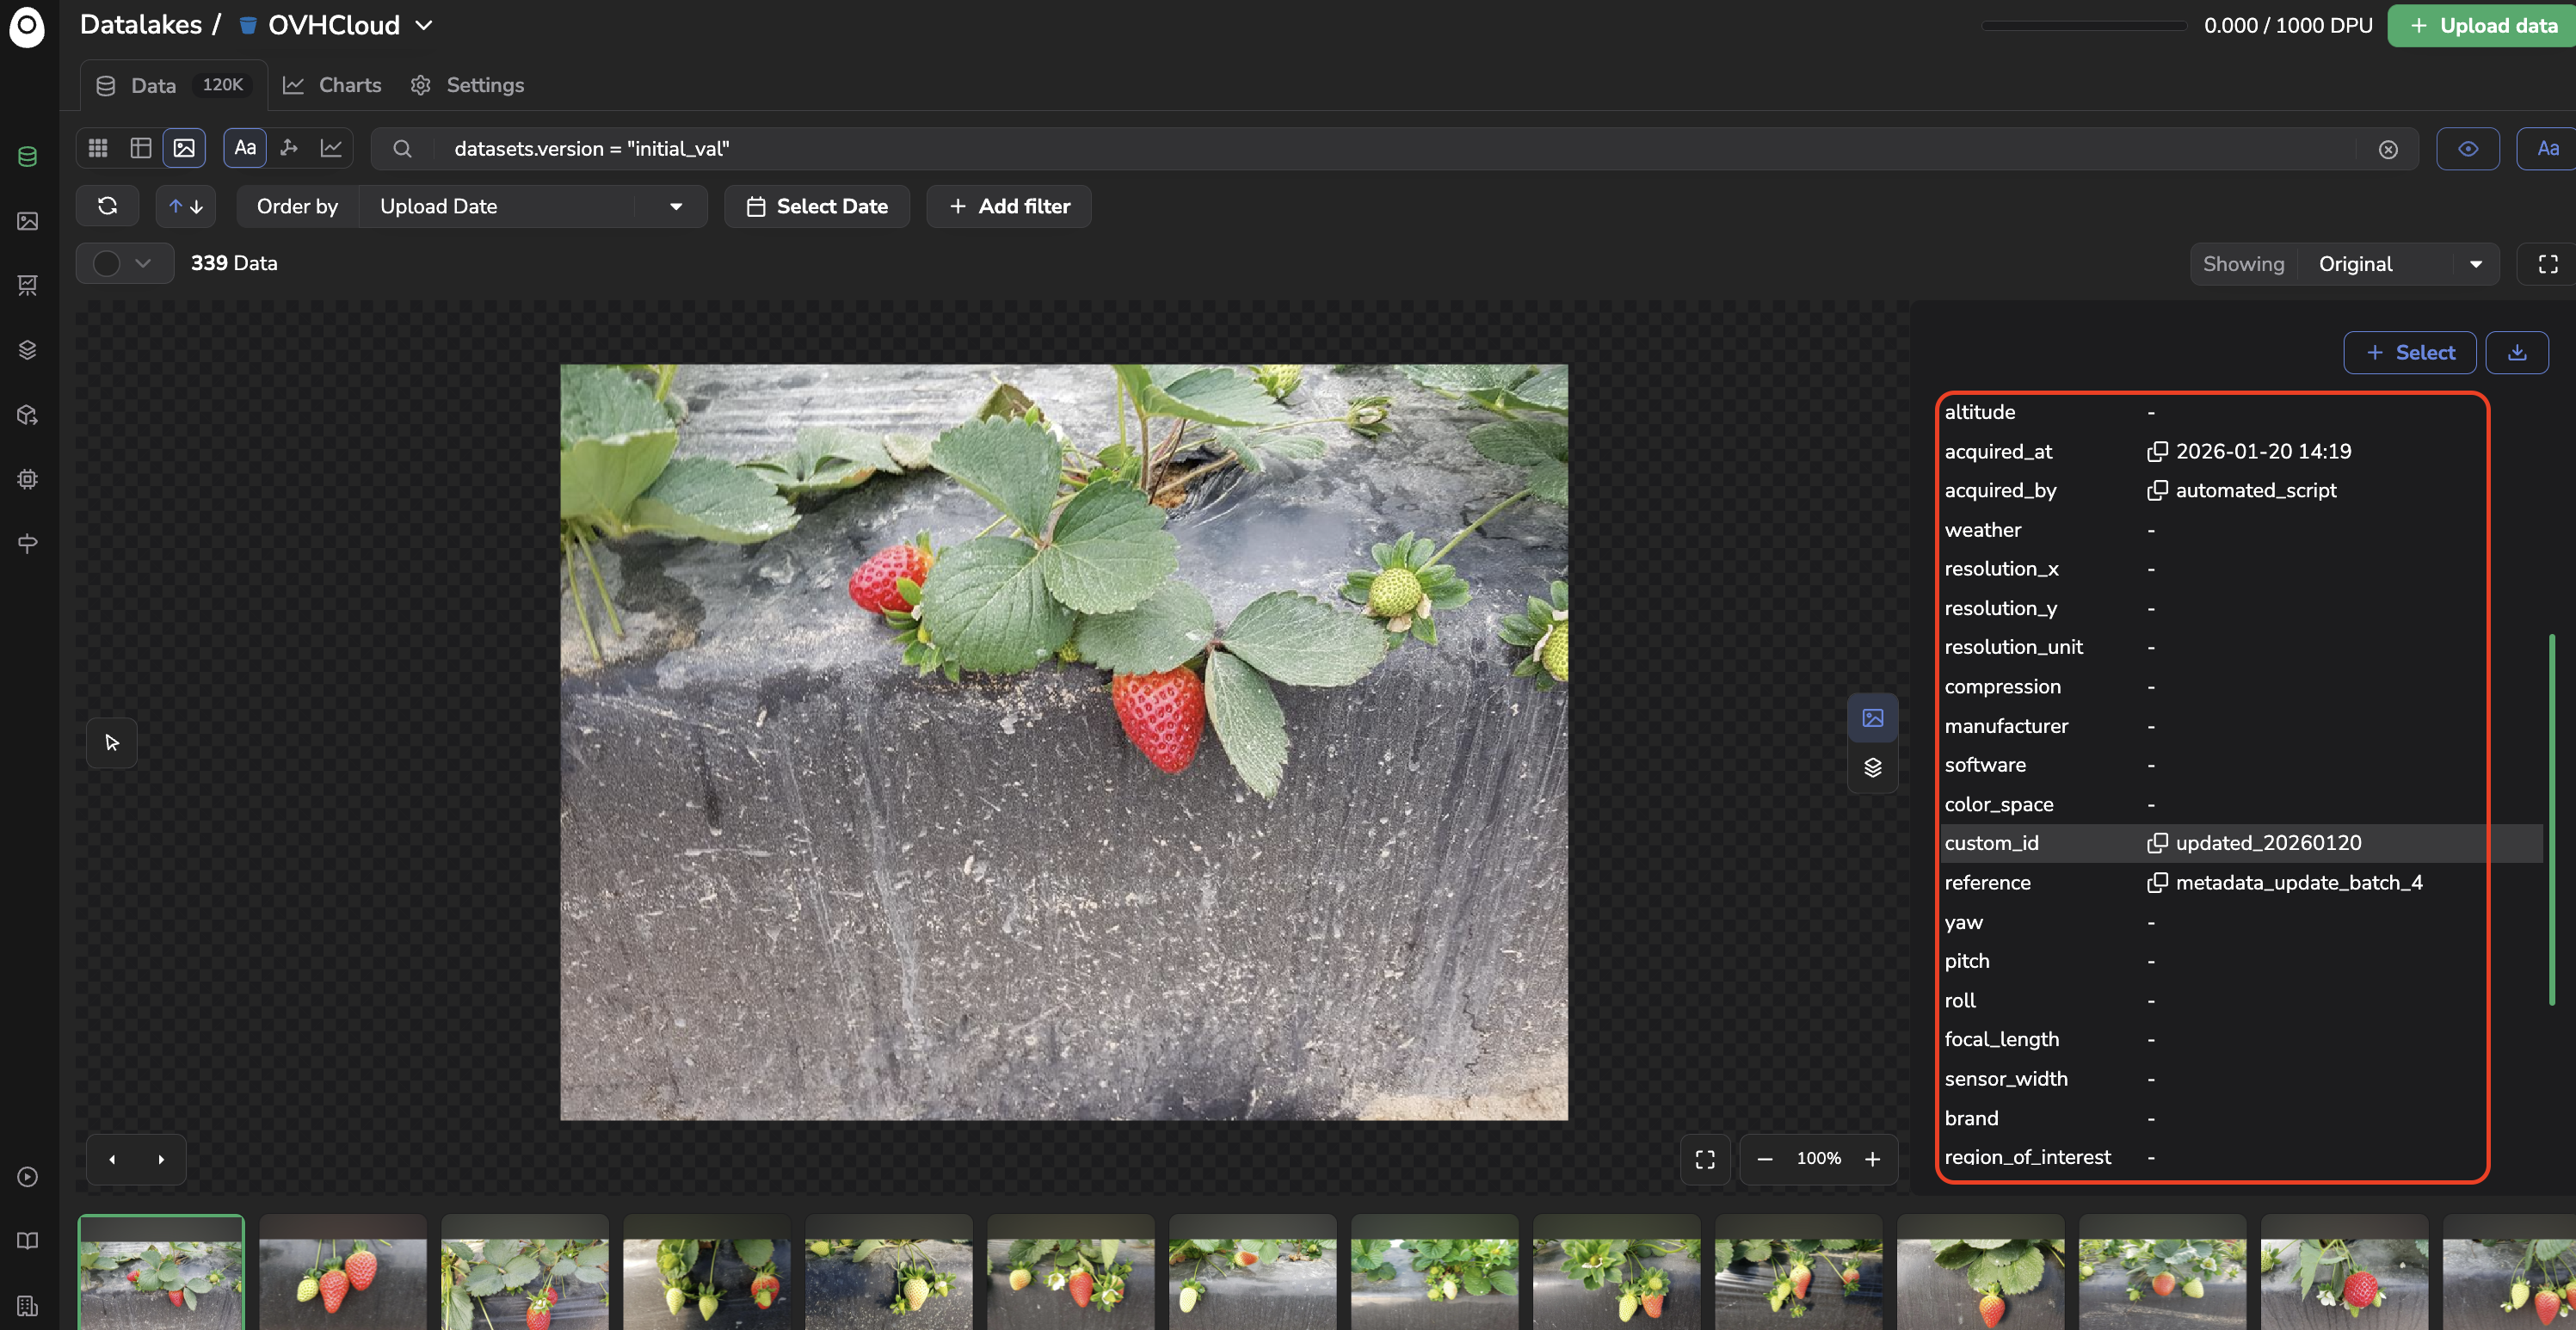
Metadata in the Details view
2. Custom Metadata
Custom MetadataUnlike the fixed Metadata schema, Custom Metadata lets you define your own key/value fields, each with a chosen type: String, Integer, Float, Datetime, or Boolean.
Custom Metadata can be managed directly from the UI, from the Metadata section of any Details view across the platform (Datalake, Dataset, Annotation Studio, Evaluation, etc.):
-
Add: click + Add, provide a key, select its type, and provide a value.
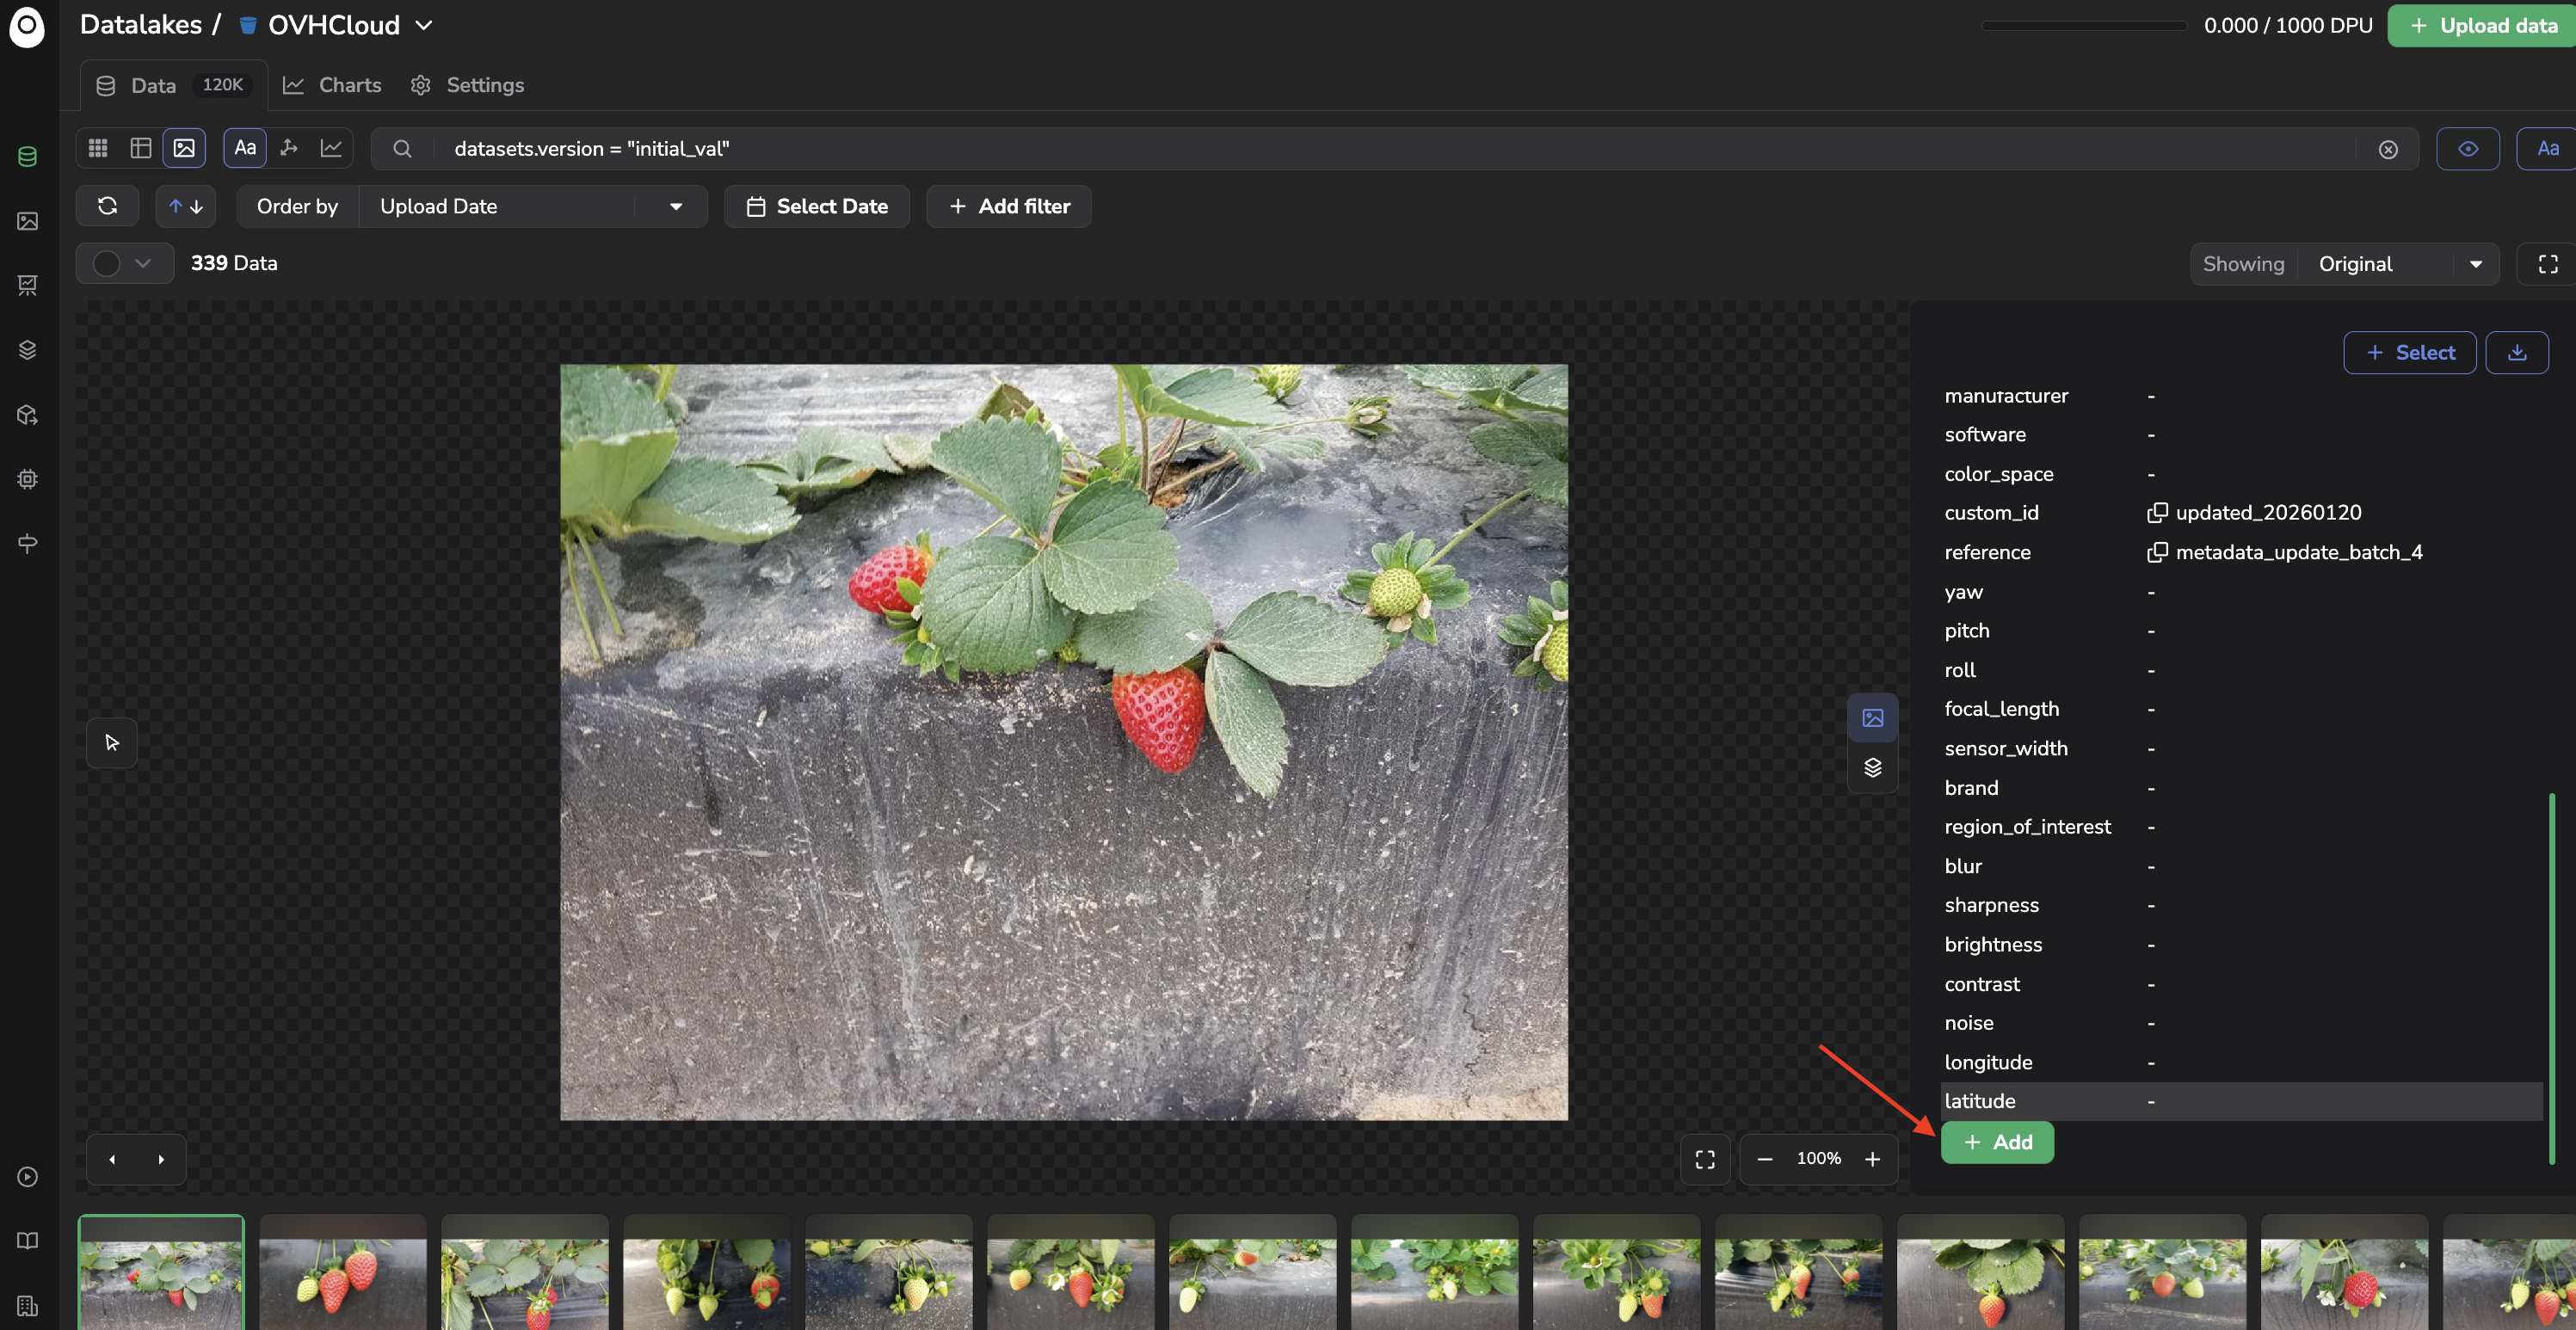
Create a new Custom Metadata for a given Data
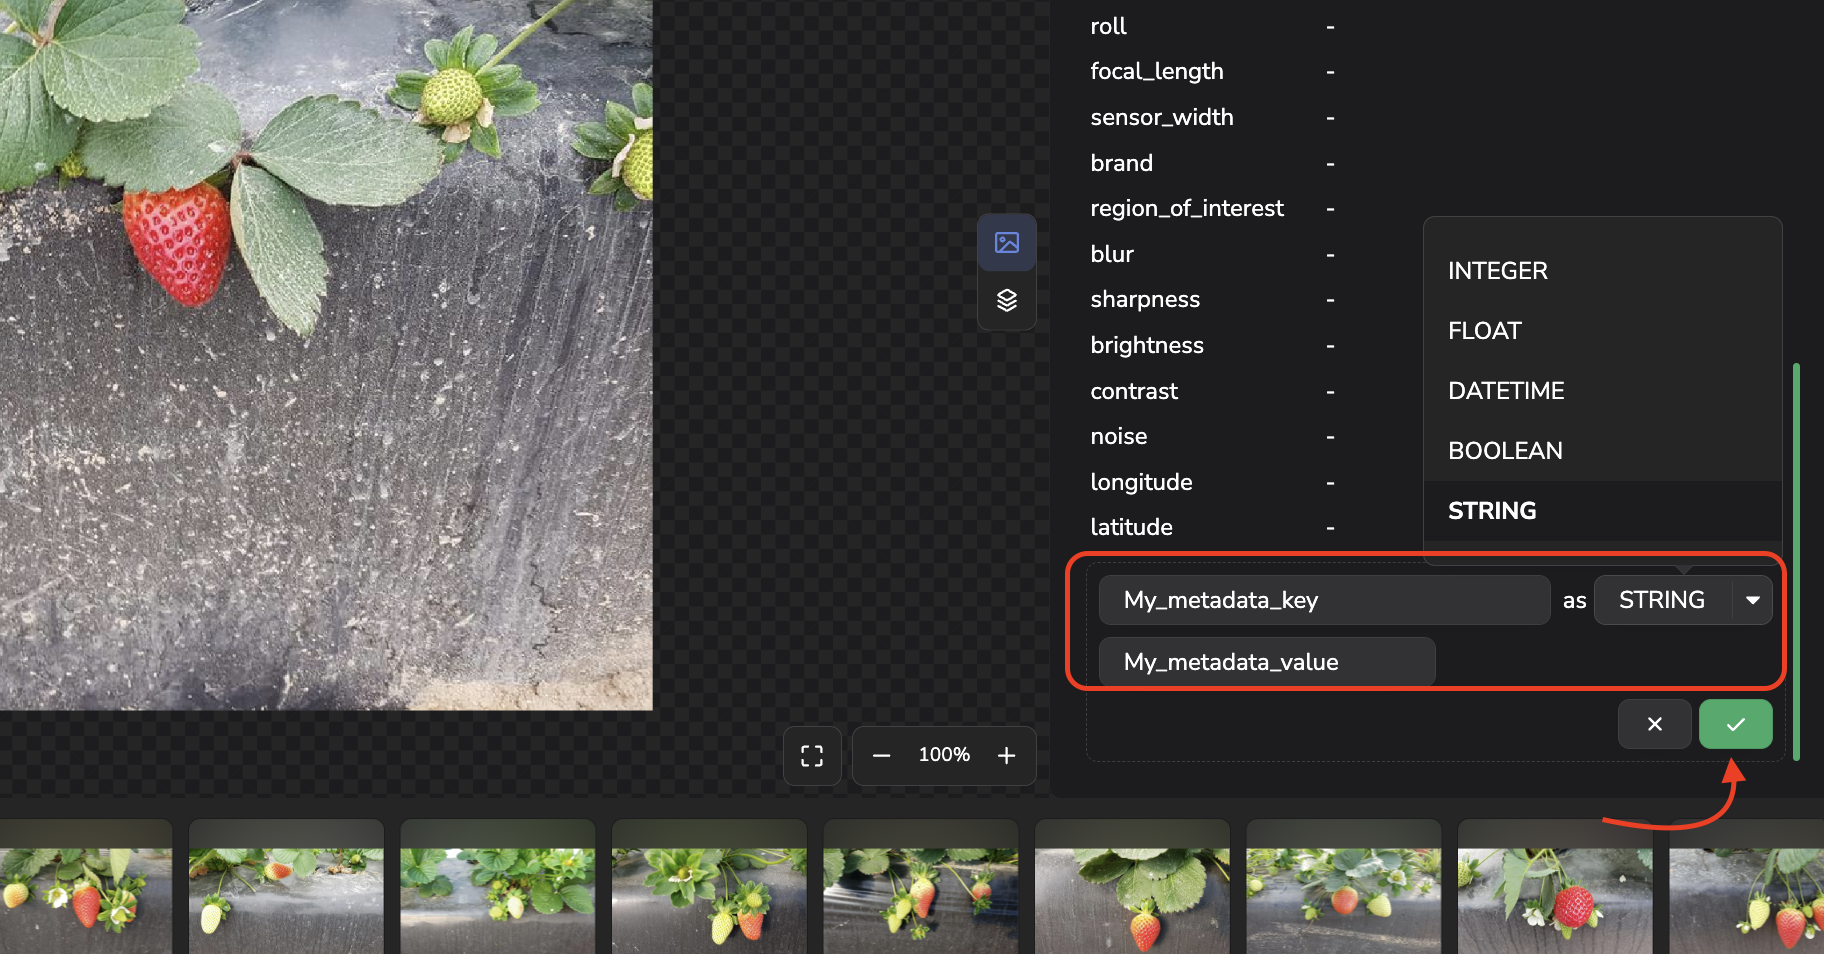
Define Custom Metadata key, type, and value for a given Data
-
Edit: hover over an existing entry and click the pencil icon. Please note that only the value can be edited, not the key.
-
Delete: hover an existing entry and click the trash icon.
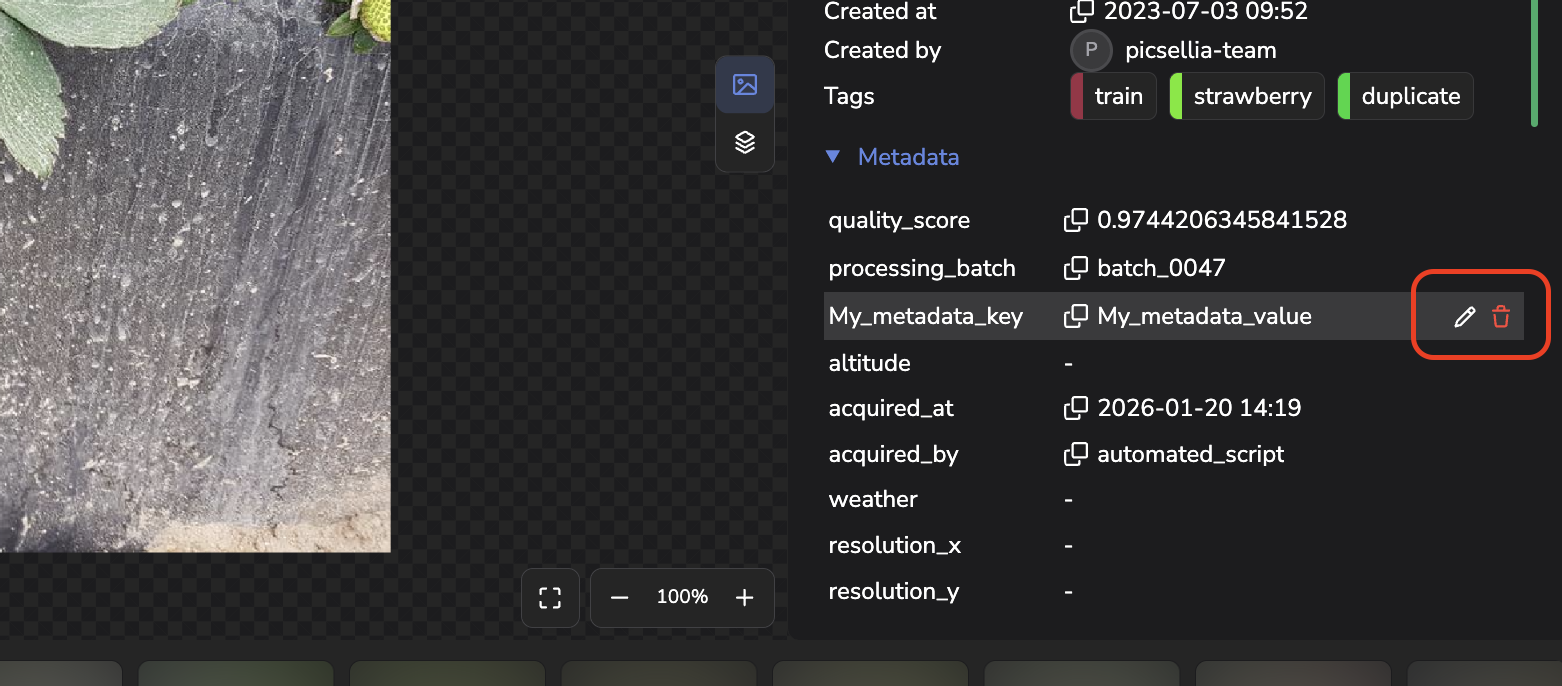
Edit or delete a Custom Metadata for a given Data
As is the case for Metadata, Custom Metadata is always displayed in the Details view across the platform; it is stacked on the Metadata list.
3. The Custom Metadata schema
Custom Metadata schemaBecause Custom Metadata keys are yours to invent, a Datalake that several people feed can end up with sensor_id, sensorId, and sensor all meaning the same thing, which makes any later filtering unreliable. To keep them under control, each Datalake carries a Custom Metadata schema: the list of keys you expect, each with its type and options. It is managed from the Metadata page of the Datalake Settings.
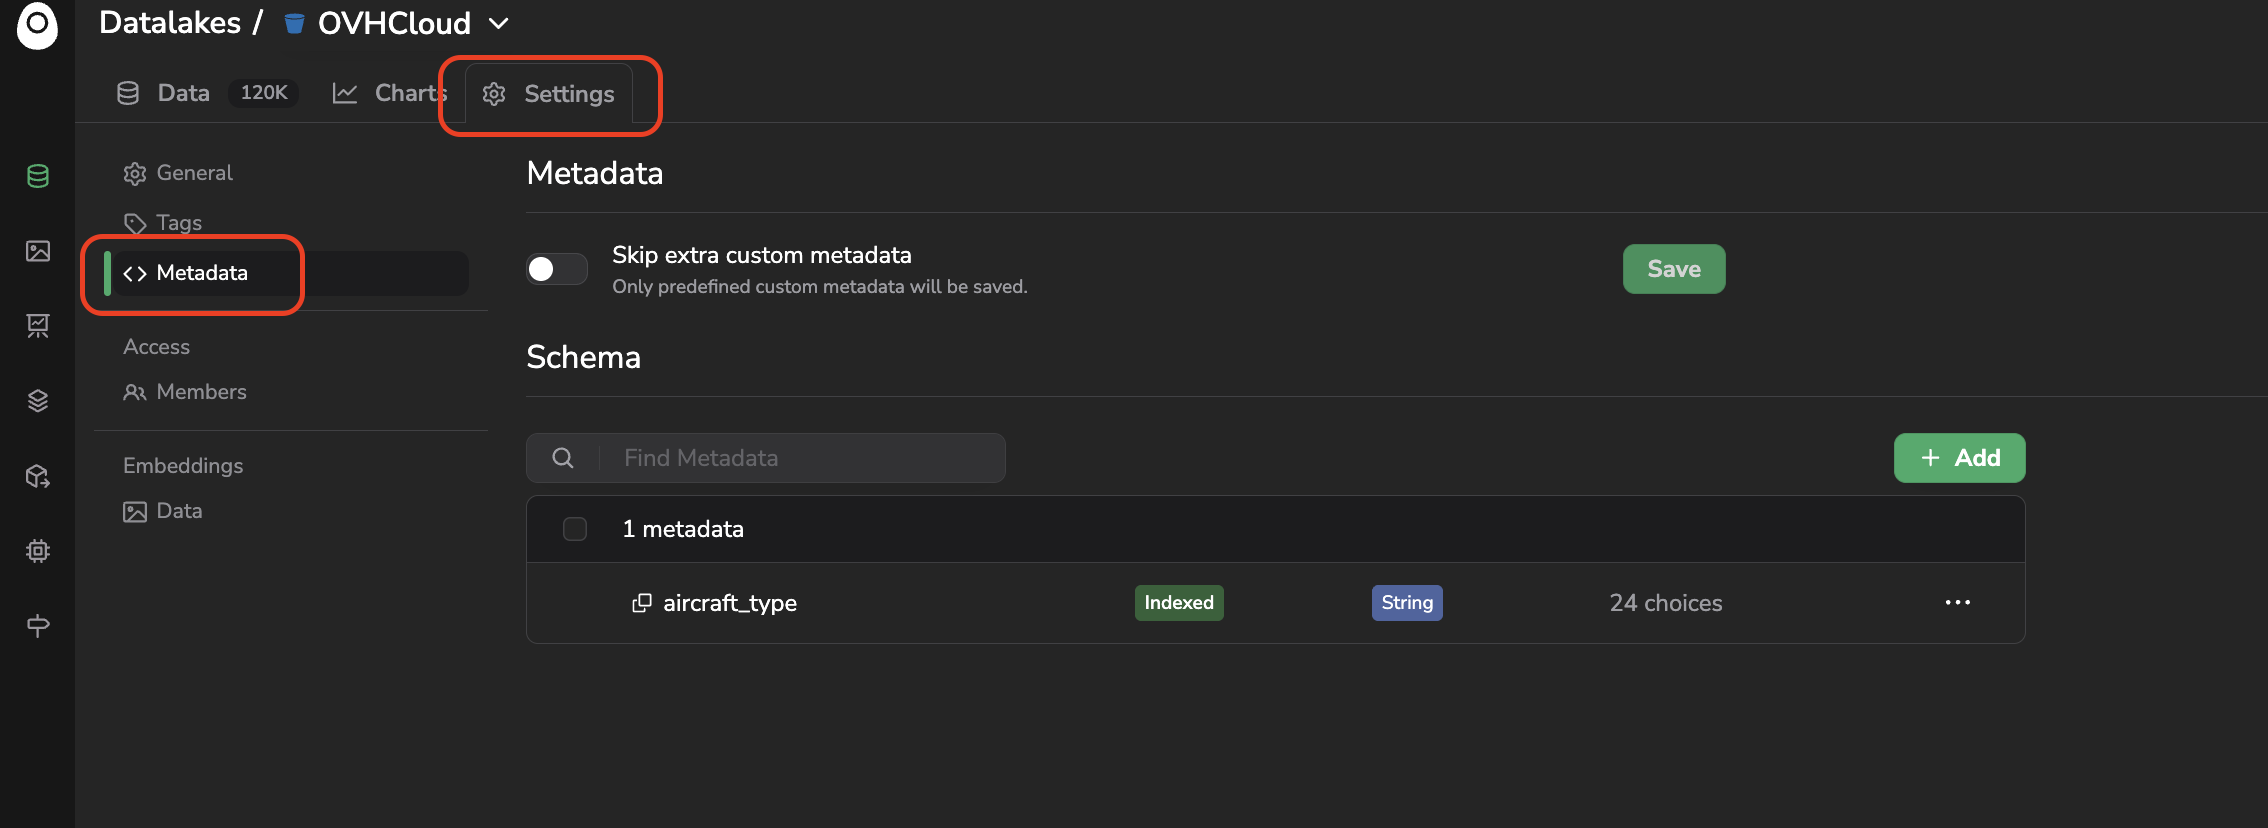
Access Metadata page of a Datalake
A. Declaring keys
Click Add, provide the key, then choose its type (String, Integer, Float, Datetime, or Boolean) and the options that go with it. Keys are declared and deleted one at a time, and a search bar at the top of the page lets you find one in a long schema.
Wherever a Custom Metadata filter is available across the platform, the keys declared in the schema are suggested to you, so you do not have to remember how a key was spelled the day it was first created.
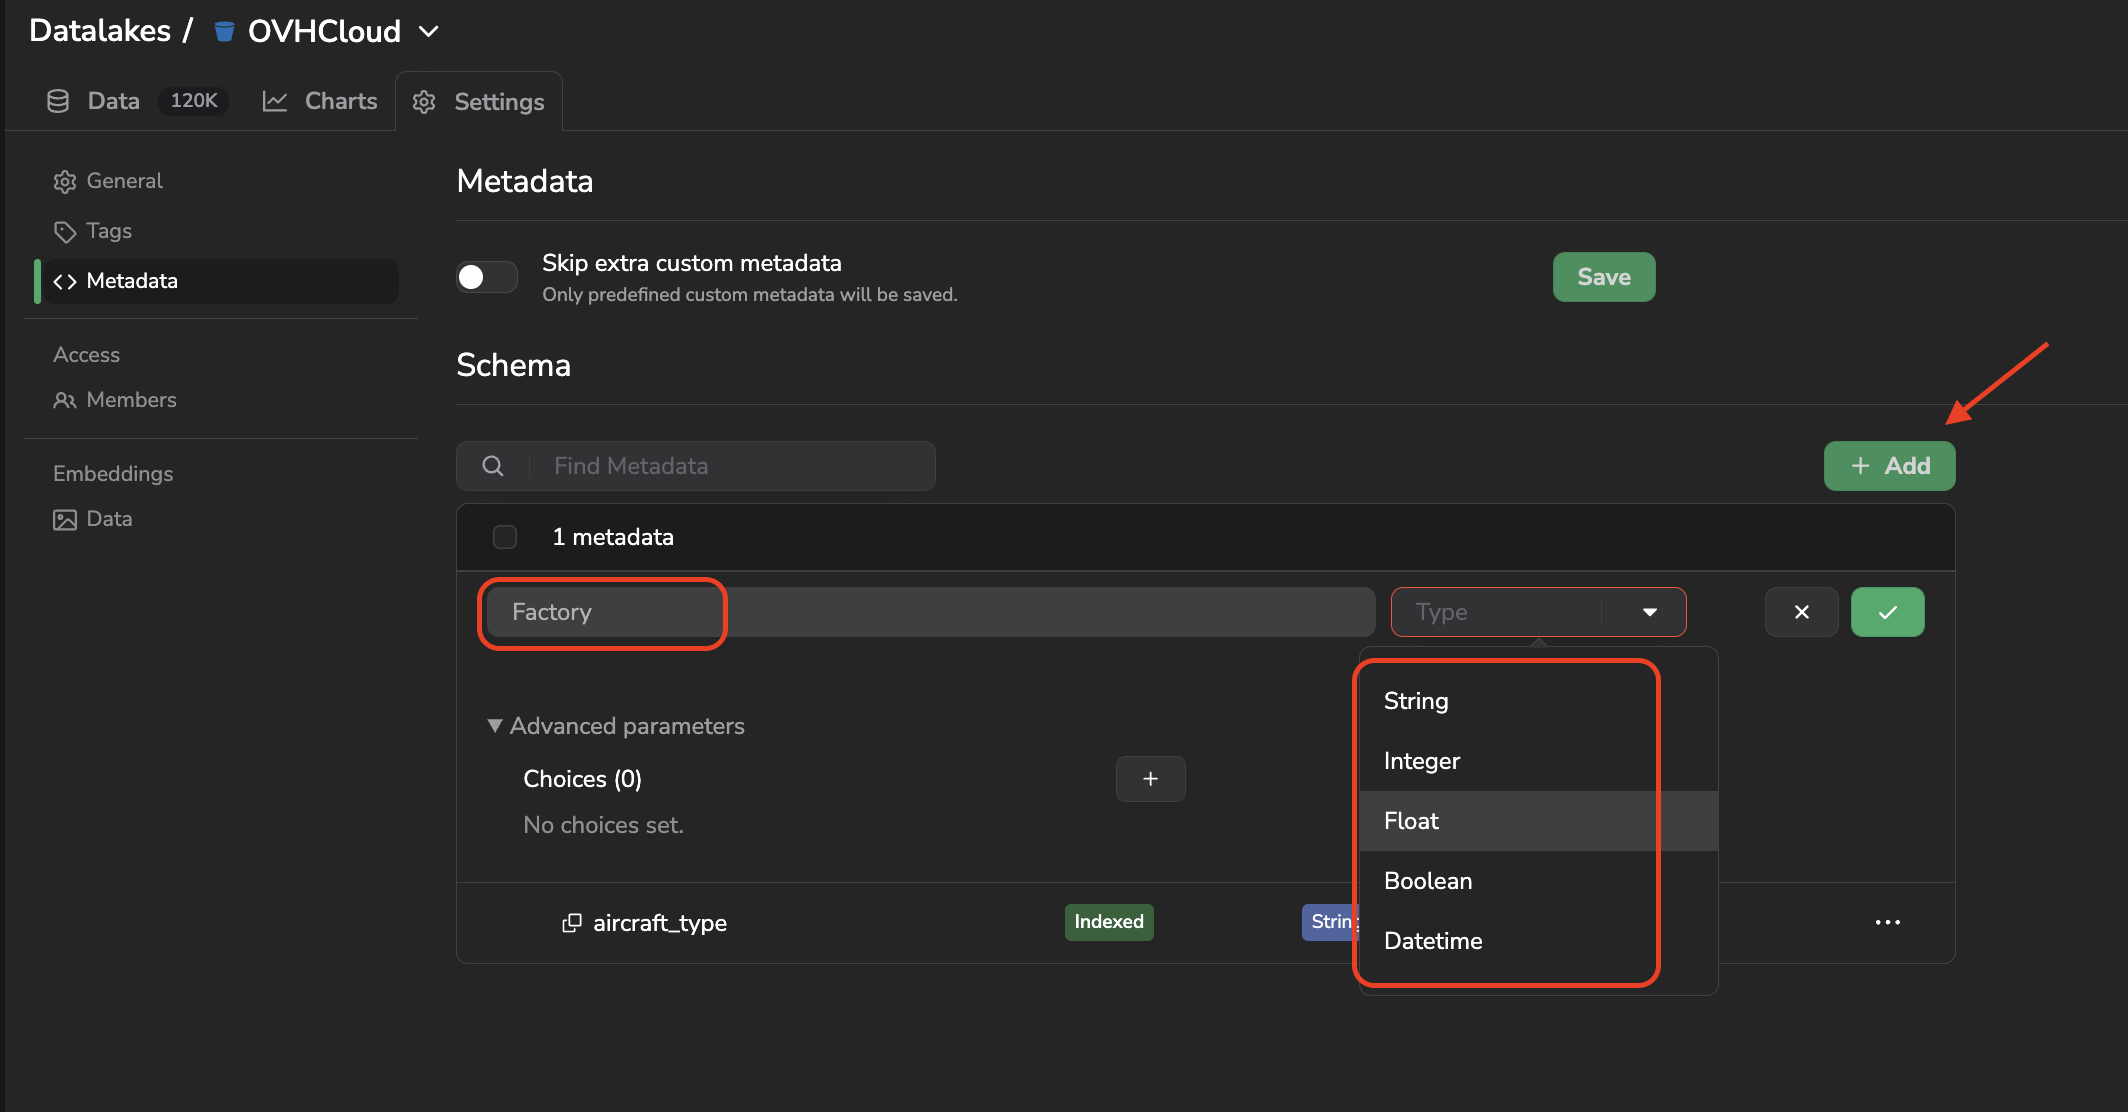
Add a Custom Metadata to your scheme
Please note that for all types expcet boolean you can declare a list or a range of potential values. This is definitely optional.
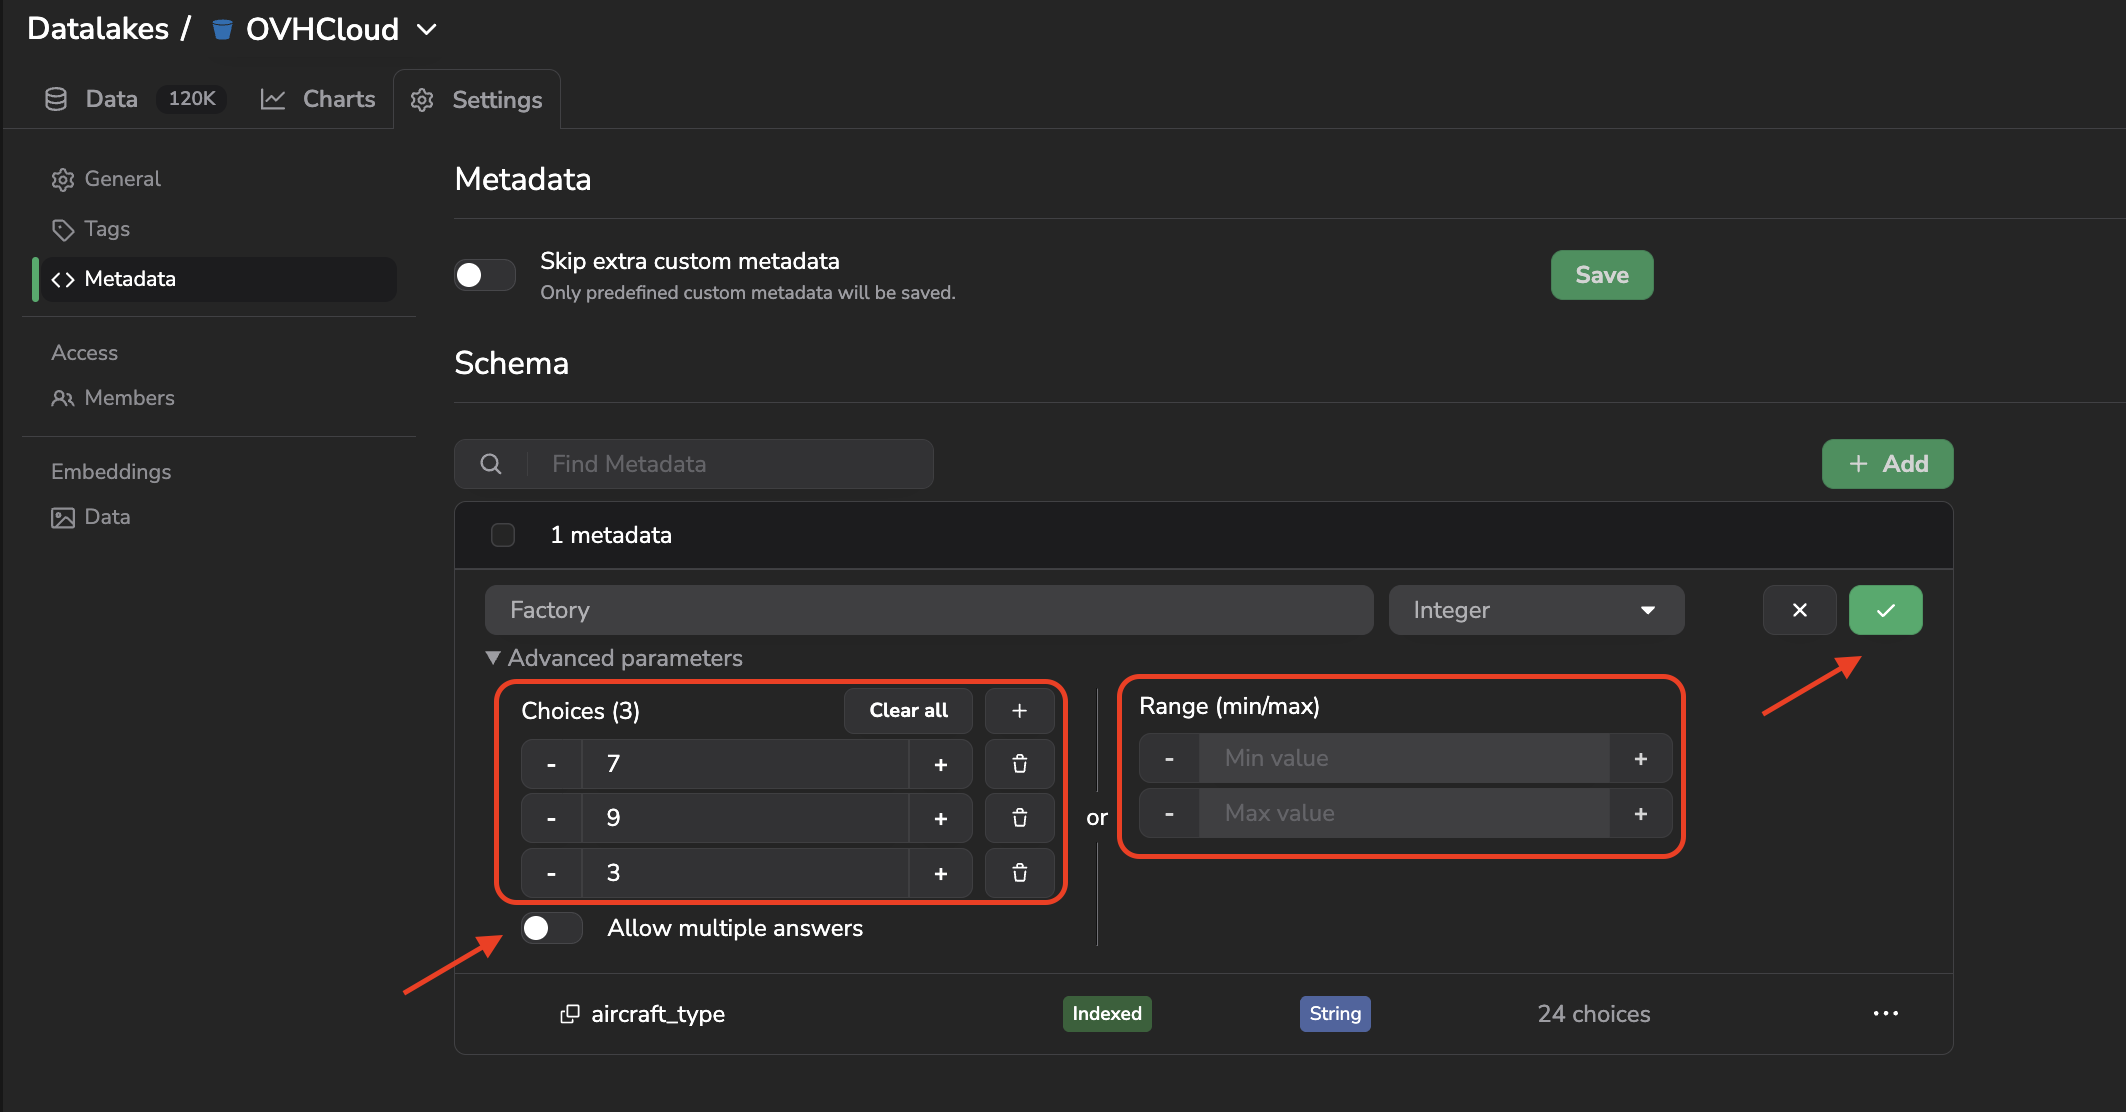
Frame potential values with list or ranges of values
Once created a key from your Metadata schema can be edited or deleted as shown below:
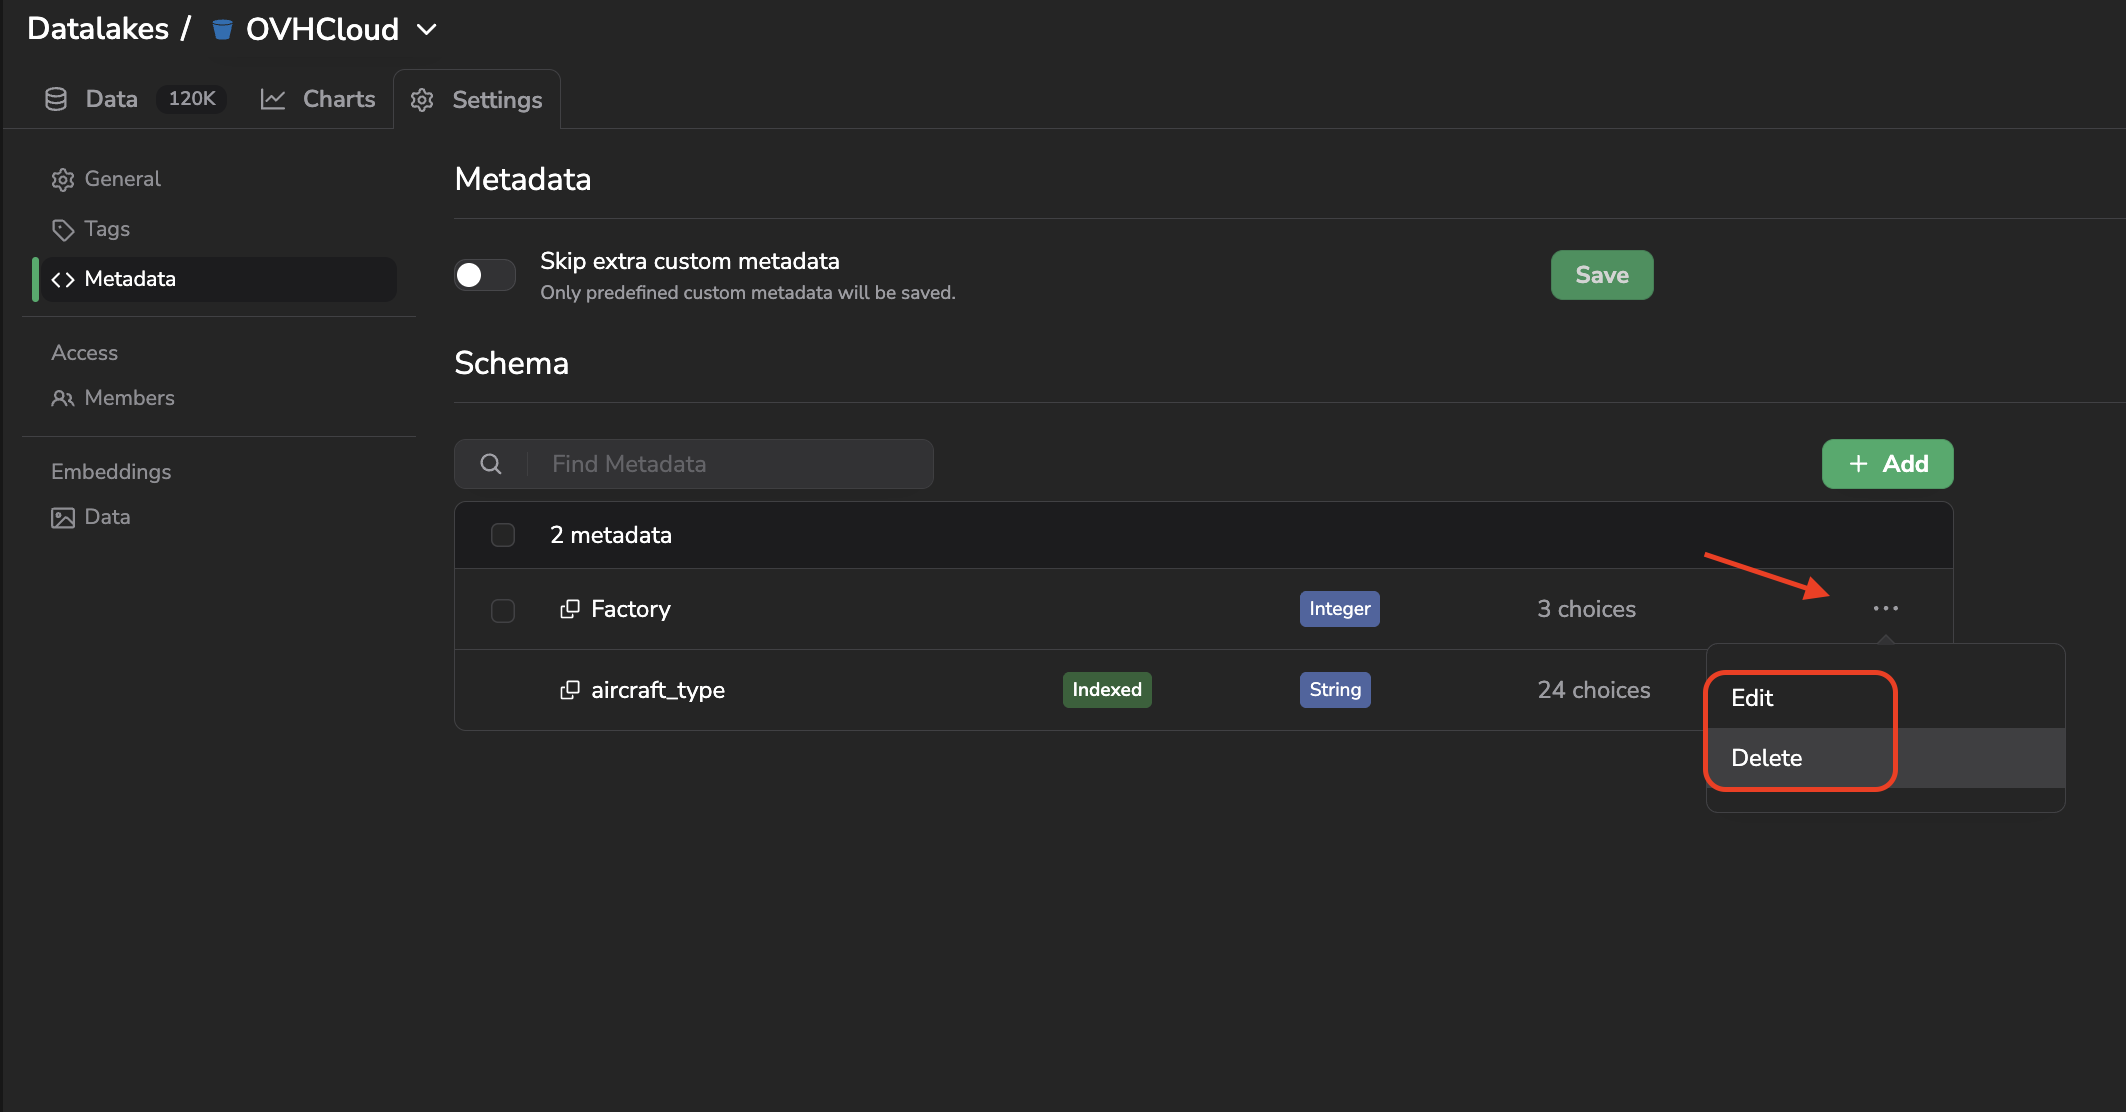
Edit or Delete a Custom Metadata from you schema
Please note that delete a key from your Metadata schema will only delte from the schema, the key and associated values will remain on the Data they were already attached with.
B. Keys the schema does not declare
By default, a Data can carry Custom Metadata keys that the schema does not declare, which is what lets you start using a new key before formalizing it. The Metadata page also lets you take the opposite stance: when the option to skip keys outside the schema is active, those extra keys are skipped, and you cannot add a Custom Metadata from the UI whose key is not declared in the schema.
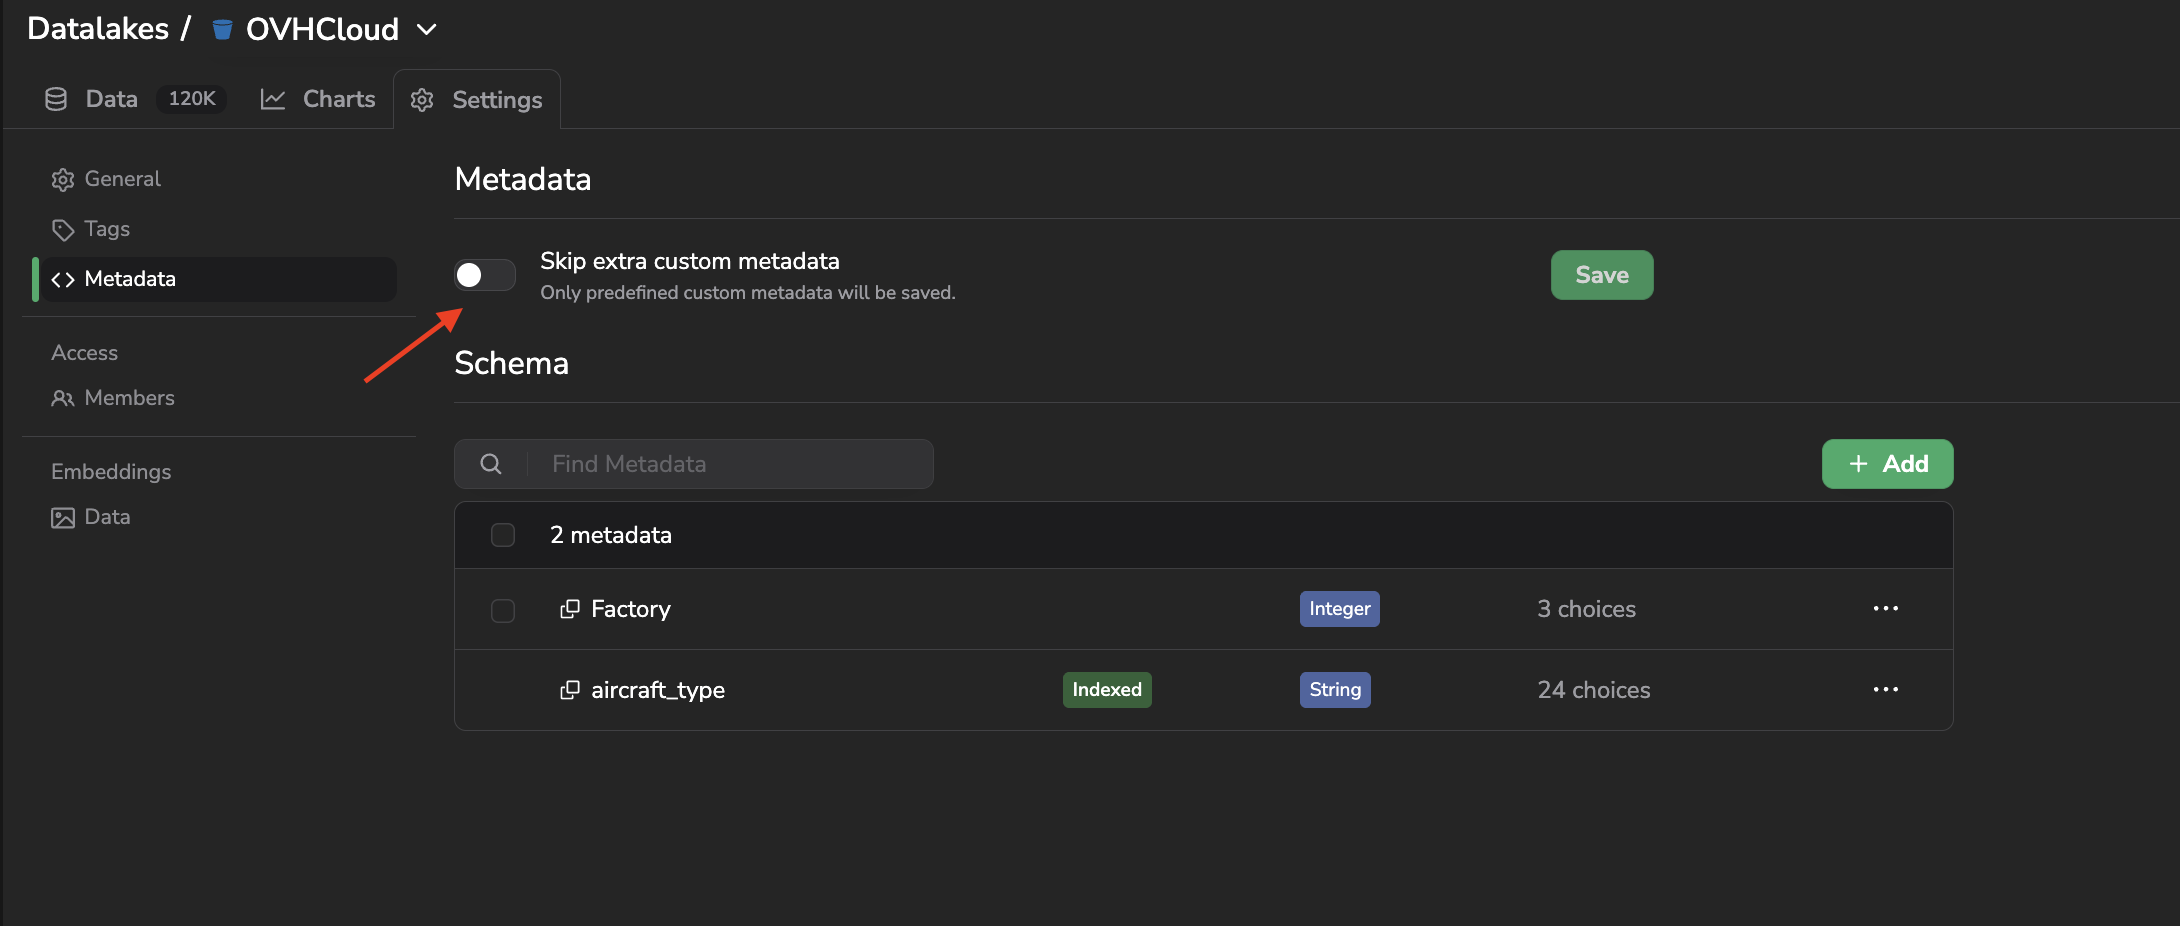
Skip extra custom metadata button
Turning it on is worthwhile once your schema has stabilized and you rely on Custom Metadata to build Dataset: it prevents a typo in an import script from silently creating a parallel key that your filters will never match.
C. Indexing a key for search
Filtering Data on a Custom Metadata key means looking inside the key/value fields of every Data of the Datalake, which becomes expensive as the Datalake grows. To keep those filters fast, a key can be indexed: Picsellia builds a dedicated search index for it, and keeps it up to date as Data and their Custom Metadata change.
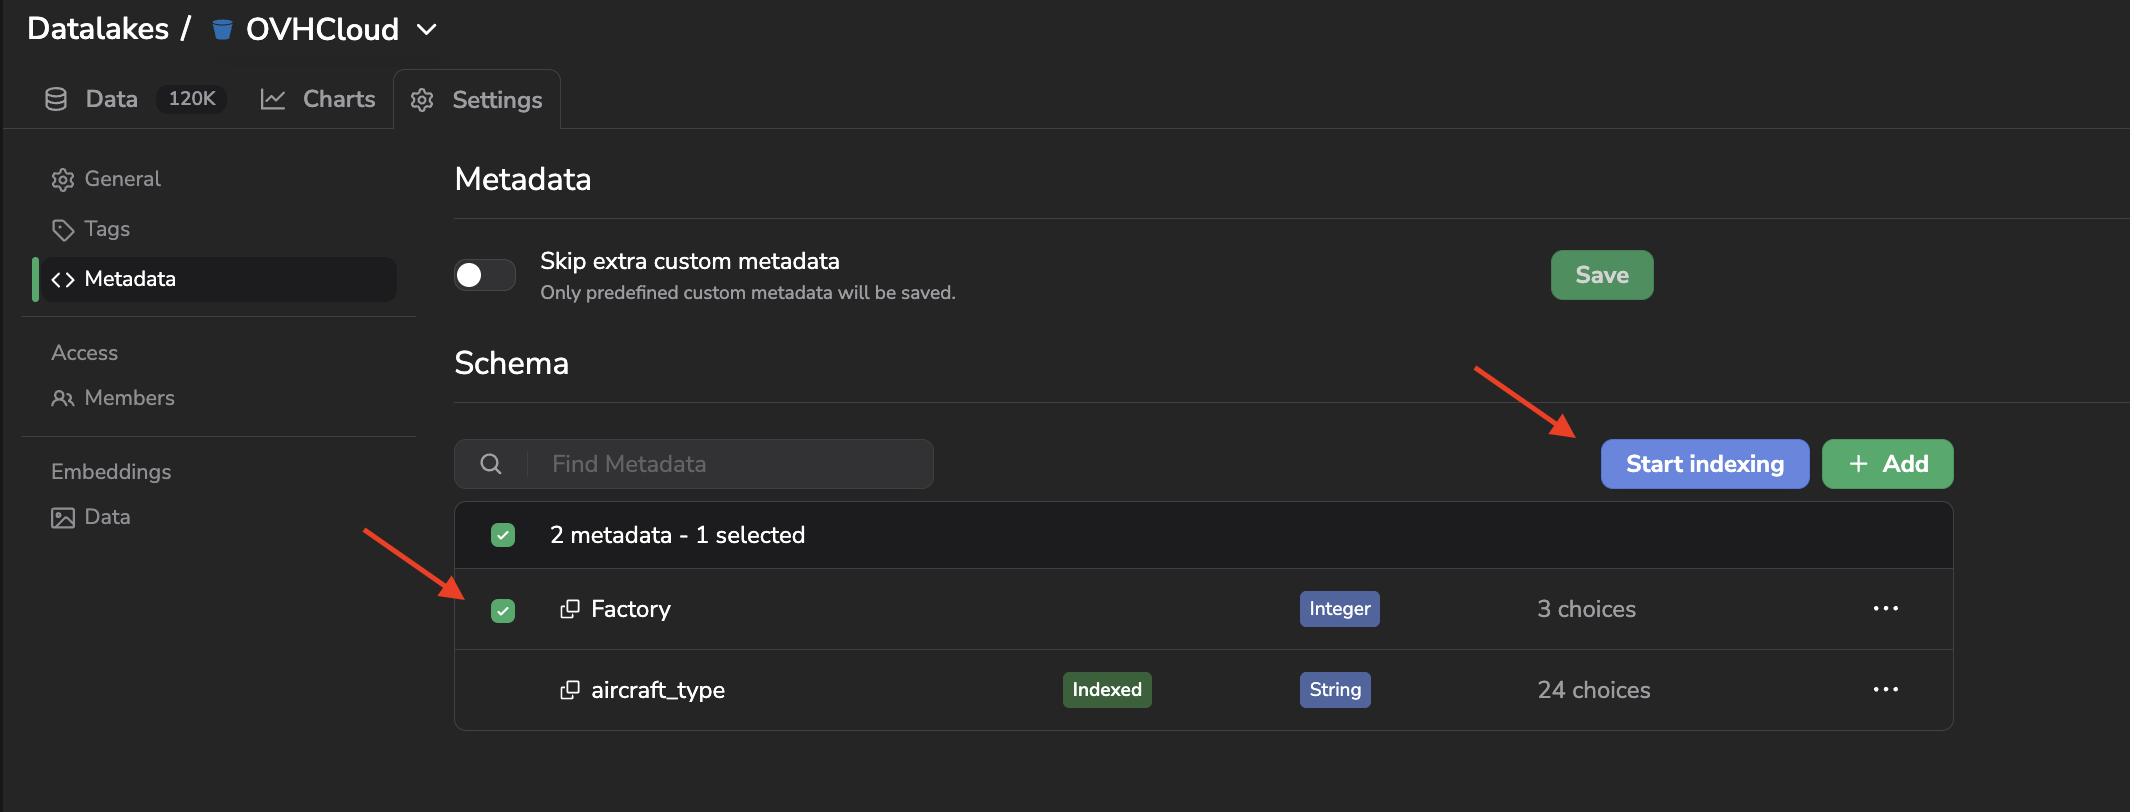
Request the indexation of a key
Select the keys to index from the Metadata page and start the indexation. It runs as a Job, detailed here, and each key shows its own status while the Job progresses — pending, indexed, partially indexed, being removed, or in error. An indexed key can be taken out of the search index again with the Deindex action.
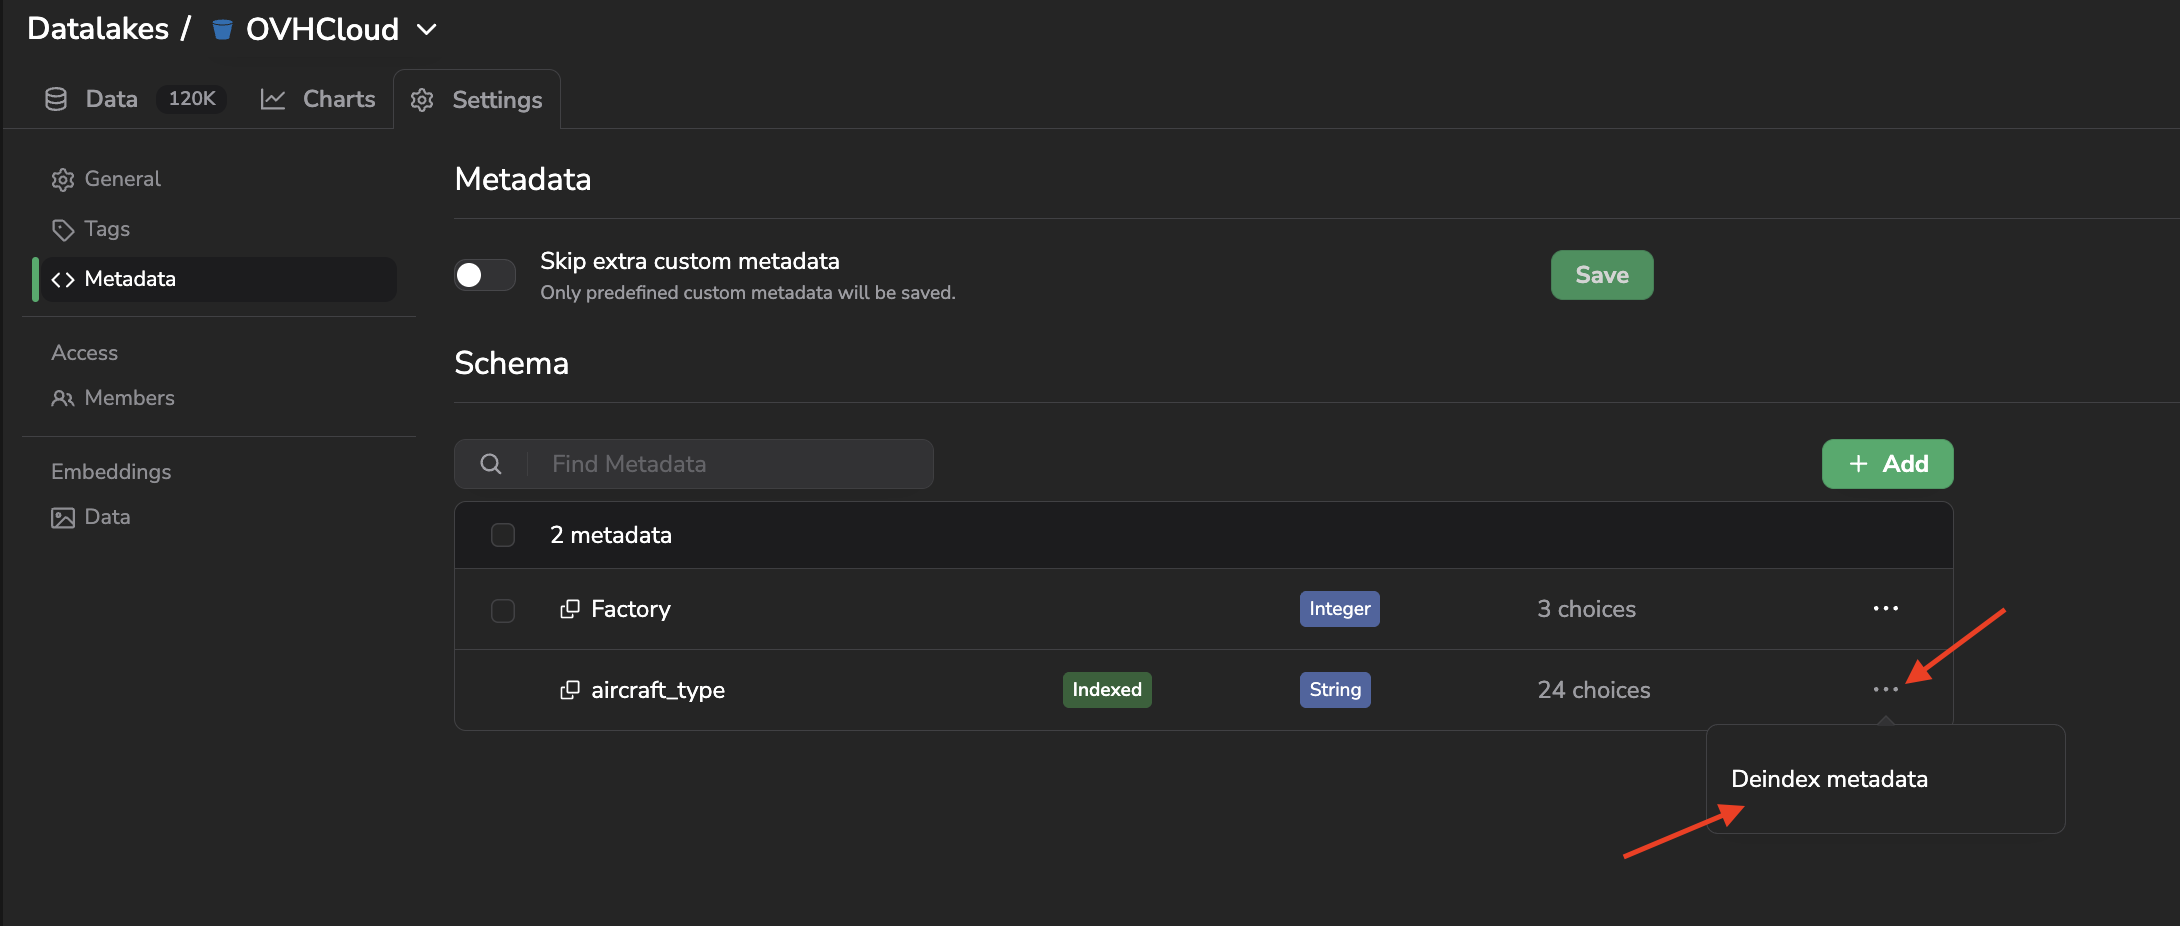
Request deinxation of a key
Above 100,000Data, indexation is required to filterOn a
Datalakeholding more than 100,000Data, aCustom Metadatakey that has not been indexed cannot be filtered on. Index the keys you intend to search on before you need them, so that the indexation has time to complete.
4. Searching Data by Metadata
Data by MetadataBoth Metadata systems can be used to retrieve Data, but not through the same mechanism:
-
The fixed
Metadataschema is queryable directly from the Query Language, detailed here, using themetadata.<key>notation, for instancemetadata.latitude > 43.5.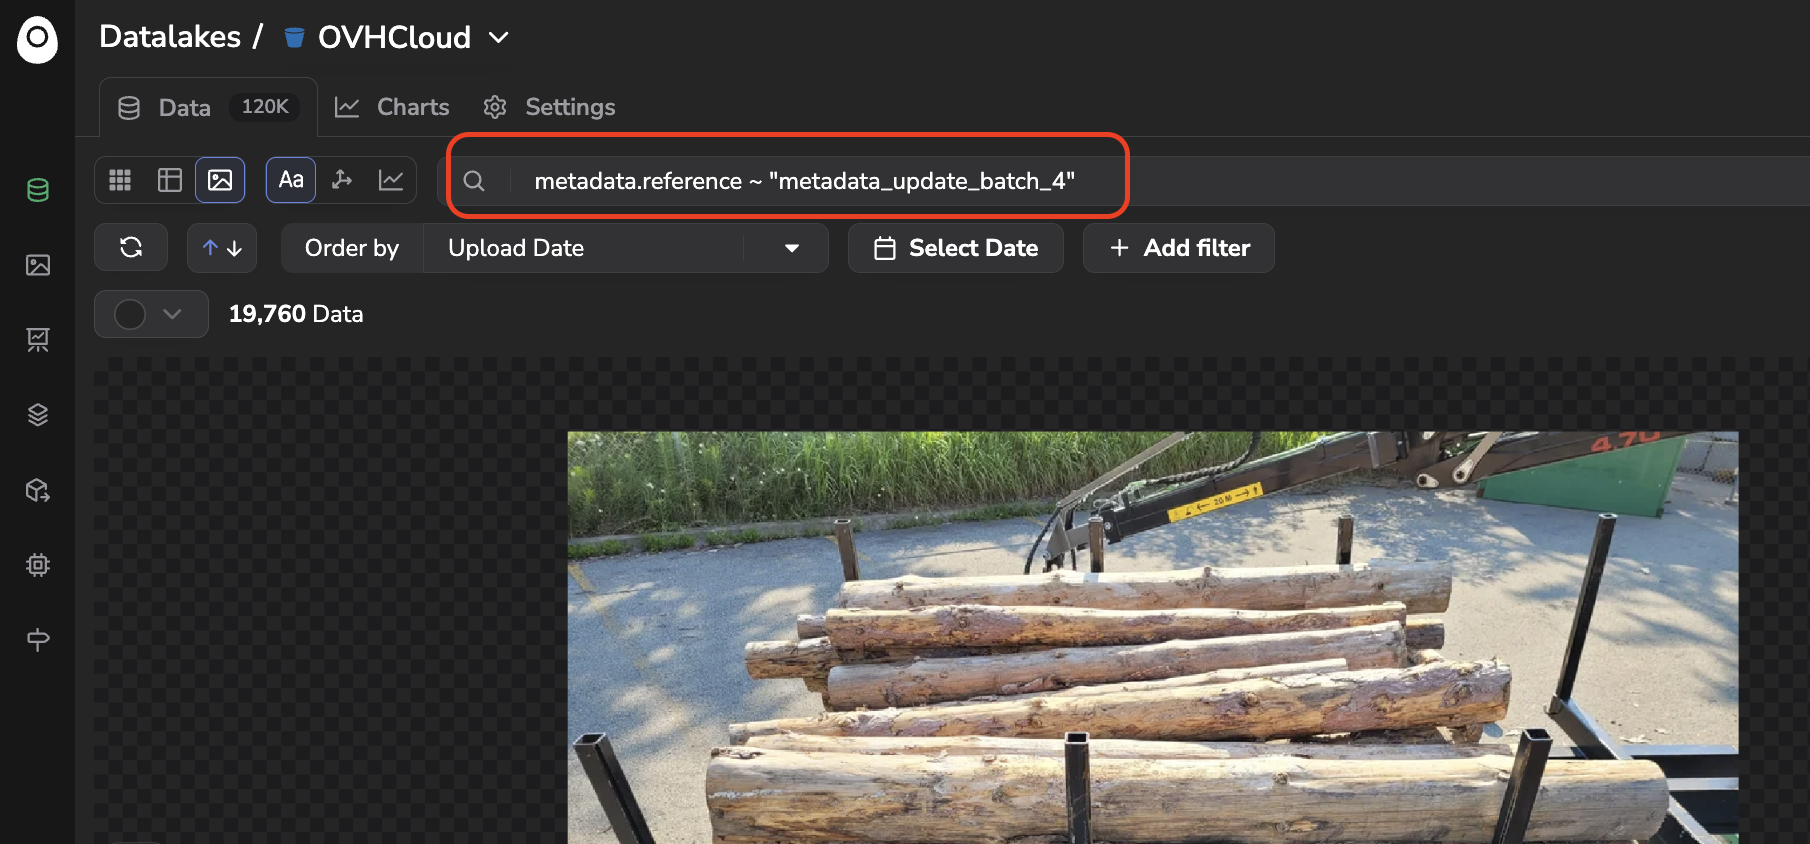
Search for Data based on Metadata value
-
Custom Metadatais not part of the Query Language. Instead, use the Add filter button next to the Search Bar to filterDatabyCustom Metadata. The filter suggests the keys declared in theCustom Metadataschema of theDatalake, and on aDatalakeover 100,000Dataa key must be indexed first, both detailed here.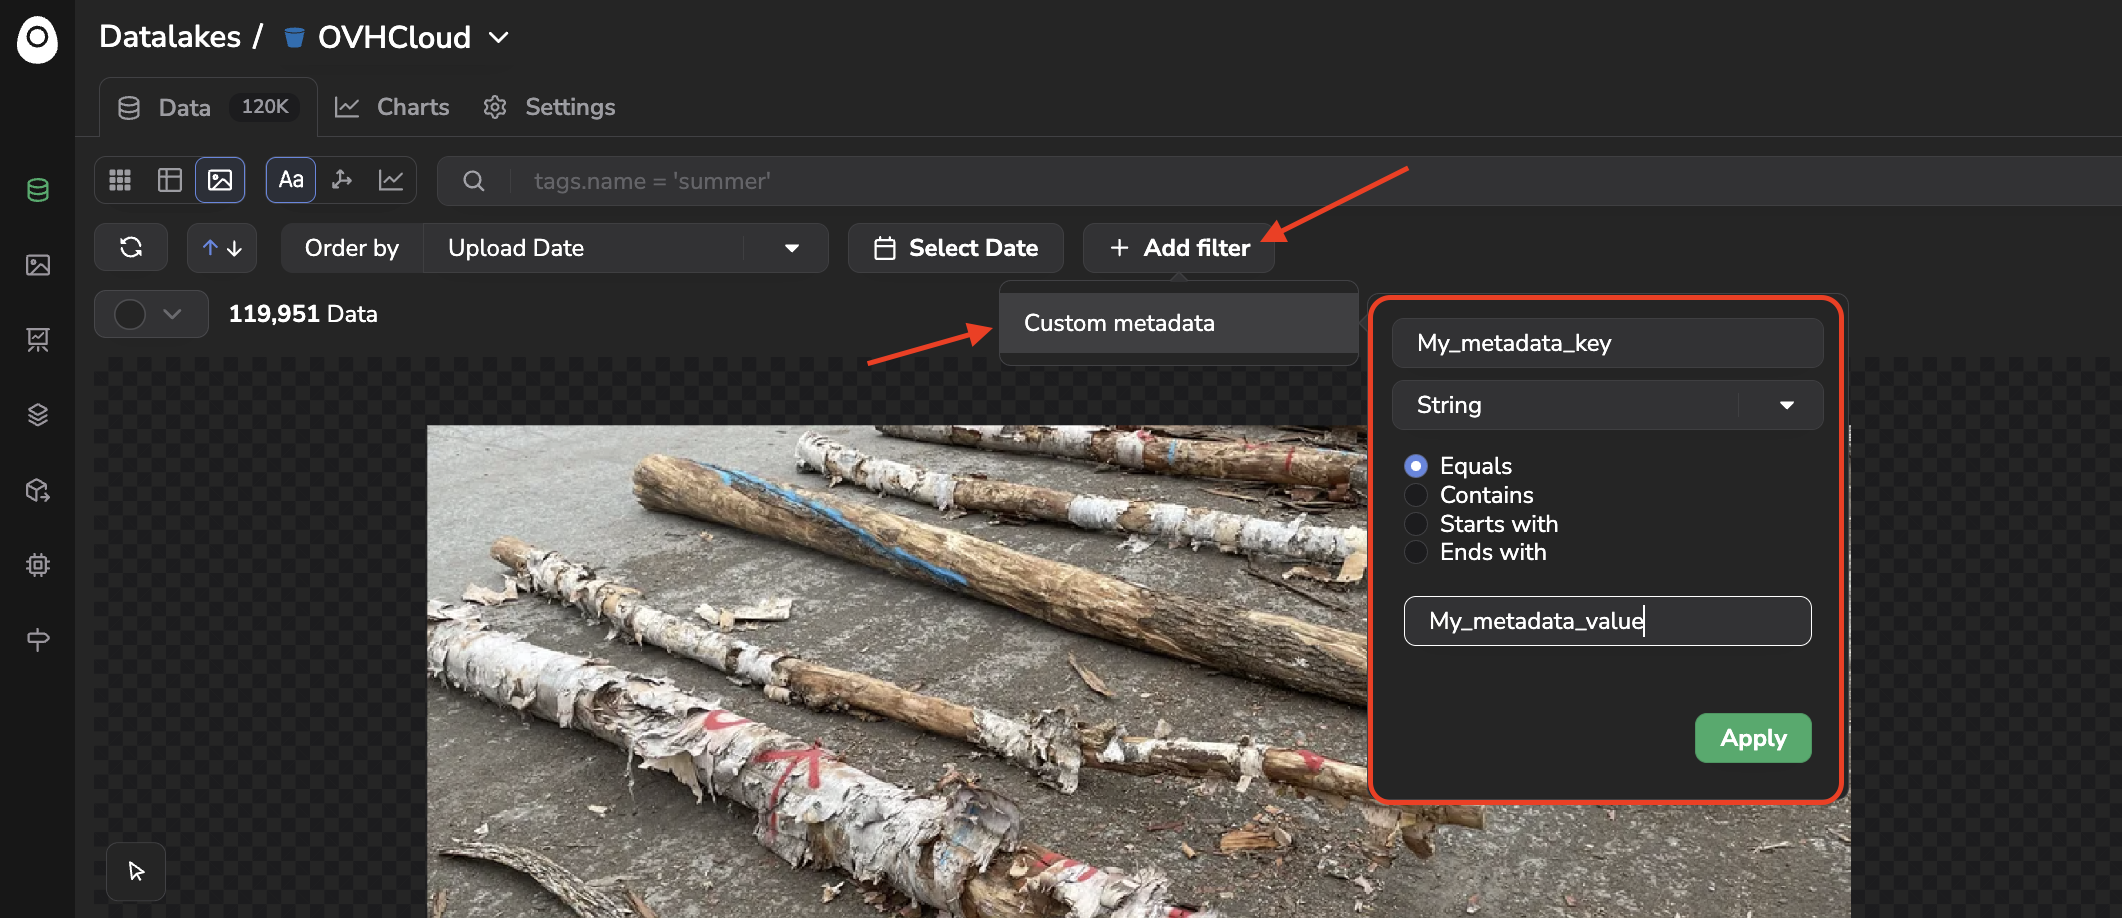
Configure a filter for Custom Metadata
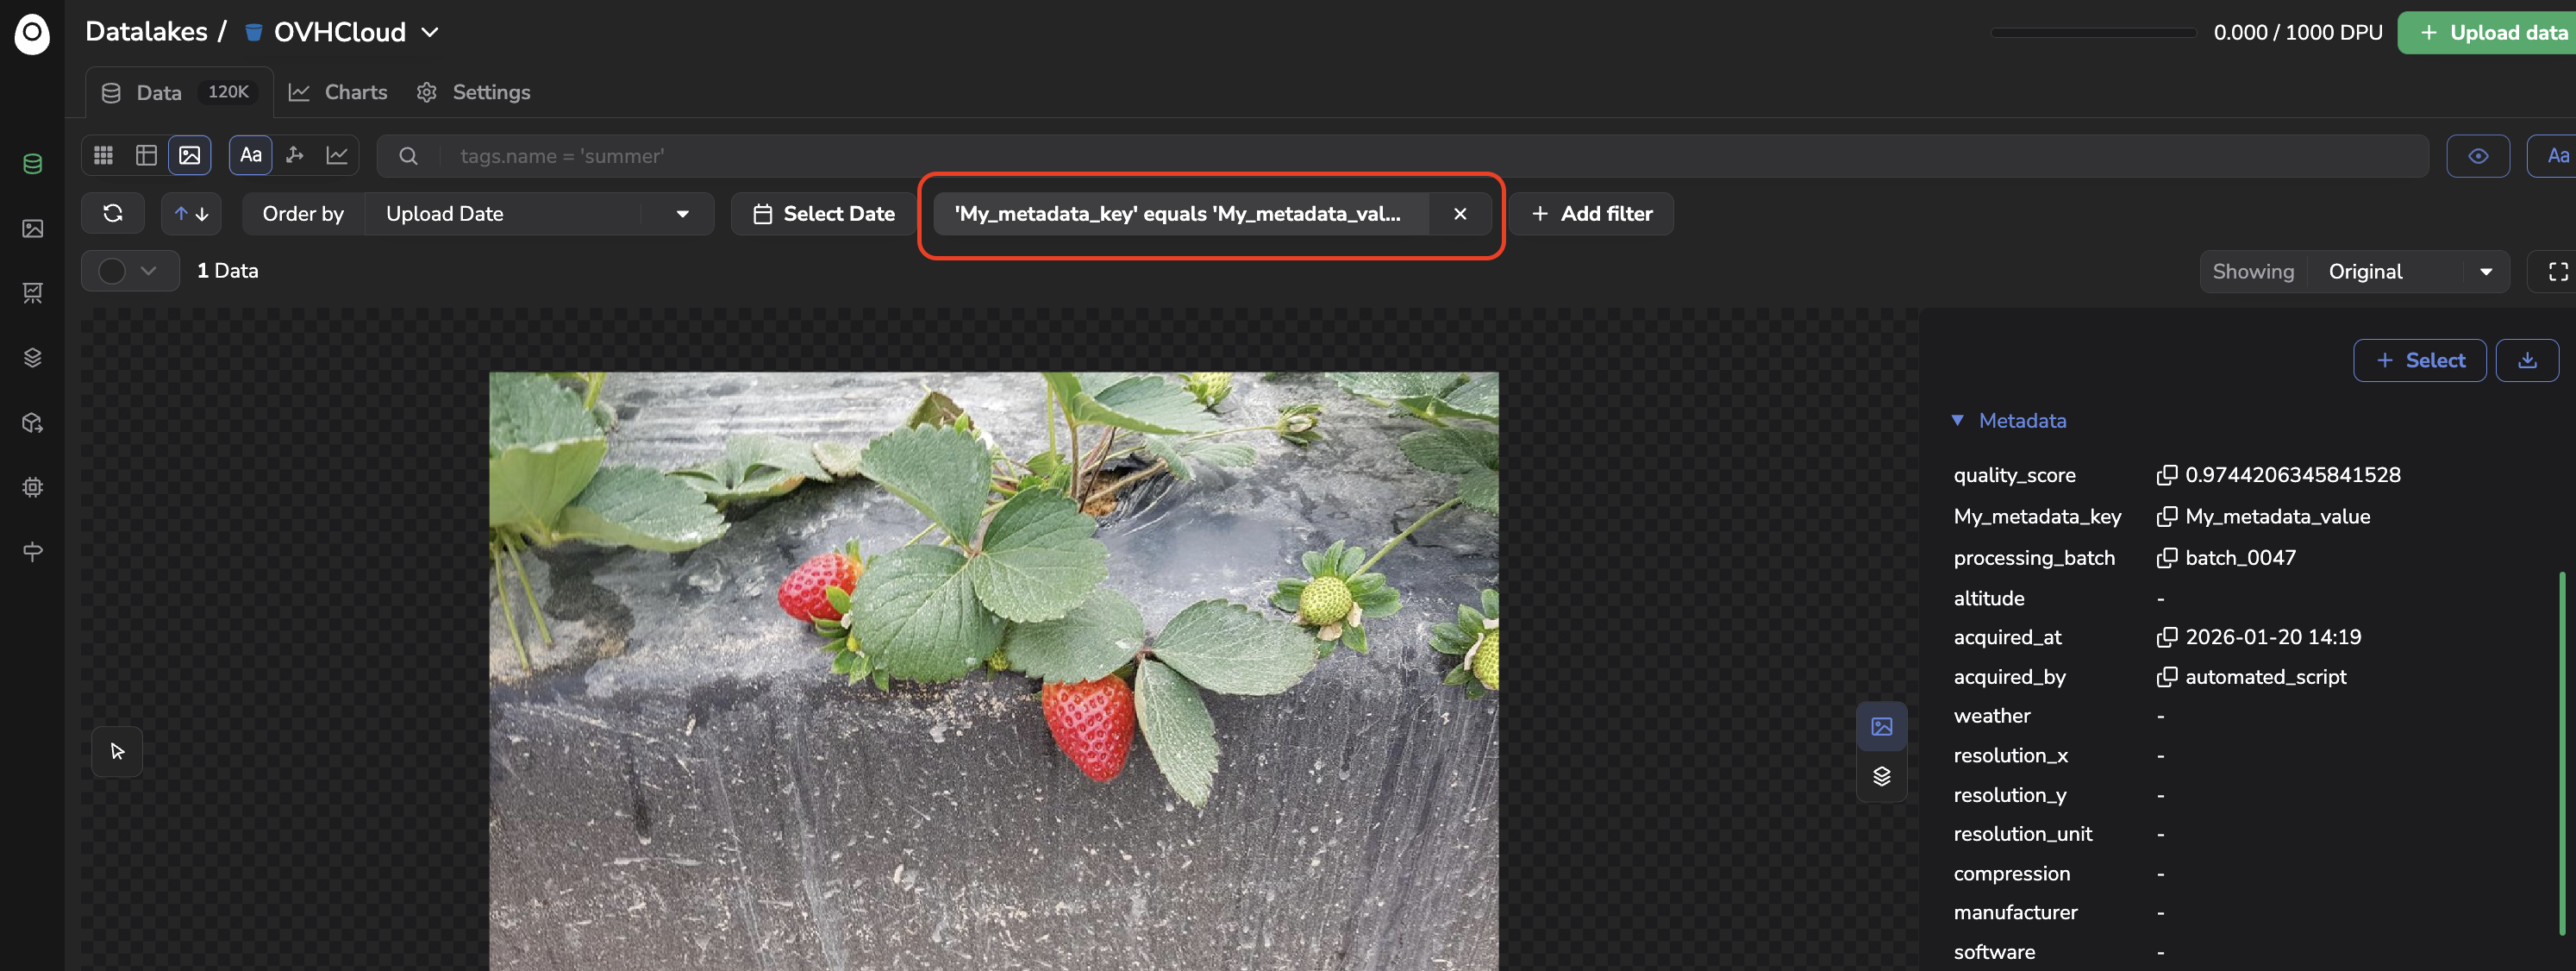
Output of the Custom Metadata filter
5. Uploading Metadata via SDK
Metadata via SDKIf you want to upload one Data with additional business reference, a different date than the uploaded time for example, you can use the SDK this way:
datalake = client.get_datalake()
data = datalake.upload_data(
  filepaths="./files/1.jpg",
  metadata={
    "reference": "7NGOMI",
    "acquired_by": "USER-178",
    "acquired_at": datetime.utcnow(),
  },
)
When sending multiple Data, you need 2 lists ("filepaths" & "metadata") of the exact same size:
datalake = client.get_datalake()
data = datalake.upload_data(
    filepaths=[
        "./files/1.jpg",
        "./files/2.jpg",
        "./files/3.jpg",
    ],
    metadata=[
        {
            "latitude": 43.6027394,
            "longitude": 1.4540158,
        },
        {
            "latitude": 43.601717,
            "longitude": 1.456135,
        },
        {
            "latitude": 43.6013007,
            "longitude": 1.4560448,
        },
    ],
)
Custom Metadata can also be uploaded the same way, using the custom_metadata parameter instead of metadata:
datalake = client.get_datalake()
data = datalake.upload_data(
    filepaths="./files/1.jpg",
    custom_metadata={
        "batch_id": "B-2024-042",
        "inspection_passed": True,
    },
)
6. Fill Metadata from Exif Tags
Metadata from Exif TagsIf you want to upload Data and automatically fill EXIF tags into the Picsellia Metadata system, you can give the parameter fill_metadata=True when calling upload_data:
datalake = client.get_datalake()
data = datalake.upload_data(
  filepaths="./files/1.jpg",
  fill_metadata=True
)
These are Metadata filled automatically with the PIL library.
You can display the Metadata automatically attached to your data as shown below:
exif_data = image.getexif()
acquired_at = exif_data.get(0x0132)
acquired_by = exif_data.get(0x013B)
resolution_x = exif_data.get(0x011A)
resolution_y = exif_data.get(0x011B)
resolution_unit = exif_data.get(0x0128)
compression = exif_data.get(0x0103)
manufacturer = exif_data.get(0x010F)
software = exif_data.get(0x0131)
color_space = exif_data.get(0xA001)
Updated 19 days ago