Experiment - Creation
It is now time to create your first Experiment that will track the training of your ModelVersion!
1. Experiment creation form
Once the DatasetVersion you're planning to use for ModelVersion training has been attached to your Project, you can click on the + button next to the Experiment list to reach the Experiment creation form.
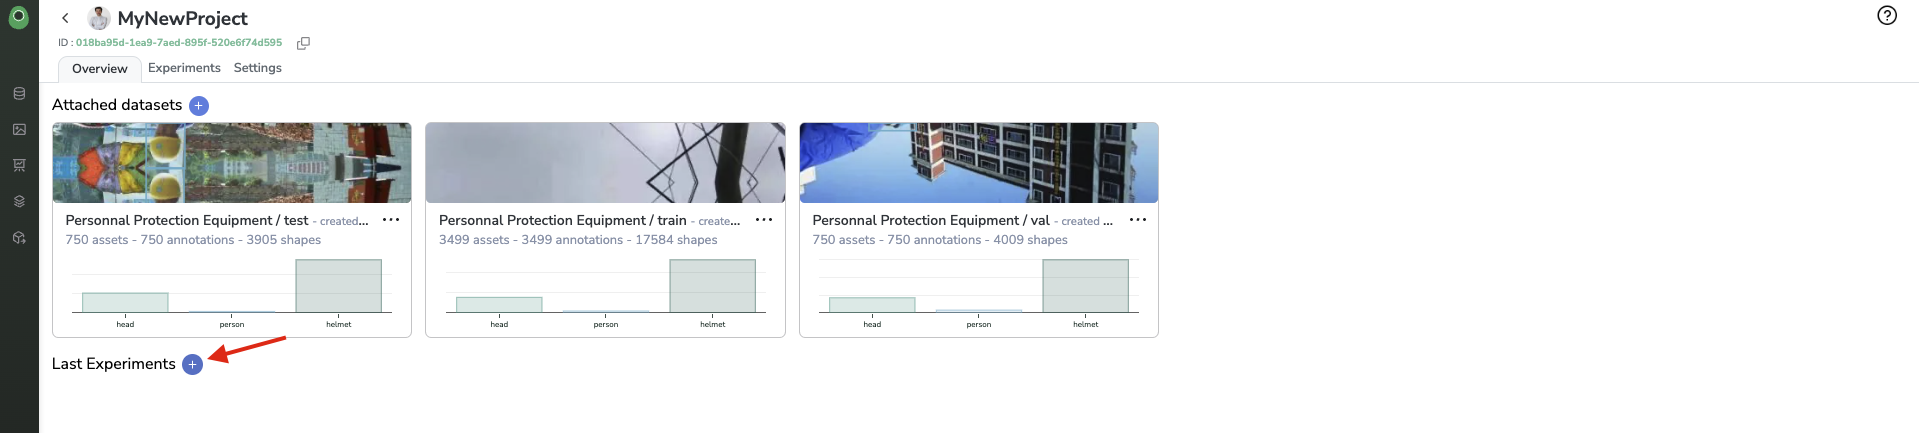
Create a new Experiment
The experiment creation form is divided into 4 sub-parts:
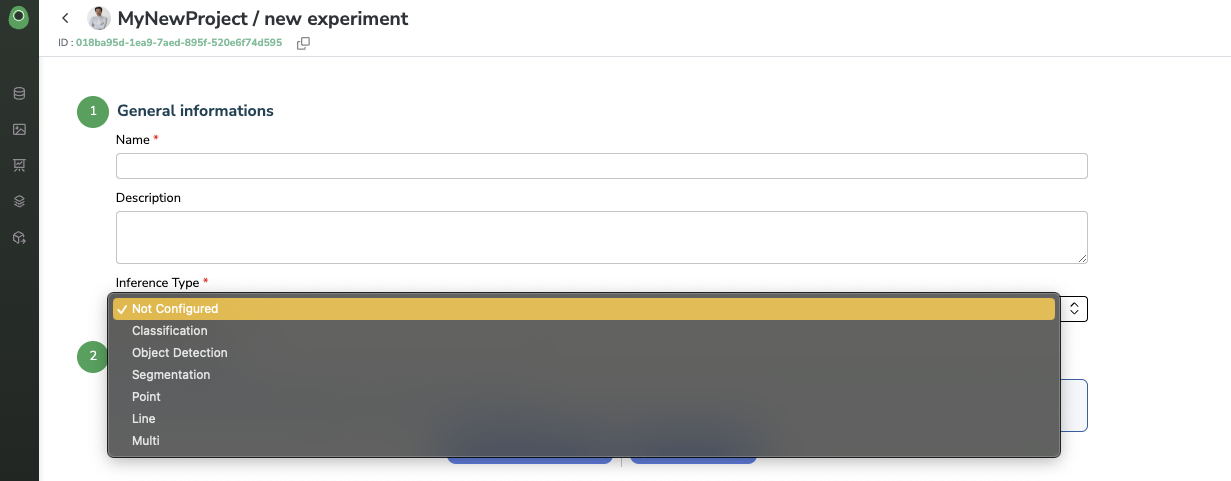
A. General information
Here again, and as is the case for all Picsellia objects for traceability purposes, you'll be asked to give a name and description to your Experiment.
In addition, you need to define the Inference Type of the Experiment you are creating. This Inference Type information will allow Picsellia to ensure the consistency of the Experiment you are about to perform. For instance, make sure that you are not training an ObjectDetection ModelVersion with a Classification DatasetVersion.
B. Base architecture
The selection of the Base architecture is critical in the Experiment creation process.
The point here is to select the base model and its associated training script that will be used to train the ModelVersion in the frame of this new Experiment.
Basically, you can use as a Base architecture any ModelVersion that is stored in the Model Registry (Public or Private) or an Experiment already performed in the frame of the current Project.
As ML/AI training is an iterative process, you may or may not want to use exisiting checkpoints, model weights, and configuration files for your Experiment. In both cases, Picsellia will initialize the to-be-created Experiment by copying if existing, the following files from the Base architecture:
- Model Files (in case of
ModelVersionas Barse architecture) or Artifacts (in case ofExperimentas Base architecture) - Parameters
Labelmap- Associated training Docker Image
a. Attach a Model
By clicking on Attach a Model, a modal with the Model Registry will open.
First of all, you can browse among the Public Registry gathering SOTA models ready-to-be-used and packaged by the Picsellia team or among your Private Registry gathering all ModelVersion you already have developed or imported by our or any user accessing your Organization.
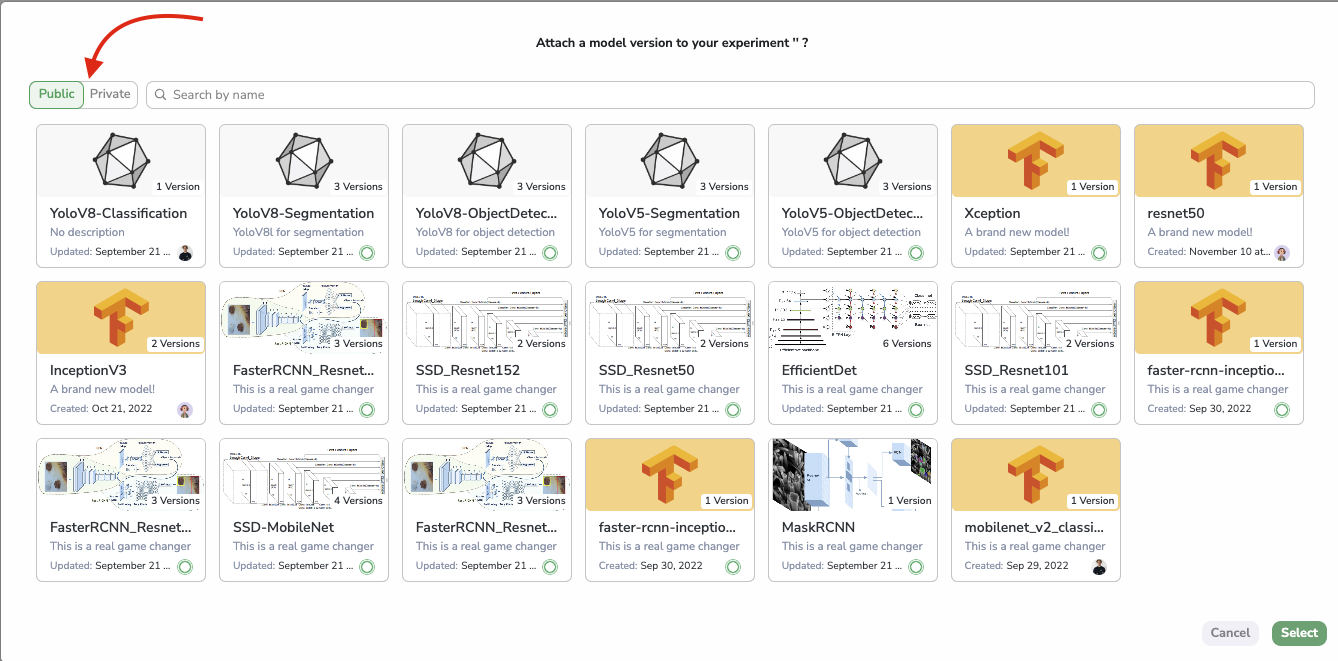
Model Registry modal from Experiment creation form
Once the ModelVersion is selected (from the Public or Private Registry), you can select the ModelVersion related to be used in the frame of the current Experiment.
The selected ModelVersion will be attached to the Experiment after having clicked on the Select button.
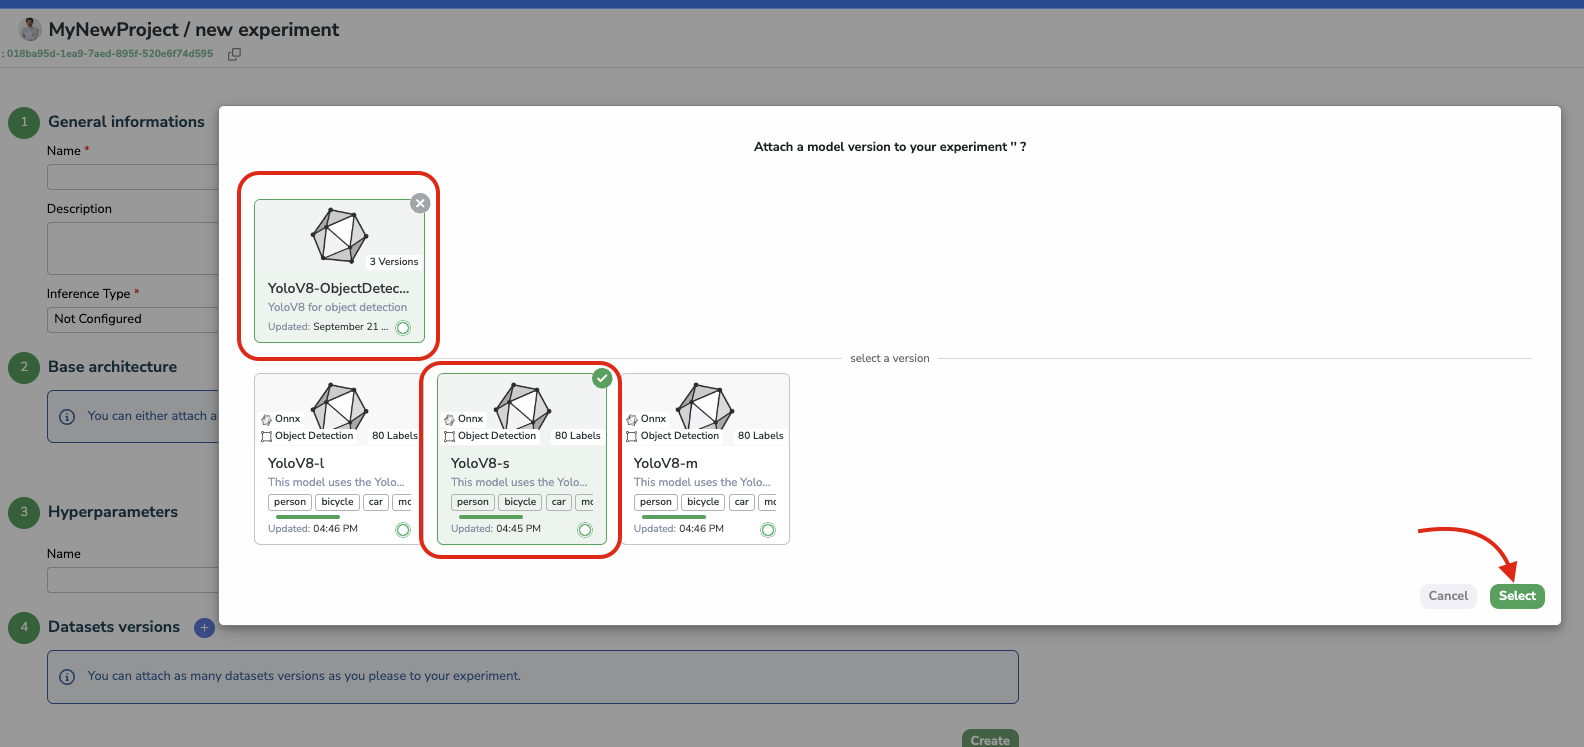
Selection of a ModelVersion from Model Registry as a Base architecture
More information about ModelVersion is available on this page.
b. Attach an Experiment
By clicking on Attach an Experiment, a modal listing the existing Experiment in the frame of the current Project will allow you to select the Experiment to take as a Base architecture for your new Experiment.
The selected Experiment will be attached to the new Experiment after having clicked on the Select button.
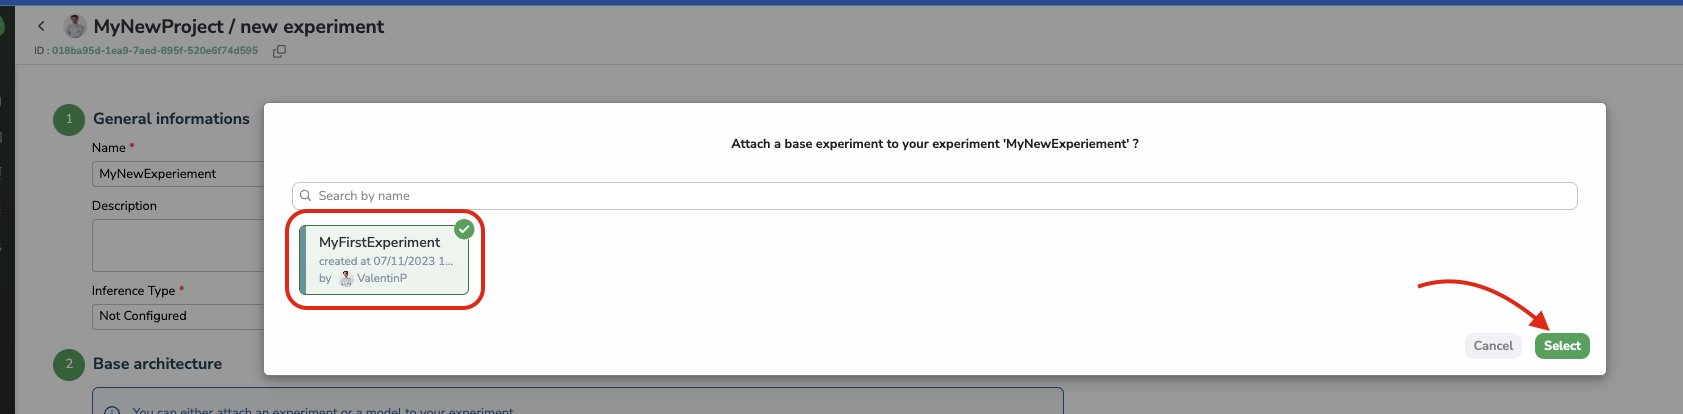
Selection of an Experiment as a Base architecture
In summary, the selection of the Base architecture will define the ML base (neural network architecture, weights, training script, and hyperparameters...) that will be used to train a ModelVersion in our new Experiment.
Inference TypeThe list of
ModelVersionorExperimentproposed while choosing the Base architecture is filtered based on the Inference Type choosen in the General Information sub-part of the Experiment creation form.
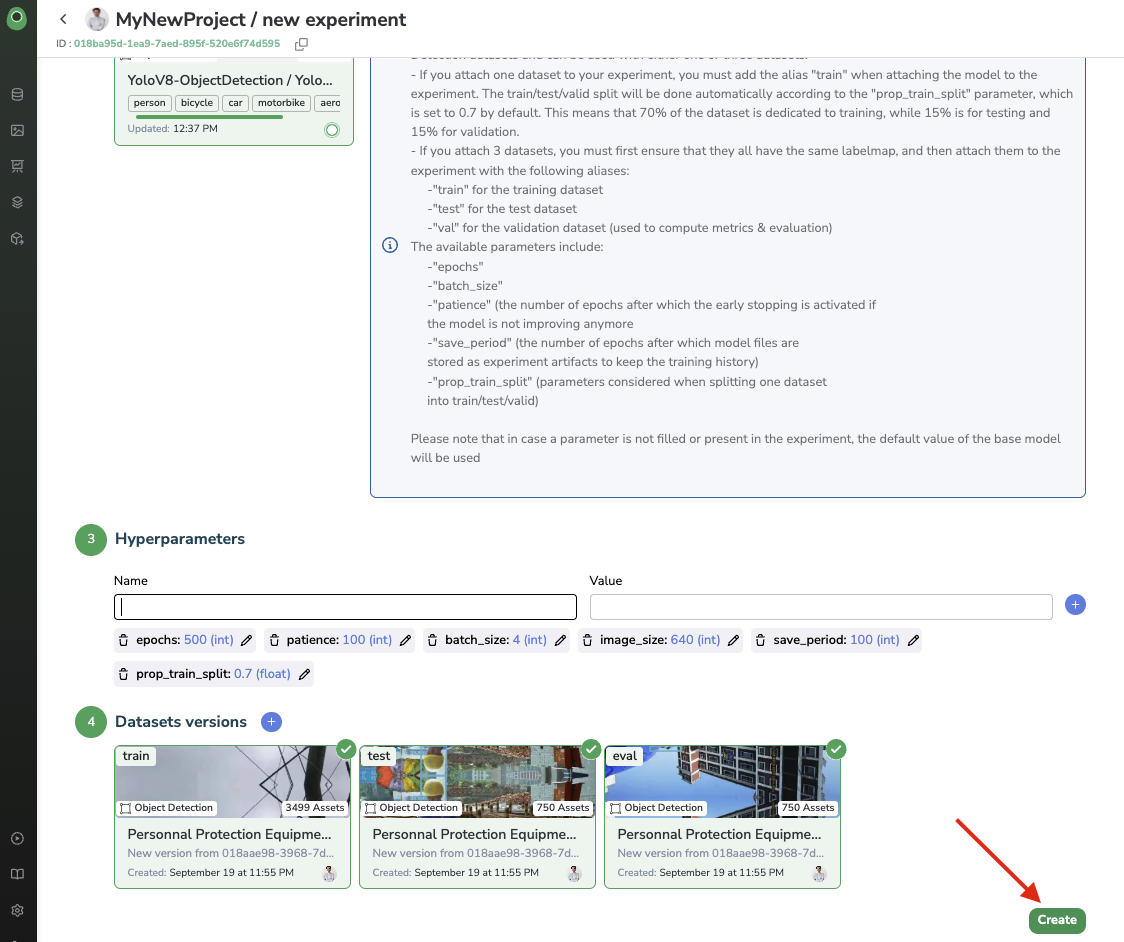
C. Hyperparameters
After selecting the Base architecture, Picsellia will automatically inherit the Hyperparameters of the Base architecture and associated default values.
In this sub-part of the Experiment creation form, you will then be able to modify the value of the inherited Hyperparameters to configure the training as expected. You also have the possibility to add or remove Hyperparameters. But be careful because those Hyperparameters and their associated values will be passed as training parameters to the training script when launching the ModelVersion training in the frame of the Experiment, so if some training parameters are missing or unexpected, it might impact the training script execution and cause errors.
Hyperparameters ofModelVersionfrom Public RegistryWe strongly recommend you to not add or remove Hyperparameters if you are using
ModelVersionfrom the Public Registry as Base architecture of yourExperiment
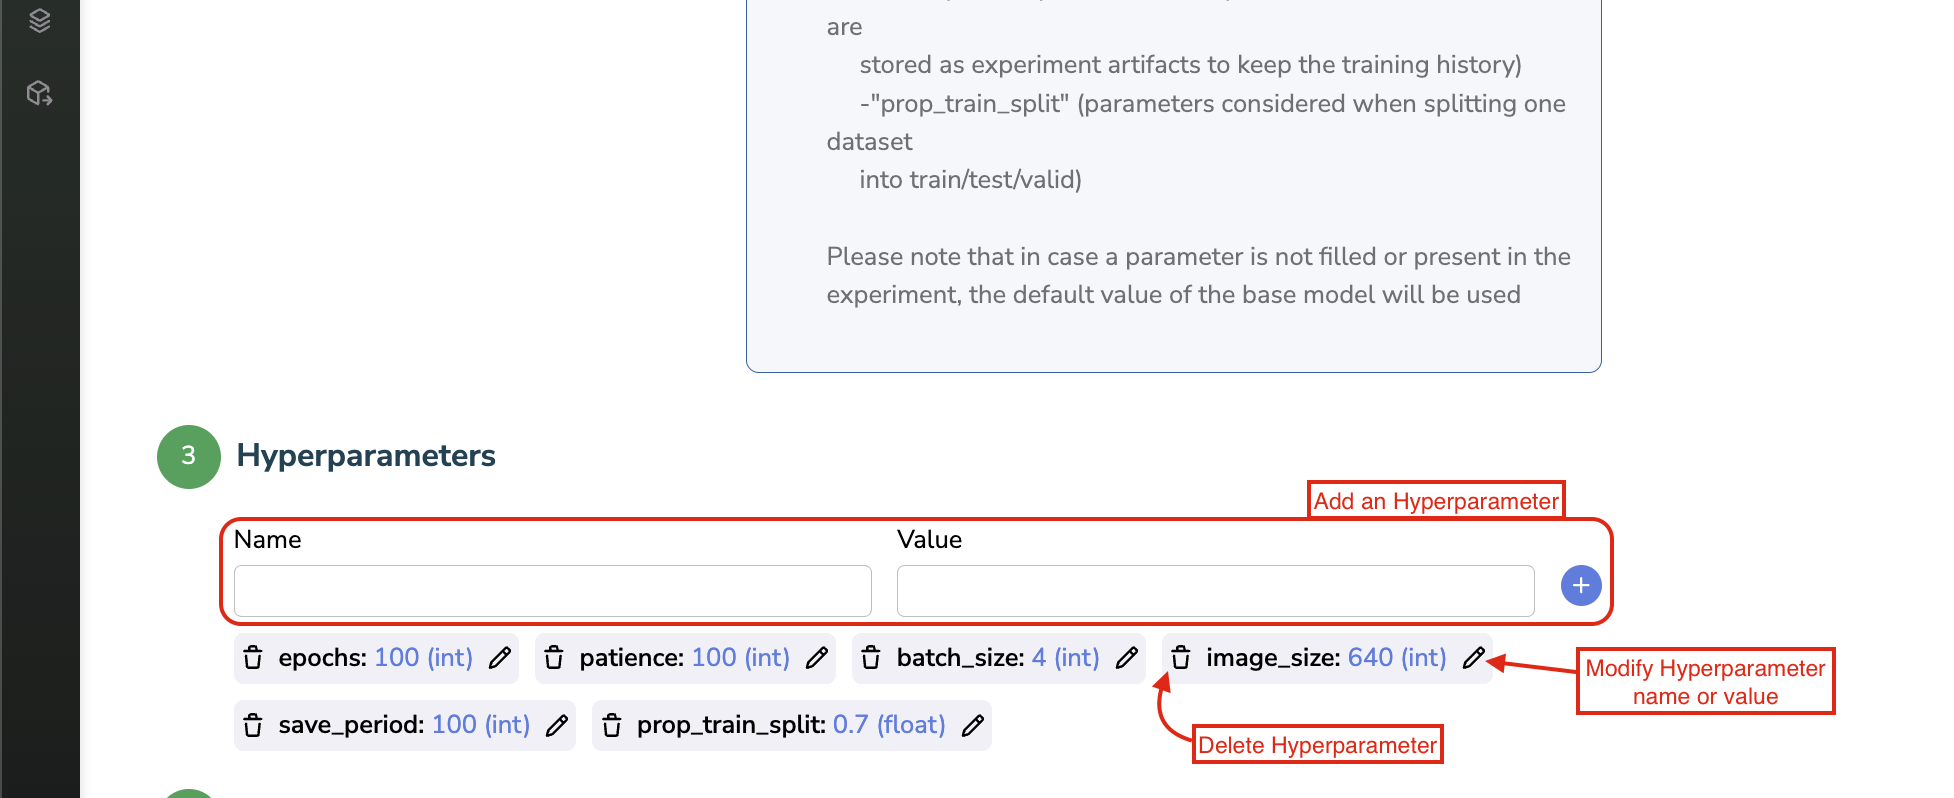
Hyperparameter edit, deletion, creation
D. Dataset Versions
Last but not least, you need to attach DatasetVersion to your Experiment, obviously those DatasetVersion will be used during the training to train your ModelVersion.
By clicking on the +, a modal displaying all DatasetVersion attached to the Project will open.
You can from this one, pick up the DatasetVersion that will be used during the model training, depending on the ability of the training script to handle one or several DatasetVersion as input.
For each selected DatasetVersion, you'll be asked to provide an alias. This alias will be passed along with the DatasetVersion to the training script, it will allow the training script (if written to receive such an alias) to understand the purpose of each DatasetVersion, for instance, differentiate the training DatasetVersion, from the validation or test ones.
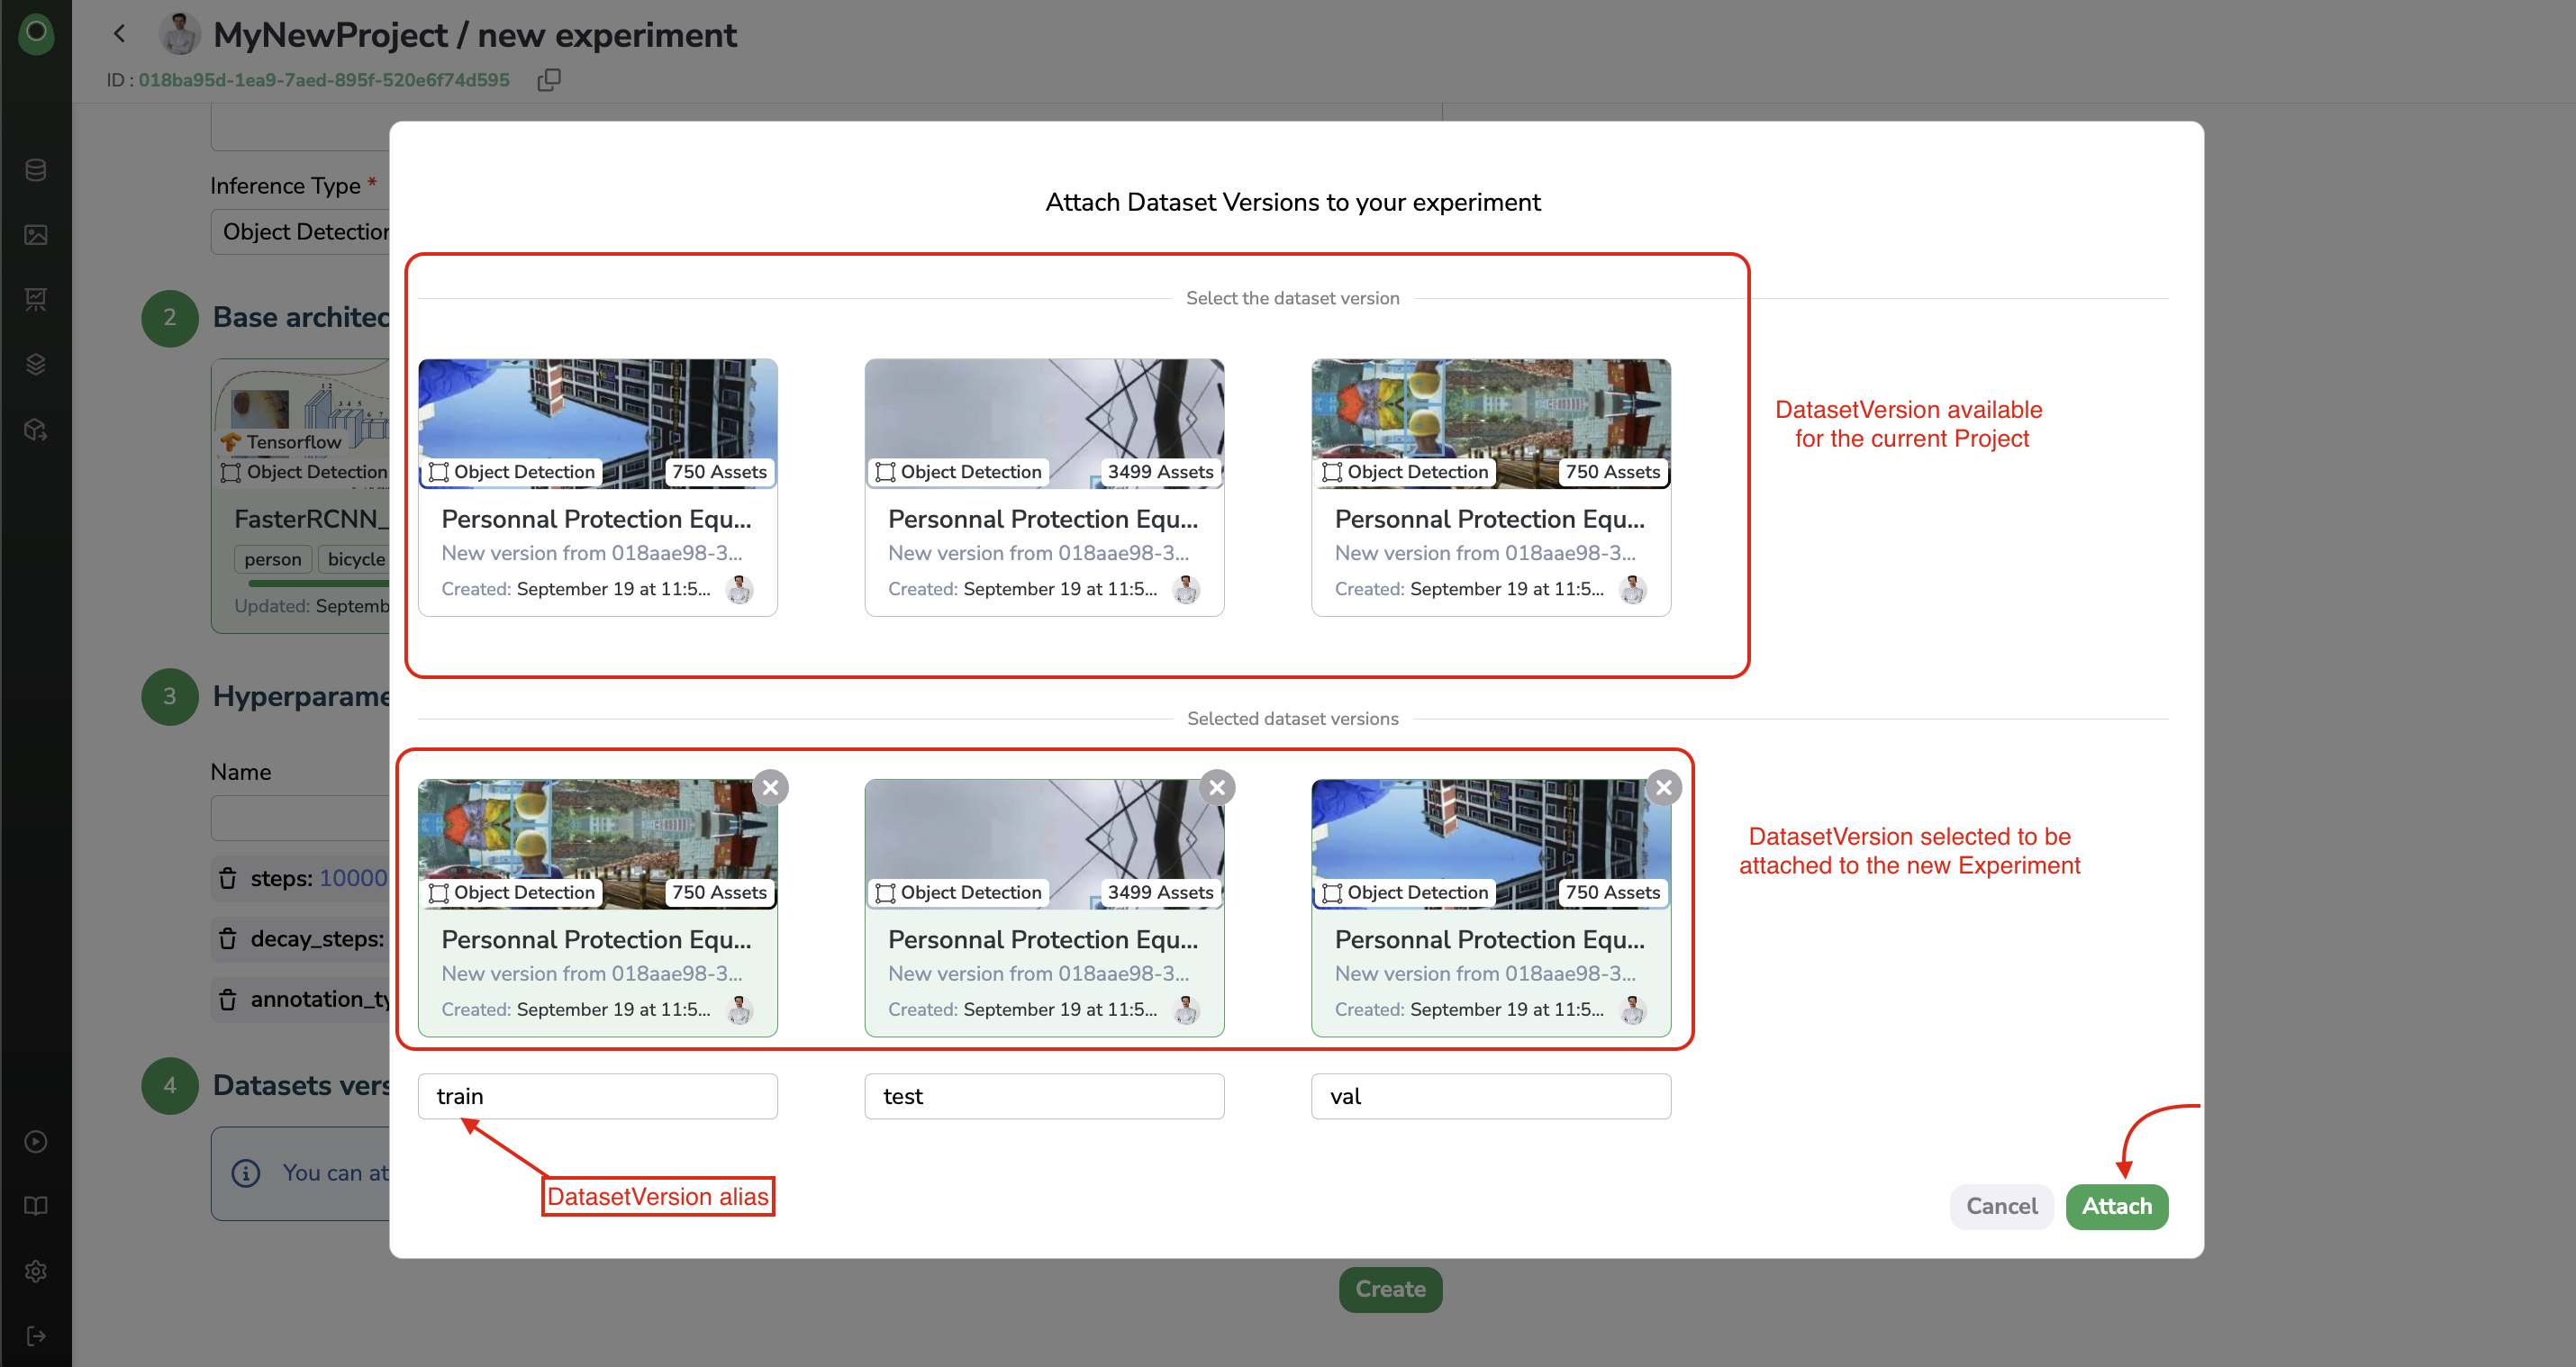
DatasetVersion attachment with aliases
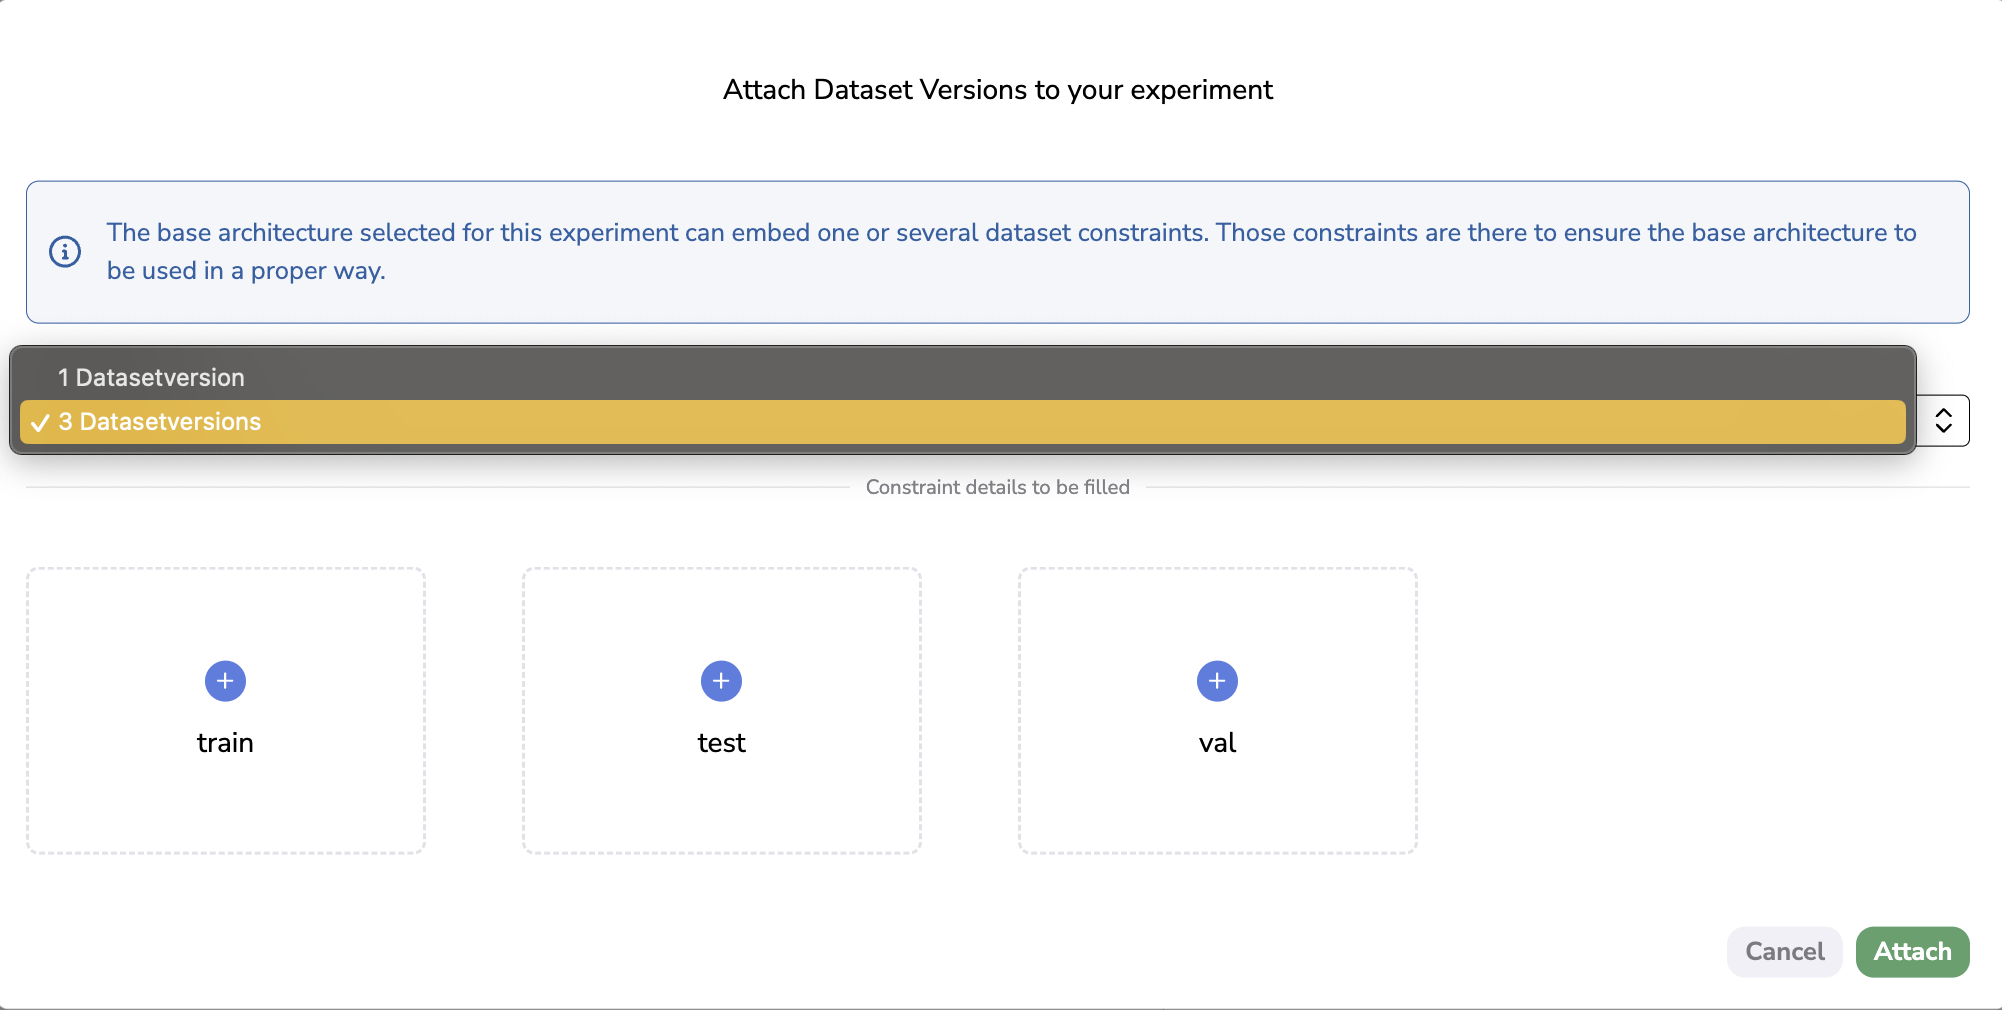
a. Dataset Constraints
If you use a ModelVersion from the Public Registry as Base architecture, you might see a different modal, this is due to the Dataset Constraints.
A Dataset Constraint is a set of constraints in which each constraint predefines the number of DatasetVersion that can be attached to an Experimentand define also the alias that must be given to each attached DatasetVersion. A Dataset Constraint is always related to a ModelVersion, it means that the Dataset Constraint you will have to fulfill depends on the selected Base architecture.
Dataset Constraints reflects the fact the training script is designed to get a given number DatasetVersion with particular alis as input. Dataset Constraint mainly aims at preventing the training script of the Base architecture from falling into error because DatasetVersion attached and associated aliases are not handled.
Only onModelVersionfrom the Public RegistryAt the moment Dataset Constraints are only activated on
ModelVersionfrom the Public Registry. But soon, Picsellia users will be able to create and edit Dataset Constraints on their ownModelVersion.It is also important to note that, if existing,
Dataset Contraintsare inherited from the Base architecture to theModelVersionthat will be created through theExperimentusing this Base architecture.
So at first, after having selected a Base architecture that has Dataset Constraints defined, the DatasetVersion selection modal will open displaying a dropdown of available constraints for this Base architecture and empty placeholders with associated aliases that correspond to the constraint selected.
DatasetVersion attachment with
Then you can just click on any placeholder to be prompted with the list of available DatasetVersion ready to add to your Experiment, without the need to write the alias because it has been pre-filled for you! This way, you ensured that you attached the right number of DatasetVersion with the proper aliases depending on the Base Architecture selected.
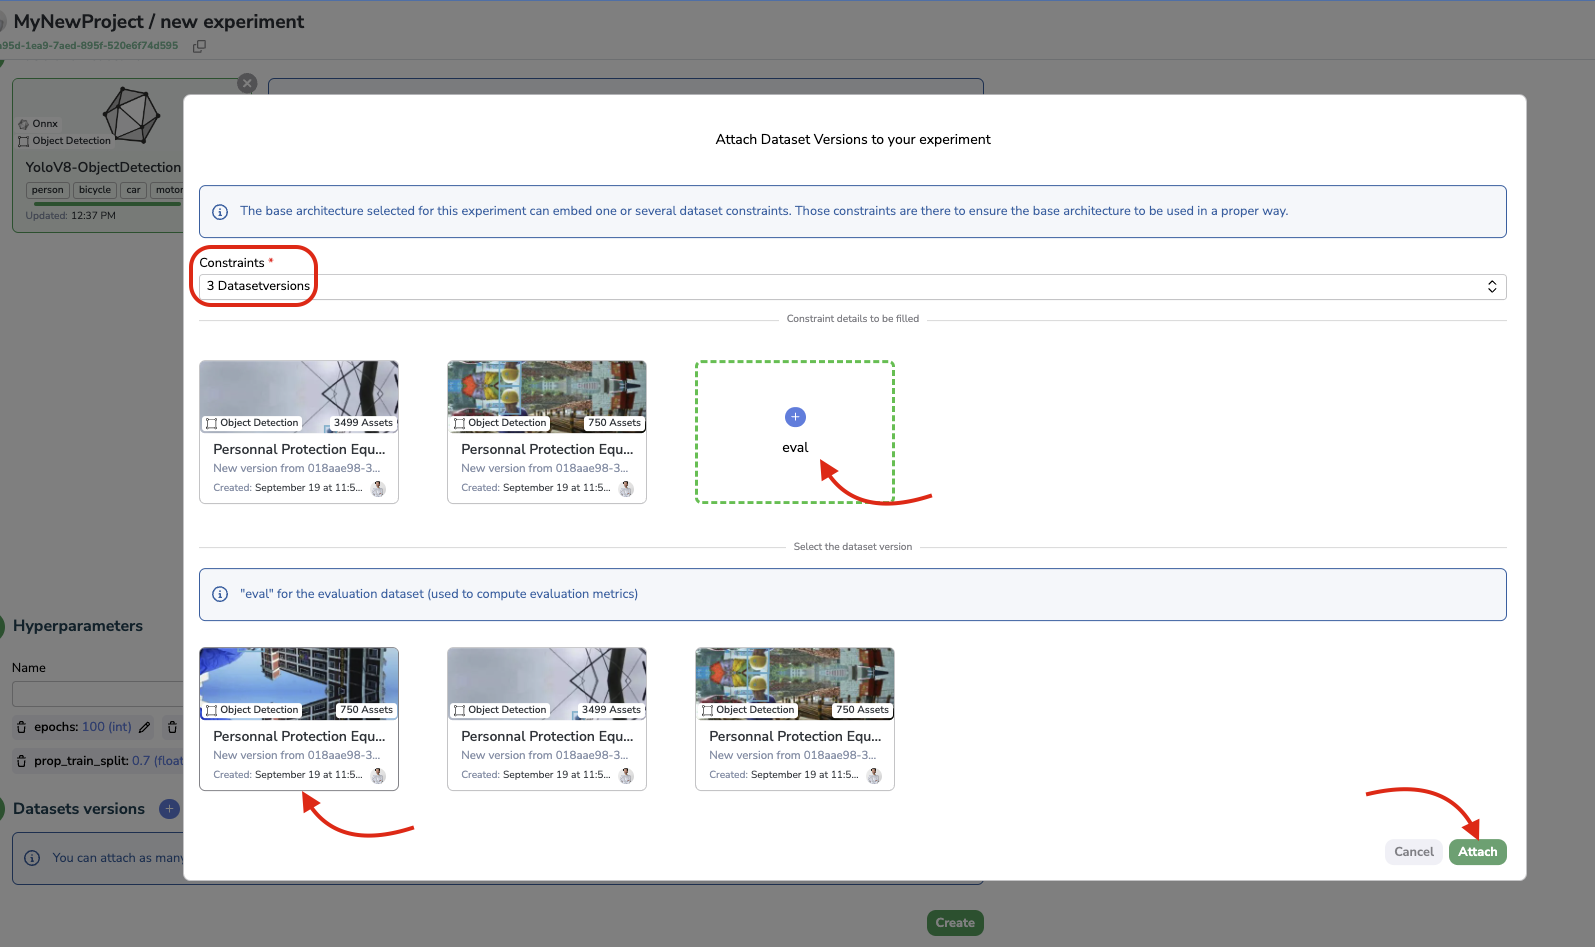
Dataset Constraint completion
Once the constraint has been filled properly with all the required DatsetVersion, you can click on Attach.
2. Created Experiment
ExperimentAll the Experiment creation form sub-parts should now be completed, the very last step is to click on create to instantiate your Experiment.
Experiment creation
Once created, you'll land on the Experiment overview, in which you will retrieve all the elements defined during the Experiment creation.
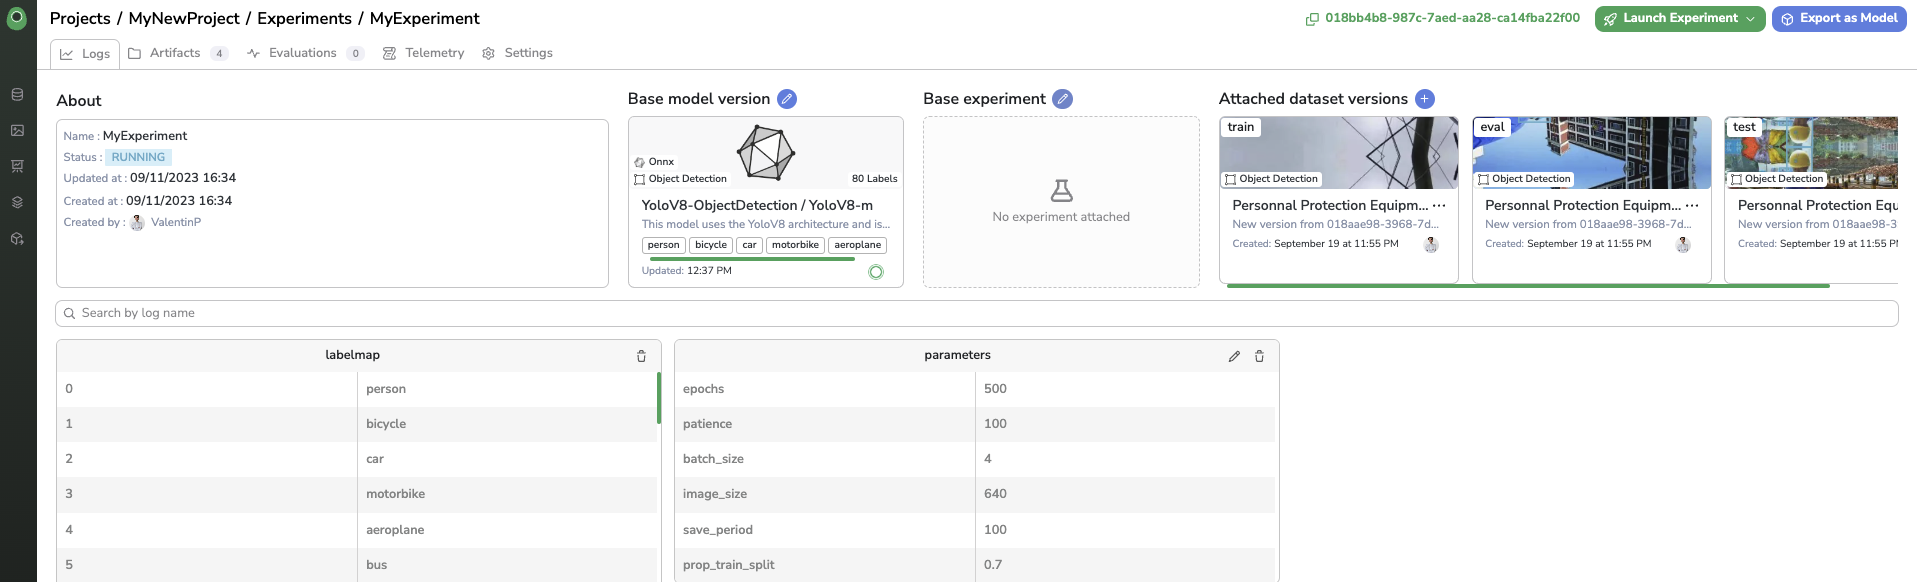
Experiment overview
Updated about 1 year ago