For AI agents: visit https://documentation.picsellia.com/llms.txt for an index of all pages formatted in Markdown and endpoints in OpenAPI. Append .md to any documentation page URL to get its markdown version.
The way you draw a Shape in the Annotation tool depends on the Version Type configured on the DatasetVersion (see Set up the dataset). Each Version Type exposes its own set of drawing tools in the left toolbar.
🚧
The Multi Version Type is not yet available
A MultiVersion Type is listed in the DatasetVersion configuration, intended to make the drawing tools of several Version Type below available at once in the same Annotation. It cannot be selected yet, so it is not usable in the Annotation tool for now.
1. Classification
For a DatasetVersion in Classification mode, the Annotation tool allows you to classify each Asset among the available Labels.
1️⃣
By definition, an Annotation in Classification mode will contain only one Shape.
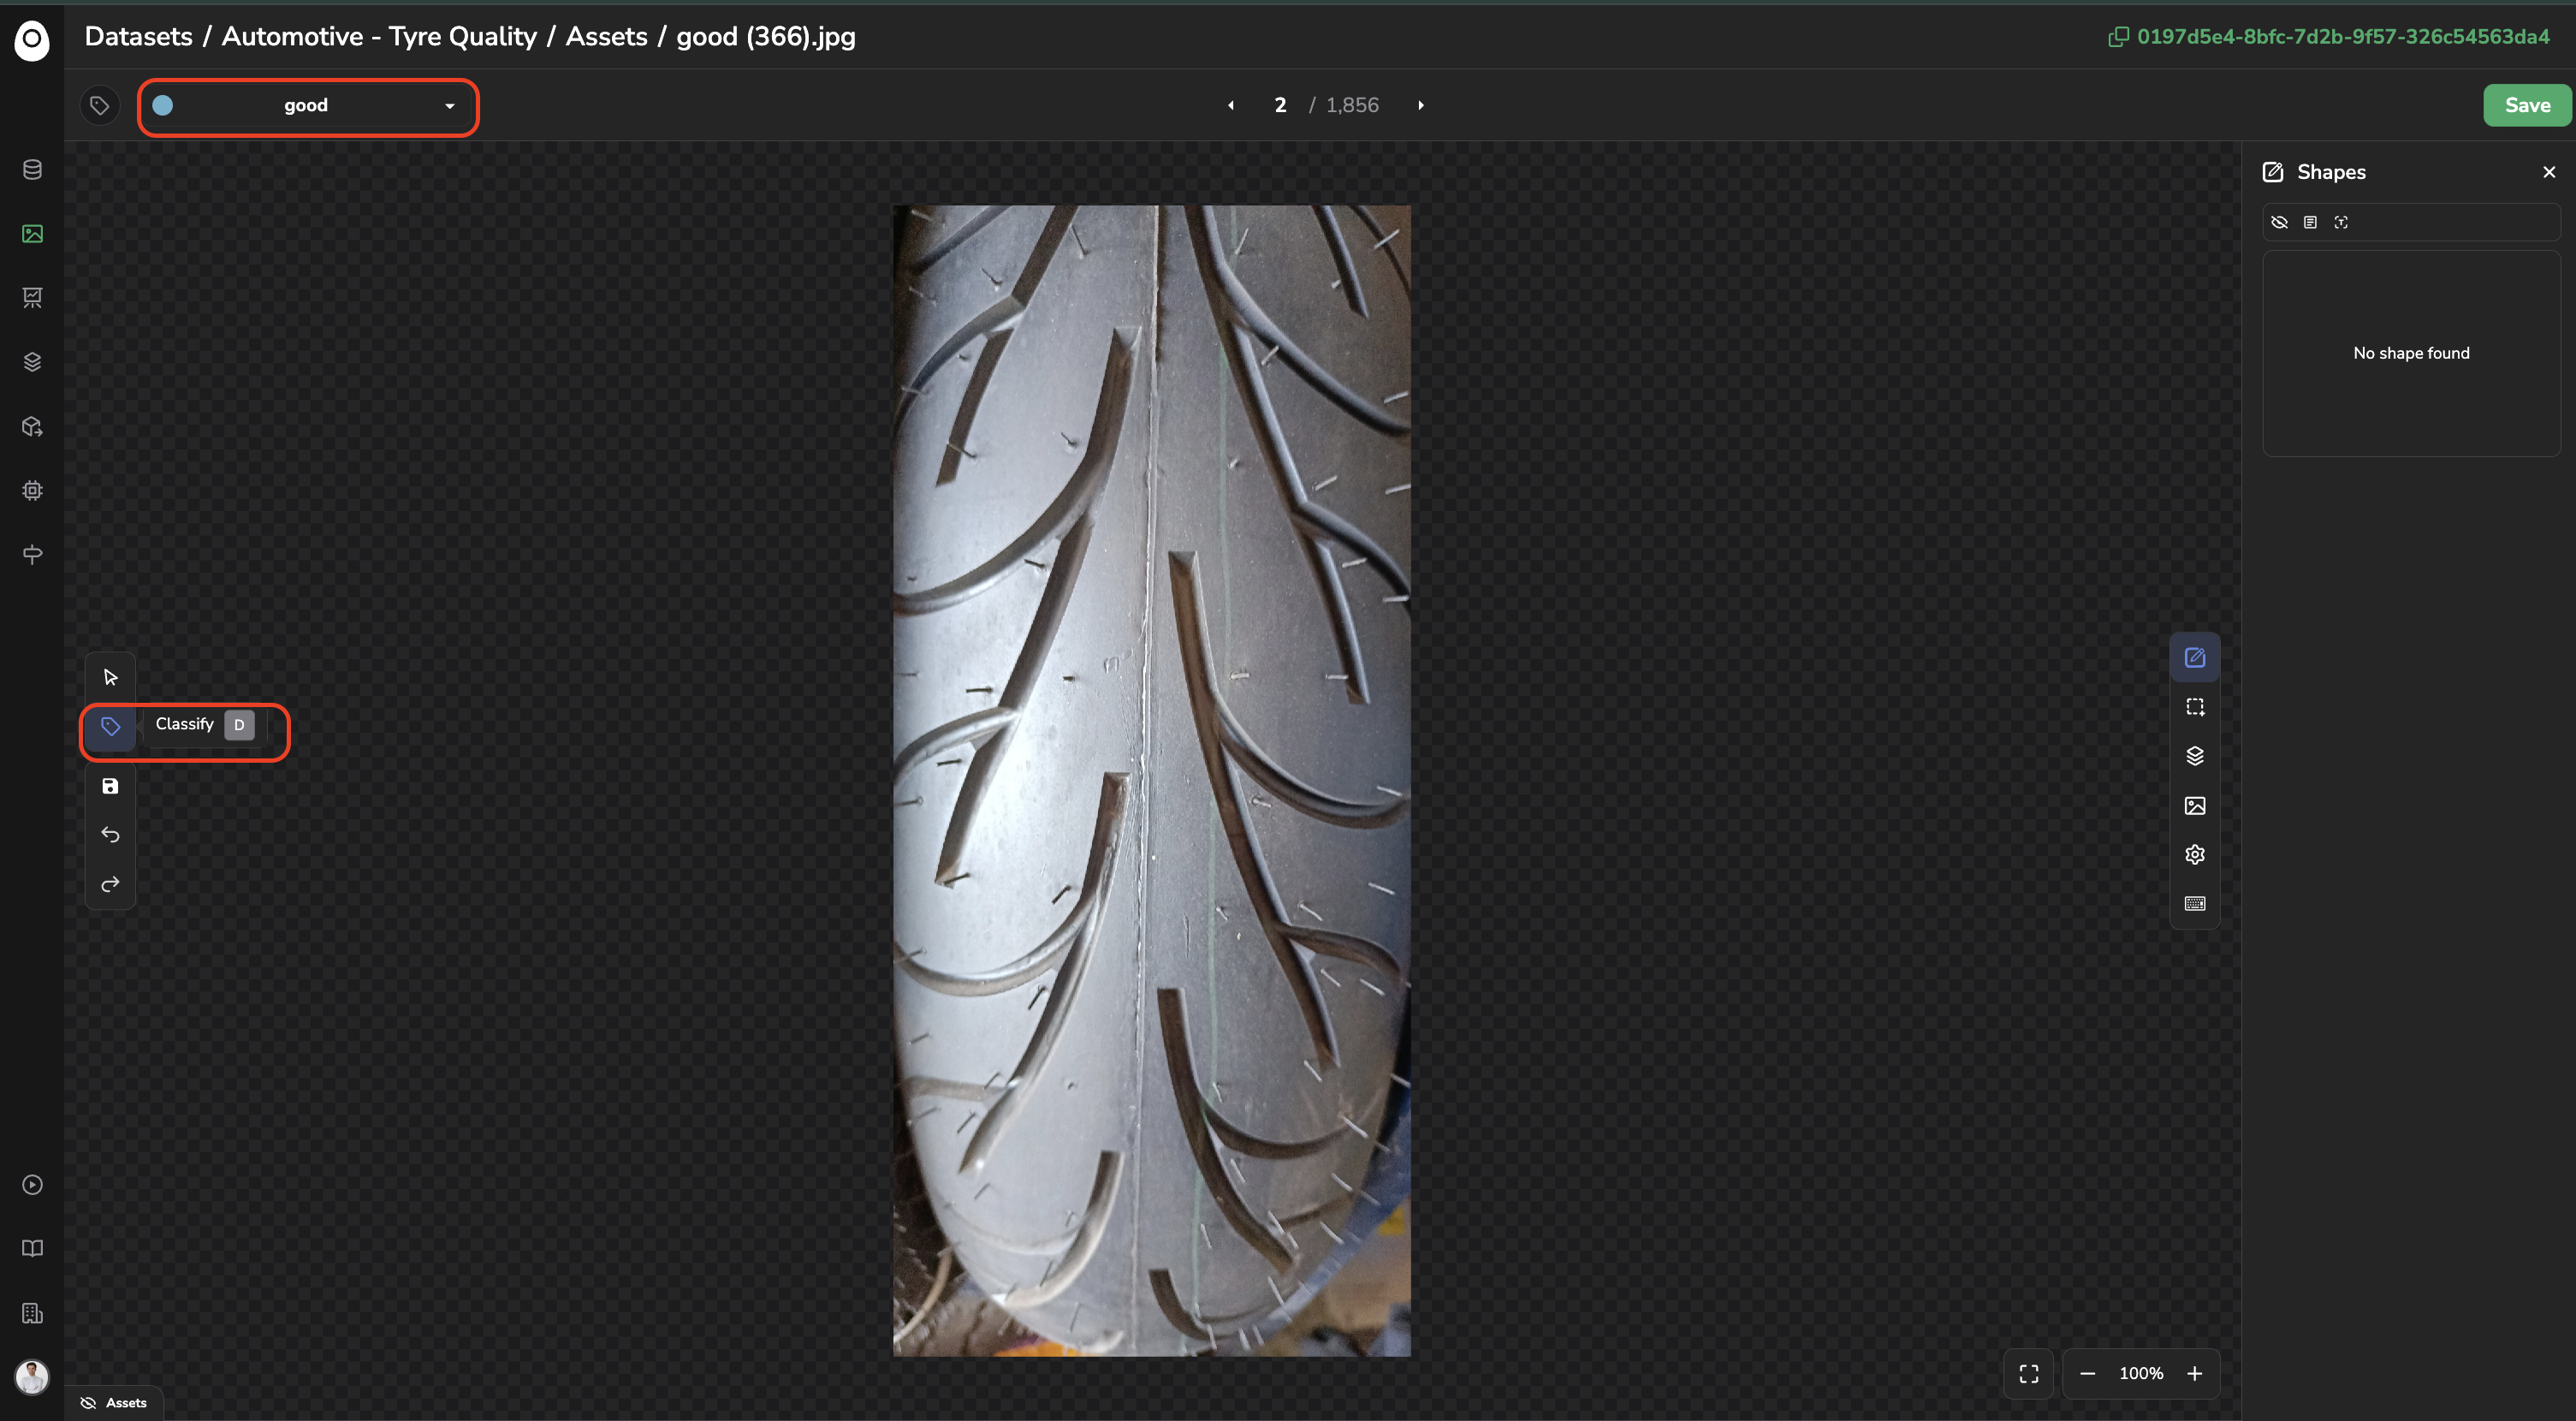
To do so, make sure drawing mode is enabled ("D" by default on your keyboard); the first click on the image will classify the Asset with the active Label.
Select the Classification tool
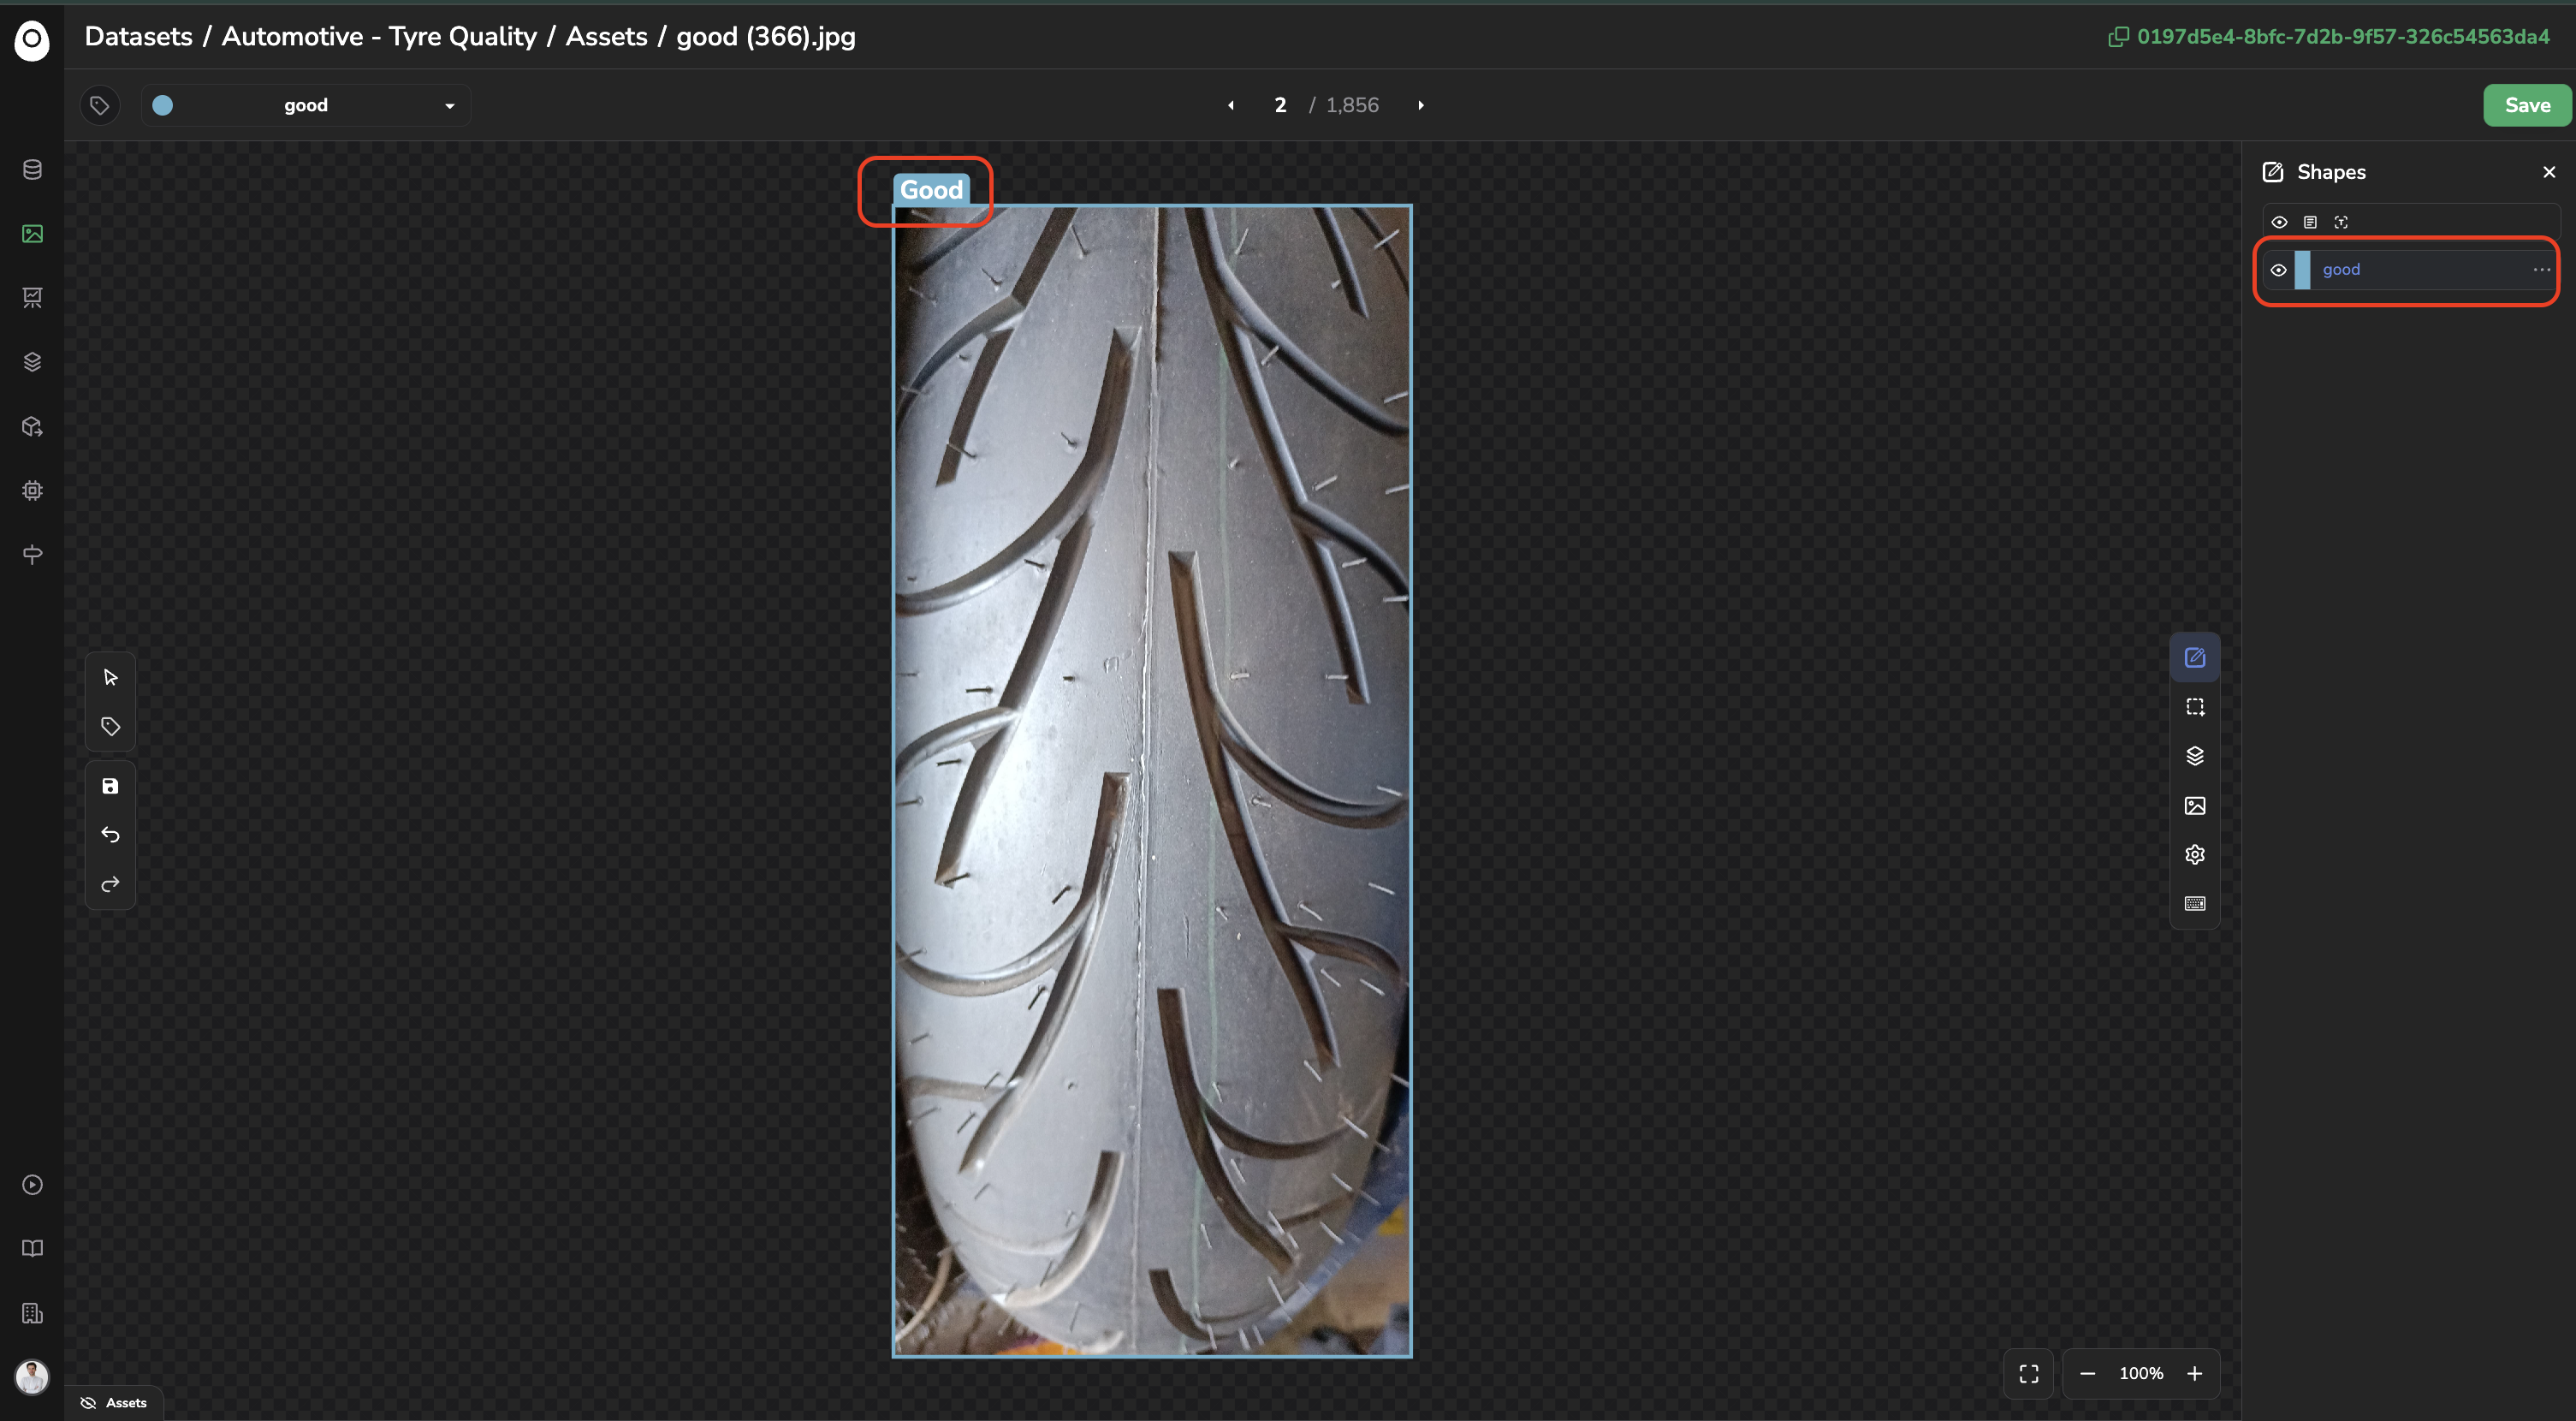
Once the ClassificationShape is created, the image is framed by the classification and its Label; the Shape is also added to the Shapes panel.
Classification Shape created
Once created, the Shape can obviously be edited (label modification, for instance) or deleted through the different actions available and detailed here.
2. Object Detection
For a DatasetVersion in Object Detection mode, the Annotation tool allows you to create a bounding box Shape.
A. Manual drawing
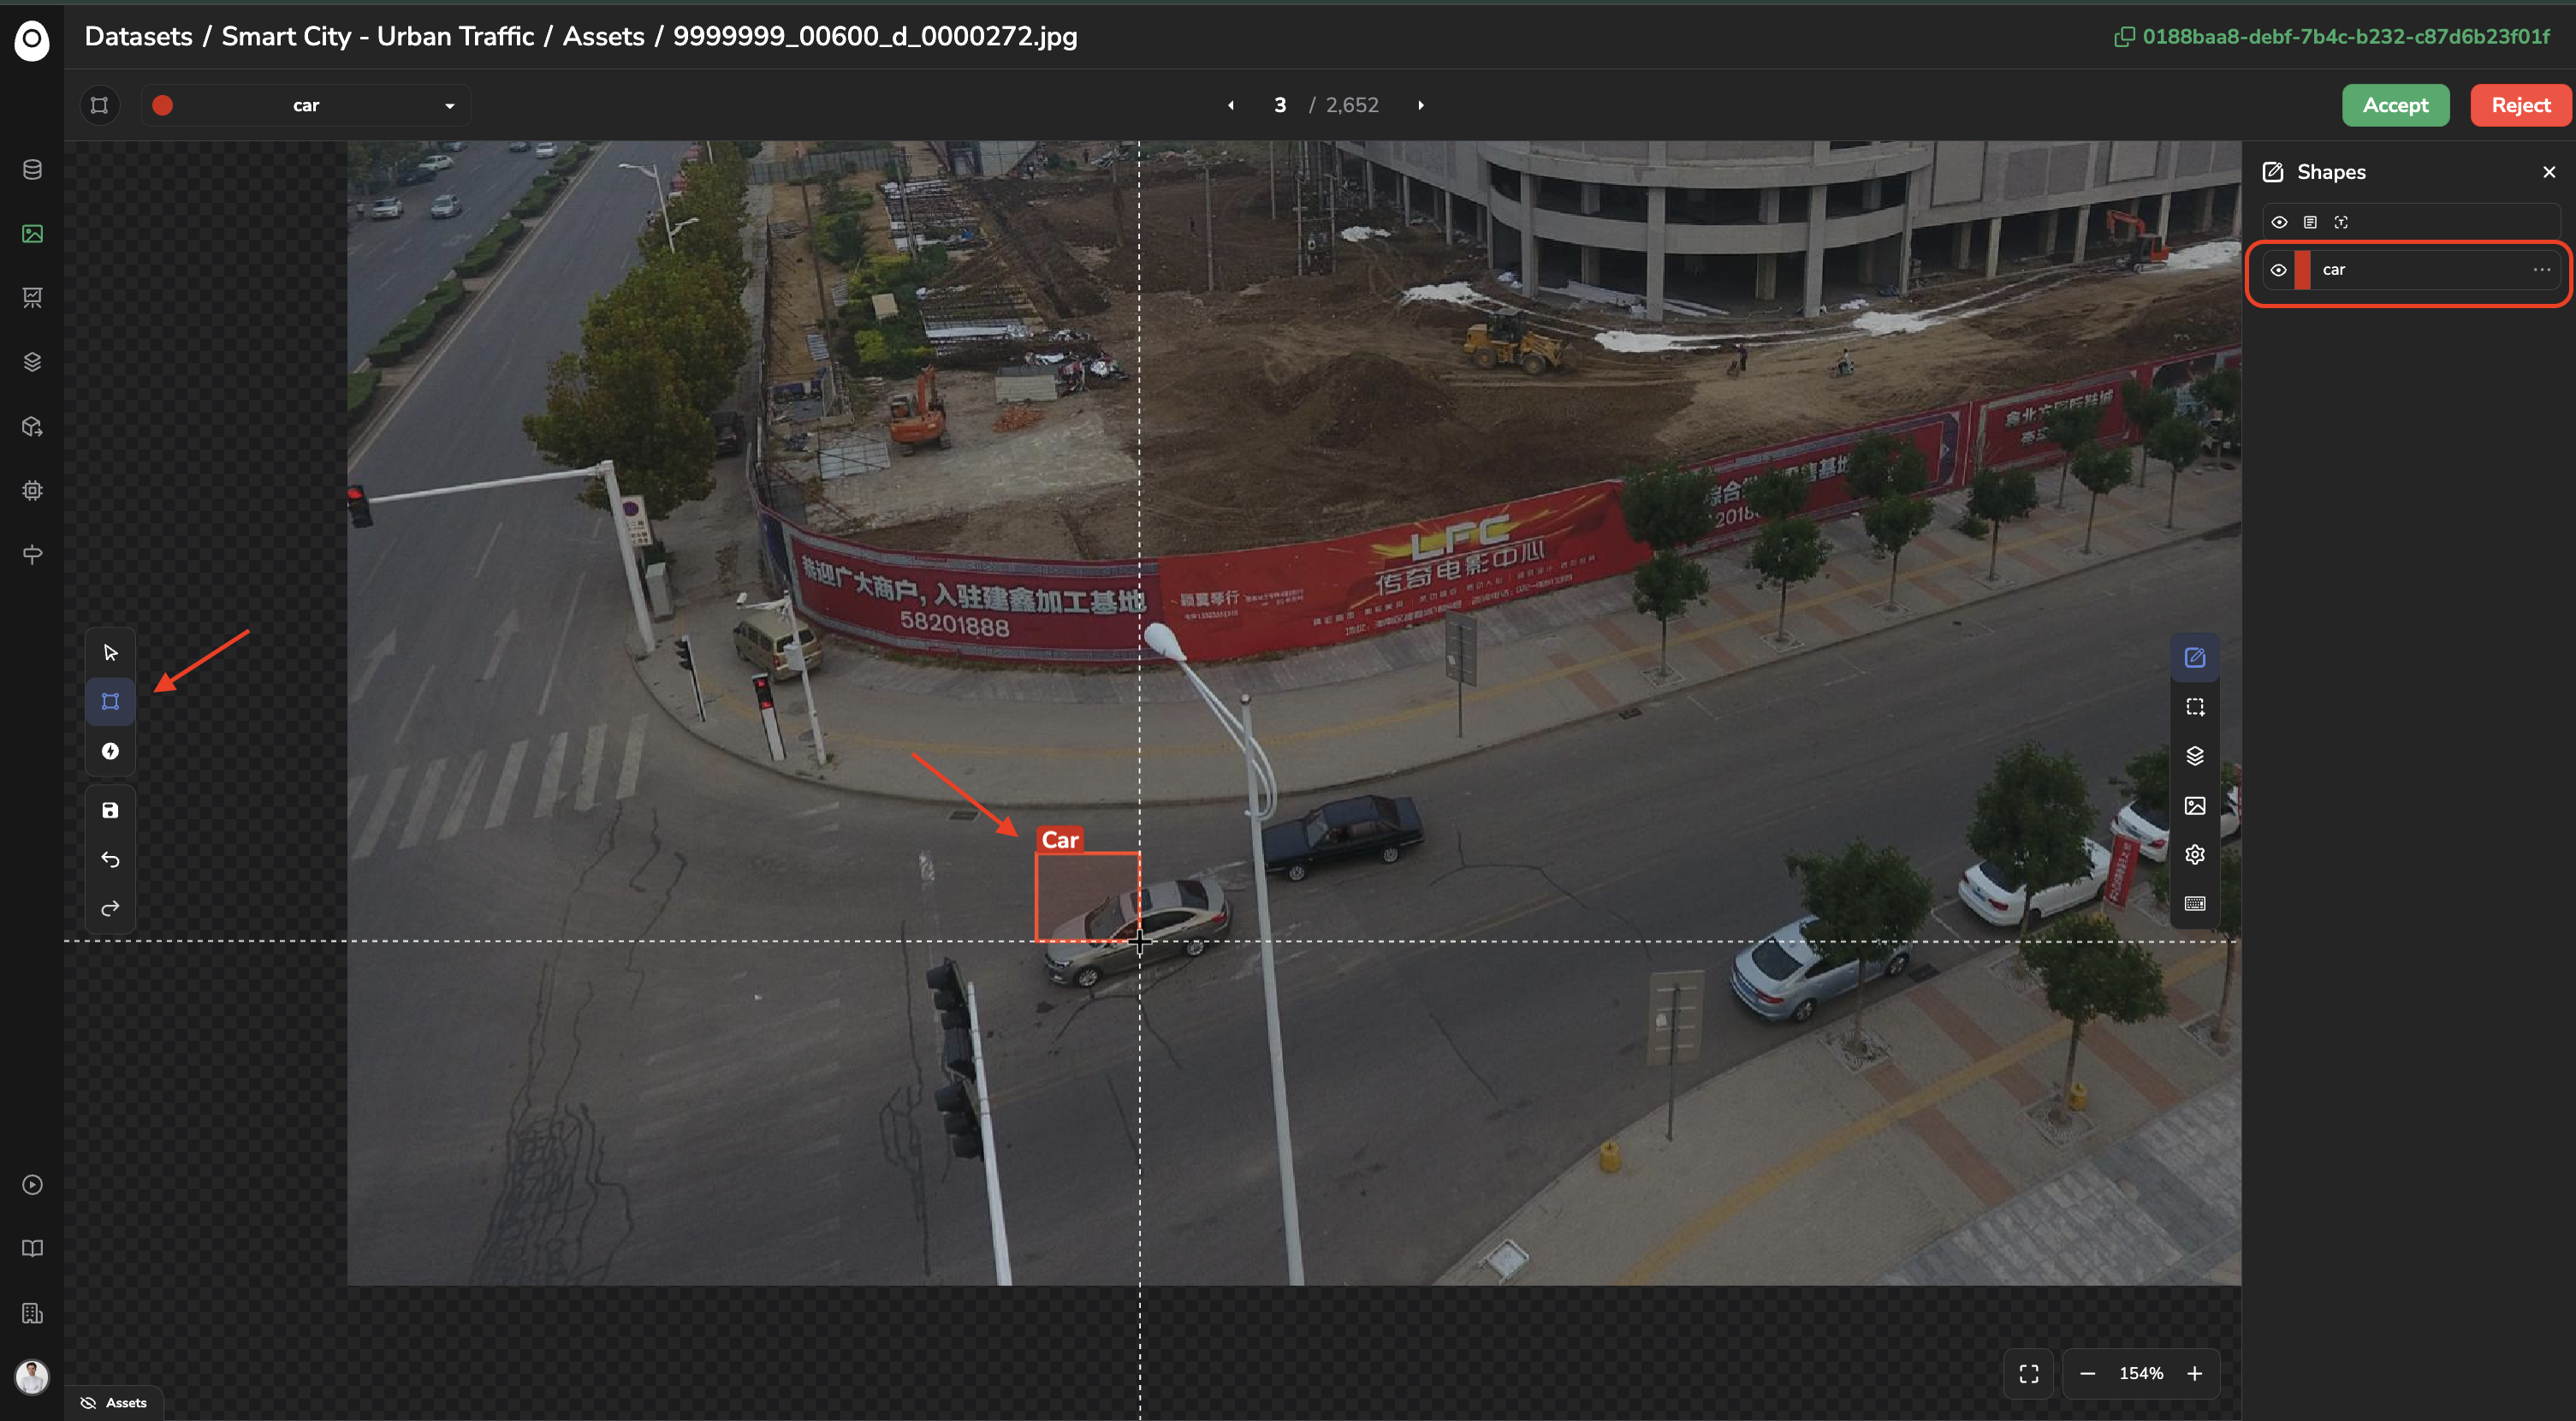
With the Draw rectangle tool ("D" on your keyboard by default), the first click will create the top-left corner of the bounding box, and releasing it will close the bounding box with the bottom-right corner.
Manual bounding box creation
B. AI-assisted drawing (SAM3)
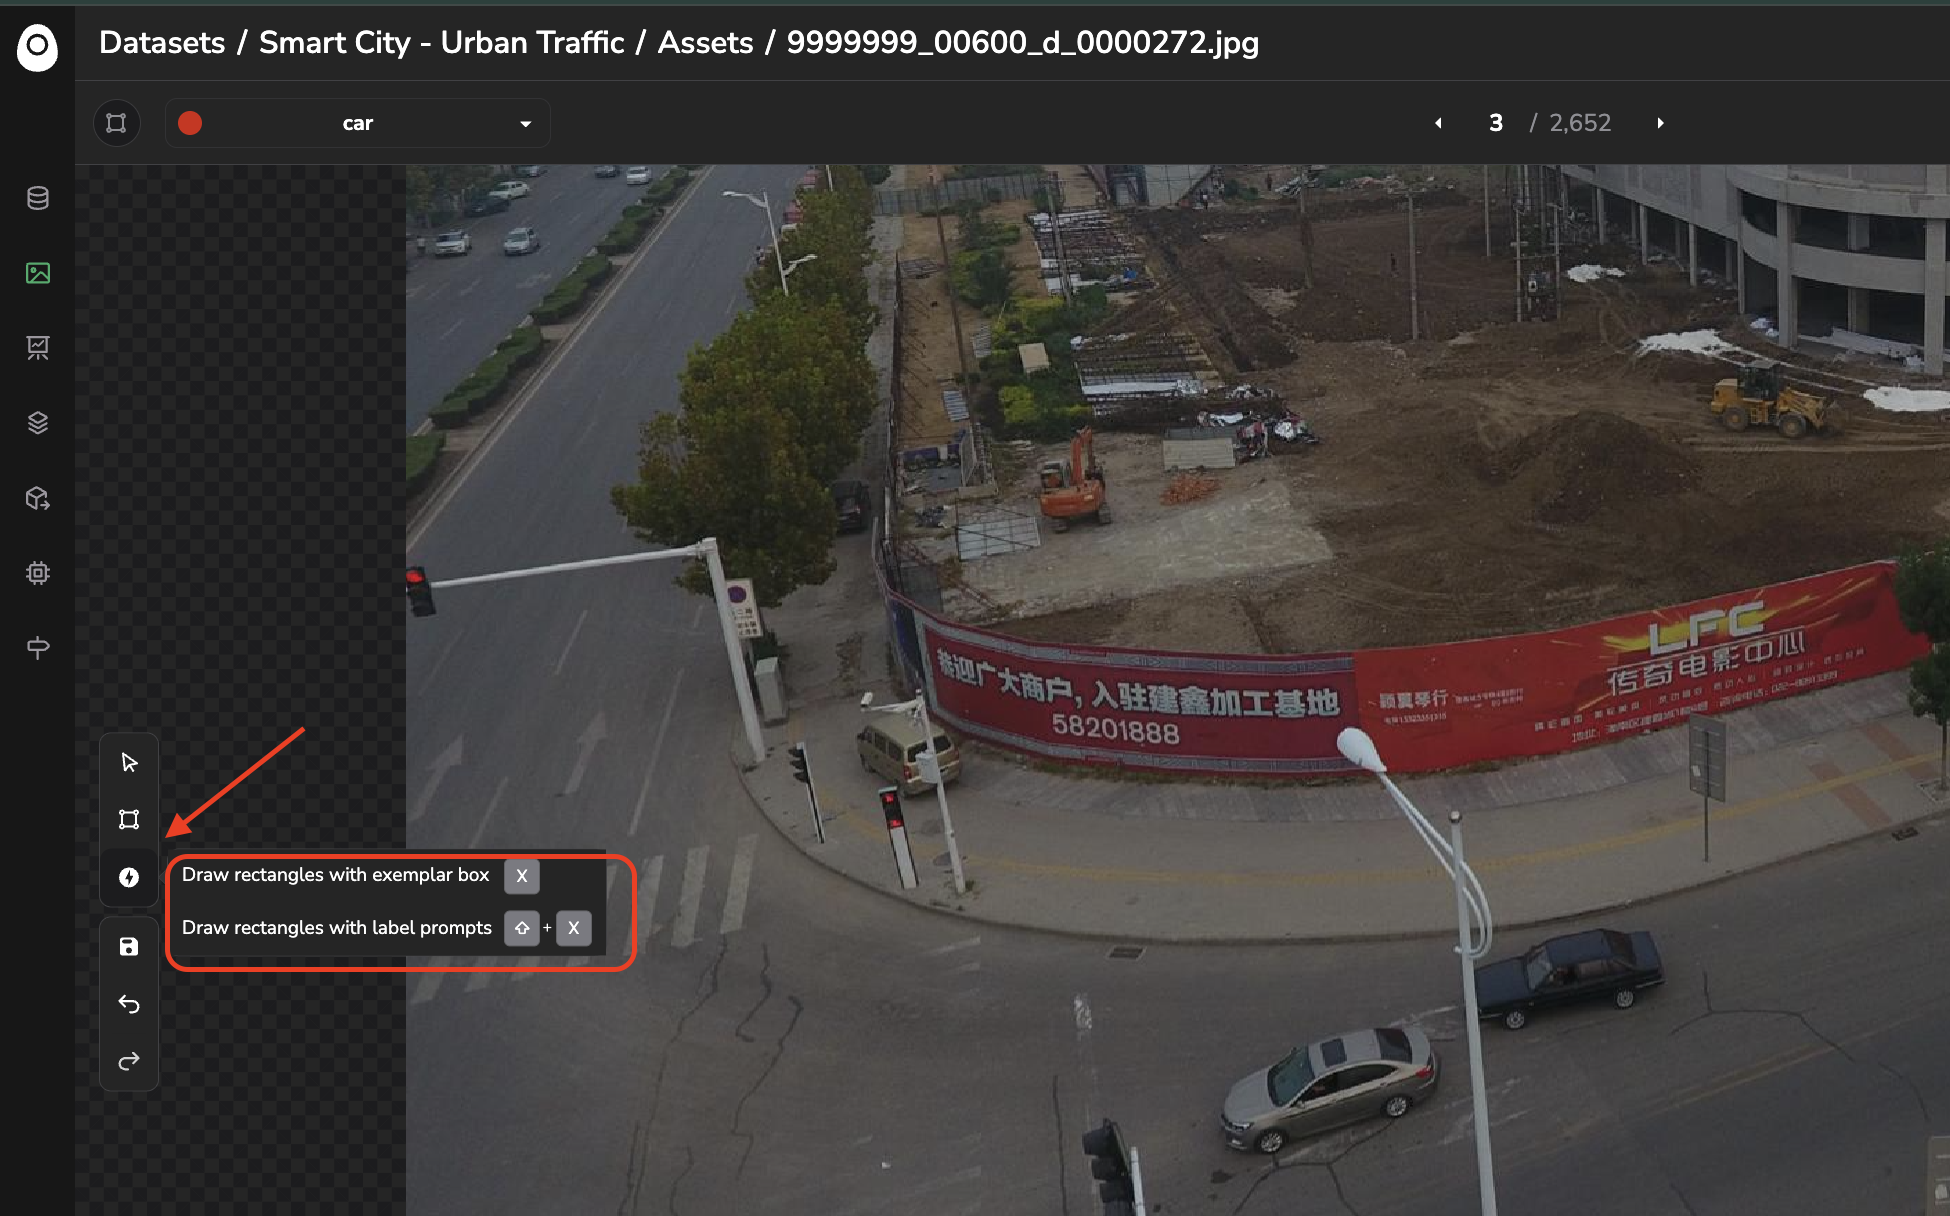
Object Detection also exposes two AI-assisted tools, powered by SAM3 (Segment Anything Model), that let you draw several bounding boxes at once instead of one by one:
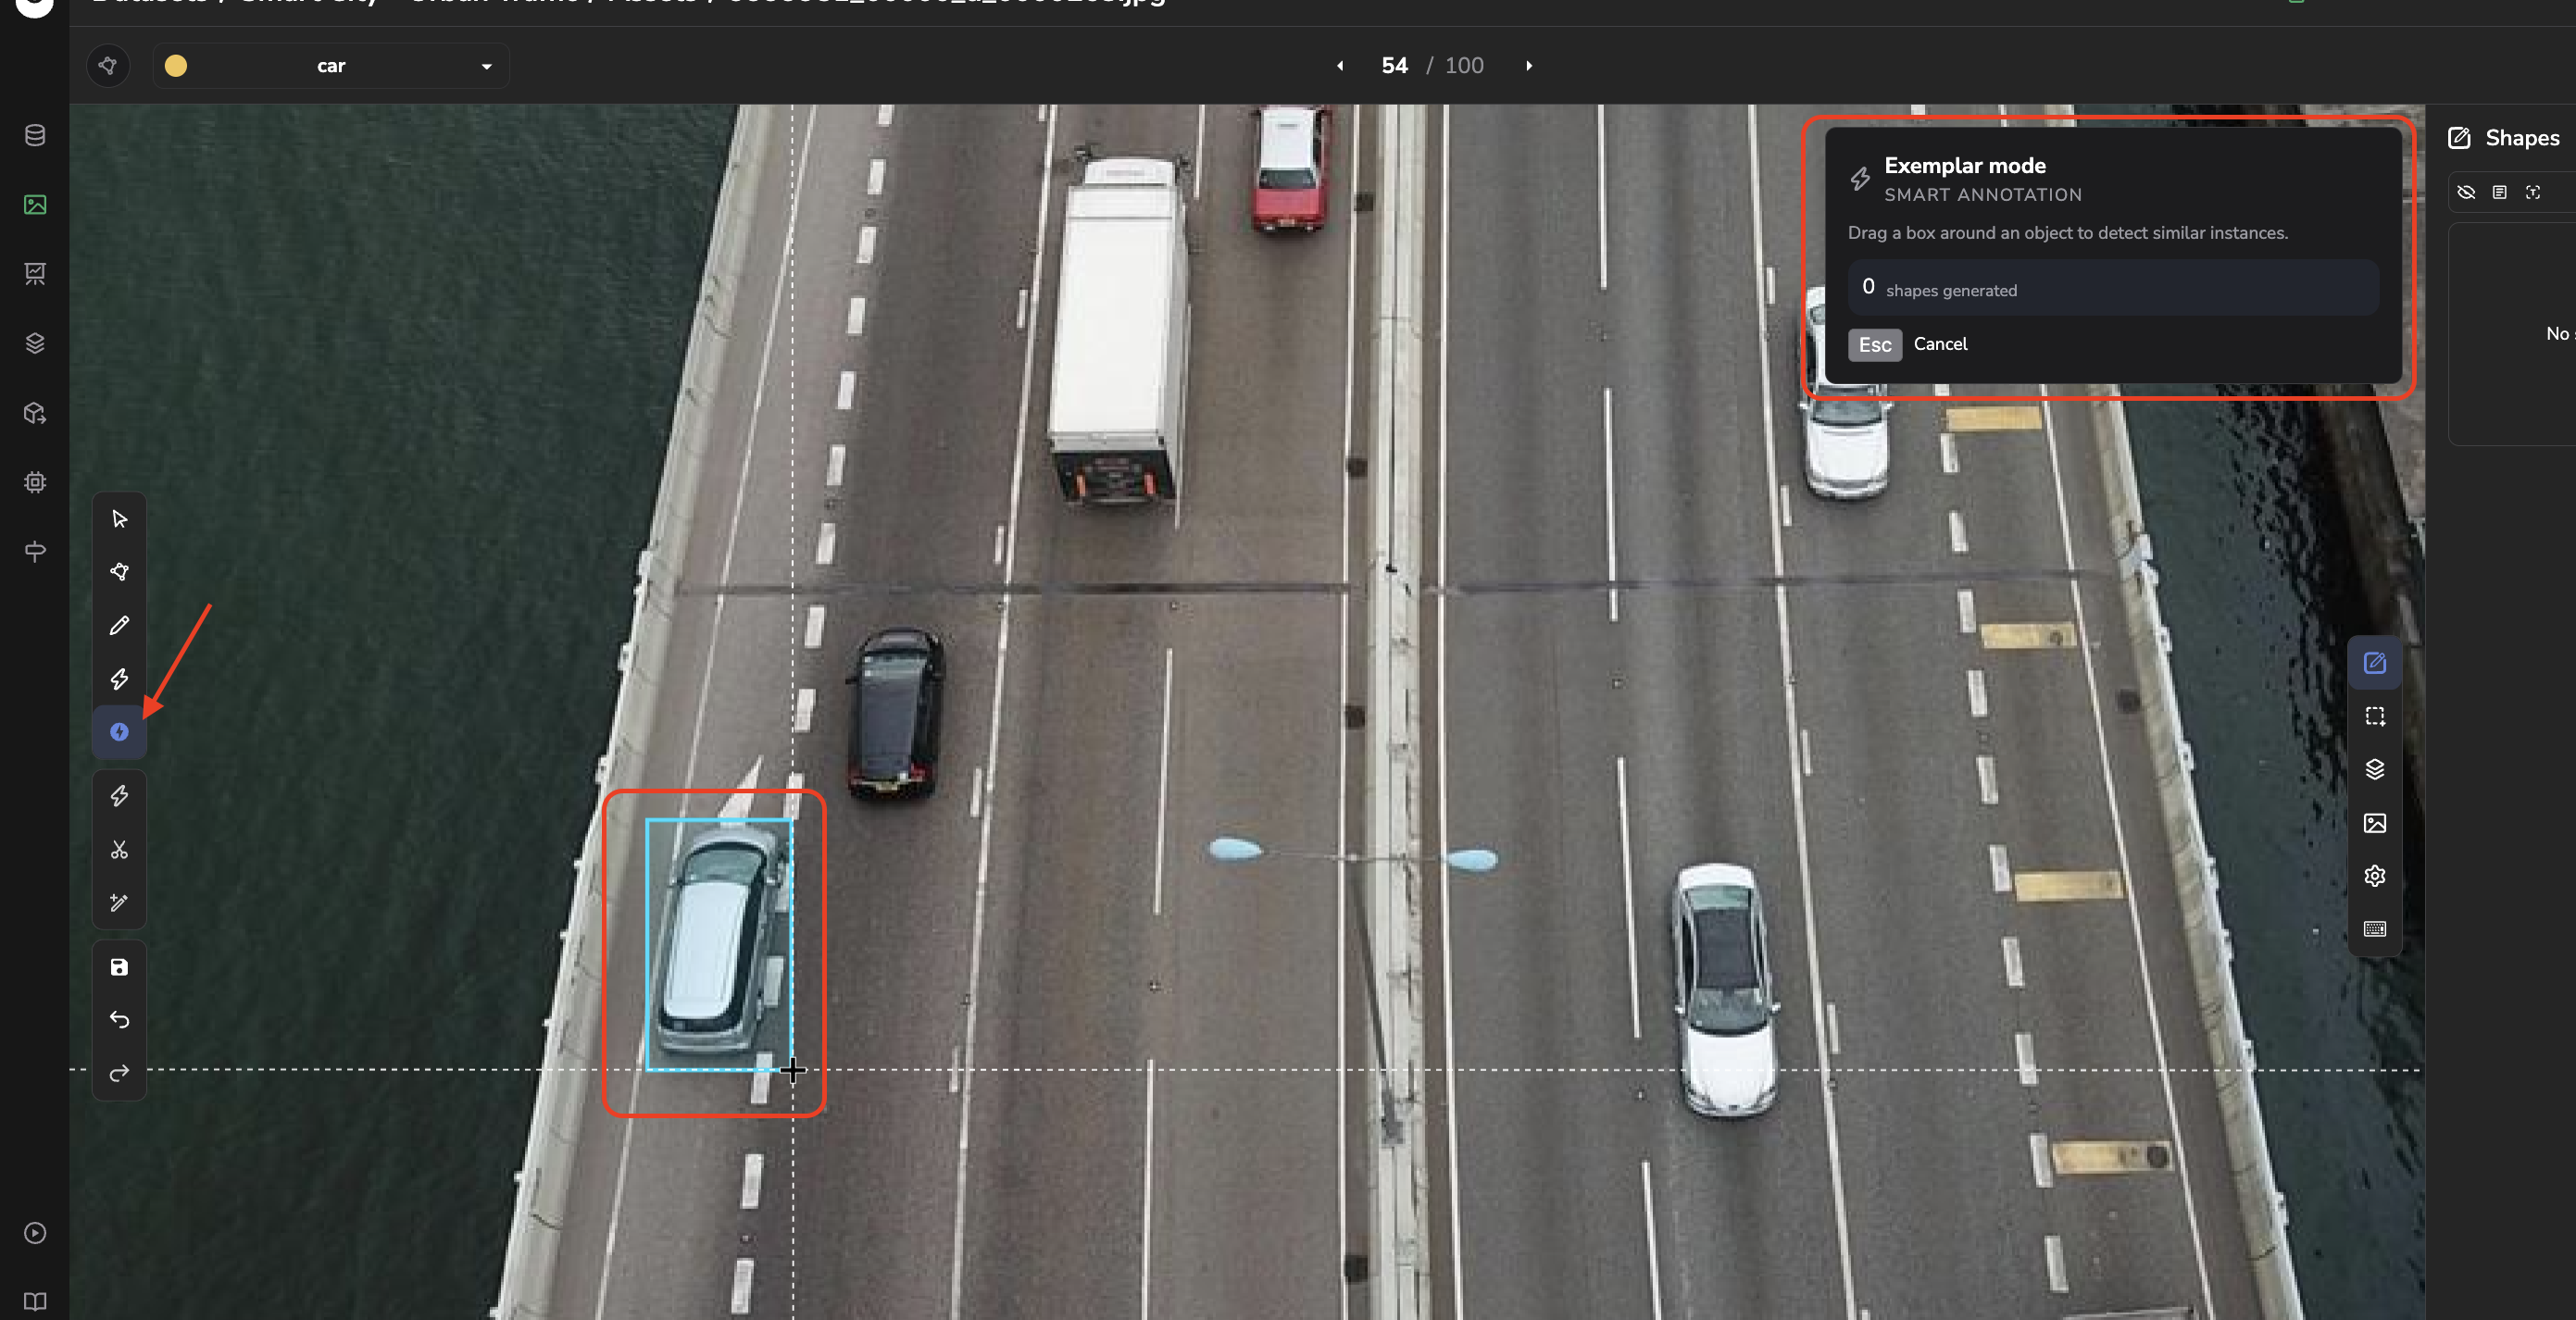
Draw rectangles with exemplar box: draw a single bounding box example around one instance of the object you want to detect, and the model proposes bounding boxes around every other matching instance found on the Asset.
Draw rectangles with label prompts: pick an existing Label as the prompt, and the model proposes bounding boxes around every instance of that Label it finds on the Asset.
AI-assisted bounding box creation
In both cases, you can then review, adjust, or discard each proposed box before it is added to the Annotation.
Whatever the tool used to create the bounding box, once created, the Shape will be displayed in the Shapes panel.
You'll also be able to click on this one to adjust the corners of the bounding box and right-click to perform any available action (change label, fill in the Text field, adjust opacity, lock...) as described here.
3. Segmentation
For a DatasetVersion in Segmentation mode, the Annotation tool allows you to create polygons Shape.
A. Manual drawing
Several manual tools are available:
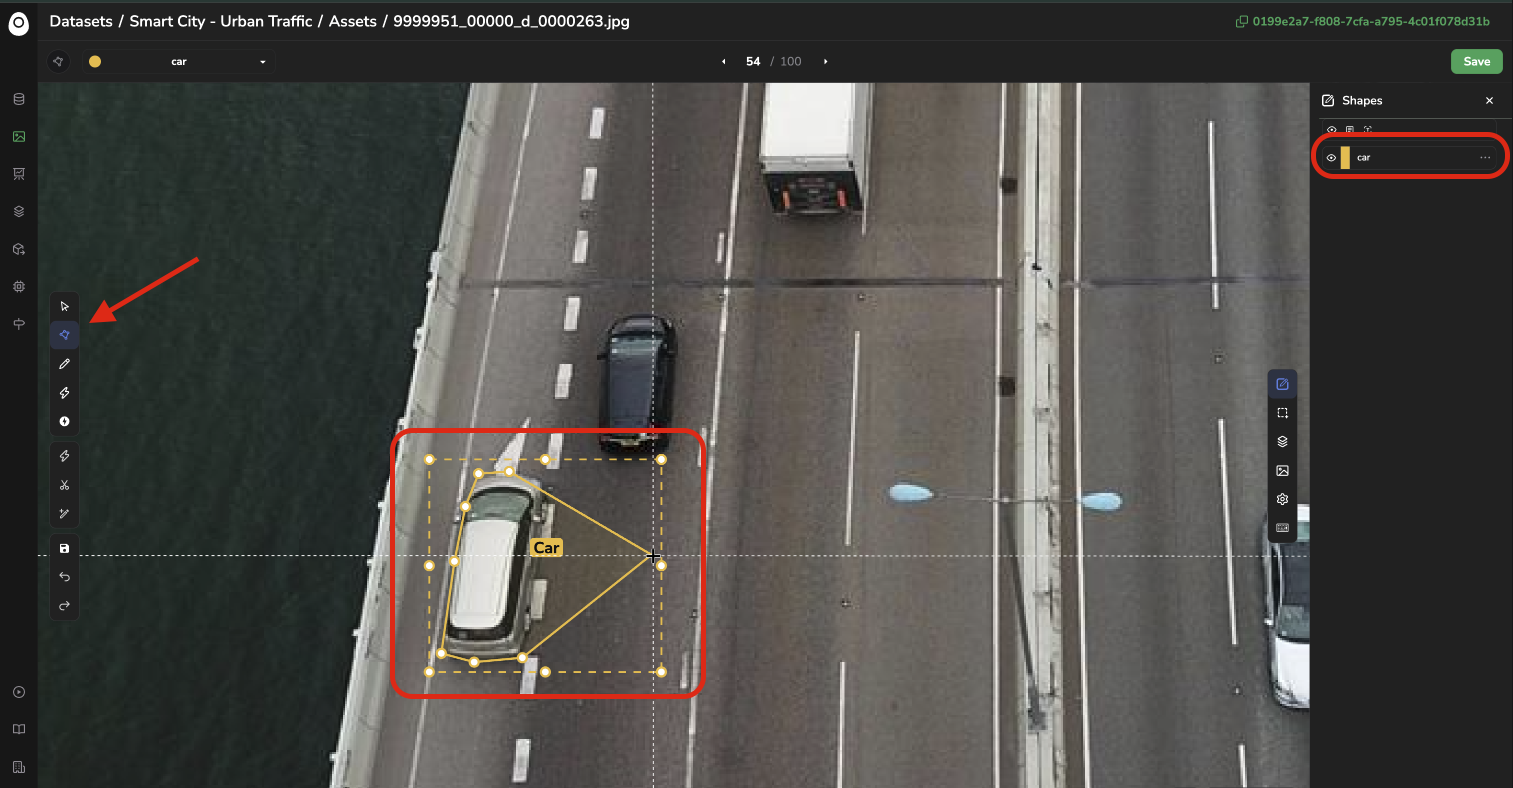
Draw polygon ("D" on your keyboard): the first click creates the first point of the polygon, then each click creates a new point. To close the polygon, press Enter. Once created, the Shape will be displayed in the Shapes panel.
Manual point-by-point drawing of a polygon
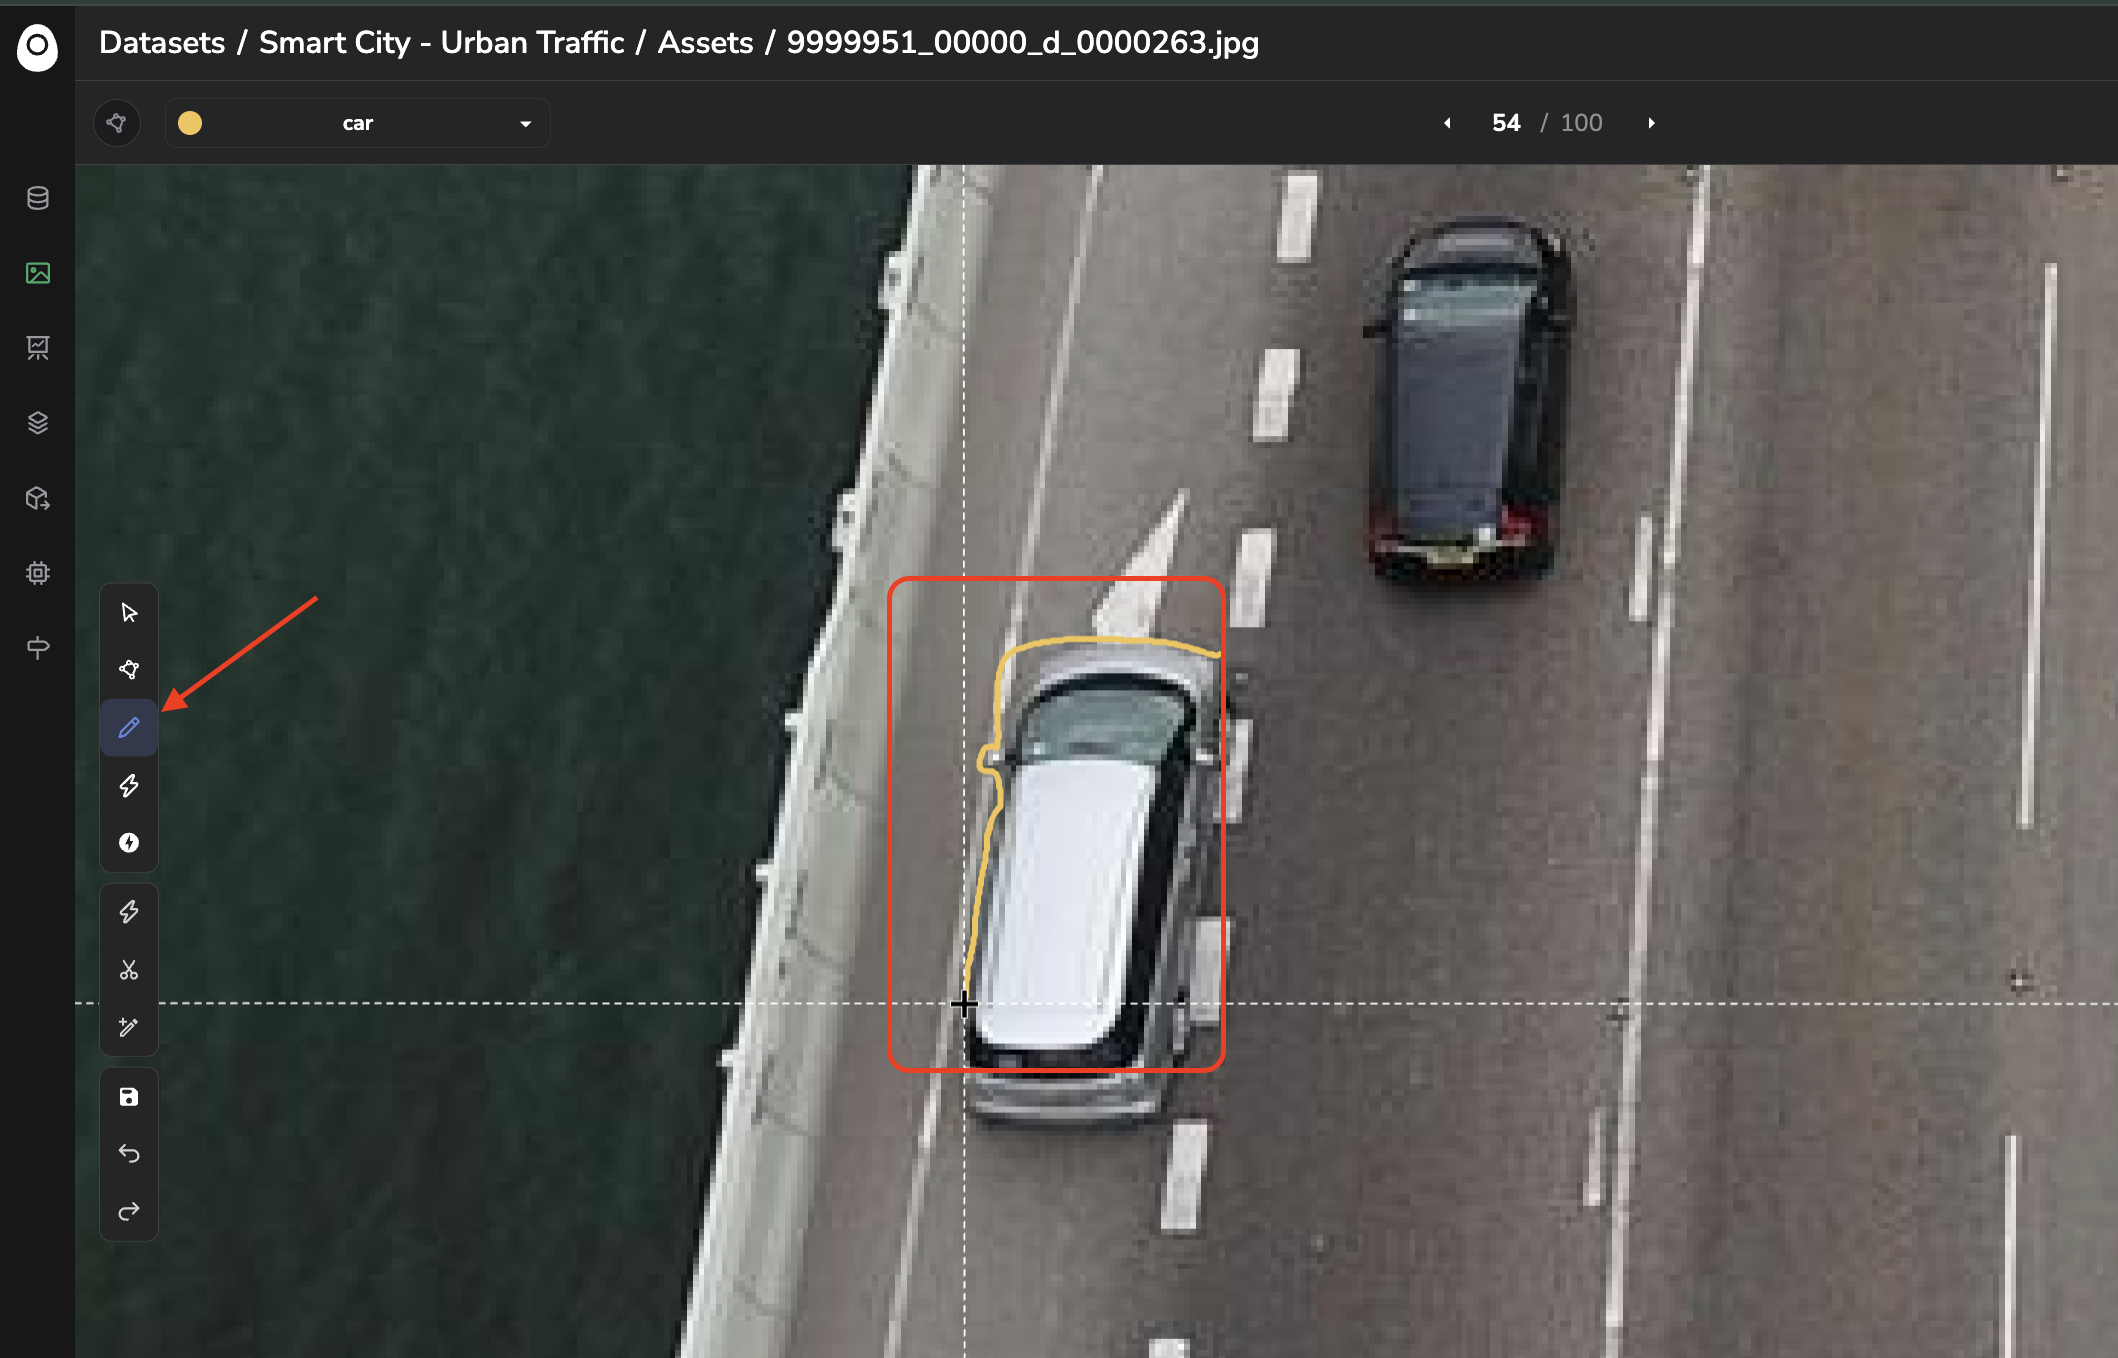
Draw polygon with pencil ("Shift + D" on your keyboard): draw the polygon outline freehand; to complete the Shape you need to press Enter. Once created, the Shape will be displayed in the Shapes panel.
Manual freehand drawing of a polygon
B. AI-assisted drawing (SAM3)
Segmentation also exposes AI-assisted tools, powered by SAM3 (Segment Anything Model), that let you draw one or several polygons smoothly.
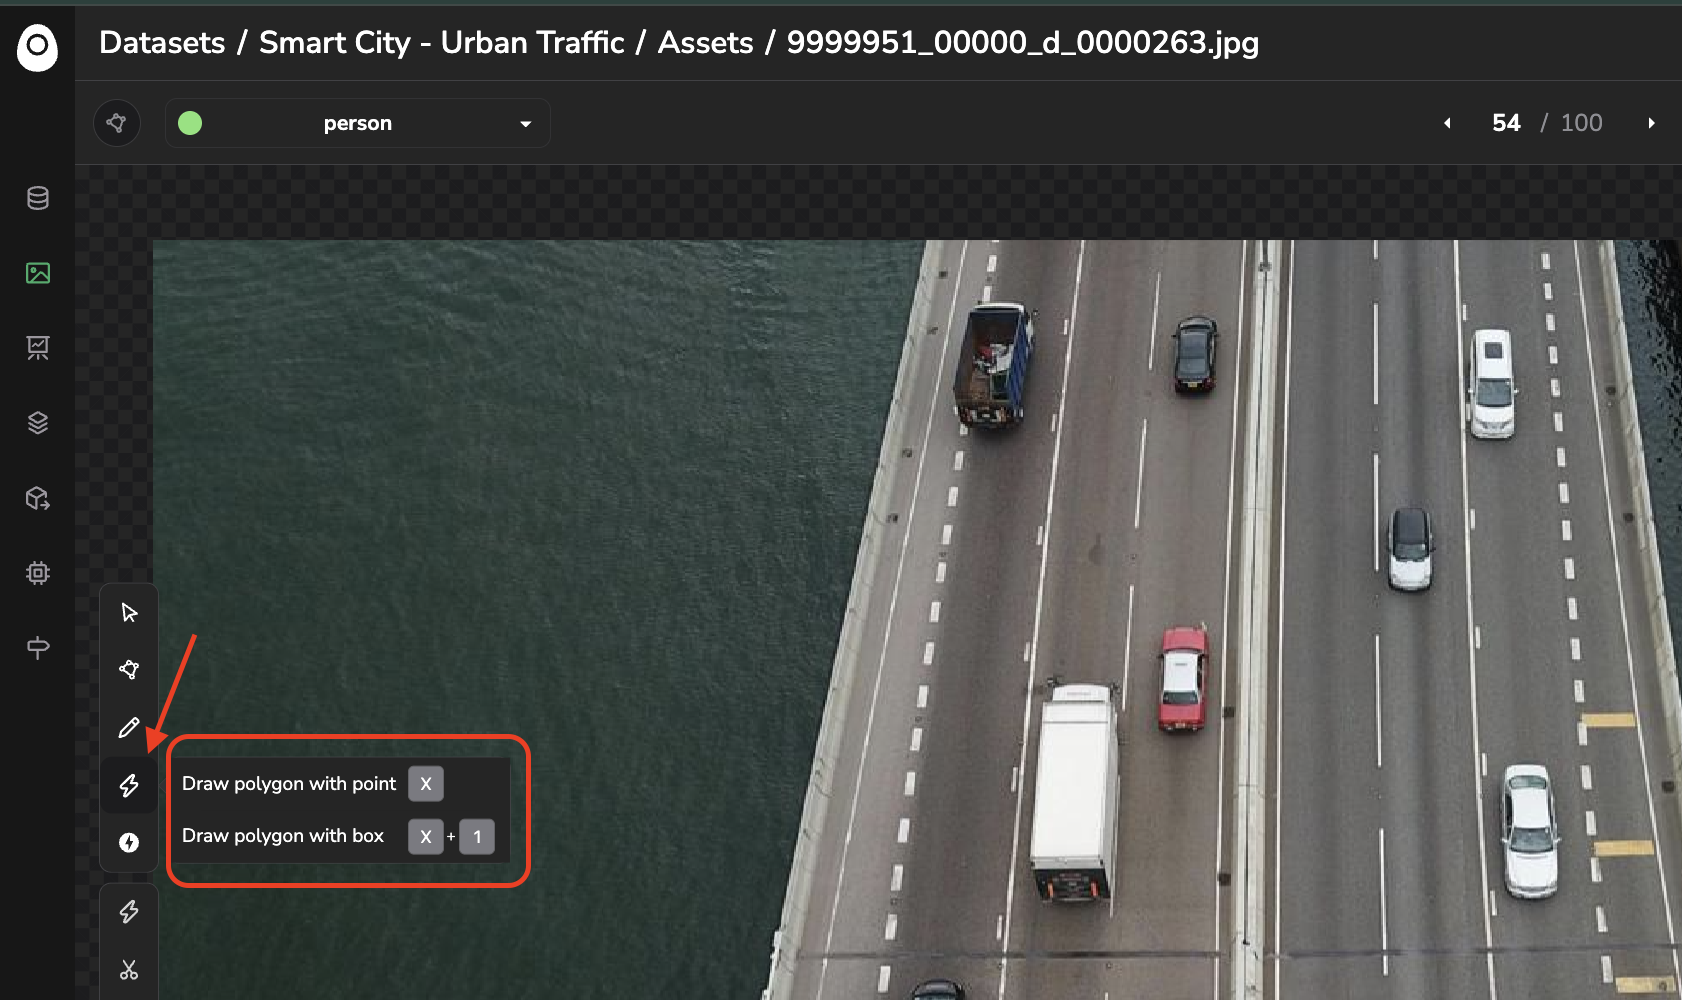
Tools for single polygon creation
AI-assisted tools for single polygon creation
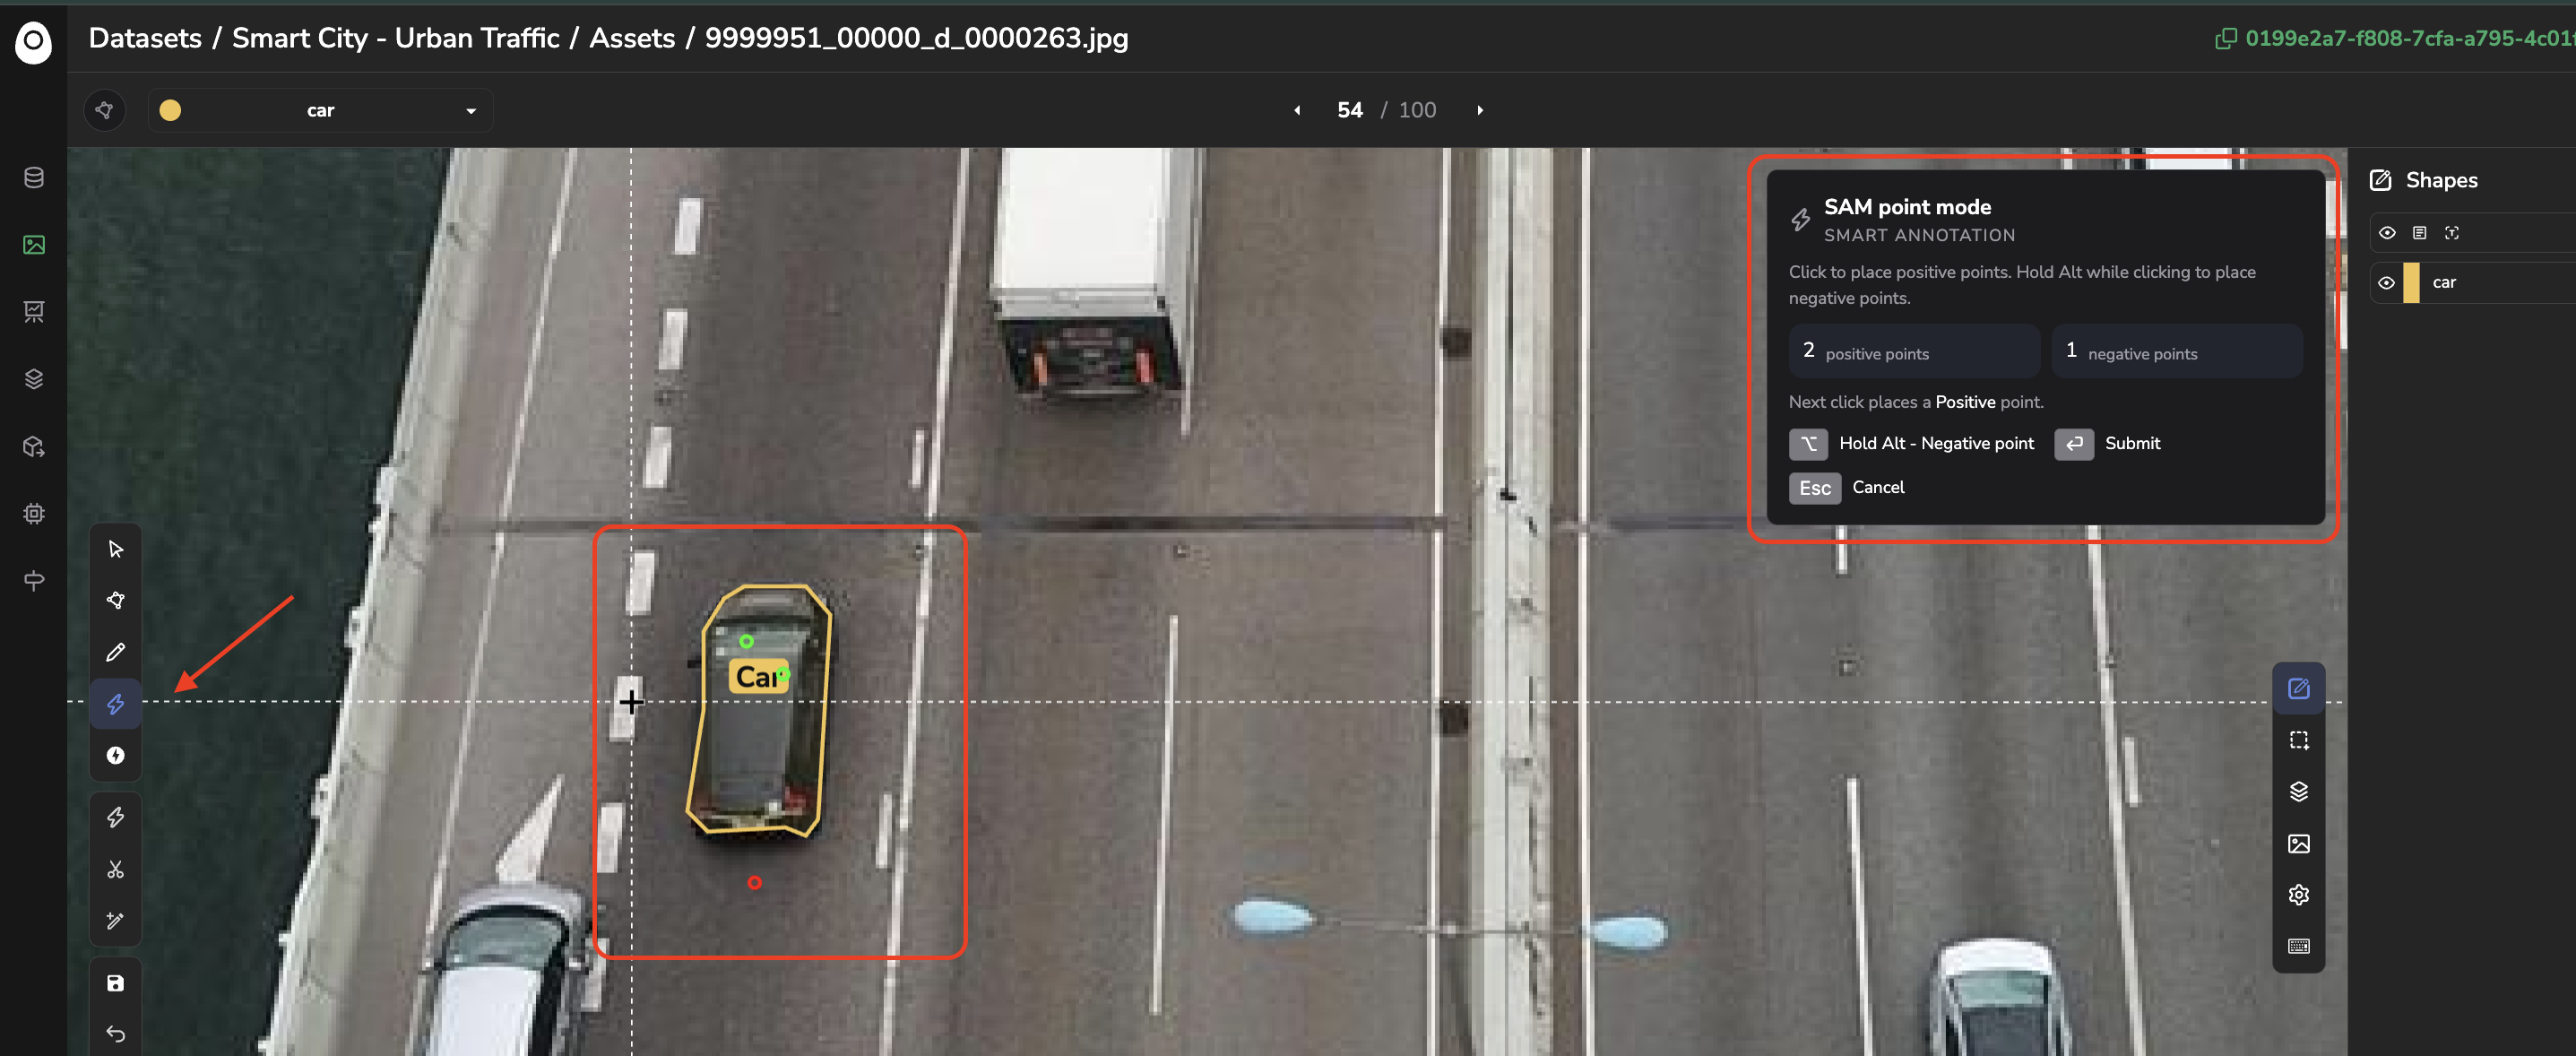
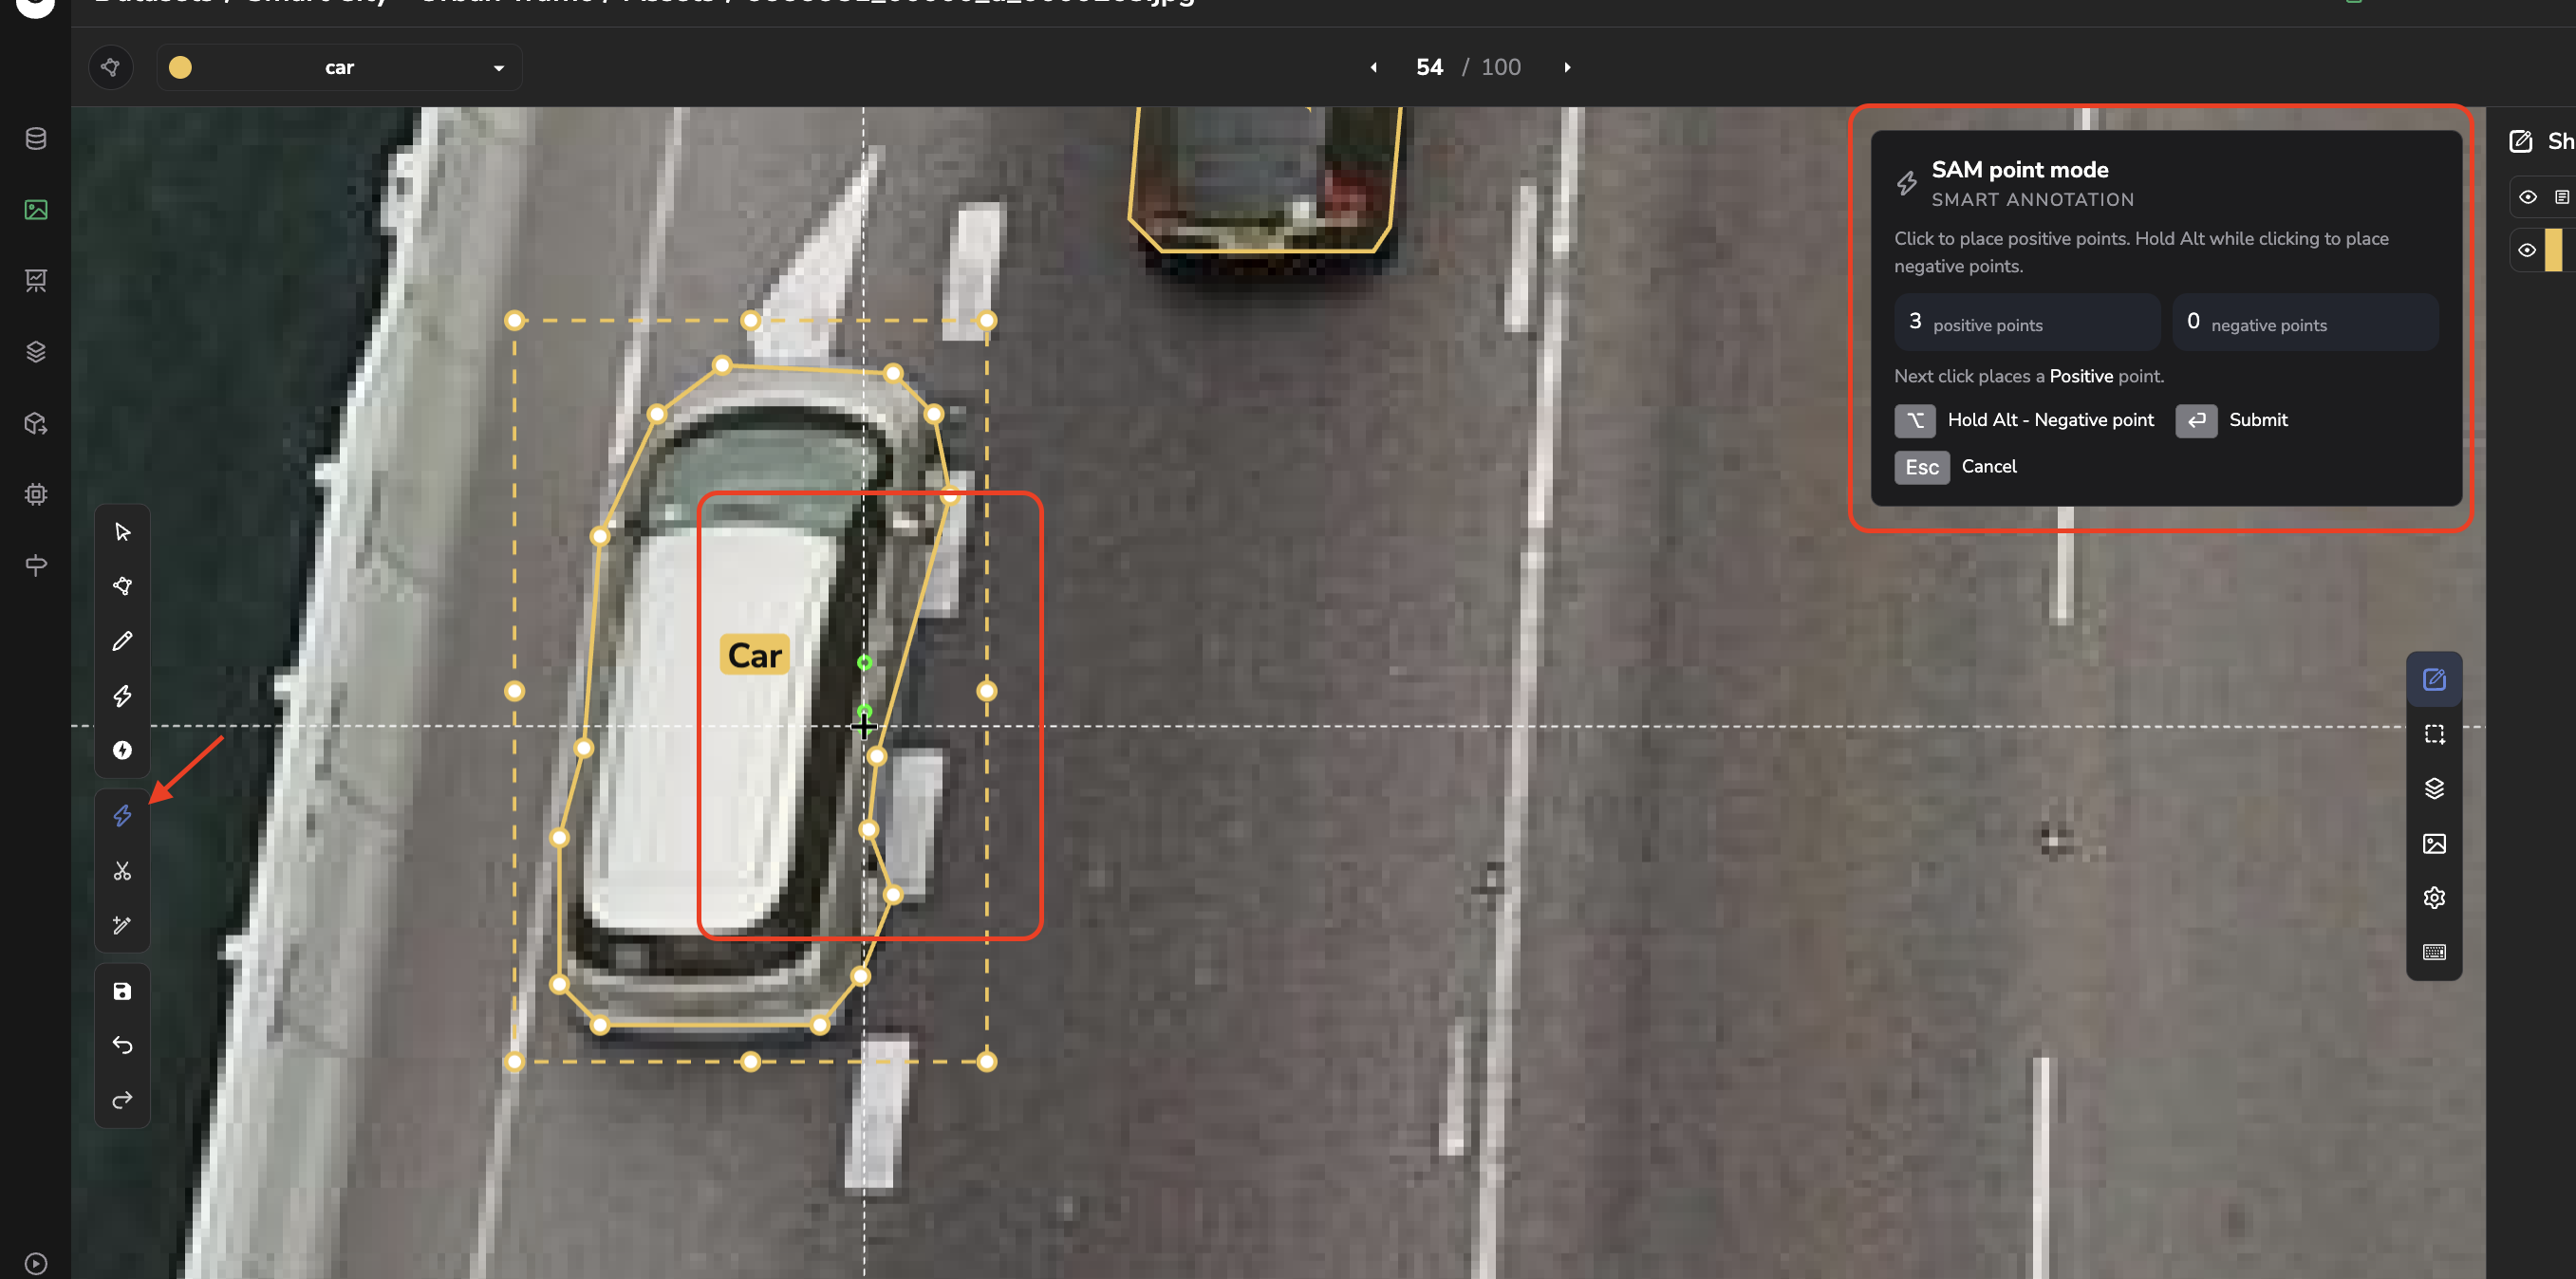
Draw polygon with points("X" on your keyboard): place several points by clicking on the object that needs to be segmented and let SAM3 create the Shape around that object. Once the polygon is created, you can still prompt SAM3 by adding additional positive or negative points (by clicking to add or Alt+clicking to remove). The Smart Annotation modal in the top right corner is there to guide you.
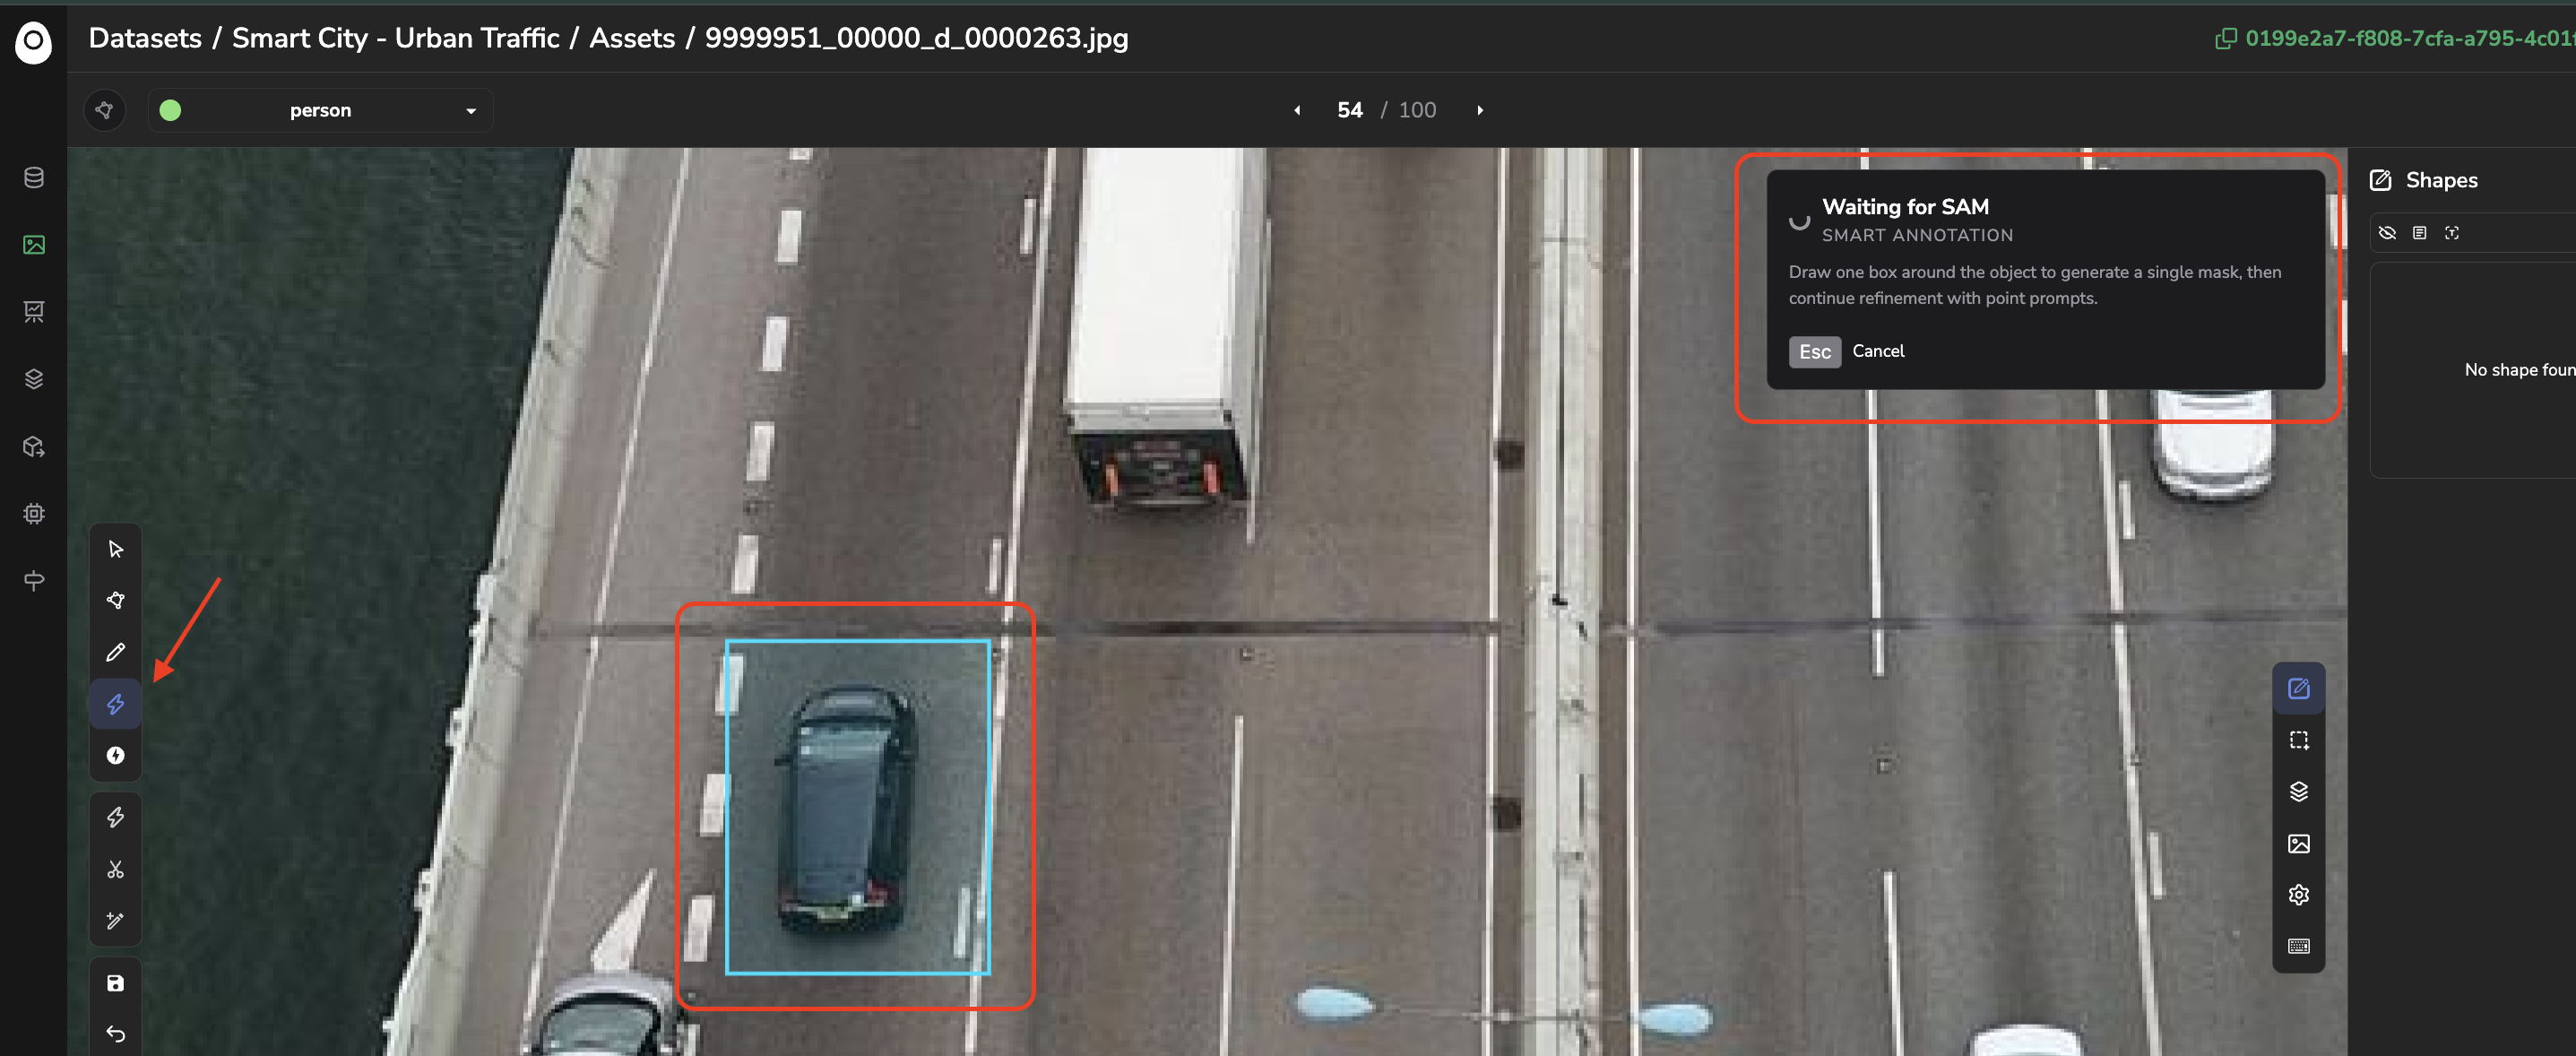
Draw polygon with box ("X + 1" on your keyboard): Draw a box to let the tool snap to the underlying object's contour. You can validate the Shape created by pressing Enter or adjust it by placing additional or removal points, which will be used by SAM3 to automatically adjust the polygon. The Smart Annotation modal in the top right corner is there to guide you.
Tools for multiple polygons creation
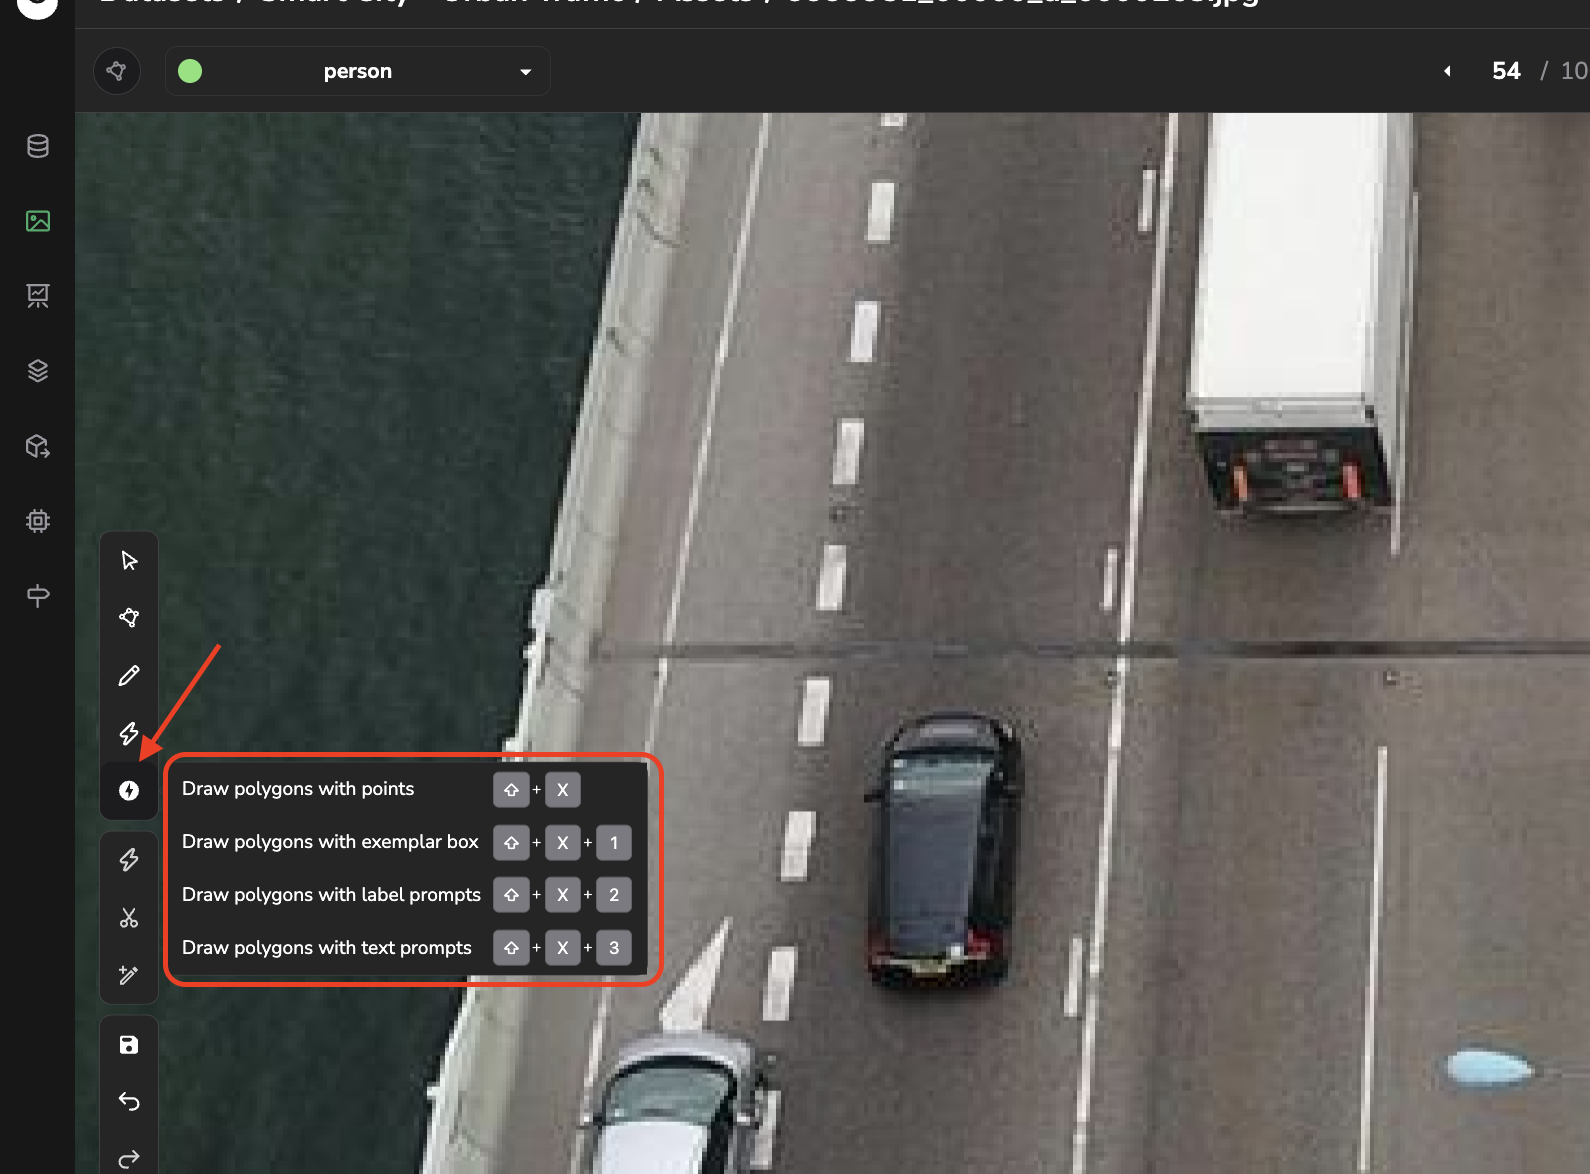
Access AI-powered tools for multiple polygons creation
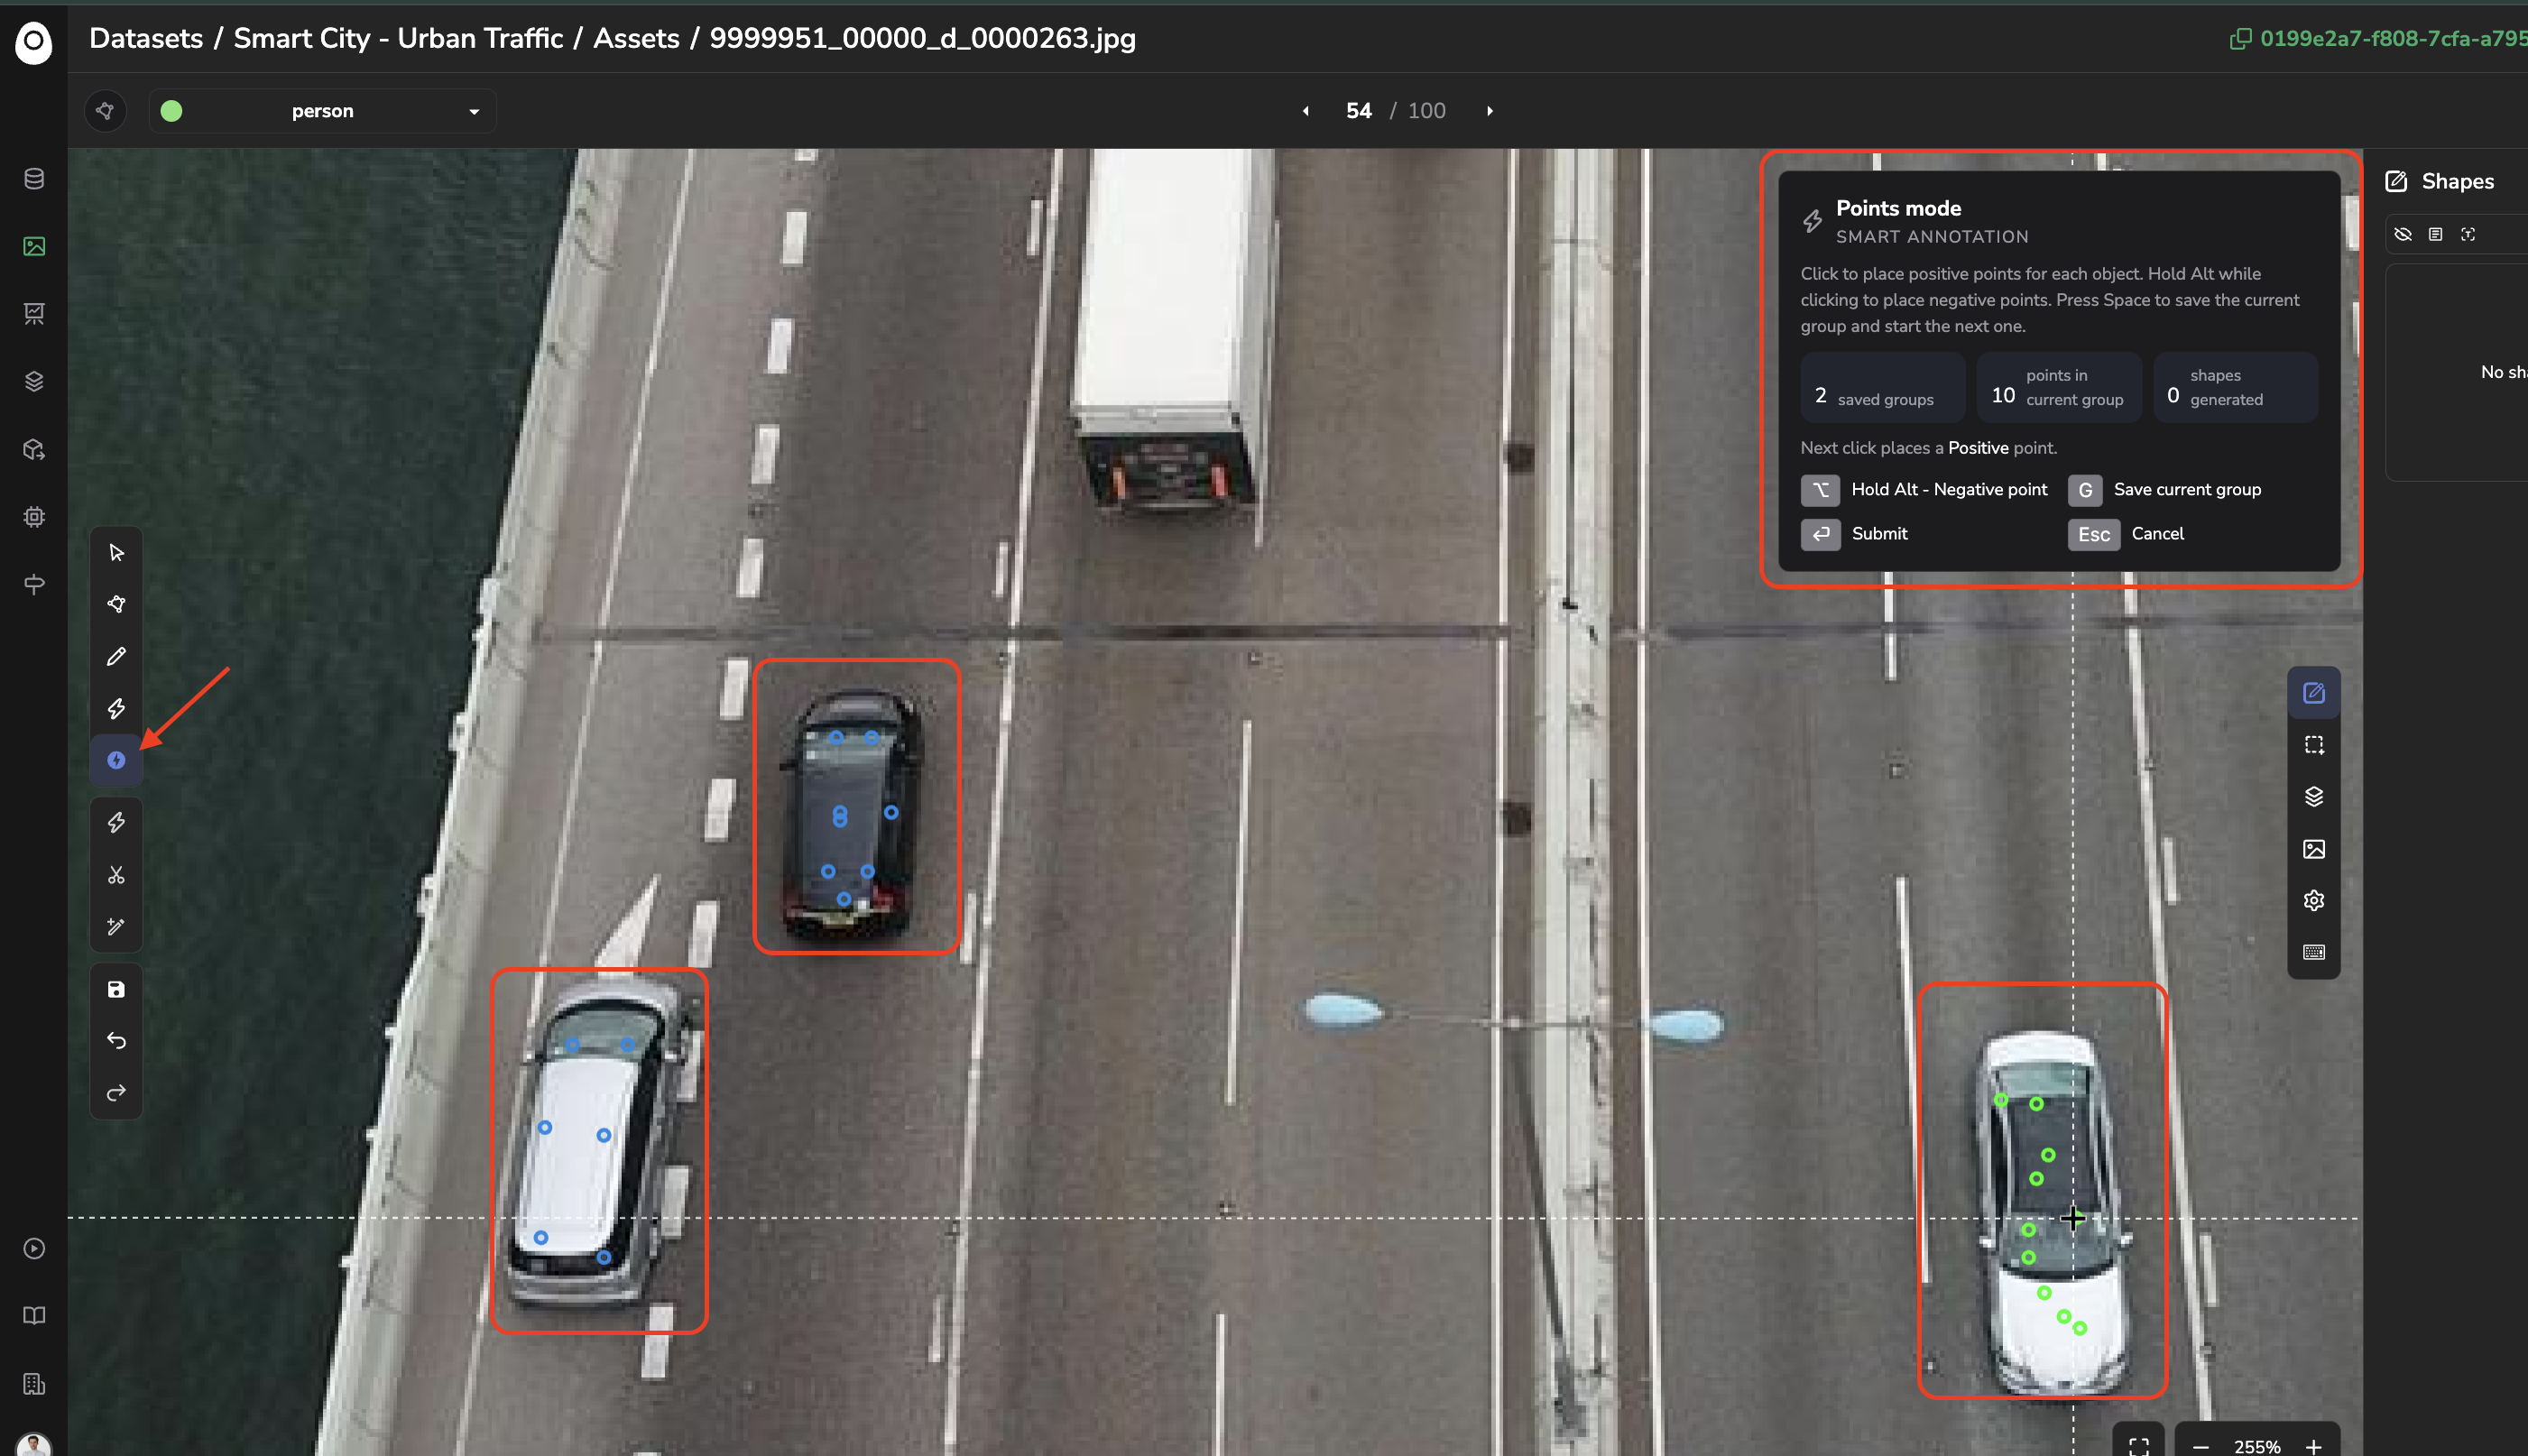
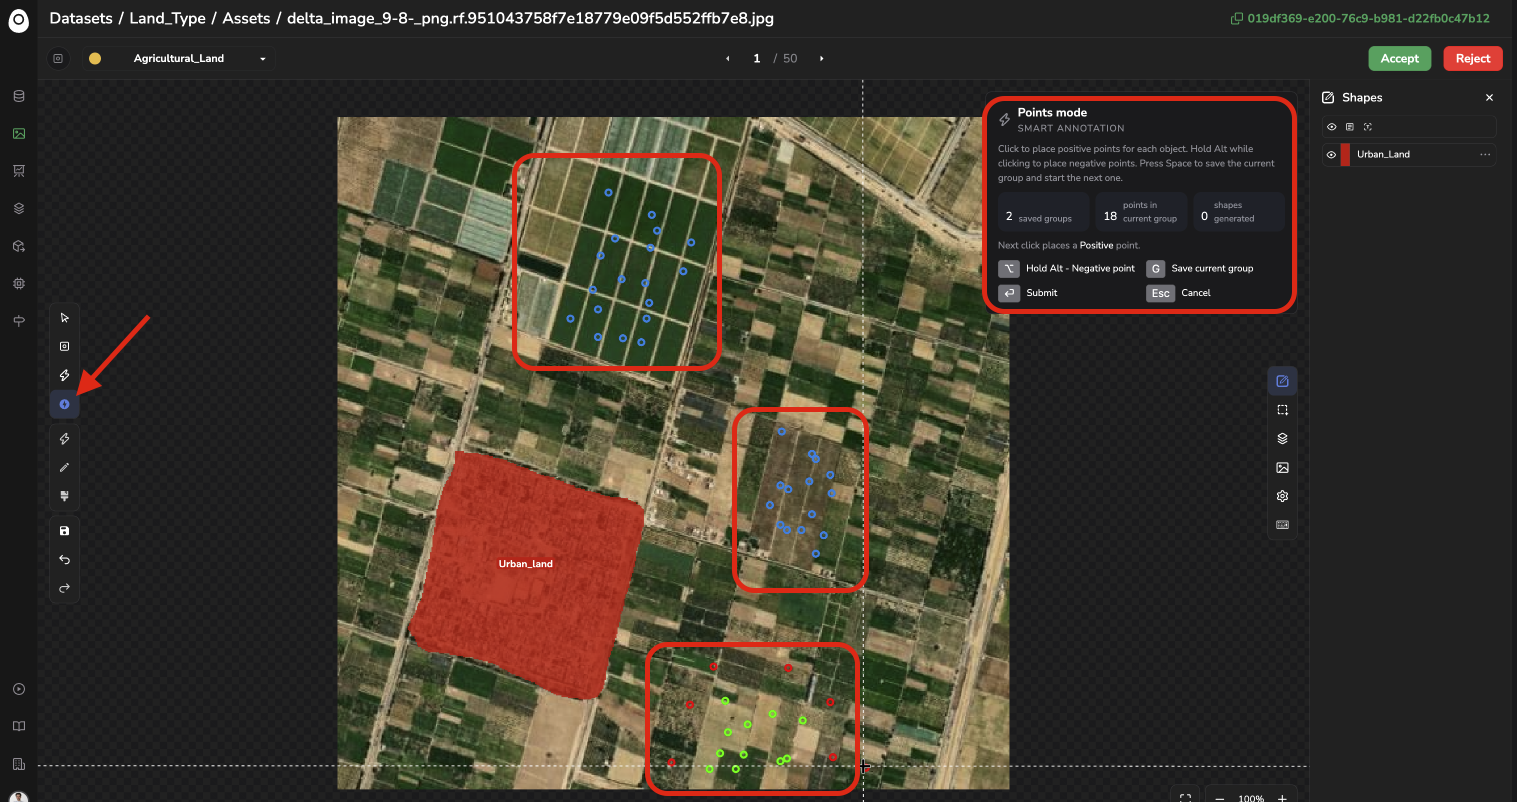
Draw polygons with points ("Shift" + "X" on your keyboard): place several points at once to create several polygons in a single call to SAM3. To do so, place one or several points on the first object to segment, and press G to move to the next object. Once all the points have been placed on all the object that needs to be segmented, press Enter to perform the call to SAM3 and display the result. The Smart Annotation modal in the top right corner is there to guide you.
Prompt several groups of points to draw polygons with one call to SAM3
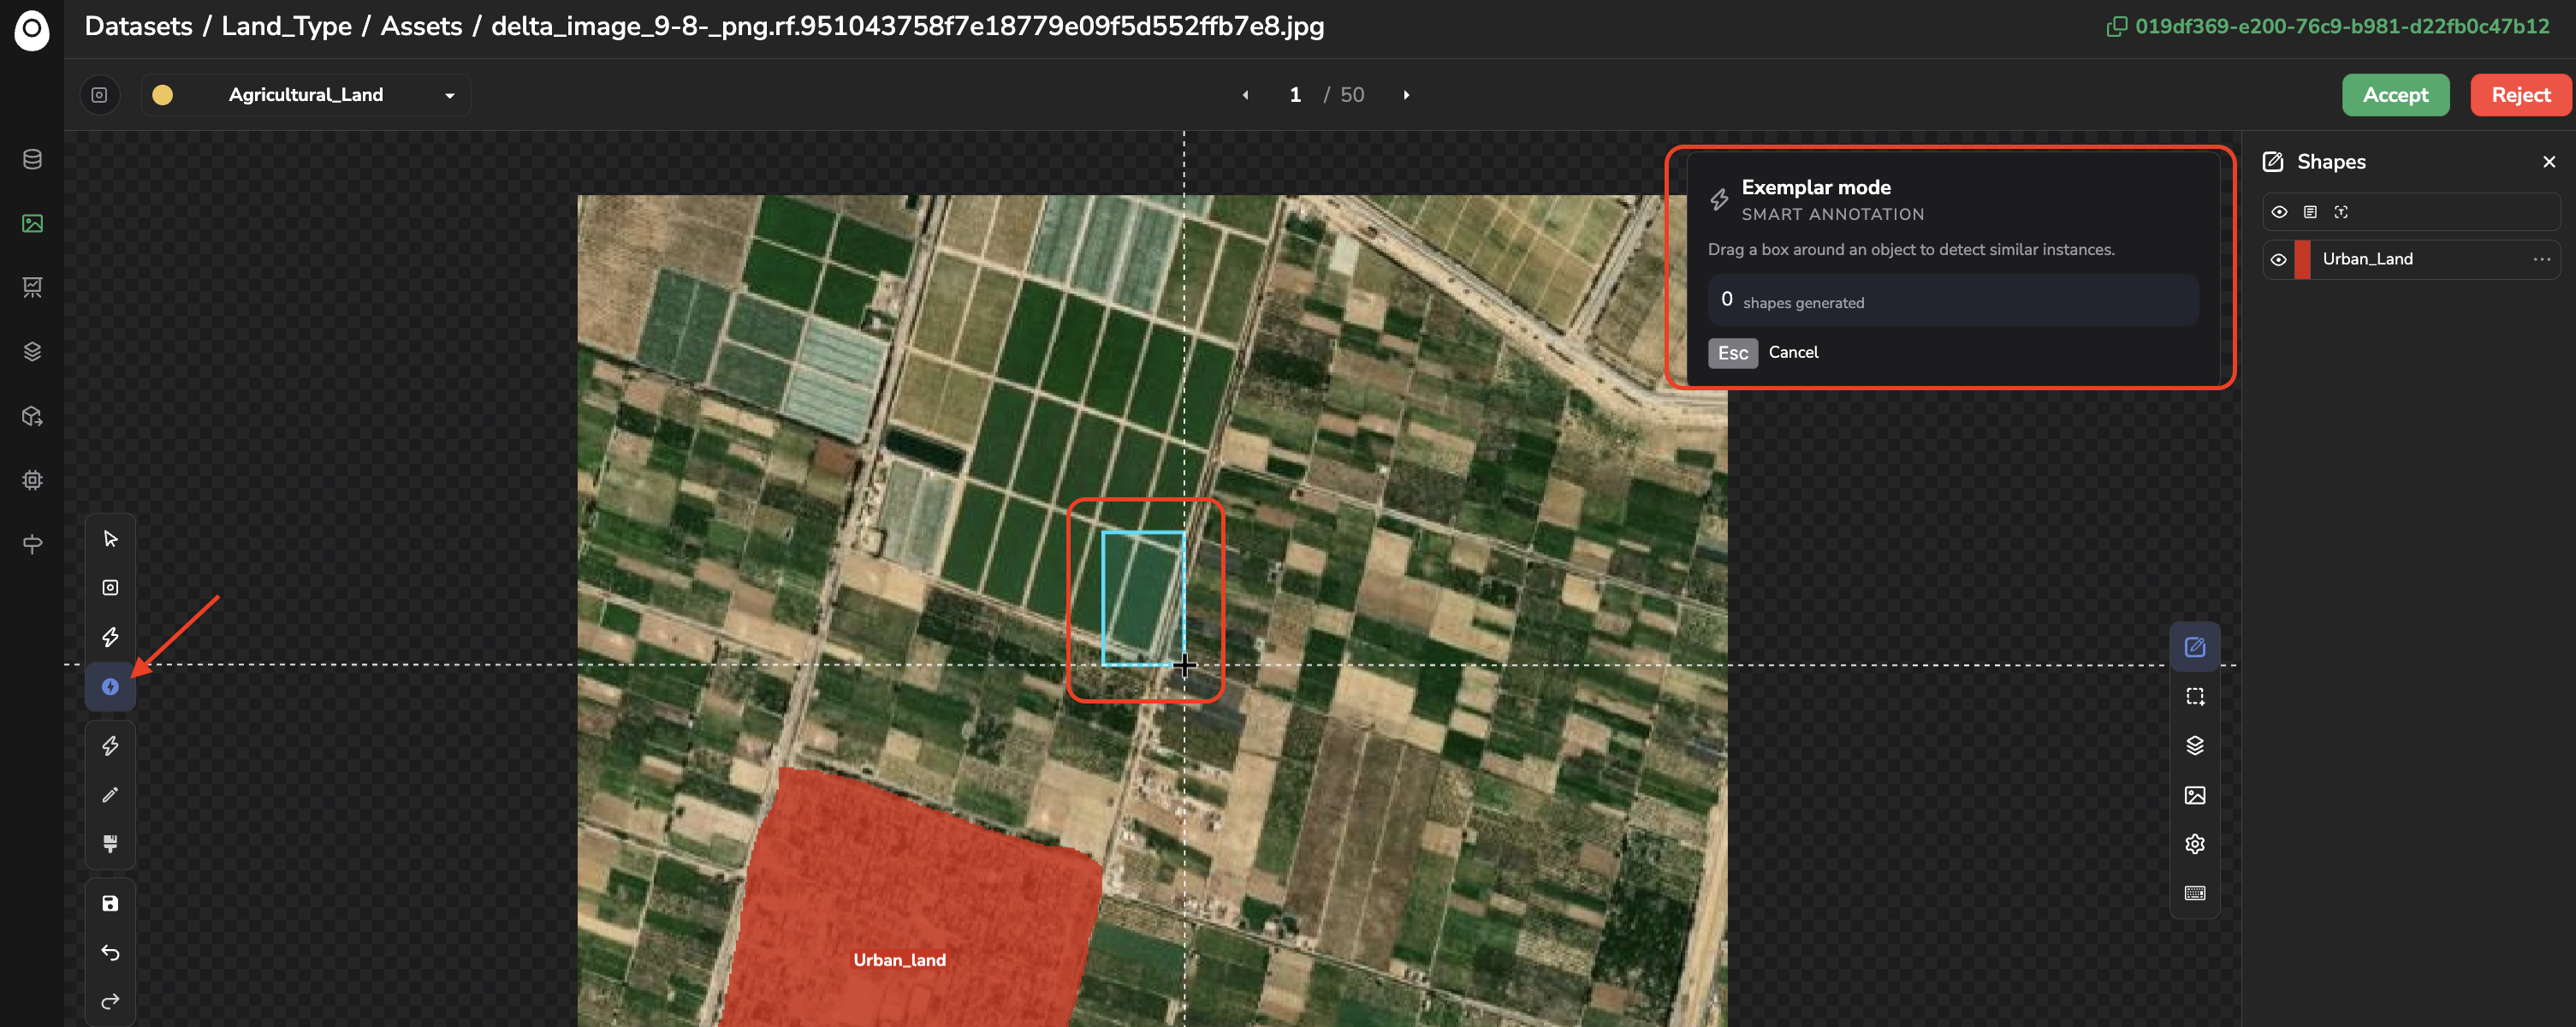
Draw polygons with exemplar box ("Shift" + "X" + "1" on your keyboard): draw a single bounding box example around one instance of the object, and the model proposes polygons around that object and every other similar instance found on the image. The Smart Annotation modal in the top right corner is there to guide you.
Draw several polygons with one exemplar box
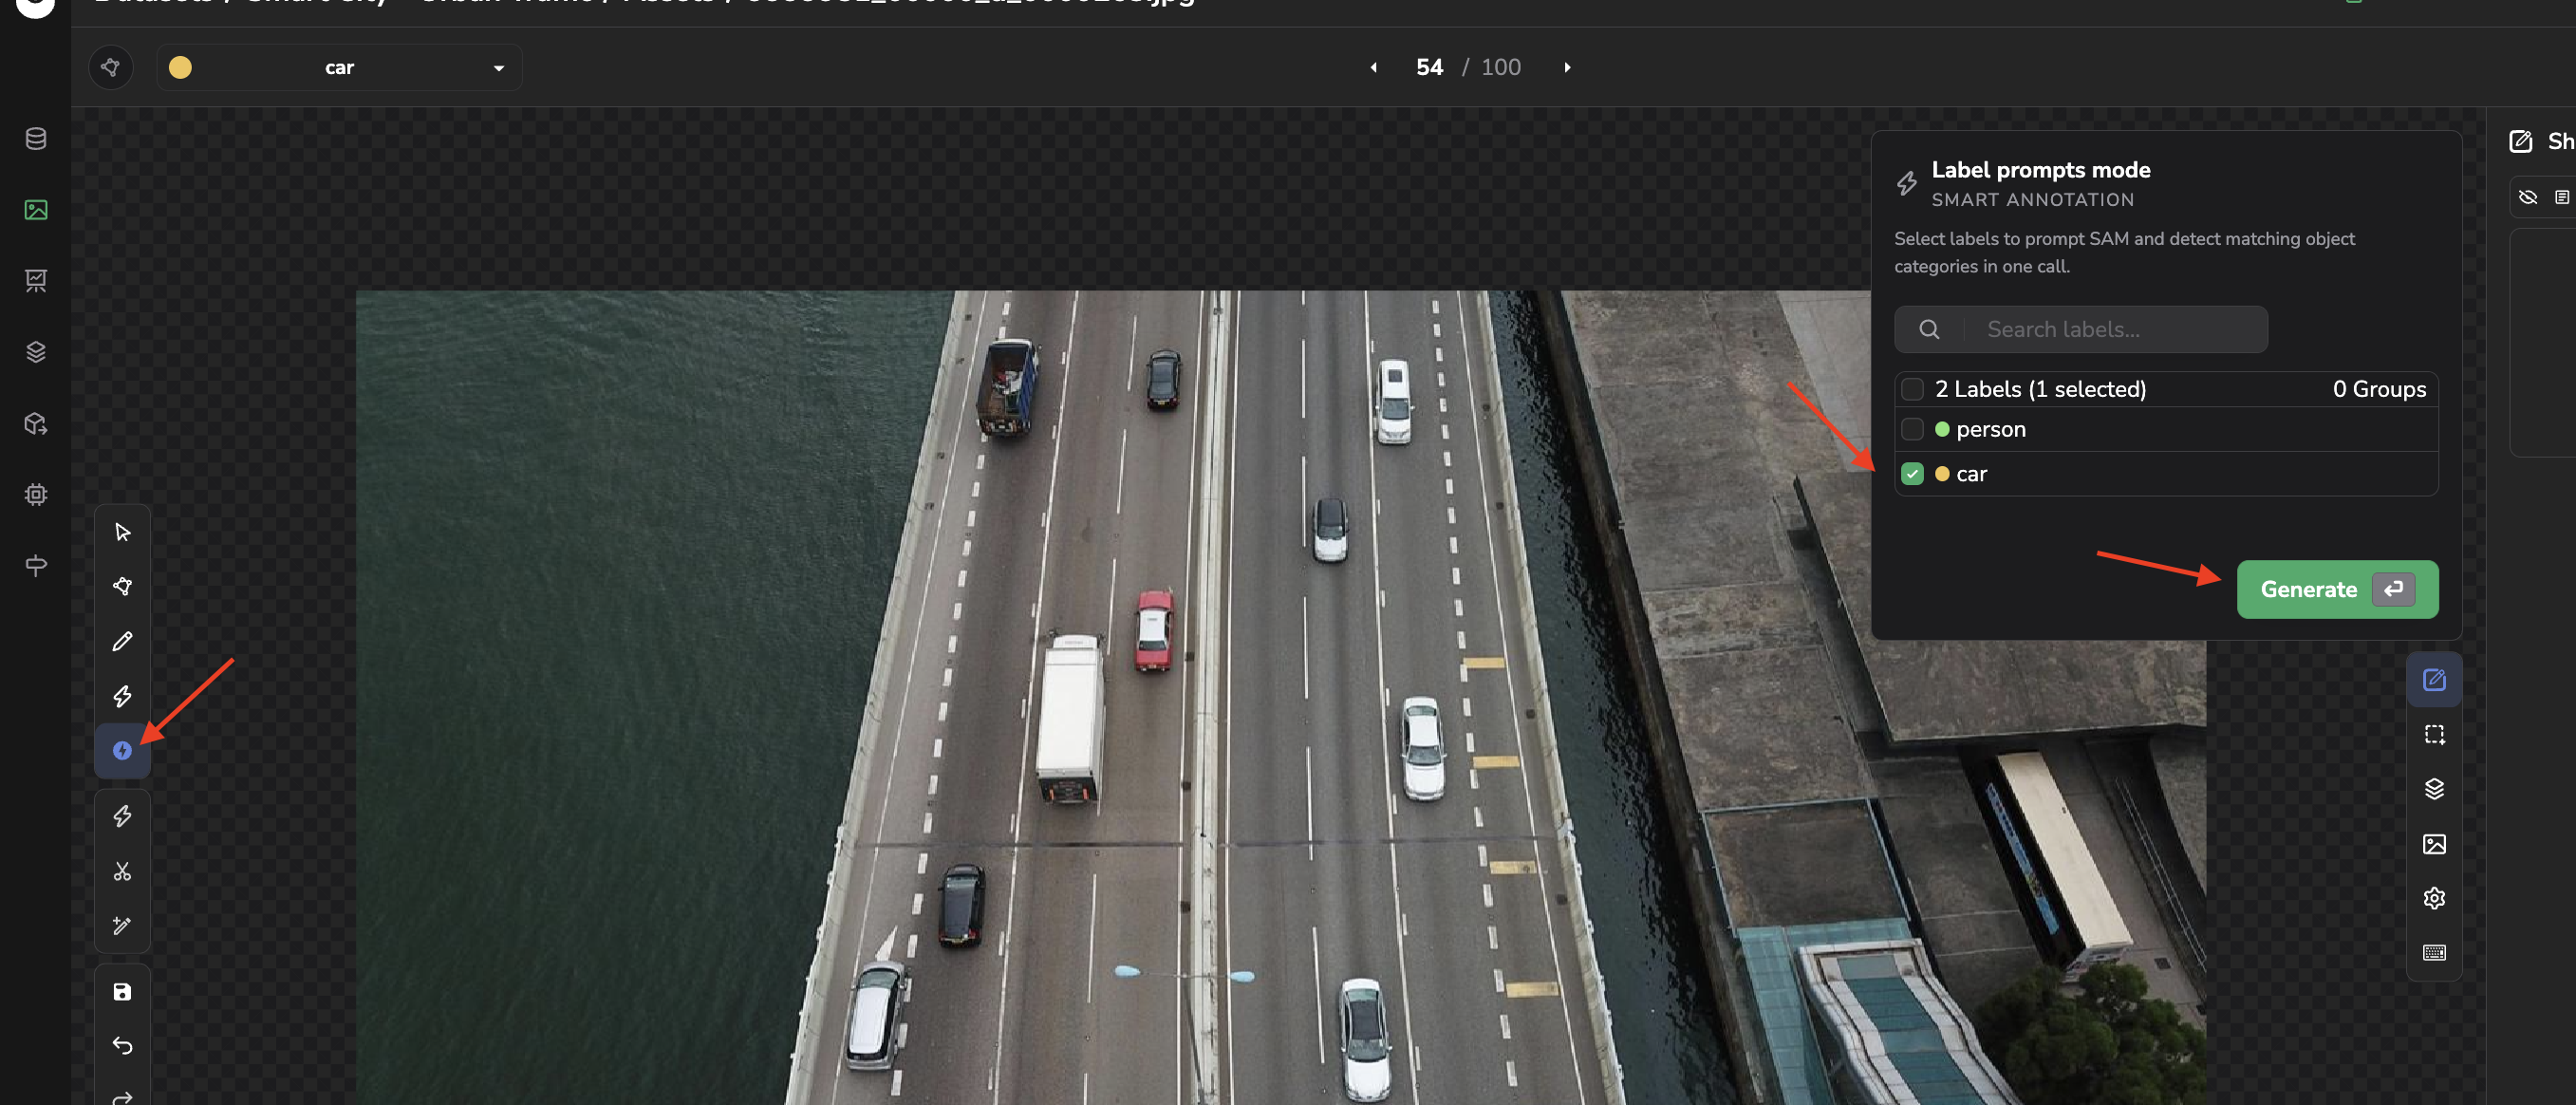
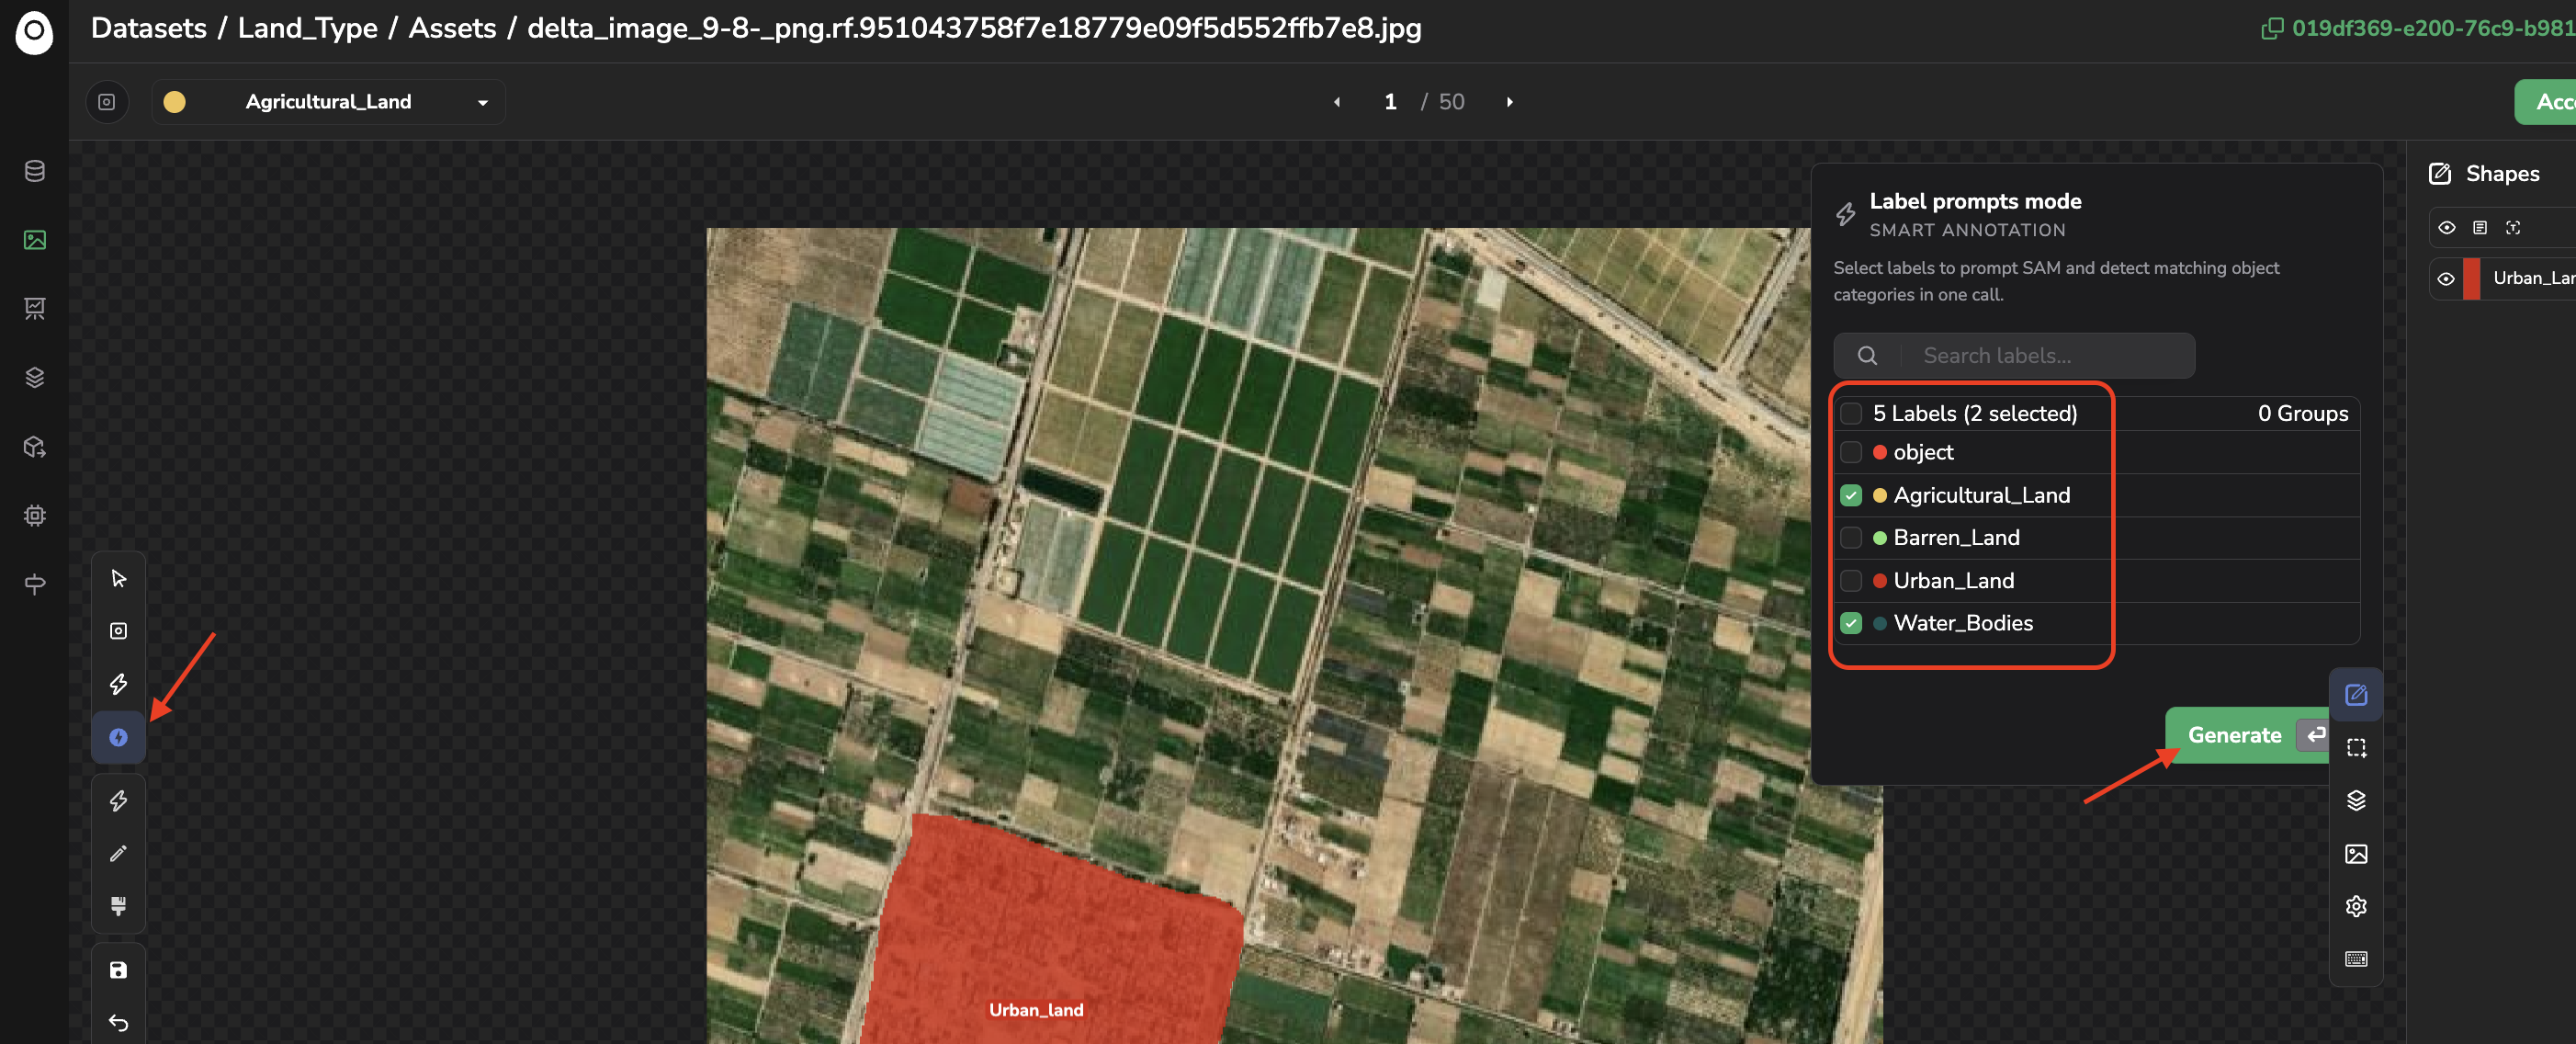
Draw polygons with label prompts ("Shift" + "X" + "2" on your keyboard): pick an existing Label as the prompt, and the model proposes polygons around every object that matches the selected Label. The Smart Annotation modal in the top right corner is there to guide you.
Draw several polygons using Label as the prompt for SAM3
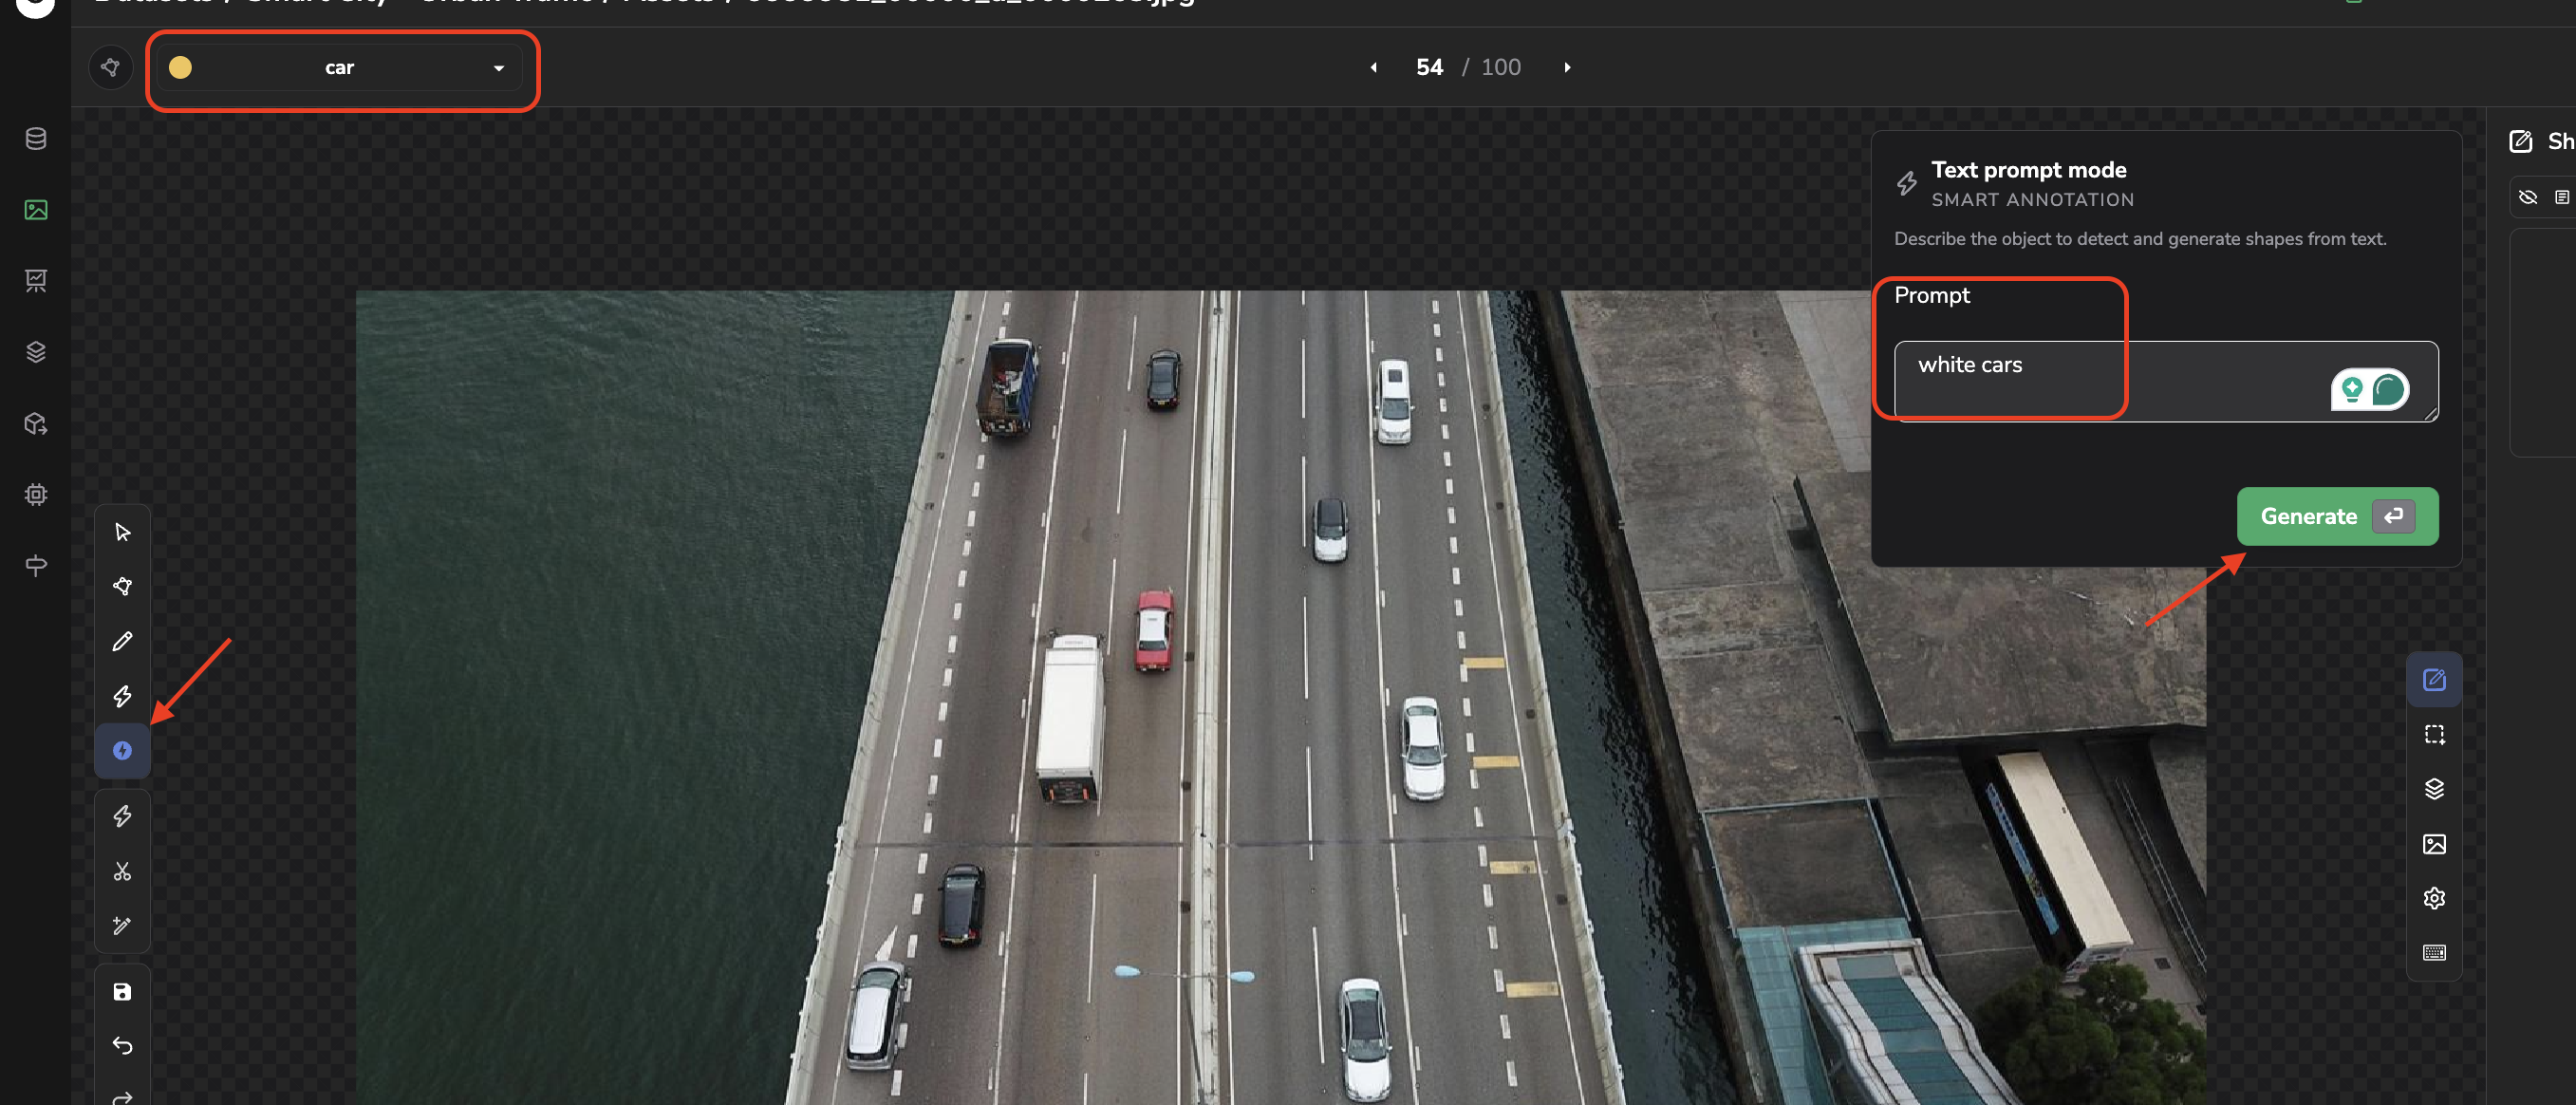
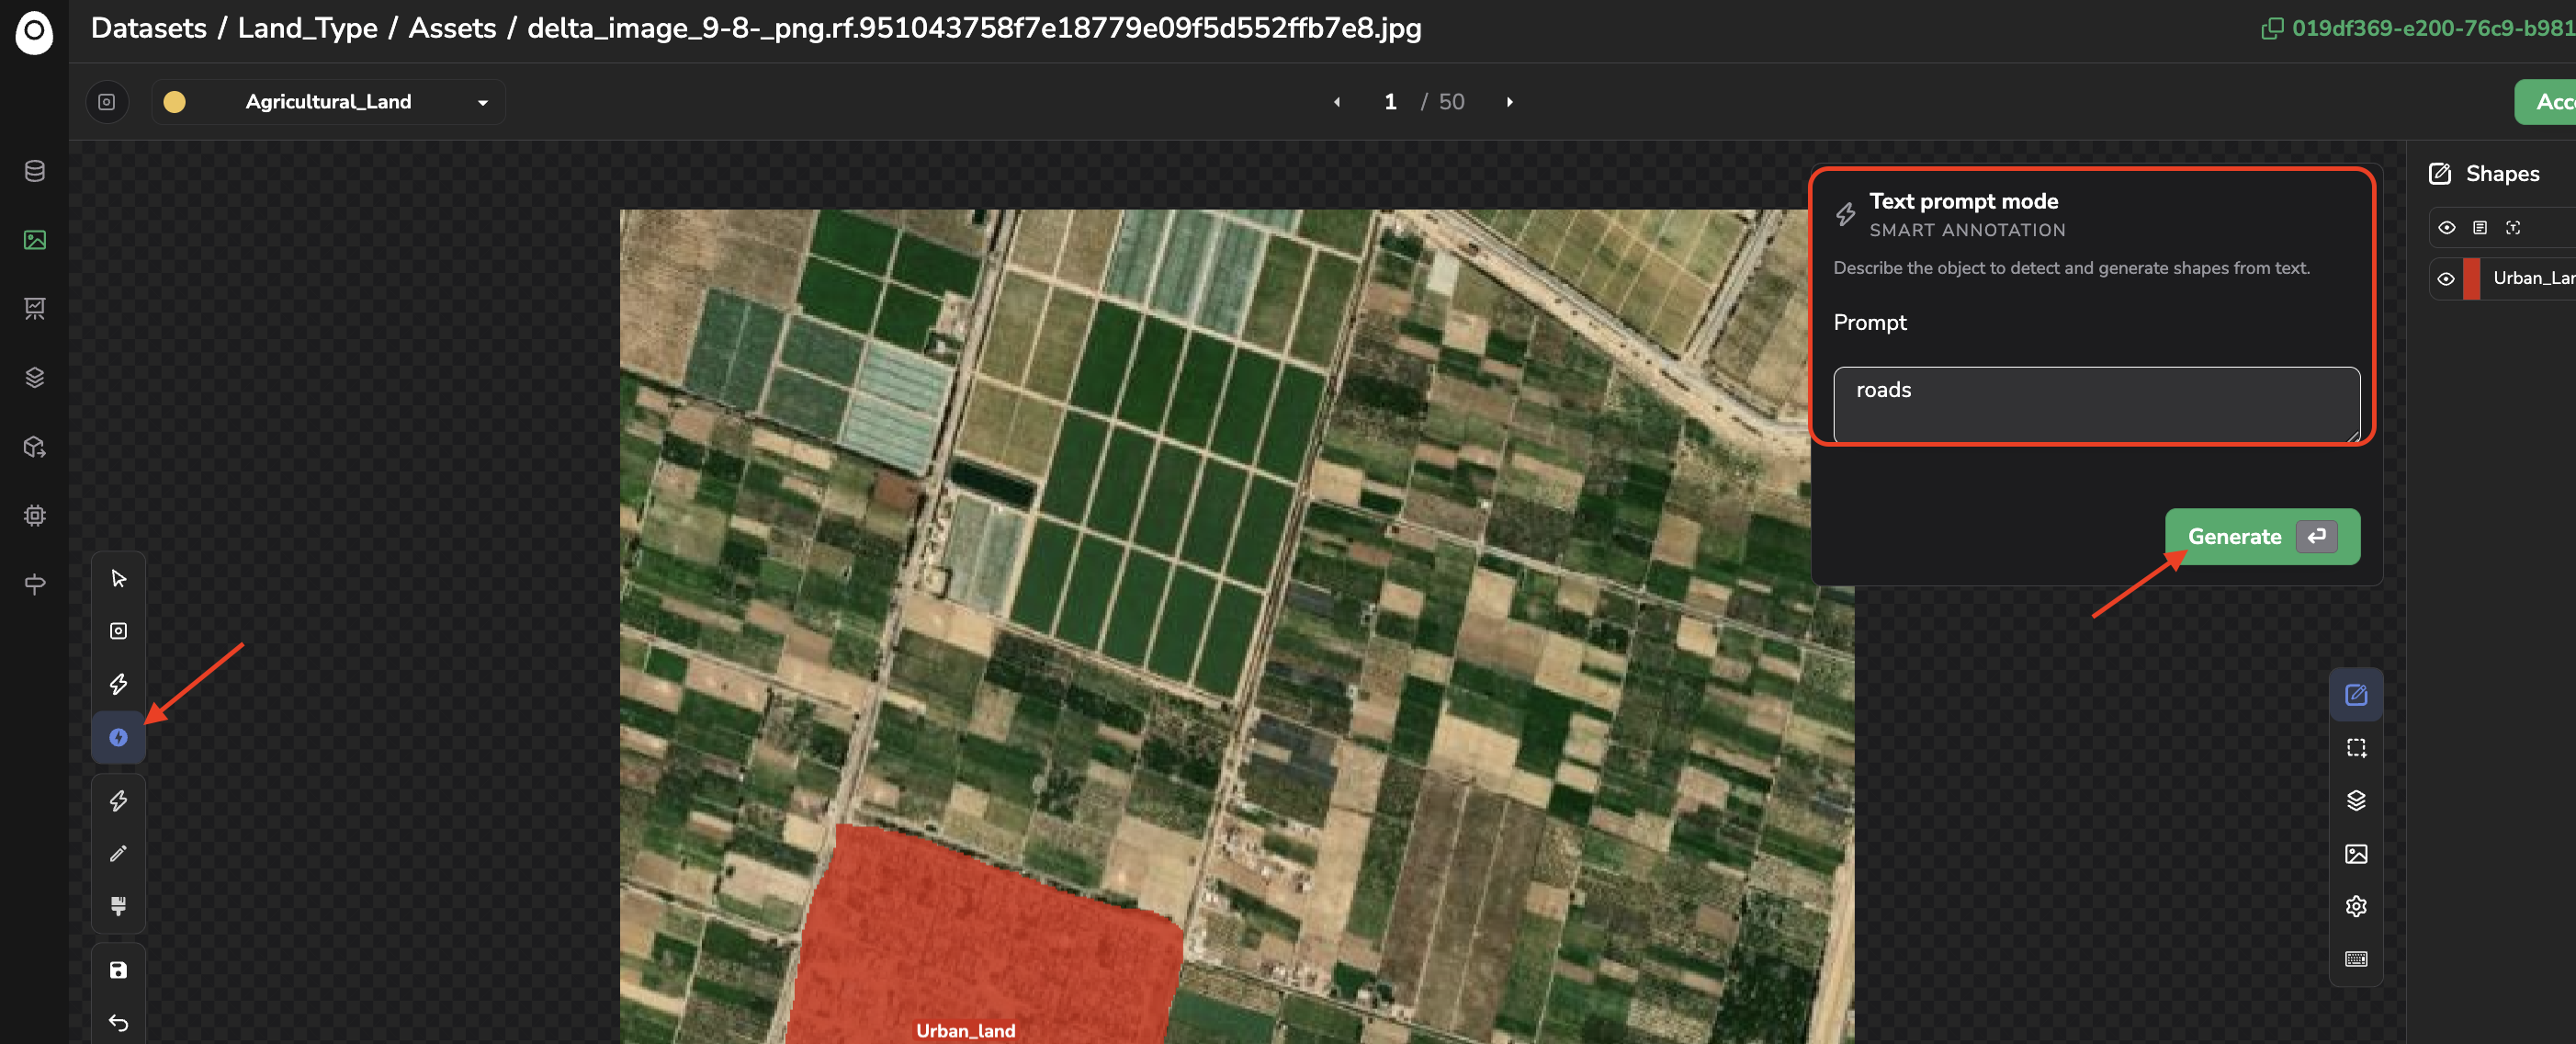
Draw polygons with text prompts ("Shift" + "X" + "3" on your keyboard): type a free-form text description (e.g. "red car") and the model proposes polygons around every matching object on the image, without needing an existing Label or example box. Please note that all the polygons generated will have as their current Label the active one displayed in the top left corner. This open-vocabulary, text-promptable segmentation is the main capability SAM3 adds over SAM2. The Smart Annotation modal in the top right corner is there to guide you.
Draw several polygons using free text as a prompt for SAM3
Whatever tool is used to create the polygon, once created, the Shape will be displayed in the Shapes panel.
C. Polygon editing
As with Object Detection, AI-proposed polygons can be reviewed, adjusted, or discarded. Once a polygon is drawn, it can also be adjusted by selecting it and using one of the following tools:
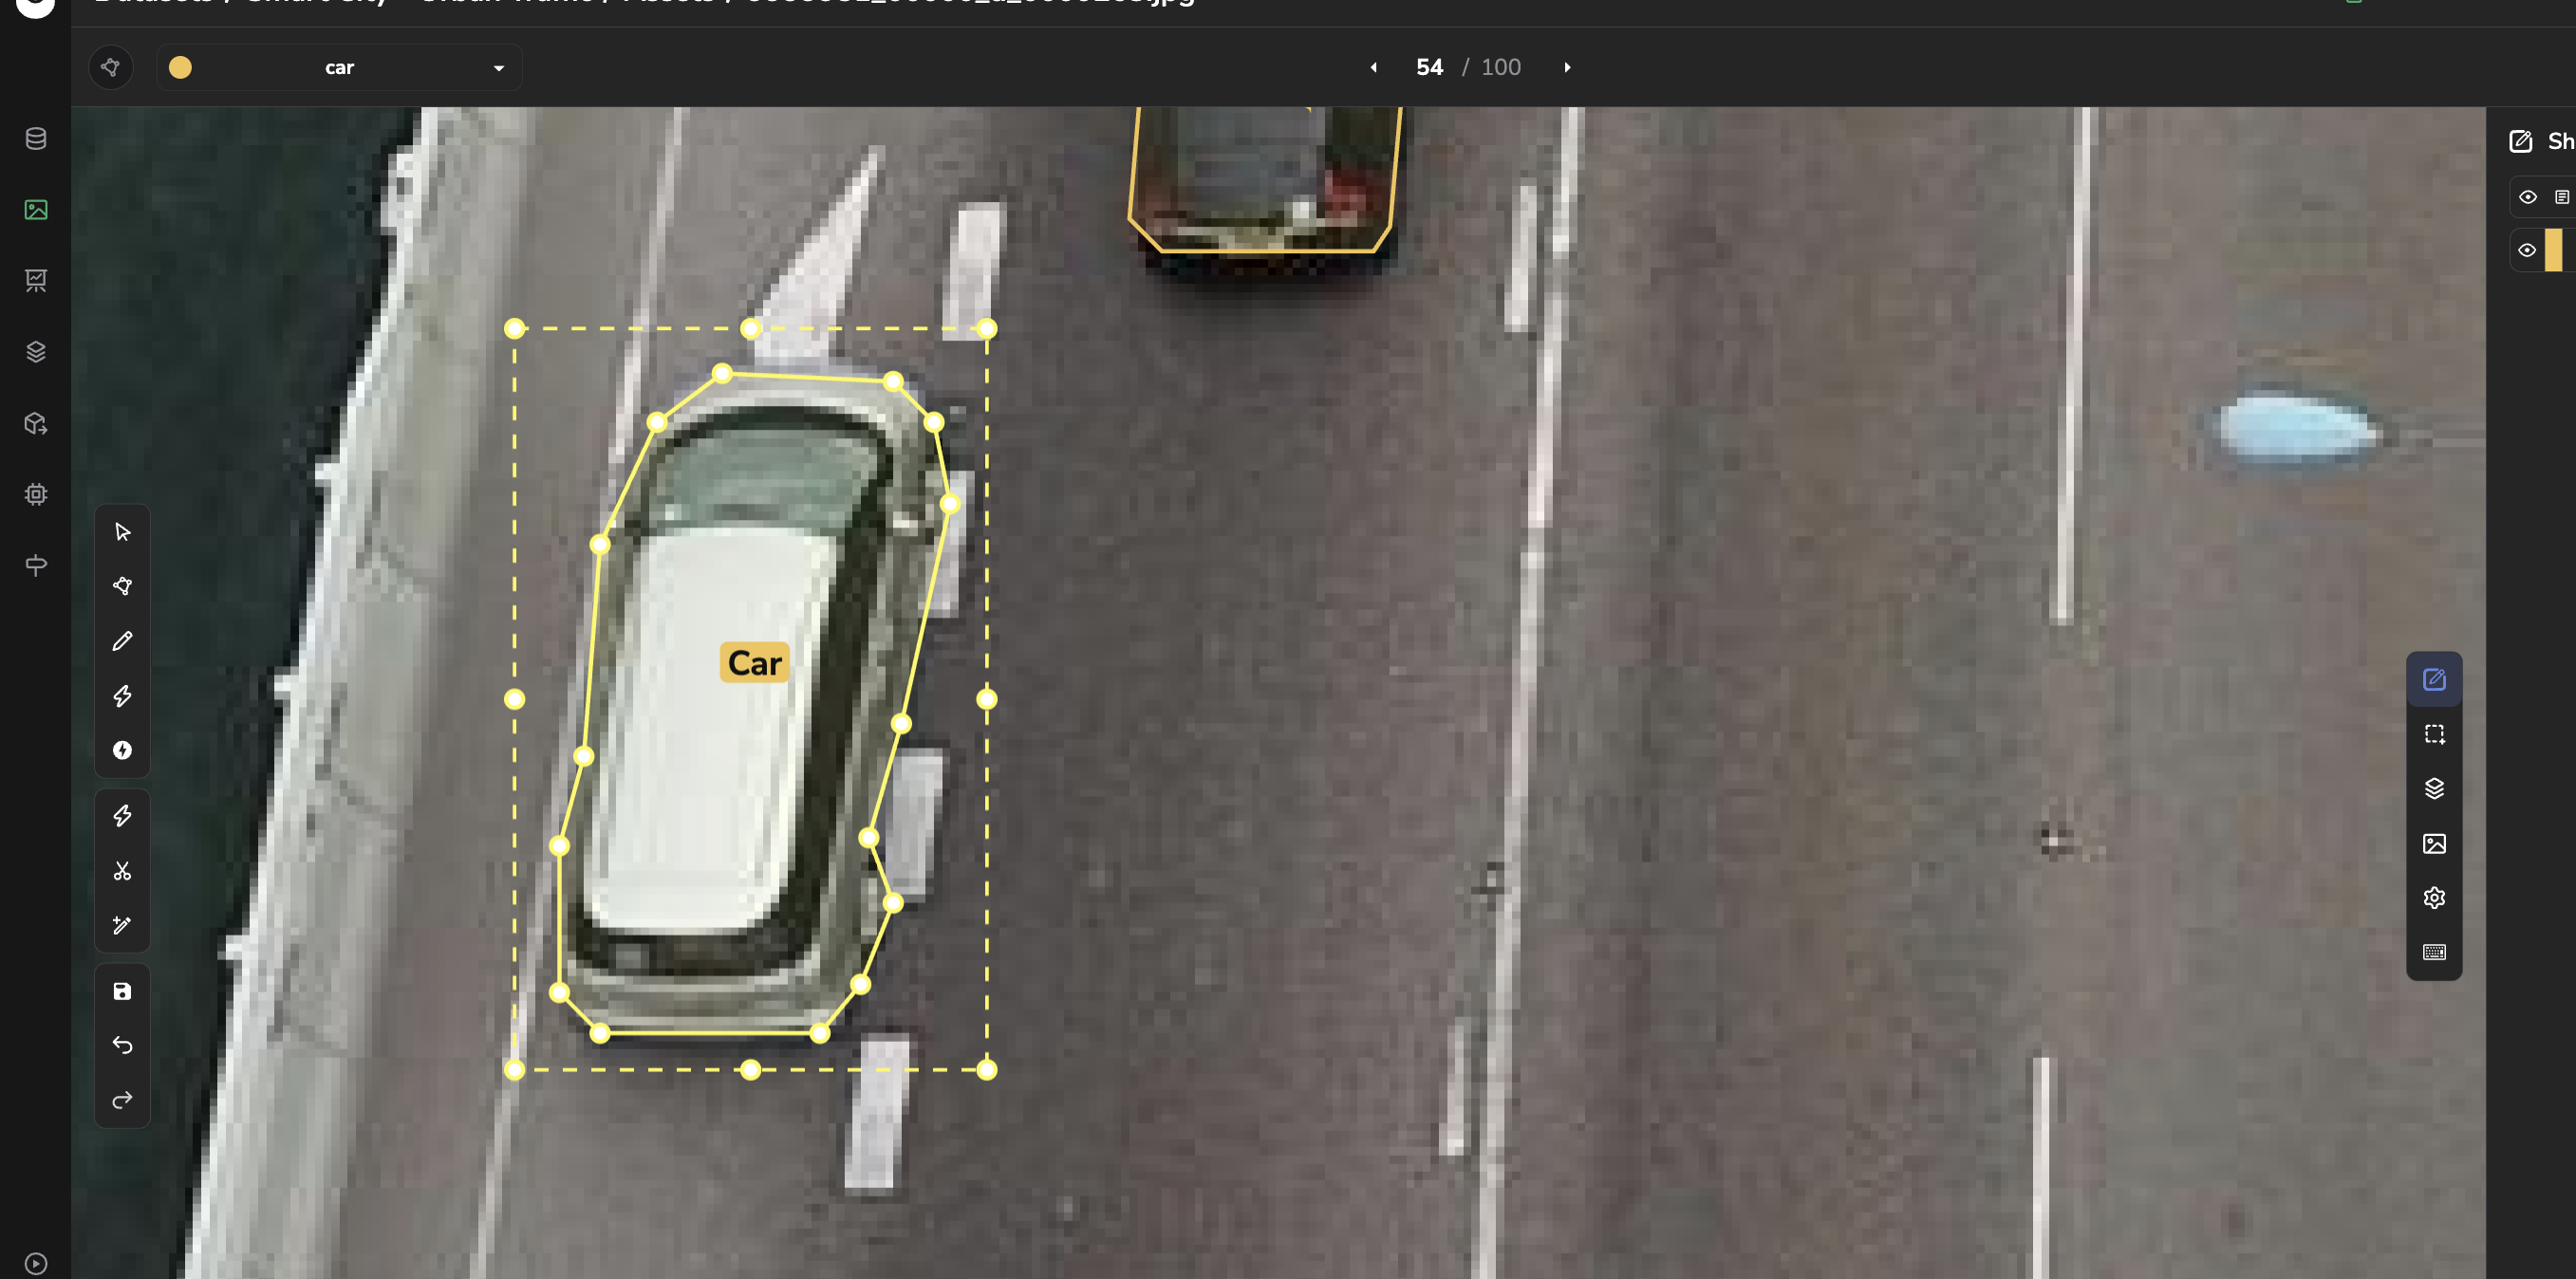
Manual adjustment of the points: Once a polygon is selected, you can manually edit it by clicking and moving anywhere on any point composing it. You can also add points by clicking on an edge and remove points by holding "Alt" and clicking on the point that needs to be deleted. You can also increase or decrease the polygon size linearly by moving the corner points of the bounding box that frames the selected polygon
Manual adjustment of a polygon
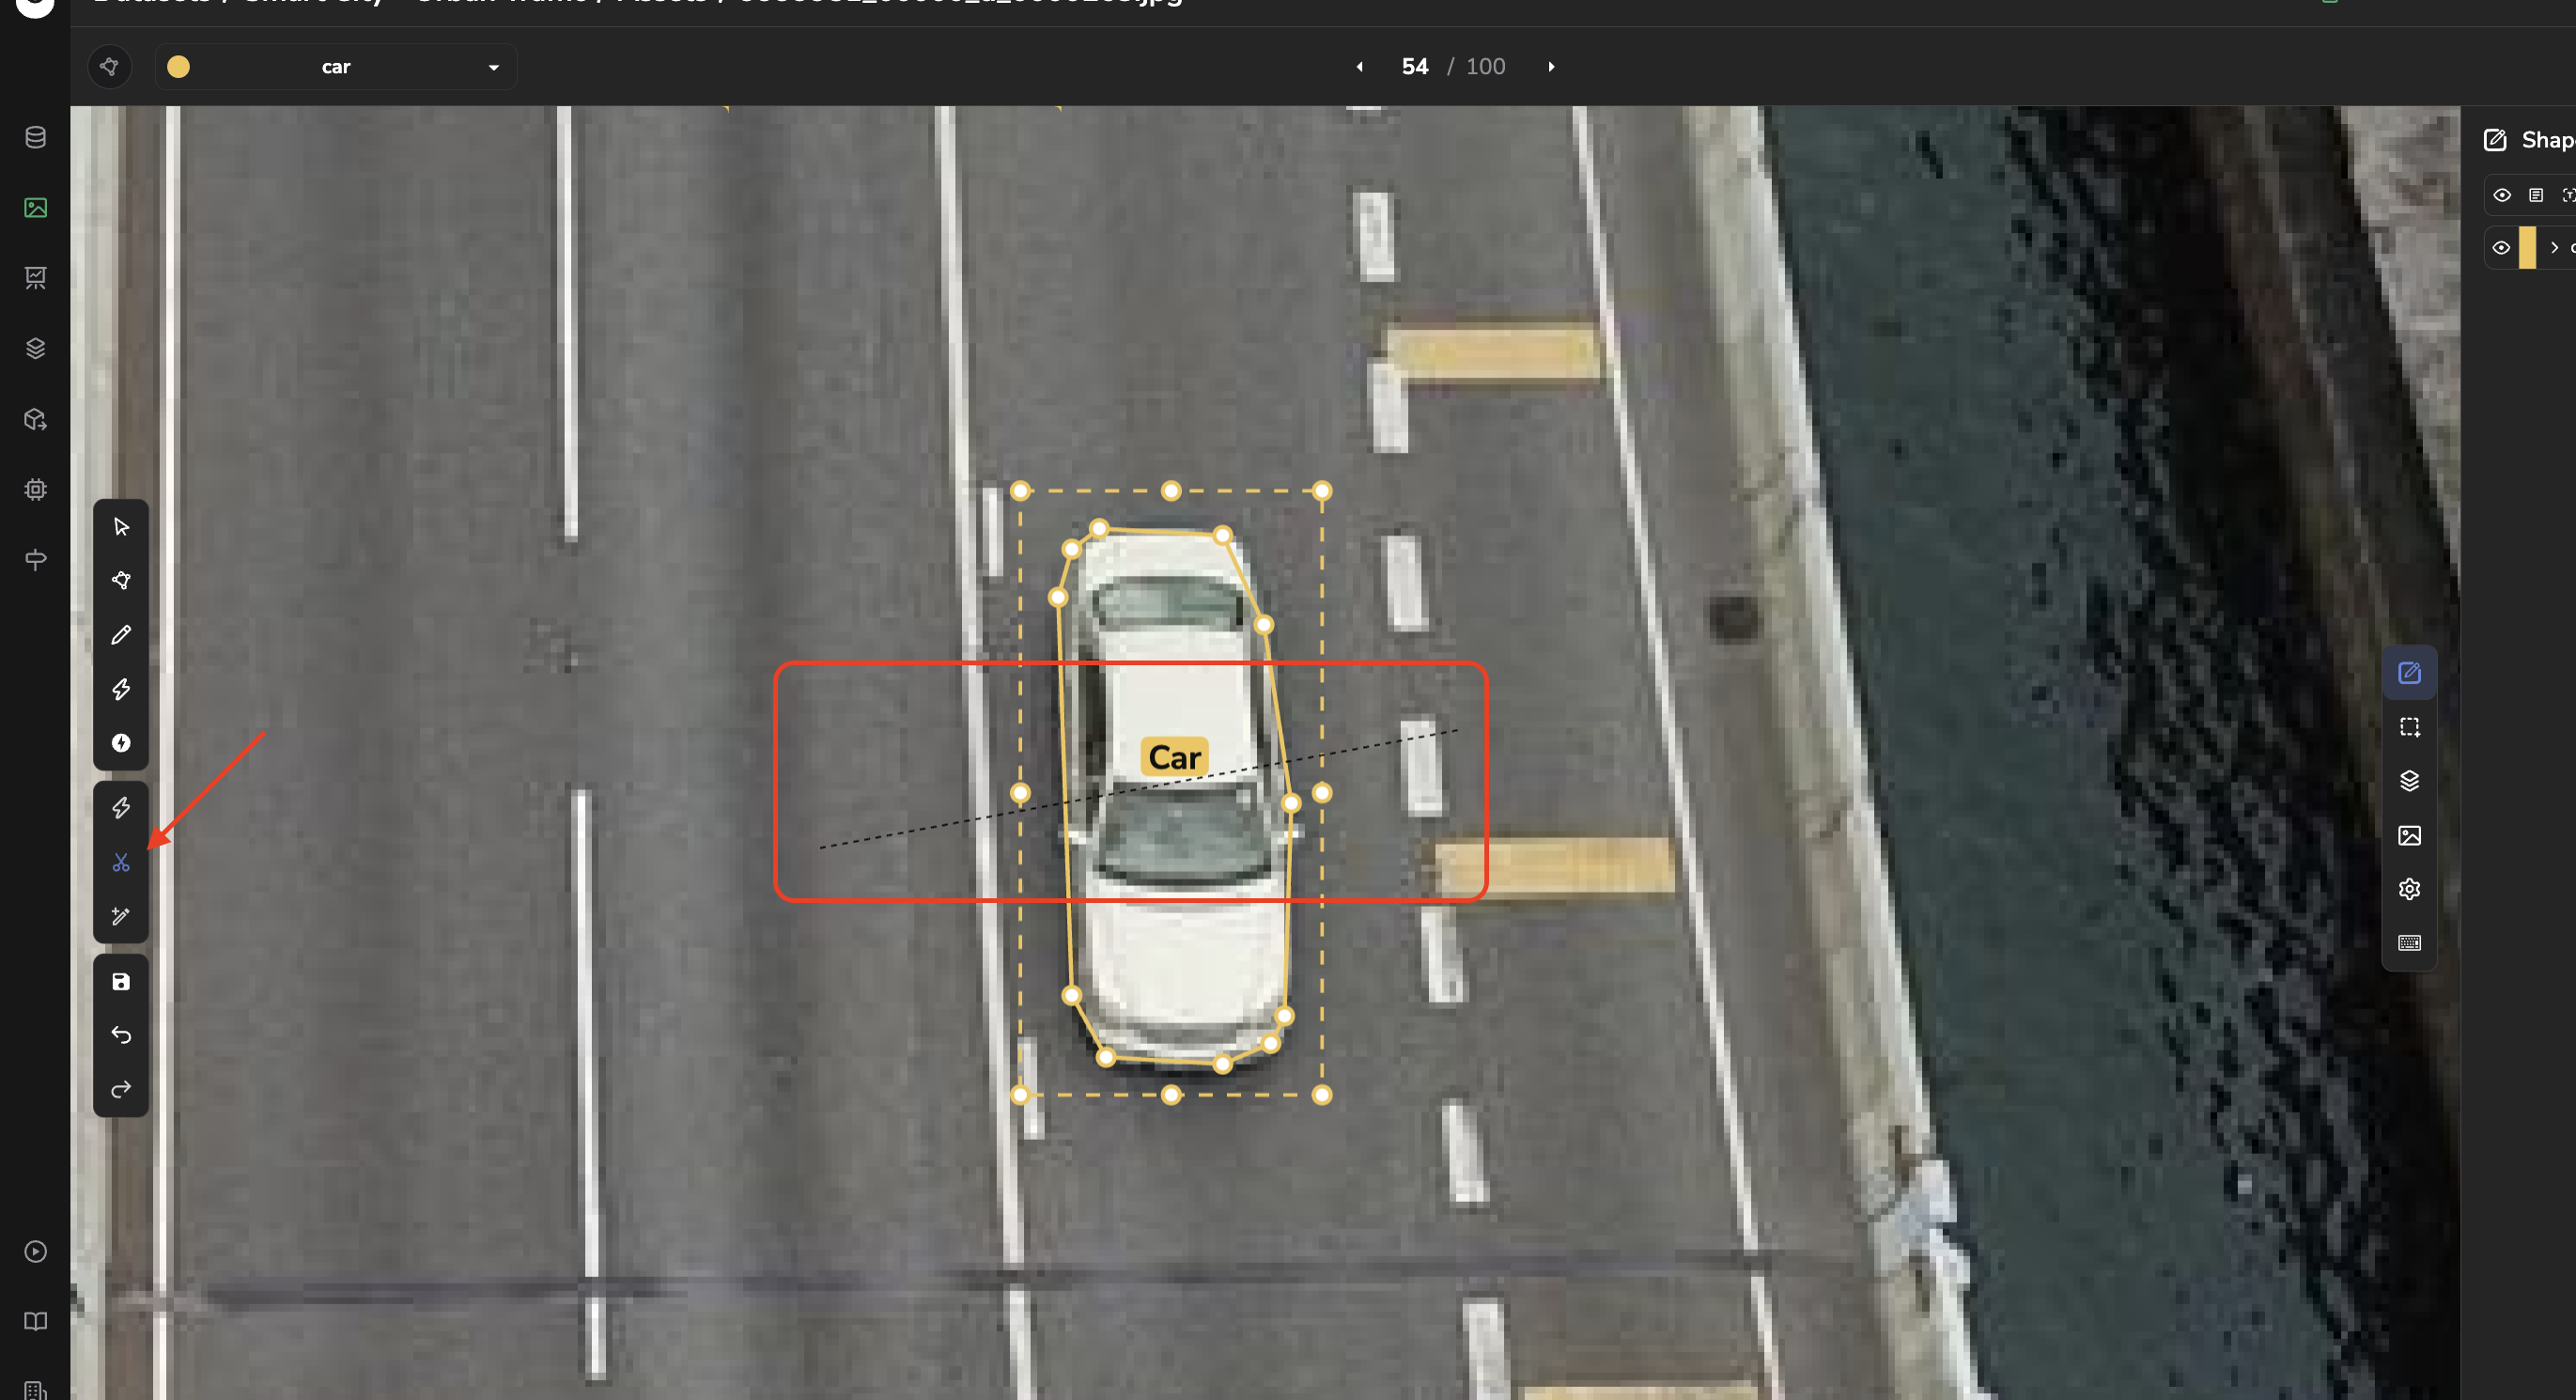
Scissors ("S" on your keyboard): Cut a polygon into two different ones by drawing a line across the initial polygon after clicking on the scissors icon.
Edit a polygon with the scissors tool
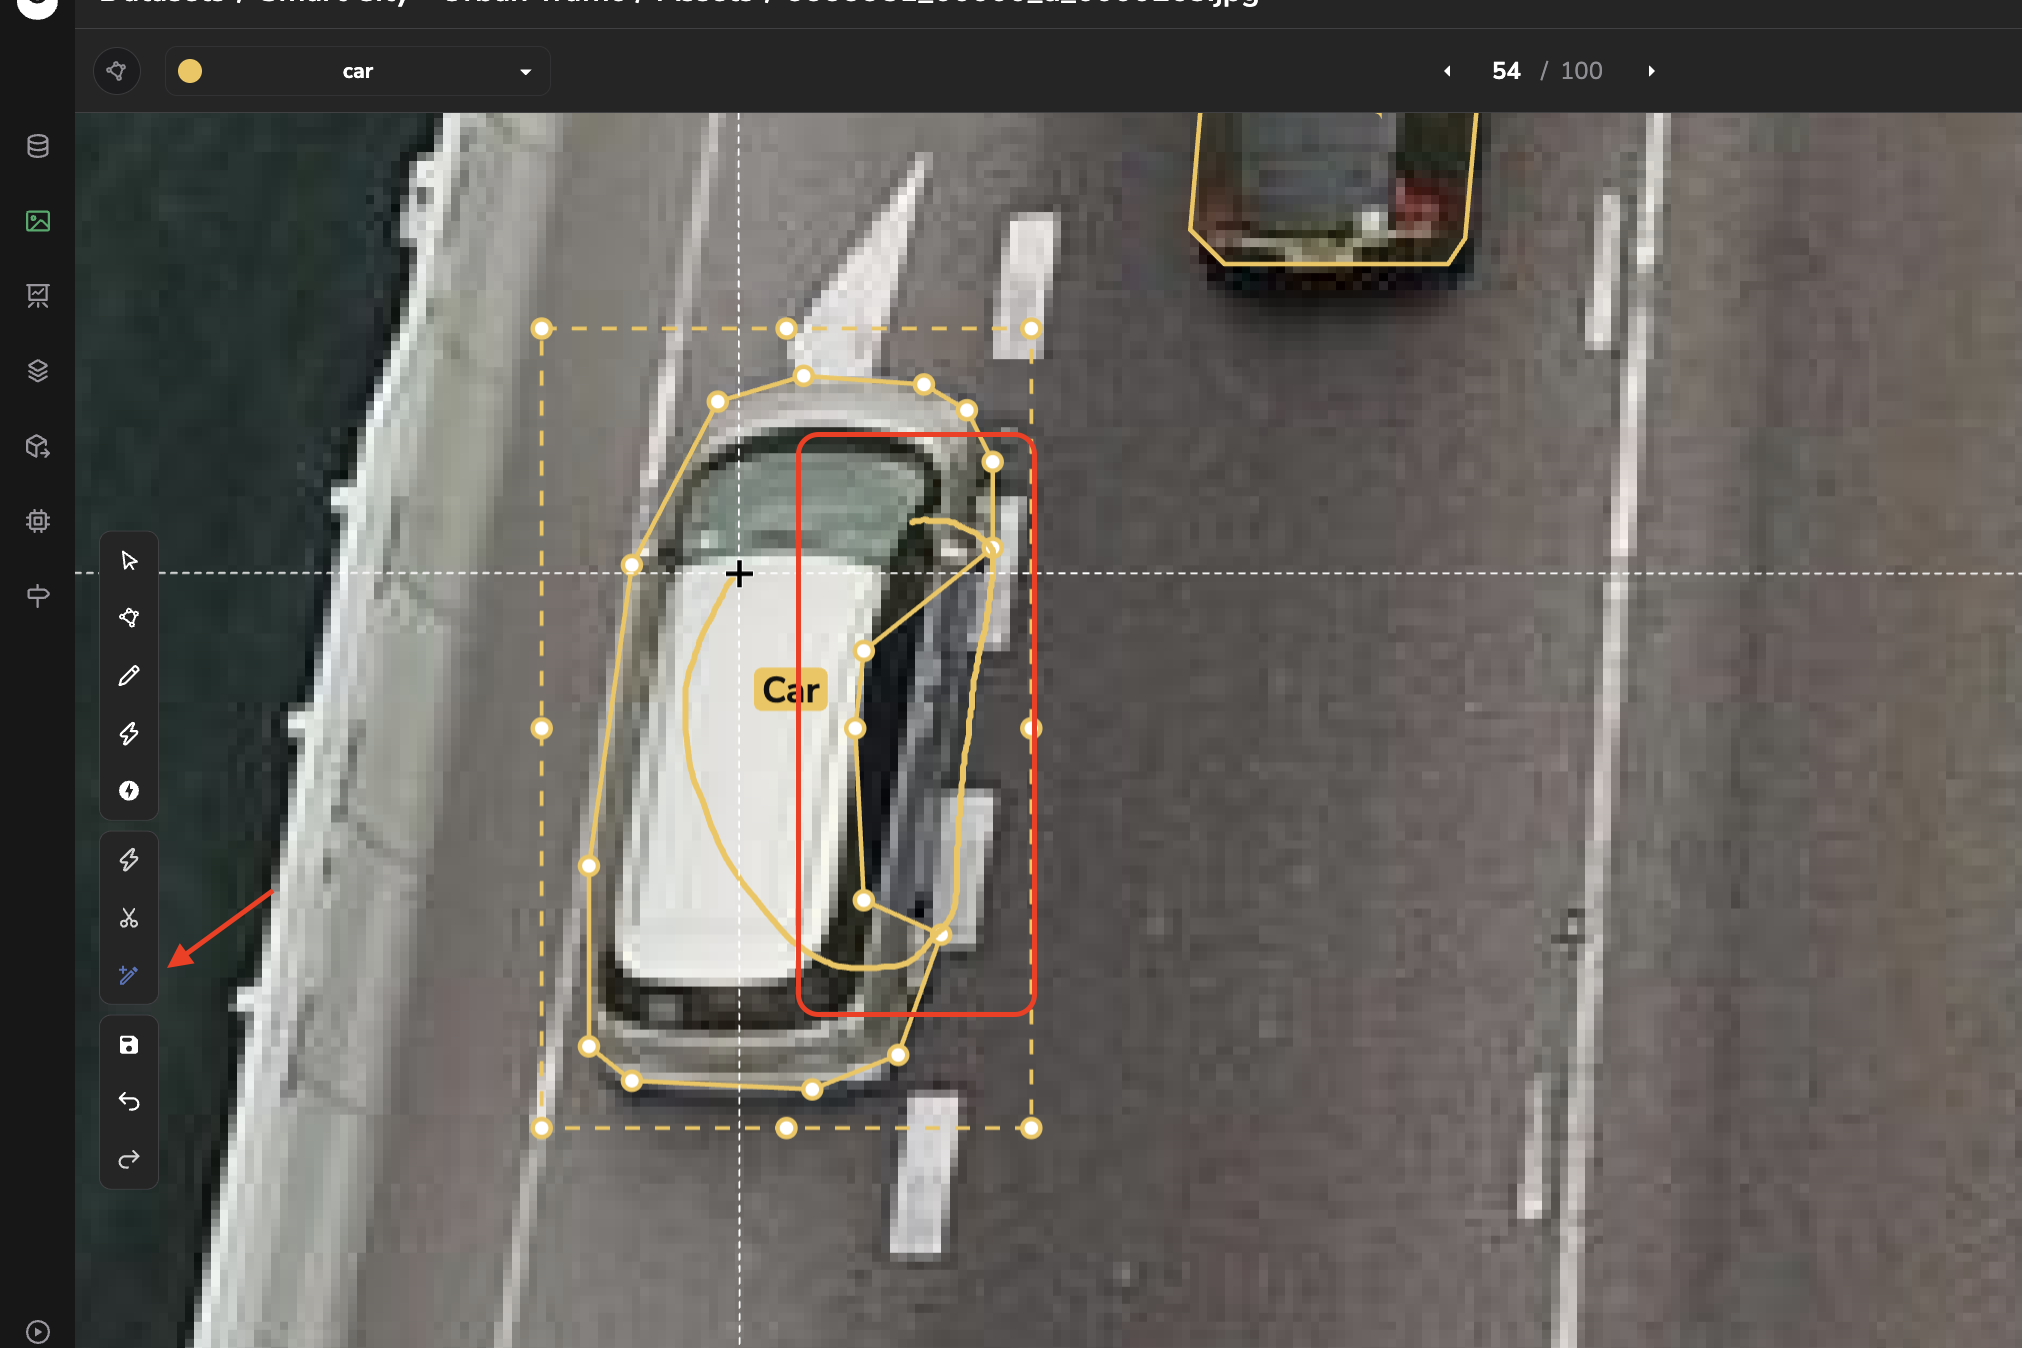
Add or remove with the pencil ("E" or "Shift + E" on your keyboard): This tool allows you to add or remove some part of the selected polygon by drawing another via the freehand tool. The original polygon will be transformed into the union of the two polygons (original one + second one) for the "Add" mode, where the intersection of the two polygons (original one + second one) will be removed from the original polygon for the "Remove" mode. You can press Enter to finalize the edit.
Add or remove areas manually to the selected polygon
Edit polygon with SAM ("E + X" on your keyboard): Select an existing polygon and let SAM3 refine its contour automatically by clicking on the areas that need to be added to the selected polygon; you can also use SAM3 to remove parts of the selected polygon by holding "Alt" and clicking on the areas that shouldn't be part of the selected polygon. You can press Enter to finalize the edit. The Smart Annotation modal in the top right corner is there to guide you.
Adjust selected polygon with SAM3
A selected polygon can also be right-clicked to Simplify it: this reduces its number of points, which is useful to clean up a polygon that ended up with more points than needed (for instance after an AI-assisted or freehand drawing). The strength of this reduction isn't adjustable per click — it follows the Polygon simplification factor set once for all in the Settings panel.
Besides being able to adjust the polygon size, you can also right-click on it to perform any available action (change label, fill in the Text field, adjust opacity, lock...) as described here.
4. Mask
For a DatasetVersion in Mask mode, the Annotation tool allows you to create a pixel-level mask Shape.
In practice, this is a panoptic-style annotation type: each Shape is a pixel-precise mask, but unlike a single flat segmentation map, an Annotation can contain several mask instances, each with its own Label — so two distinct objects of the same class (for instance, two overlapping cracks) can be captured as two separate Shape or be merged into one; it is up to you to decide.
A. Manual drawing
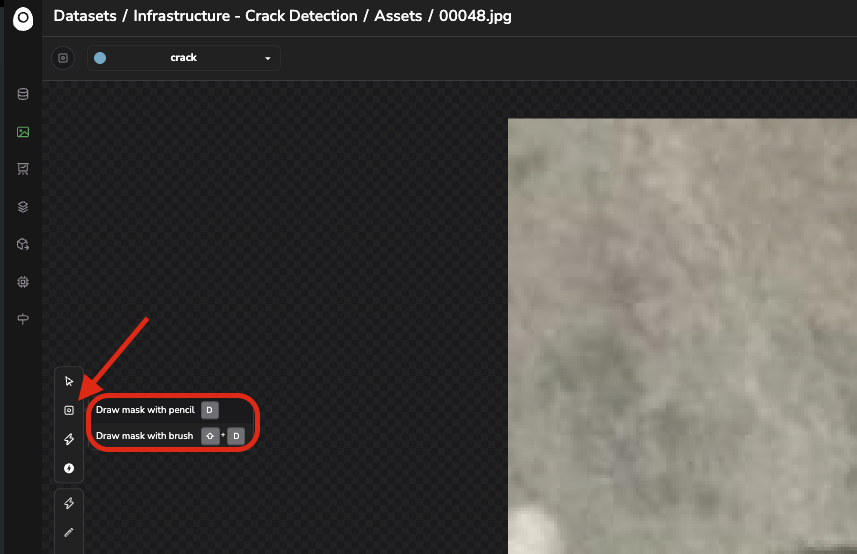
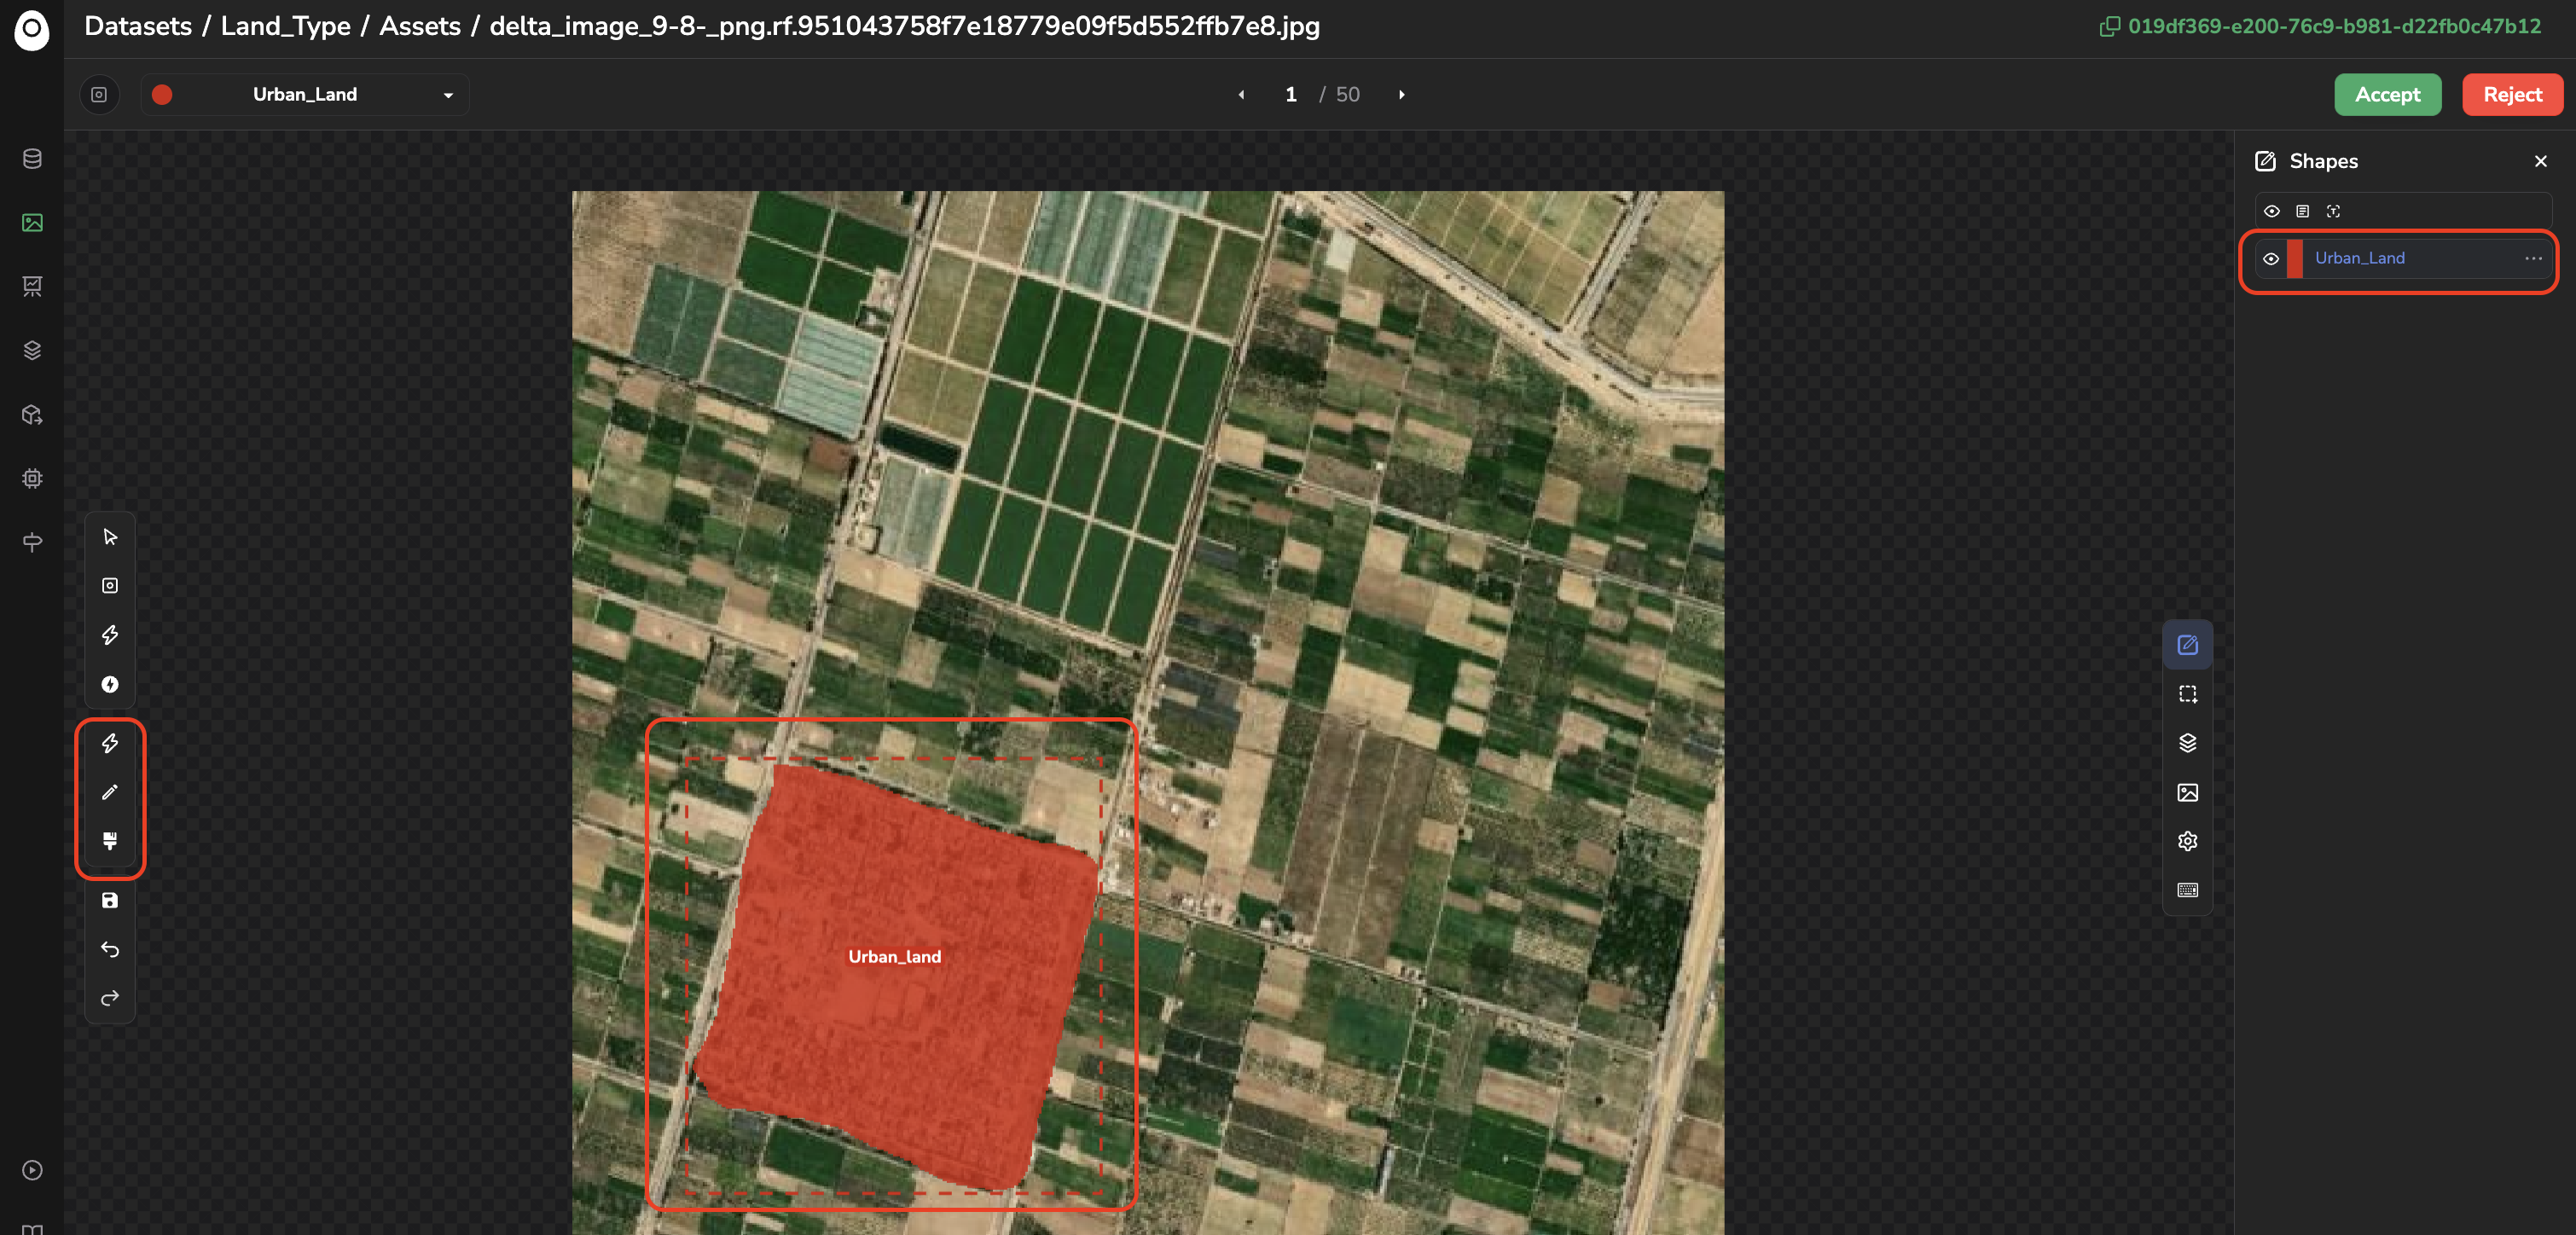
Manual mask creation tools
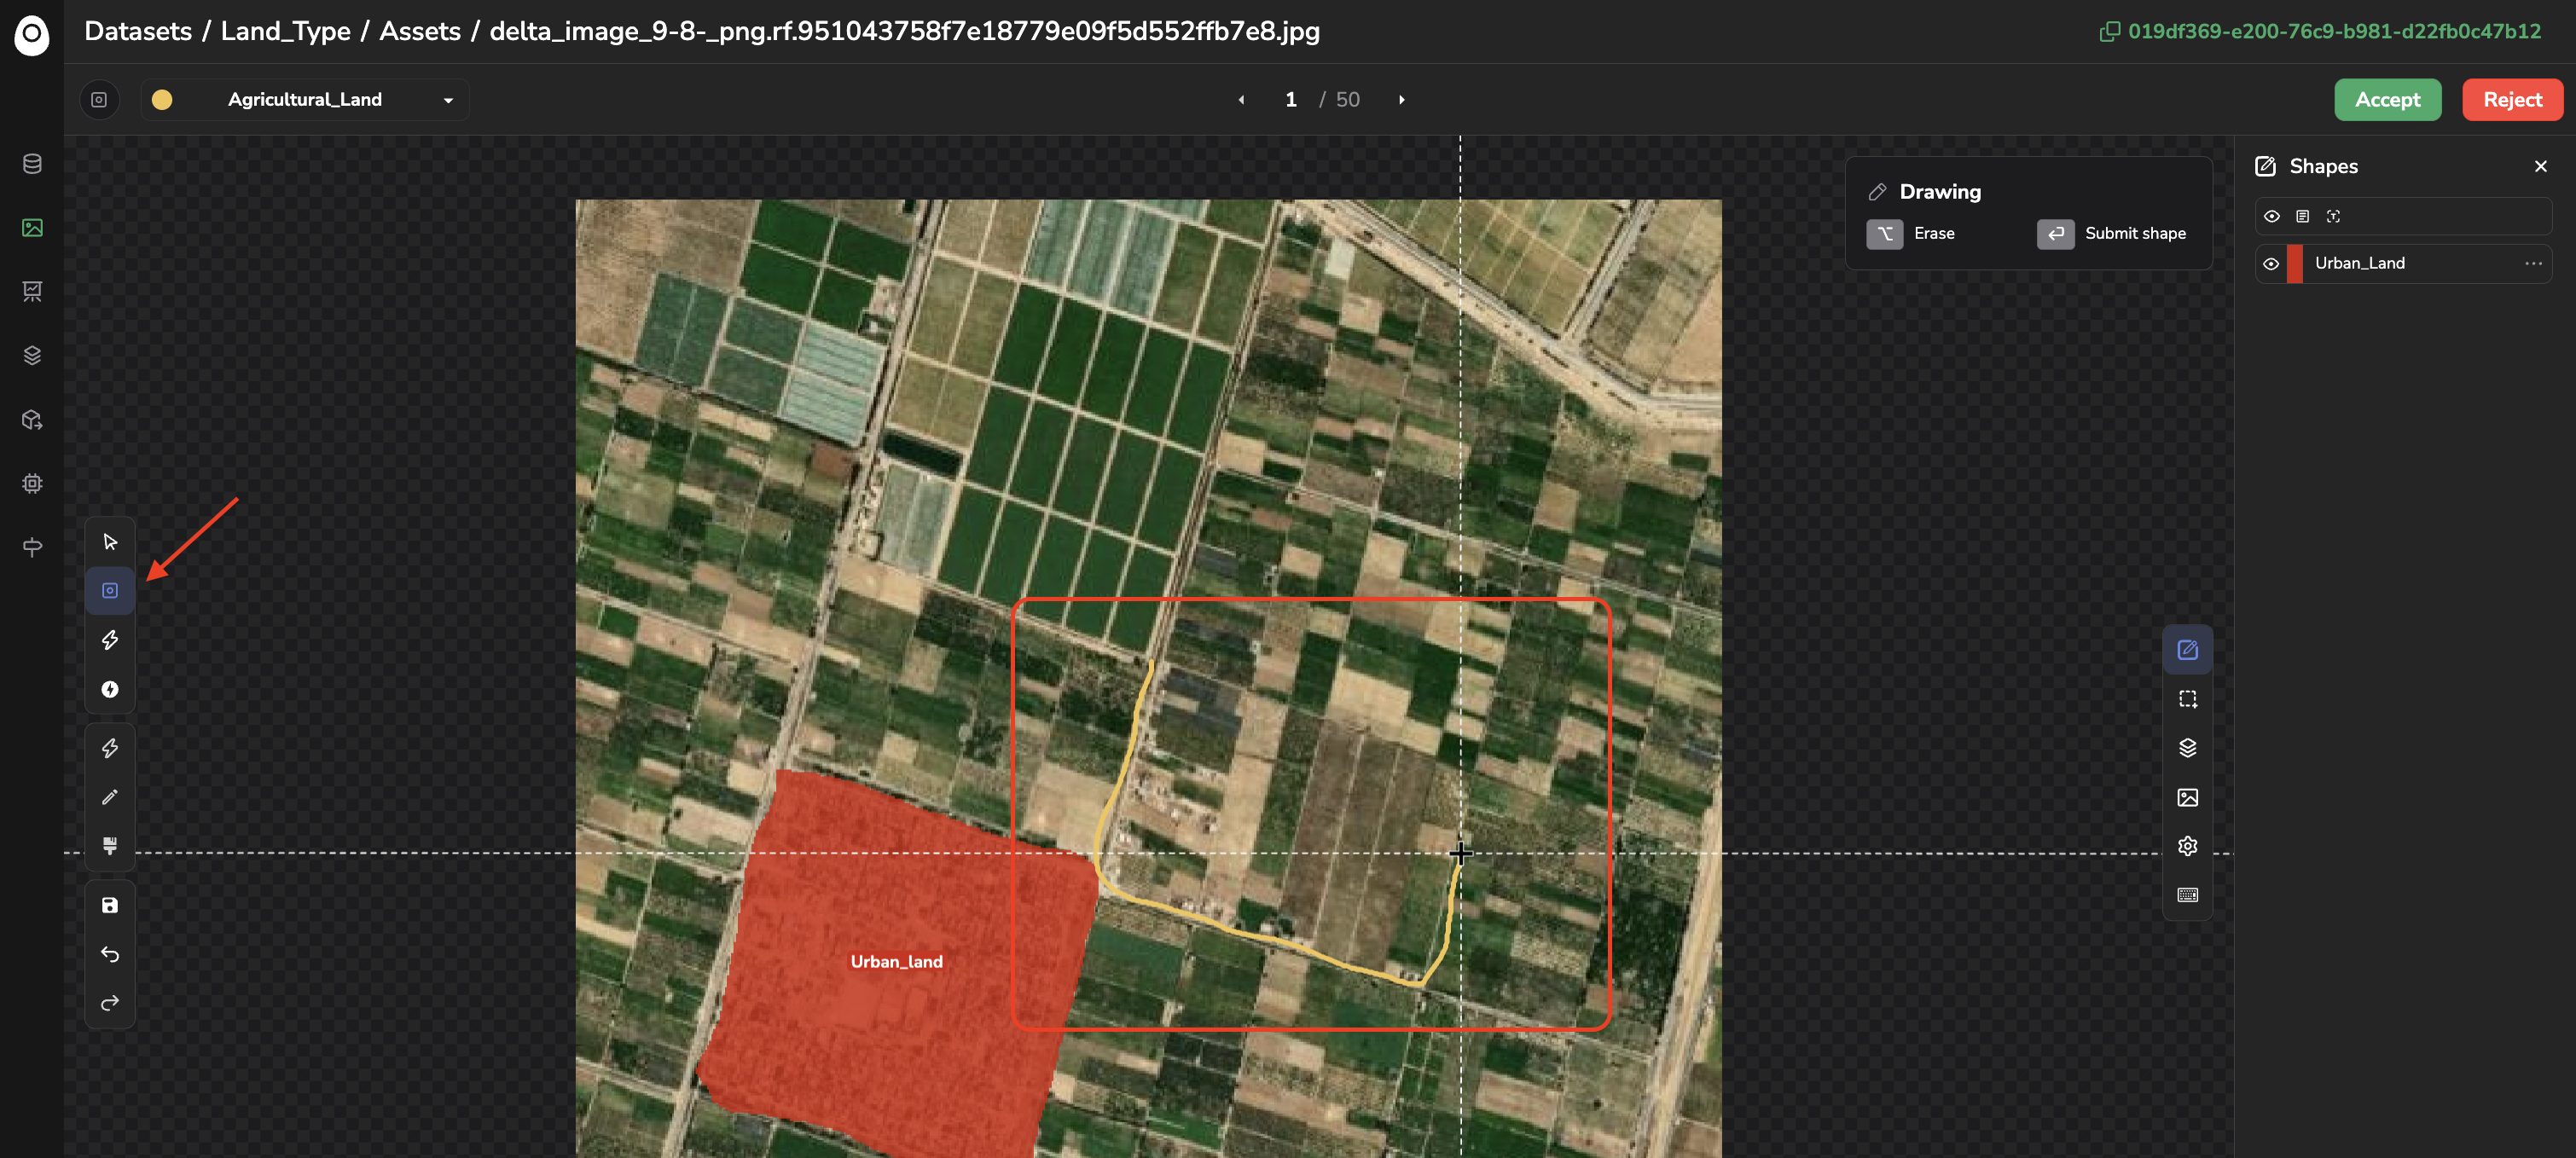
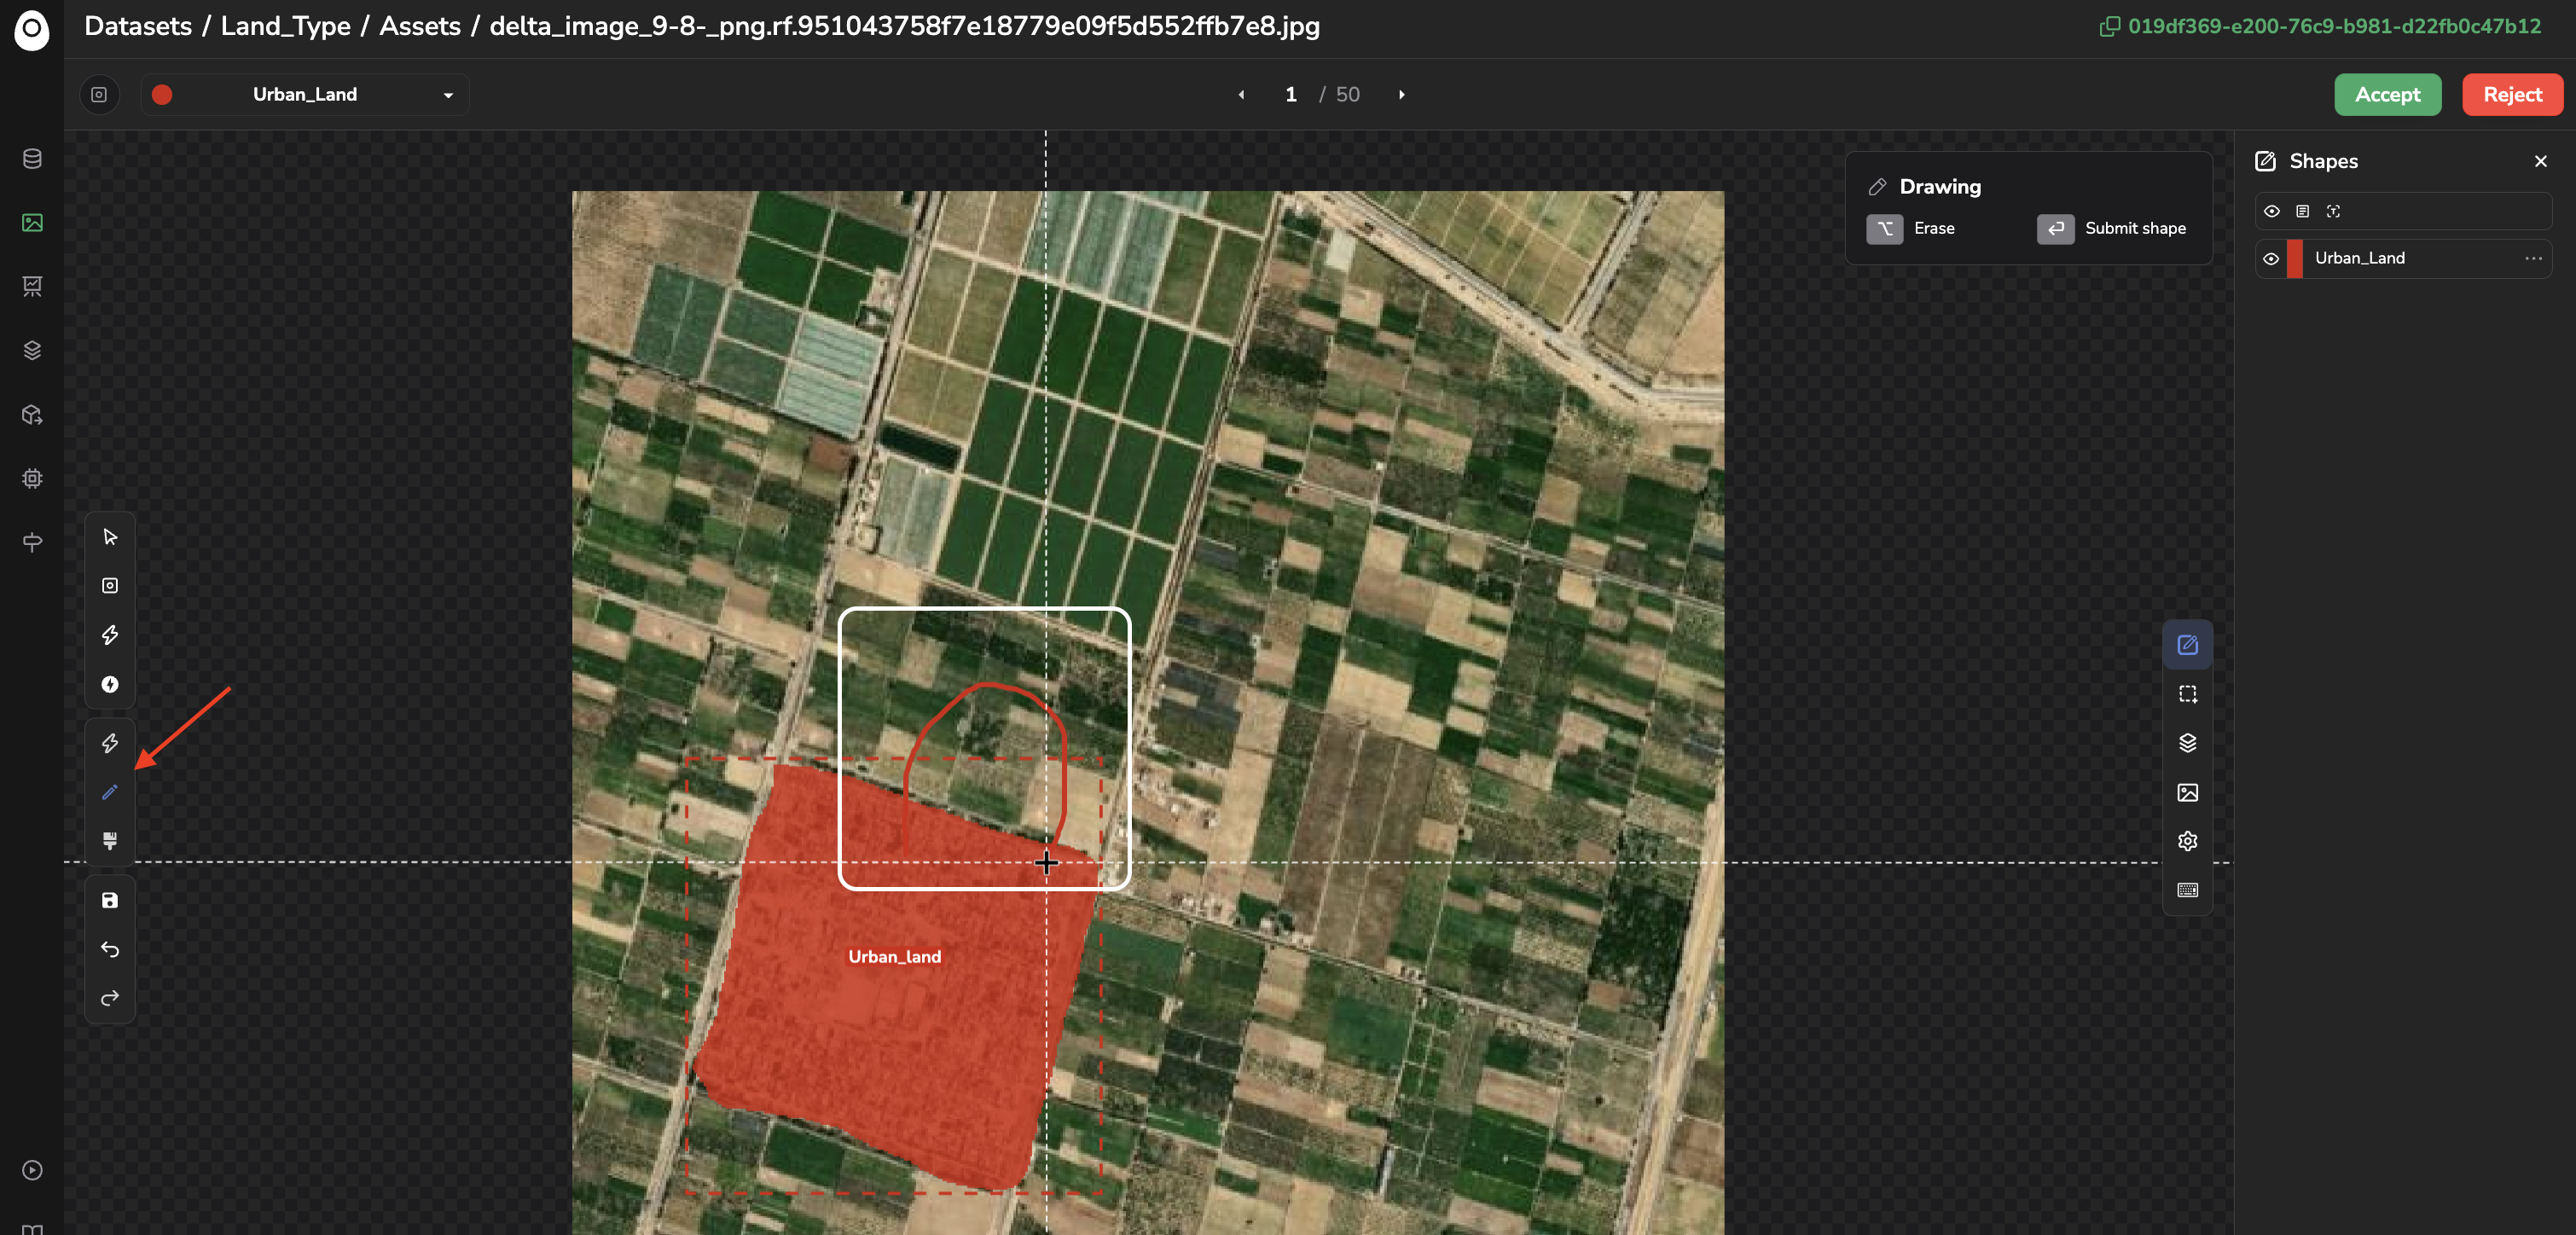
Draw mask with pencil ("D" on your keyboard): Paint the contours of your mask by holding your mouse; the inside area will automatically be filled in when releasing. A small modal will appear in the top right corner displaying the different actions available when "Draw with pencil" is active. To validate your mask, you must press Enter. Once created, the Shape will be displayed in the Shapes panel.
Manual mask creation with pencil
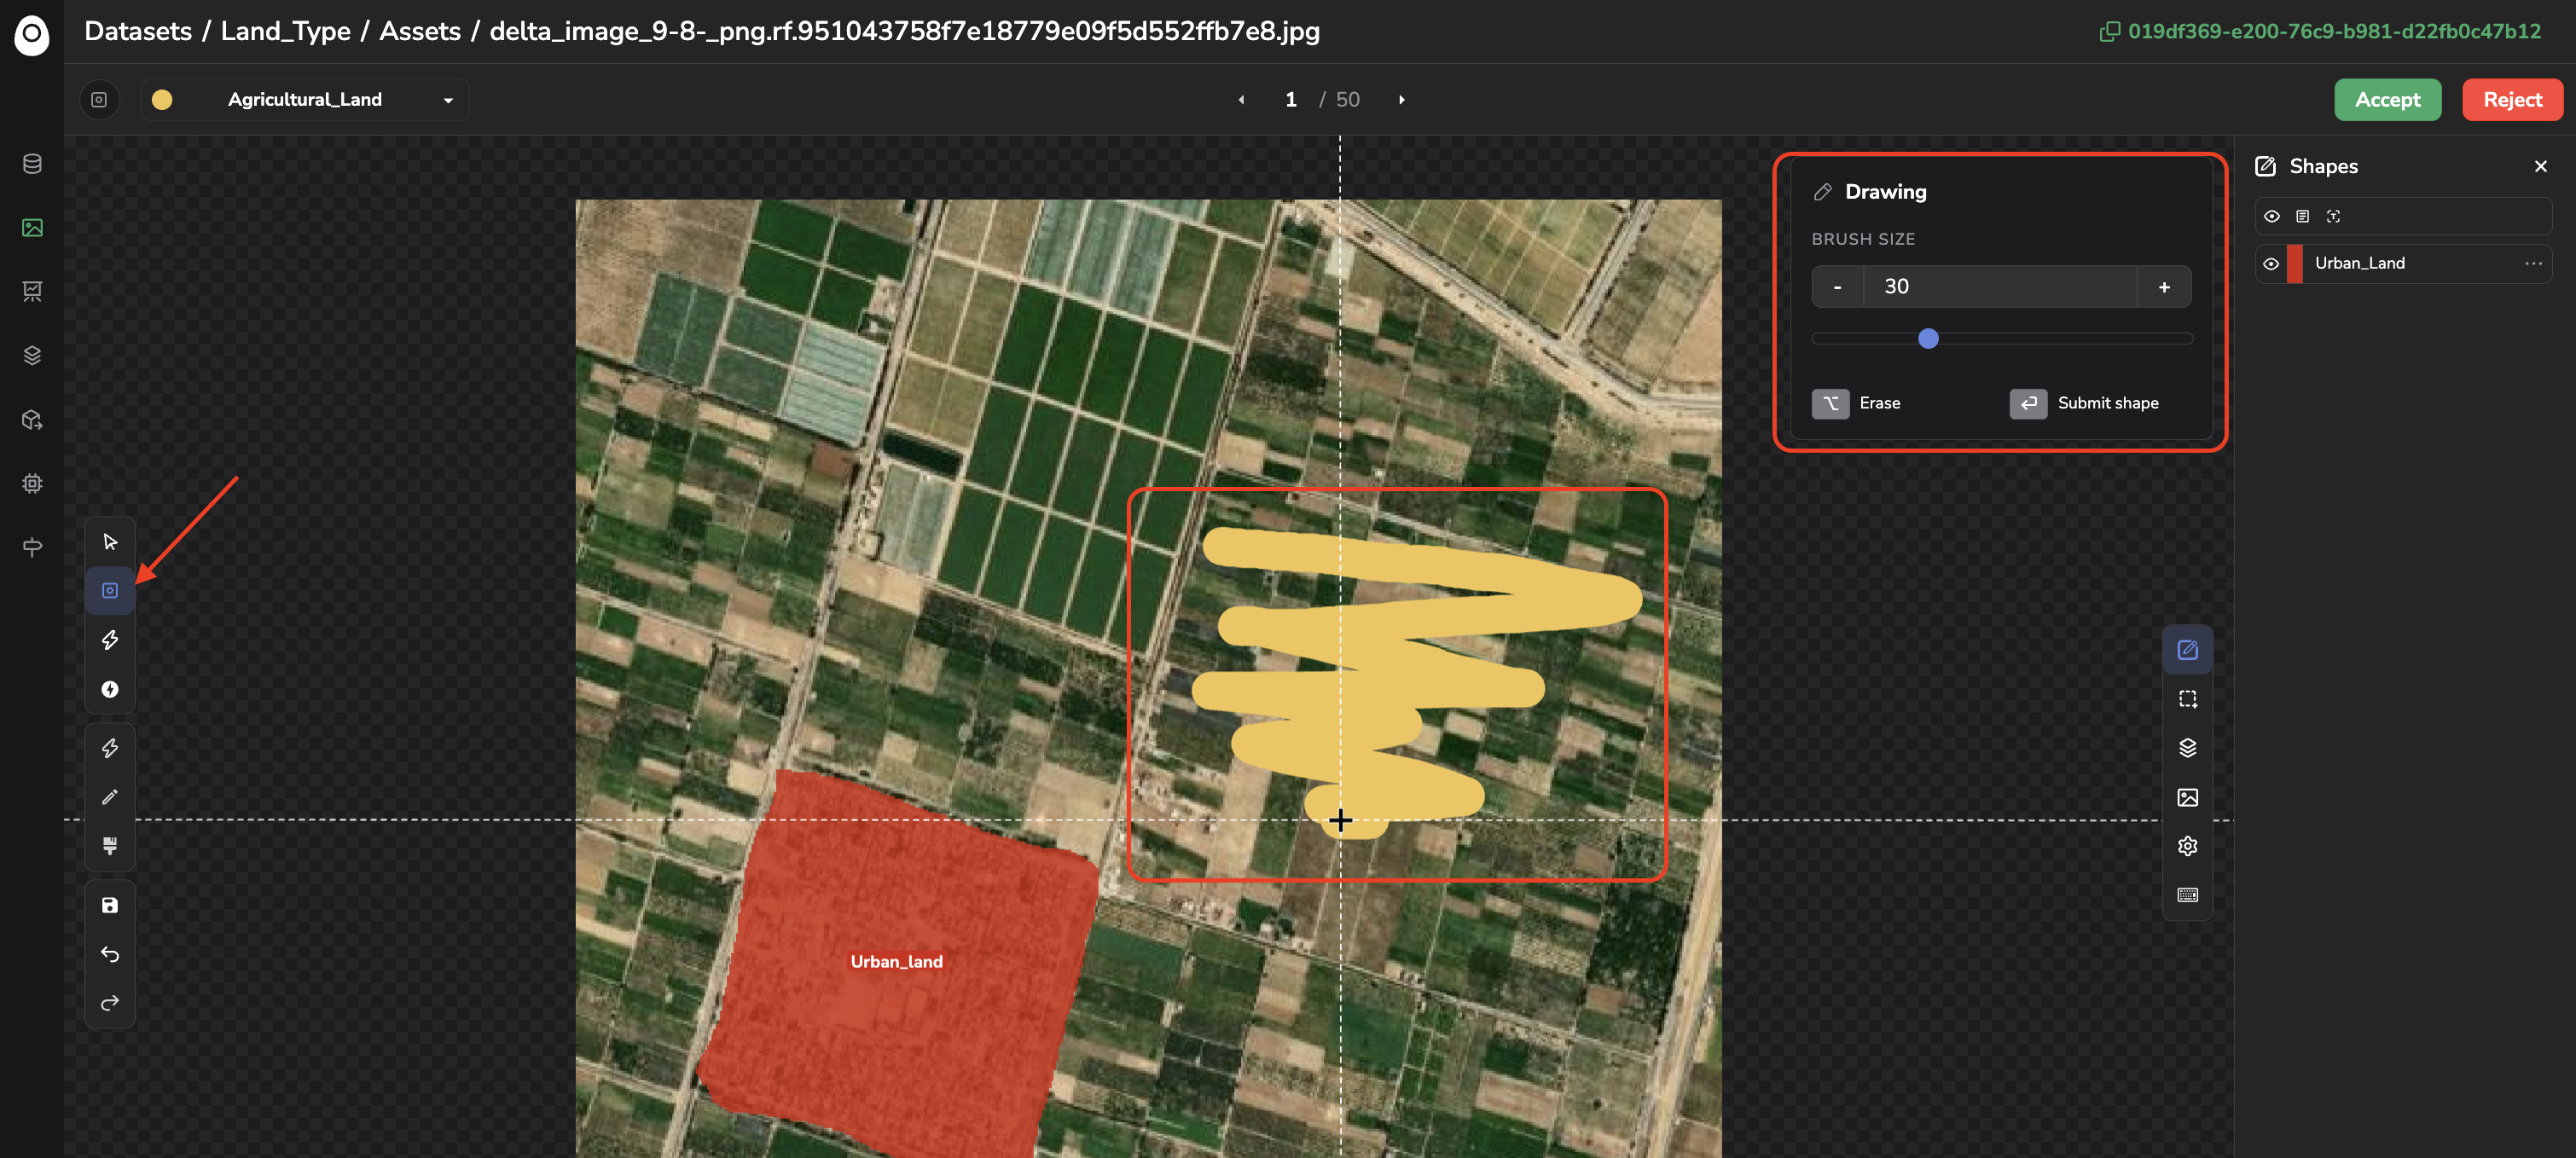
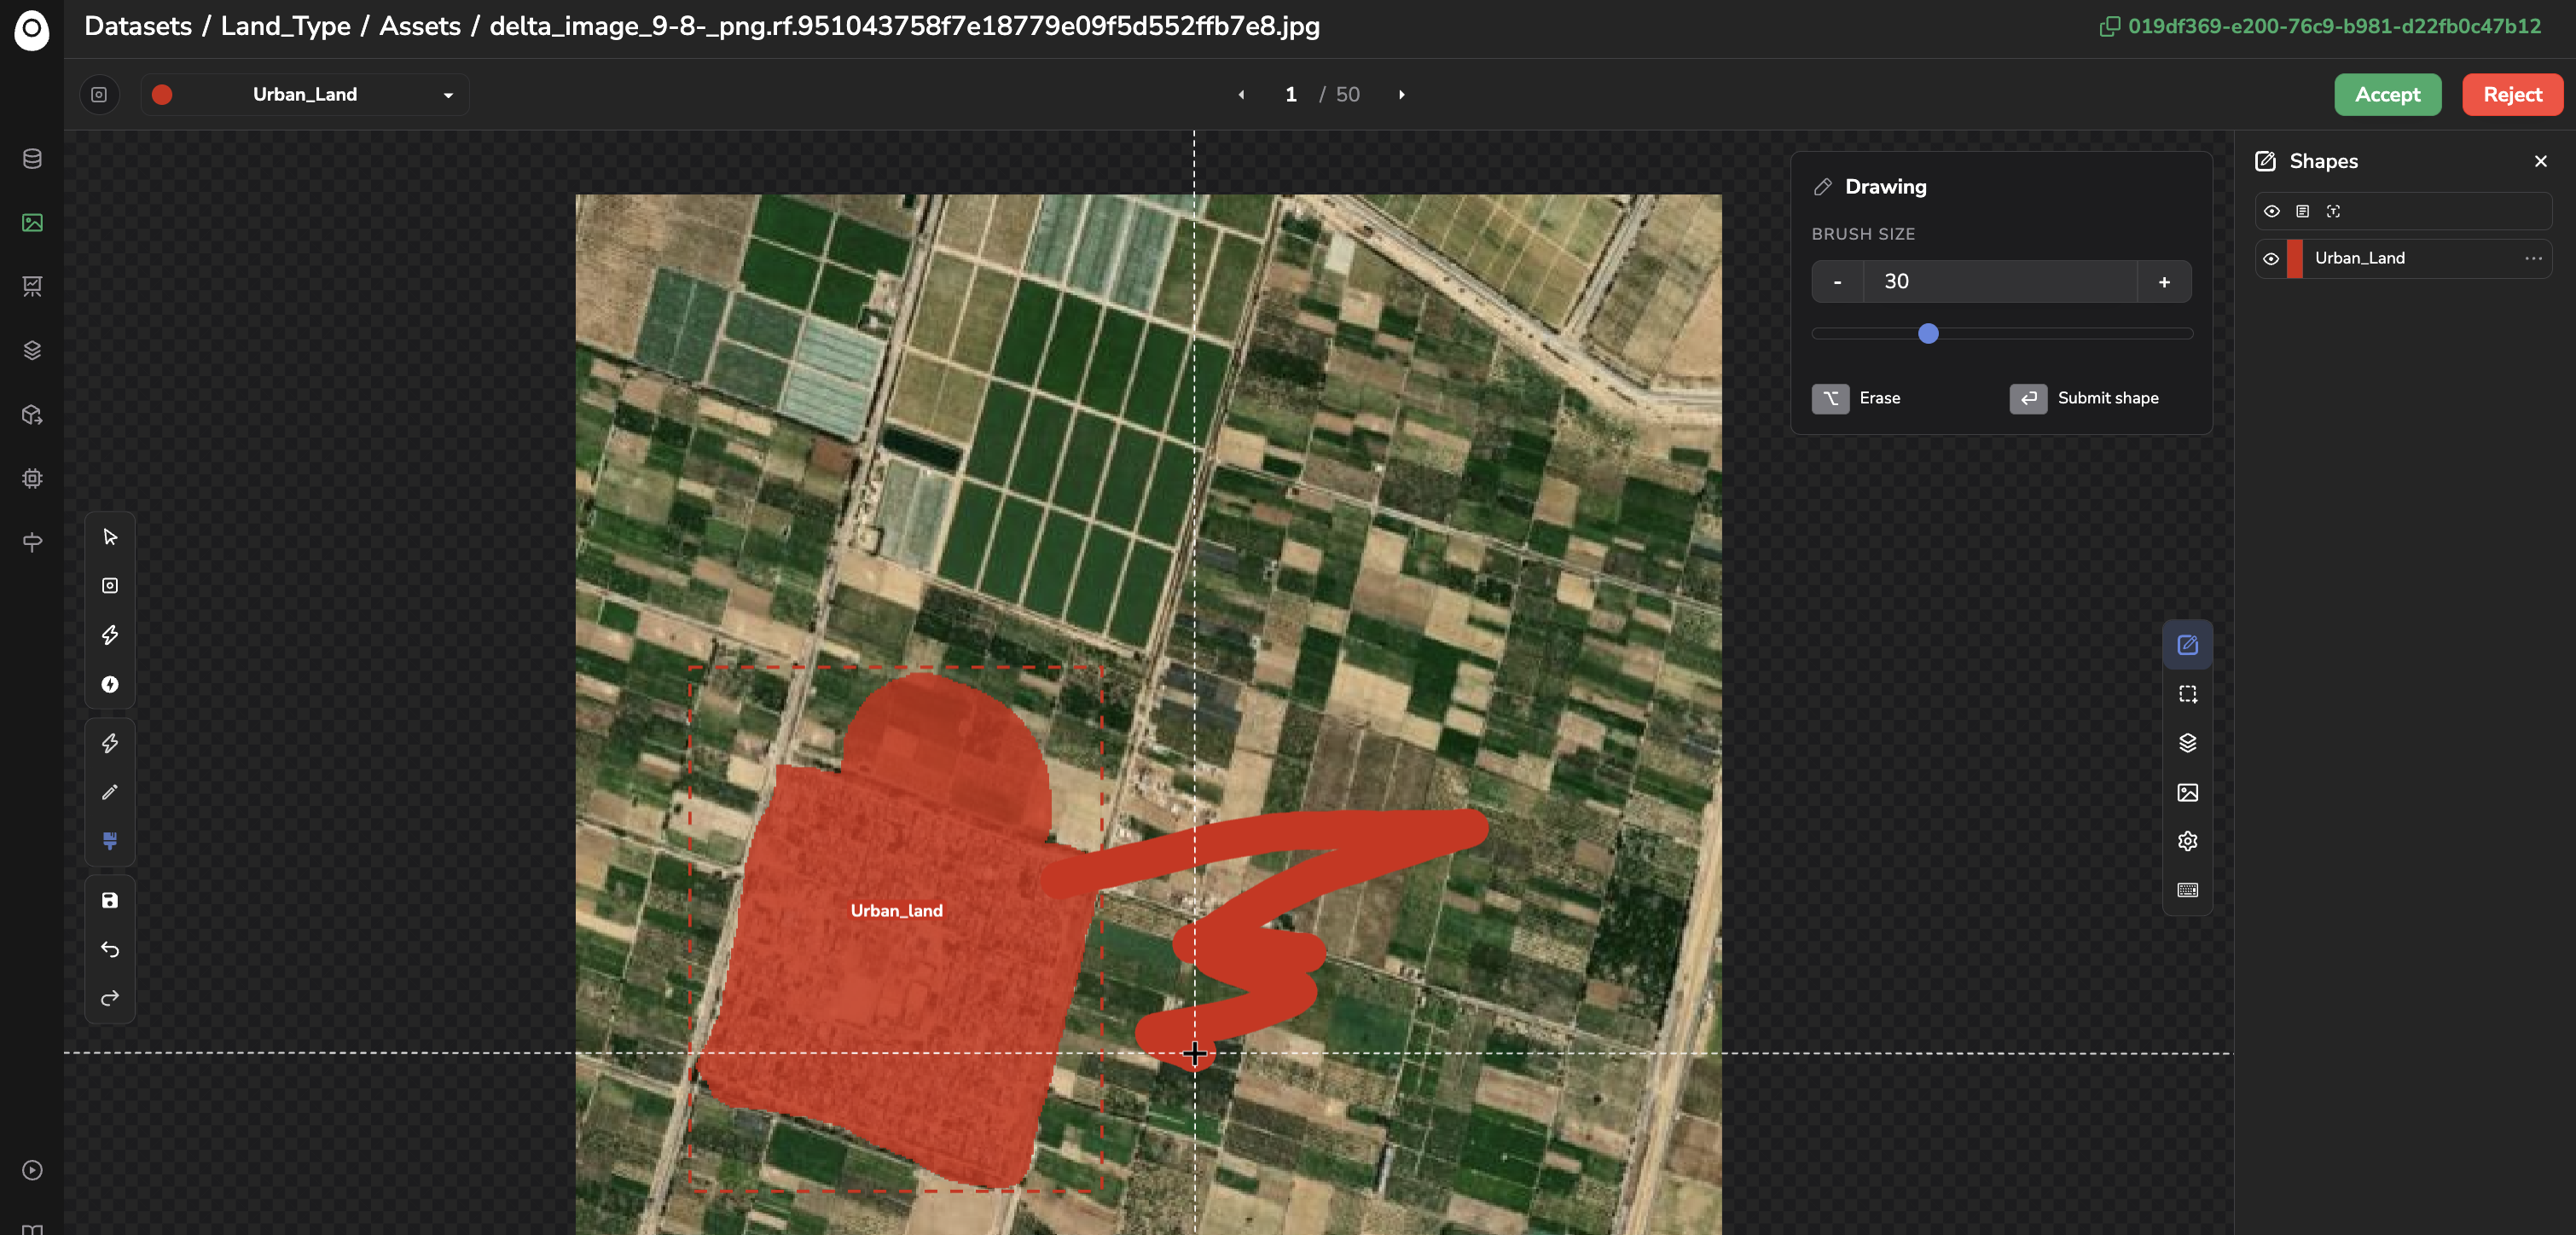
Draw mask with brush ("Shift + D" on your keyboard): Paint the mask with an adjustable brush size; here, no automatic fill-in by Picsellia; only the area drawn will be part of the mask, as with an actual brush. A small modal will appear in the top-right corner, displaying the available actions when "Draw with brush" is active. To validate your mask, you must press Enter. Once created, the Shape will be displayed in the Shapes panel.
Manual mask creation with brush
B. AI-assisted drawing (SAM3)
Mask also exposes AI-assisted tools powered by SAM3 (Segment Anything Model) that let you create one or more masks smoothly.
Tools for single mask creation
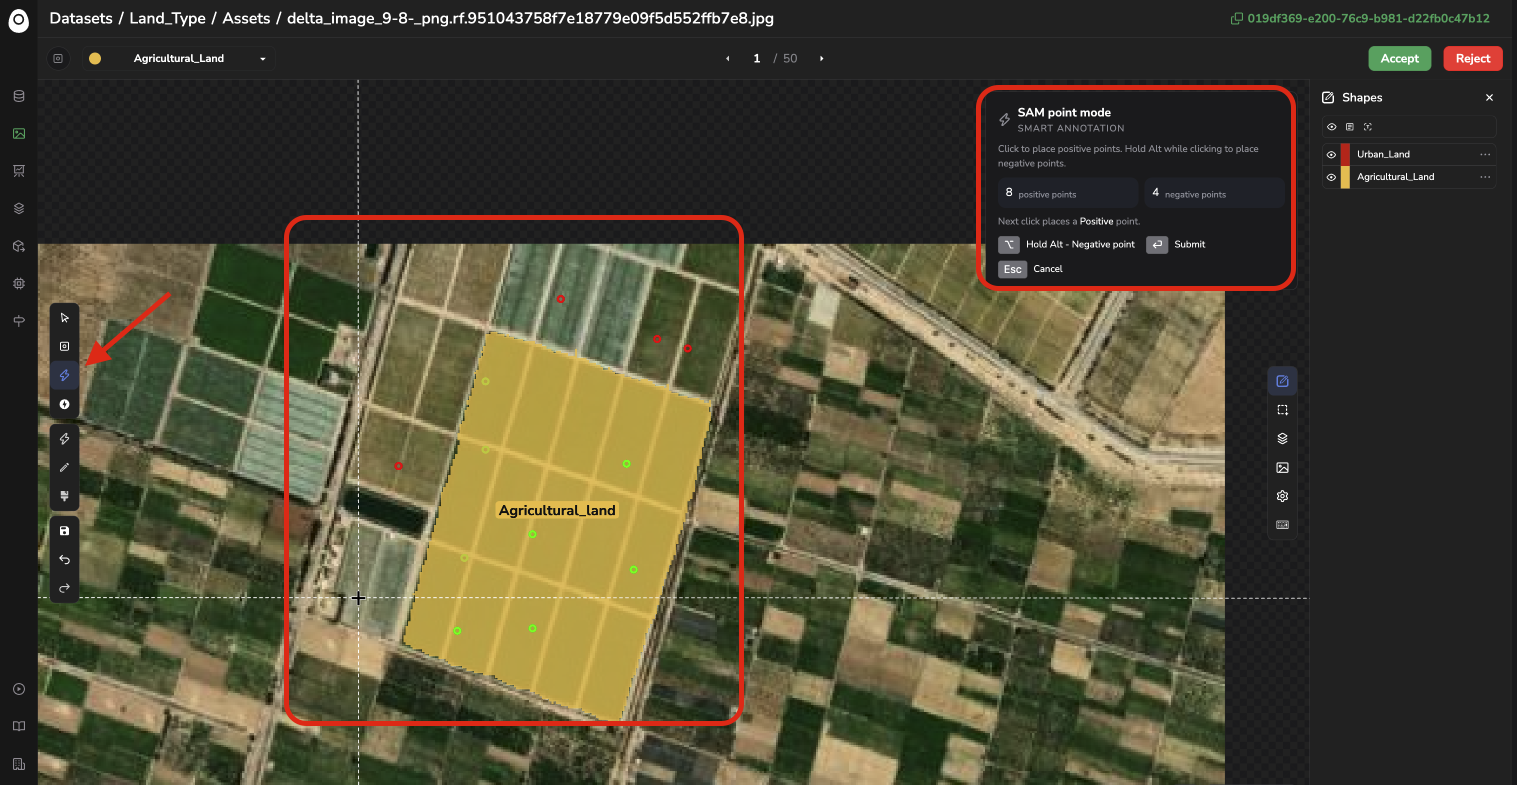
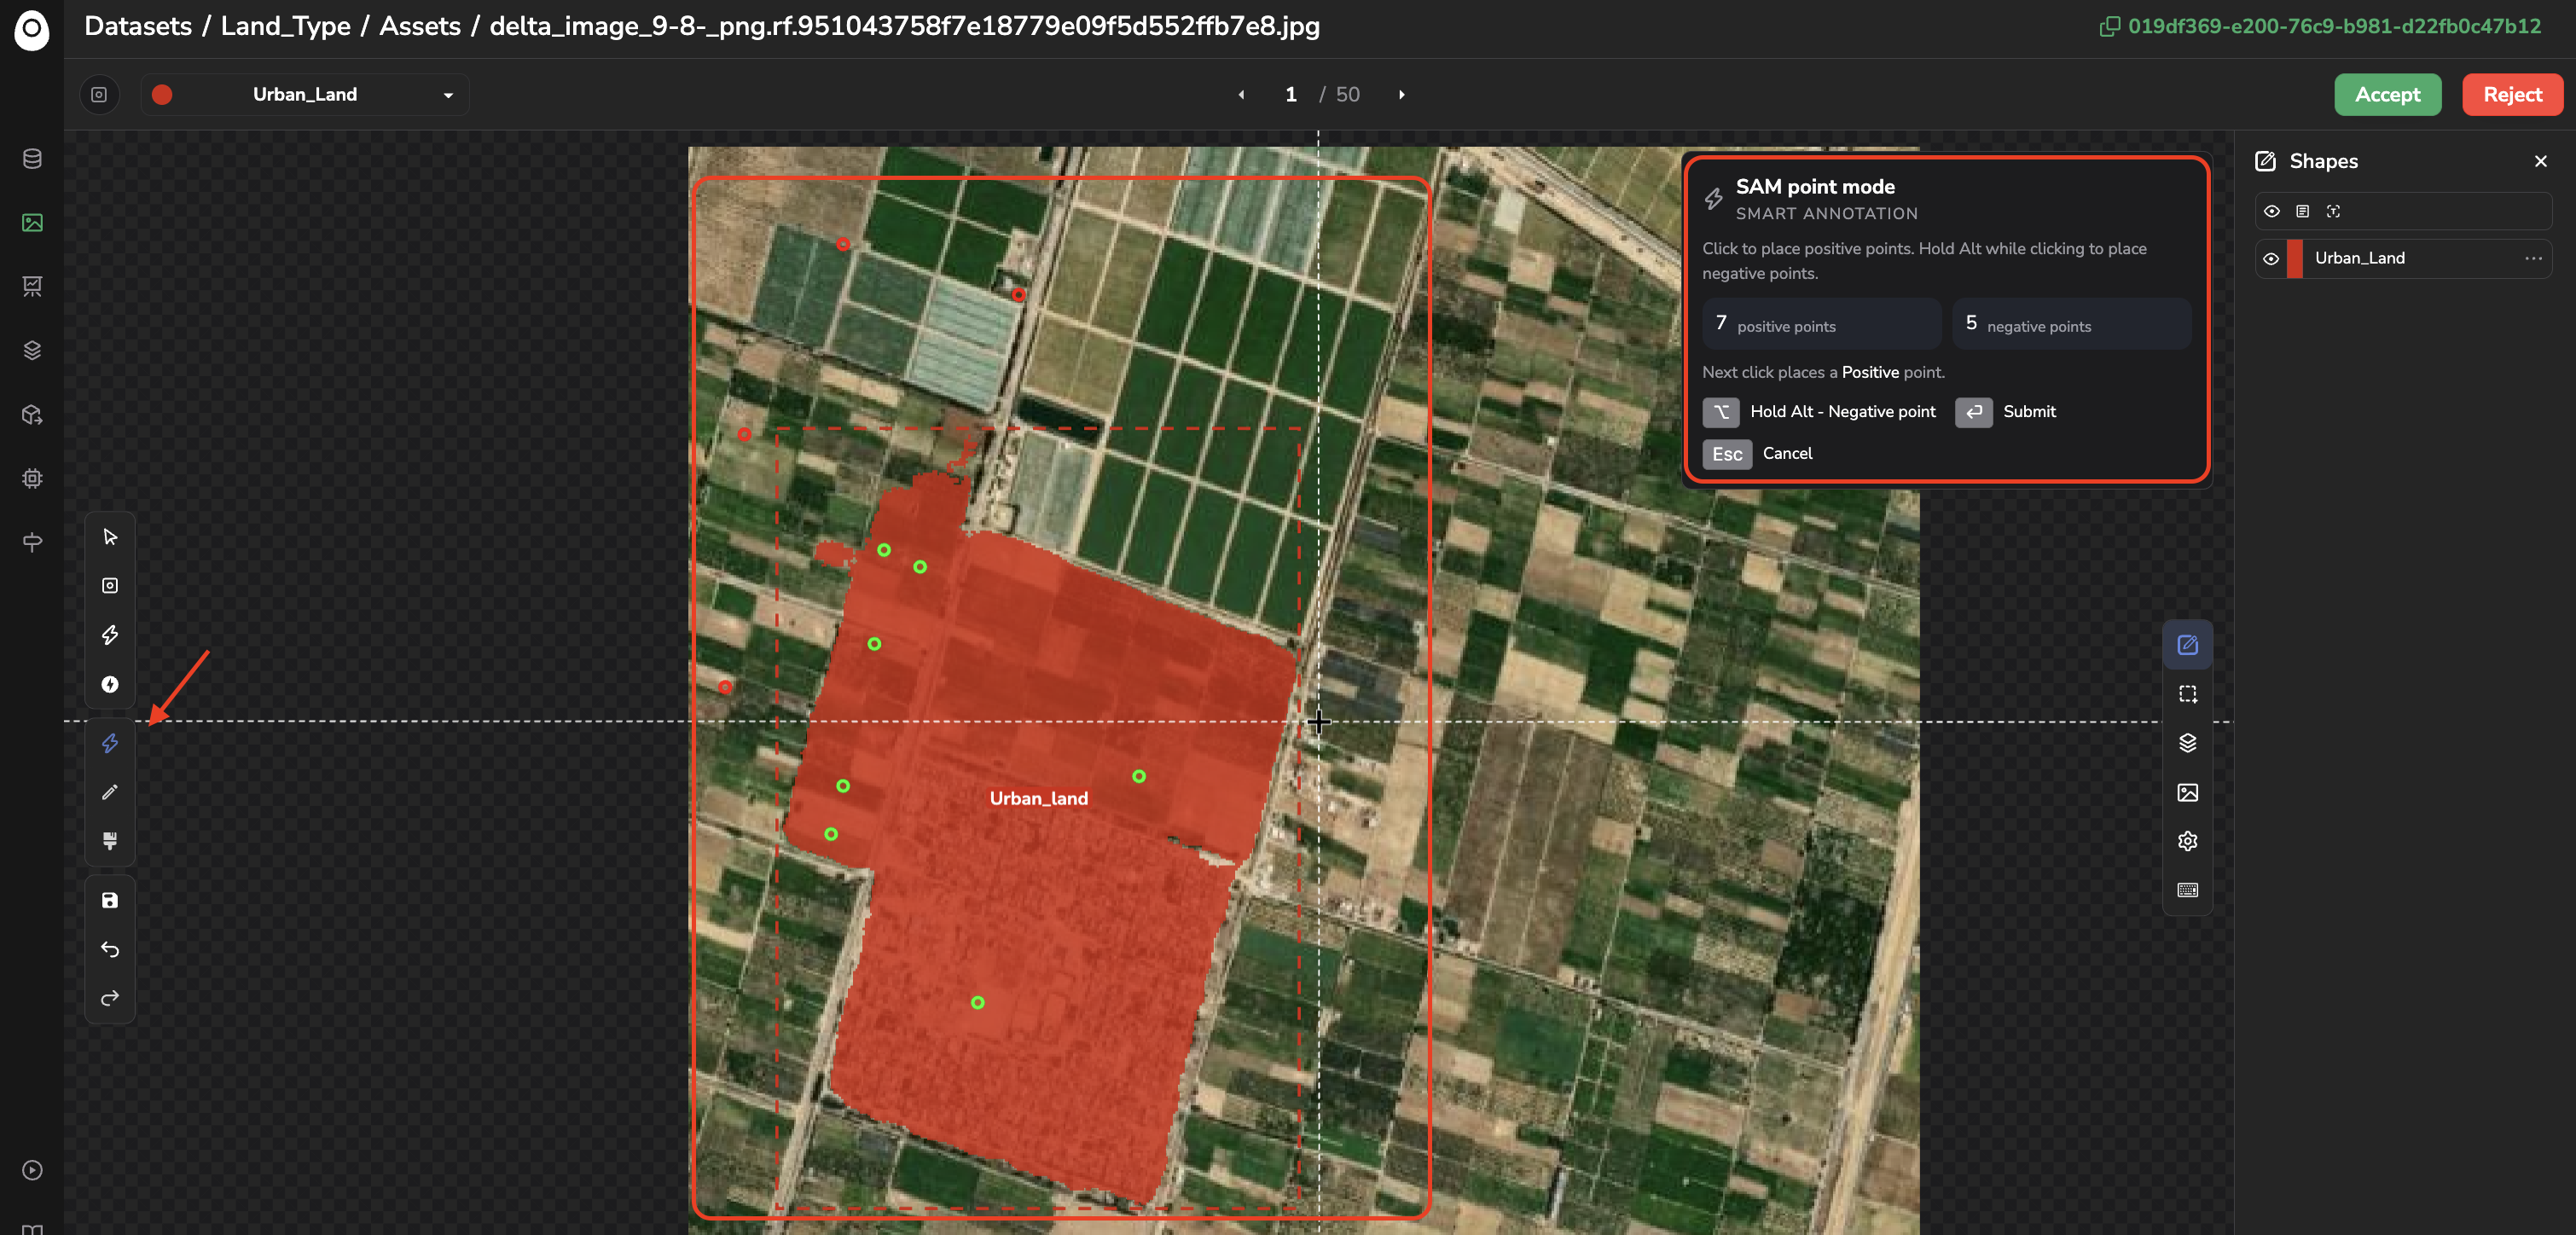
Draw mask with point ("X" on your keyboard): place several points by clicking on the object that needs to be masked and let SAM3 create the Shape around that object. Hold "Alt" while clicking to place negative points and refine the result; you can validate the Shape created by pressing Enter. The Smart Annotation modal in the top right corner is there to guide you.
Mask creation assisted by SAM3 and points as prompt
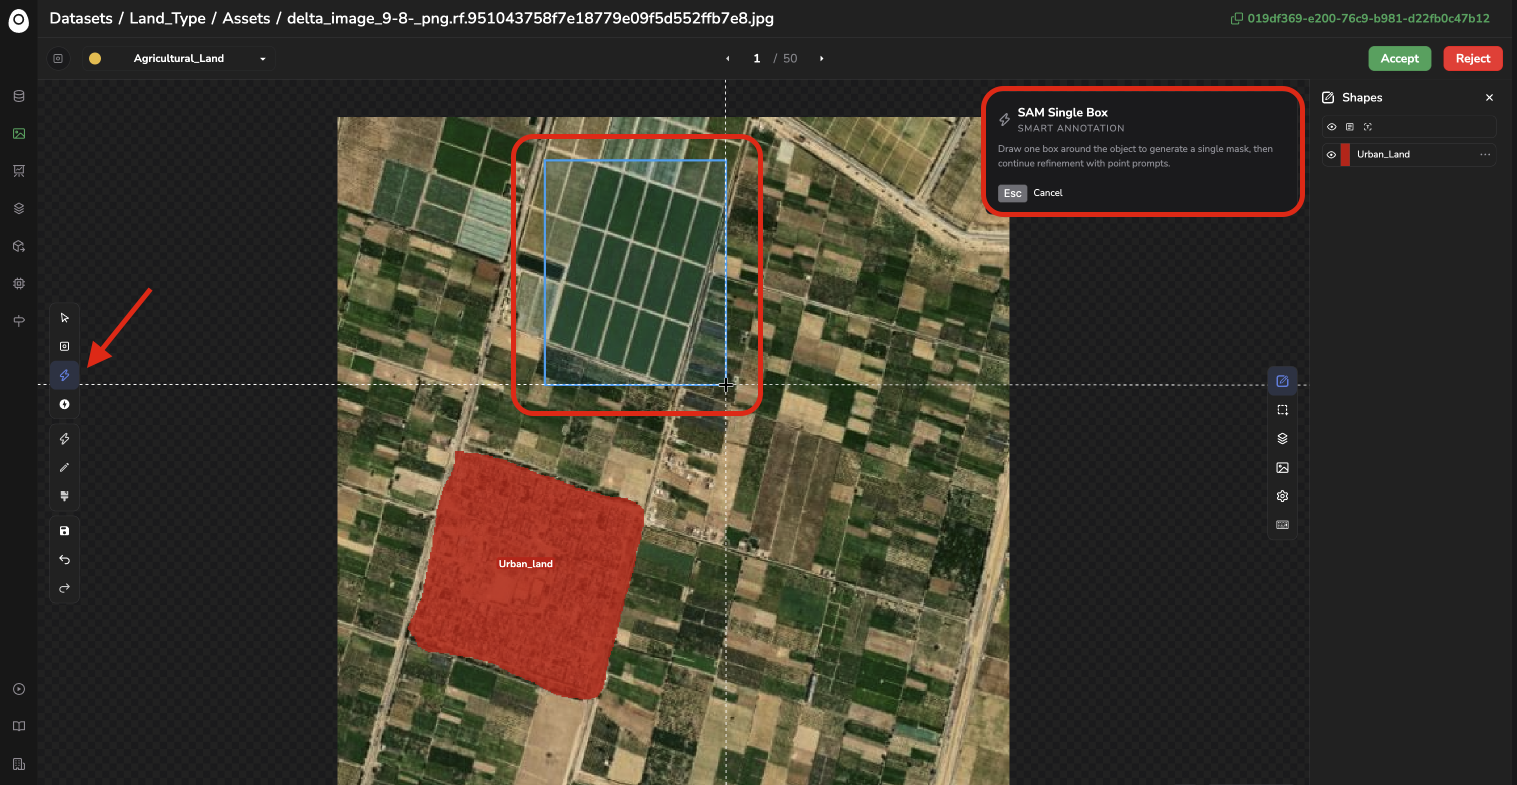
Draw mask with box ("X + 1" on your keyboard): draw a box to let the tool snap to the underlying object's contour; you can validate the Shape created by pressing Enter or adjust it by placing additional or removal points, which will be used by SAM3 to automatically adjust the mask. The Smart Annotation modal in the top right corner is there to guide you.
Mask creation assisted by SAM3 and box as prompt
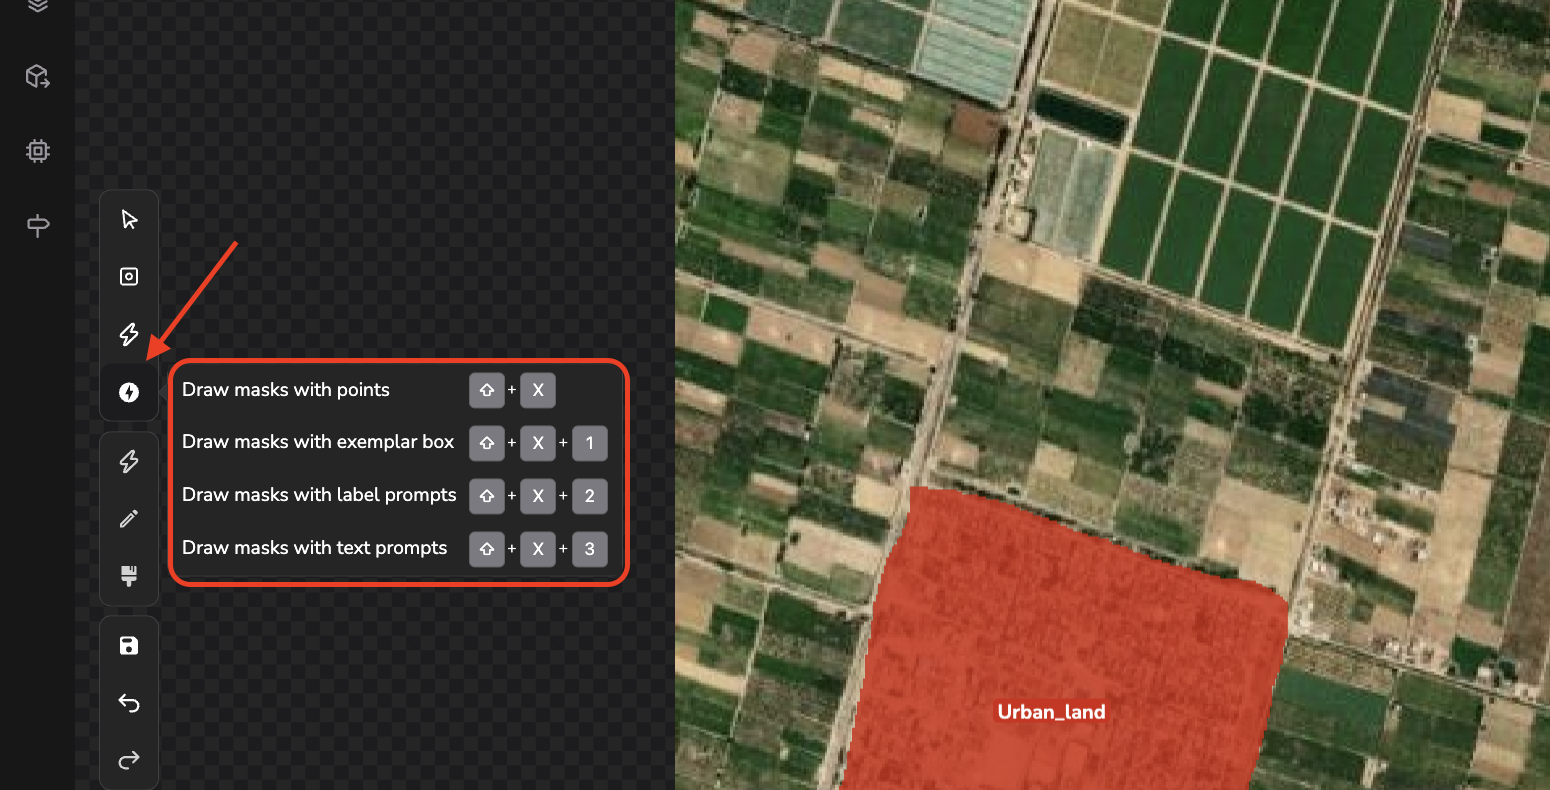
Tools for multiple masks creation
AI-assisted tools for multiple Masks creation
Draw masks with points ("Shift" + "X" on your keyboard): place several points at once to create several masks in a single call to SAM3. To do so, place one or several points on the first object to mask, and press "G" to move to the next object. Once all the points have been placed on every object that needs to be masked, press Enter to perform the call to SAM3 and display the result. The Smart Annotation modal in the top right corner is there to guide you.
Multiple Masks creation assisted by SAM3 with points as prompt
Draw masks with exemplar box ("Shift" + "X" + "1" on your keyboard): draw a single bounding box example around one instance of the object, and the model proposes masks around that object and every other similar instance found on the Asset. The Smart Annotation modal in the top right corner is there to guide you.
Multiple Masks creation assisted by SAM3 with box as prompt
Draw masks with label prompts ("Shift" + "X" + "2" on your keyboard): pick an existing Label as the prompt, and the model proposes masks around every instance of that Label it finds on the Asset. The Smart Annotation modal in the top right corner is there to guide you.
Multiple Masks creation assisted by SAM3 with Label names as prompt
Draw masks with text prompts ("Shift" + "X" + "3" on your keyboard): type a free-form text description (e.g. "a crack") and the model proposes masks around every matching object on the Asset, without needing an existing Label or example box. This open-vocabulary, text-promptable capability is the main addition SAM3 brings over SAM2. The Smart Annotation modal in the top right corner is there to guide you.
Multiple Masks creation assisted by SAM3 with free-text as prompt
In every case, you can then review, adjust, or discard each proposed mask before it is added to the Annotation.
Whatever the tool used to create the mask, once created, the Shape will be displayed in the Shapes panel.
C. Mask editing
As with Segmentation, AI-proposed masks can be reviewed, adjusted, or discarded. Unlike Segmentation, where a Shape is always a single connected polygon, a Mask Shape can be made of several distinct, non-contiguous groups of pixels (for instance, an object partially hidden behind another one) while still counting as one single instance under one Label. This is what editing a mask, rather than a polygon, is about: adding or removing pixel groups without needing them to stay connected to one another.
Once a mask is drawn, it can also be adjusted by selecting it and using one of the following tools:
Tools available for Mask editing
Add or remove pixels with the pencil ("E" / "Shift + E" on your keyboard): paint additional pixels onto the selected mask pixel by pixel to extend it, or erase existing pixels to shrink it, following your cursor.
Pen tool to edit selected Mask
Add or remove pixels with the brush ("Cmd + E" / "Cmd + Shift + E" on your keyboard): same principle as the pencil, with an adjustable brush size for broader strokes.
Brush tool to edit selected Mask
Edit mask with SAM ("E + X" on your keyboard): select an existing mask and let SAM3 refine its contour automatically by clicking on the areas that need to be added to the selected mask; hold "Alt" and click to remove parts of the selected mask instead. You can press Enter to finalize the edit. The Smart Annotation modal in the top right corner is there to guide you.
SAM3 tool to edit selected Mask
Besides being able to adjust the mask, you can also right-click on it to perform any available action (change label, fill in the Text field, adjust opacity, lock...) as described here.
5. Point
For a DatasetVersion in Point mode, the Annotation tool allows you to create point Shape.
To do so, make sure drawing mode is enabled ("D" by default on your keyboard); each click creates a new point Shape.
Once created, the Shape is added to the Shapes panel; you can then right-click on it to perform any available action (change label, fill in the Text field, adjust opacity, lock...) as described here.
6. Line
For a DatasetVersion in Line mode, the Annotation tool allows you to create line Shape.
To do so, make sure drawing mode is enabled ("D" by default on your keyboard); the first click creates the beginning of the line, then each new click creates a new segment of the line, and a double-click closes the line Shape.
Once created, the Shape is added to the Shapes panel; you can then right-click on it to perform any available action (change label, fill in the Text field, adjust opacity, lock...) as described here.
As with a polygon, a line can be right-clicked to Simplify it, which reduces its number of points — useful after a freehand drawing — following the Polygon simplification factor set in the Settings panel. The first and last point of the line are always kept.
7. Keypoint
For a DatasetVersion in Keypoint mode, the Annotation tool allows you to annotate an Asset with a Skeleton: a structured set of points (vertices) connected by edges, all attached to a single Shape with a given Label.
A. Define a Skeleton on a Label
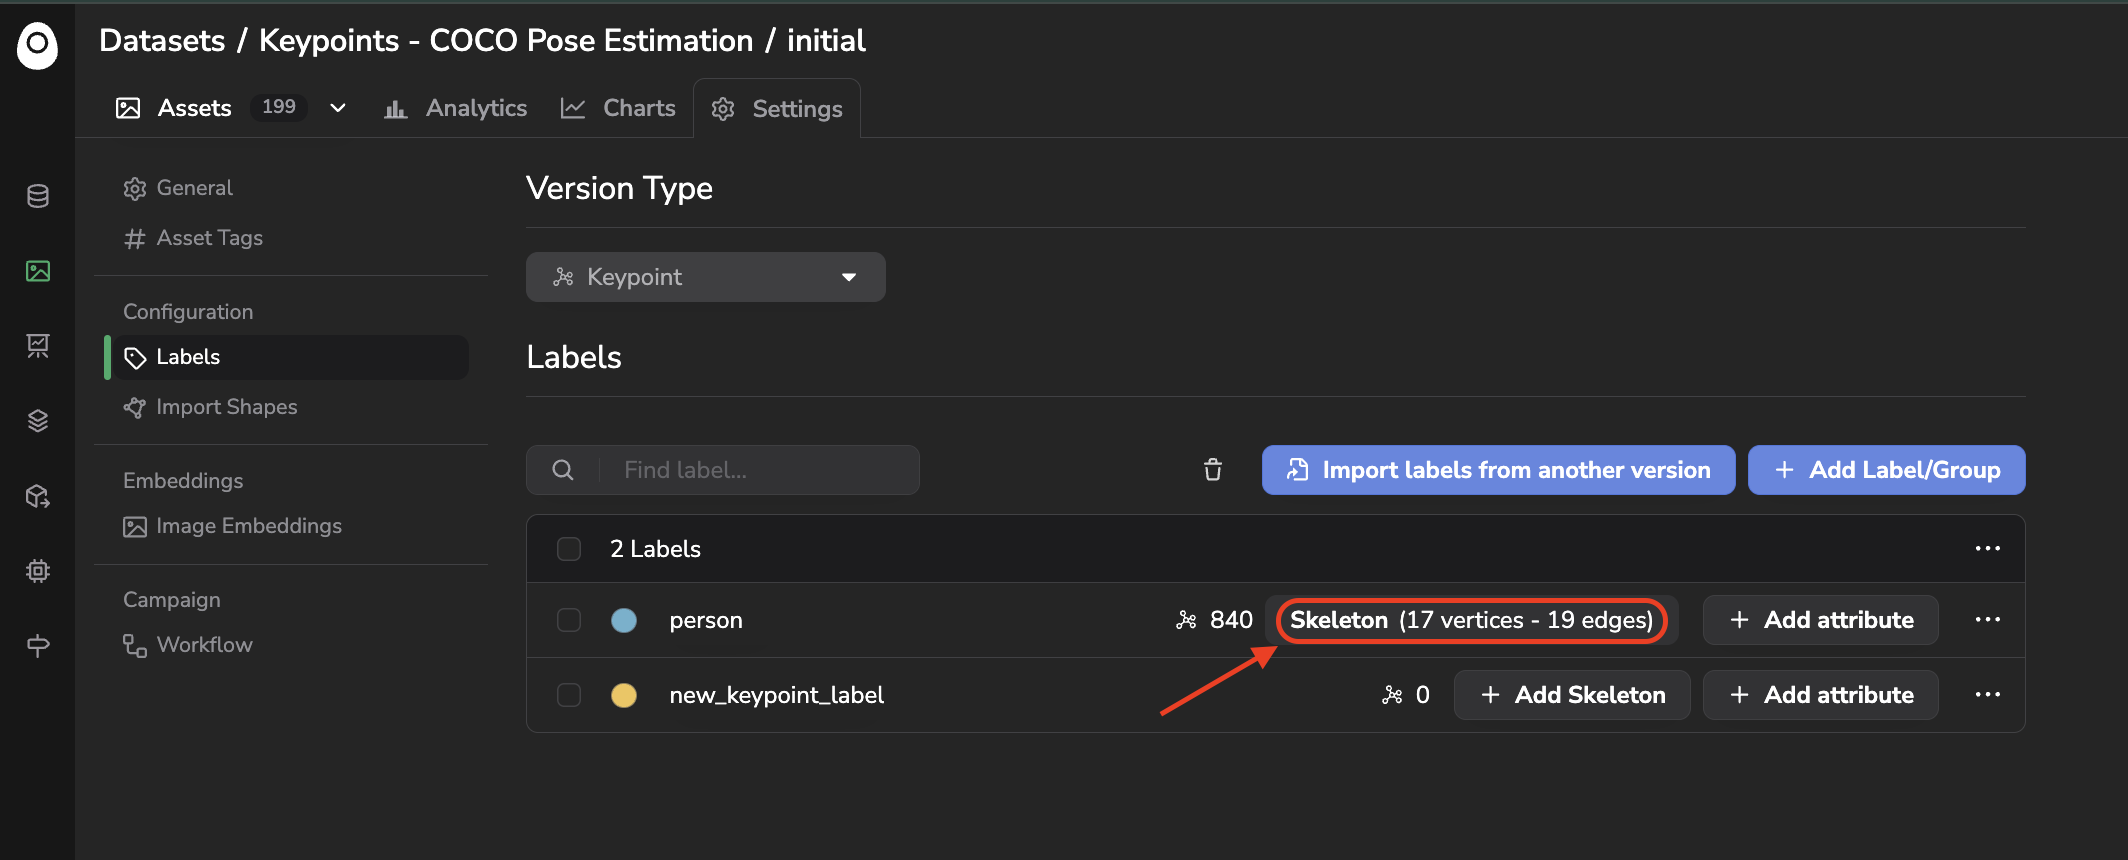
Before you can annotate with a Skeleton, it must be configured on the Label you'll use: its list of vertices, and the edges connecting them (for instance, a 17-vertex, 19-edge human-pose skeleton for COCO-style pose estimation).
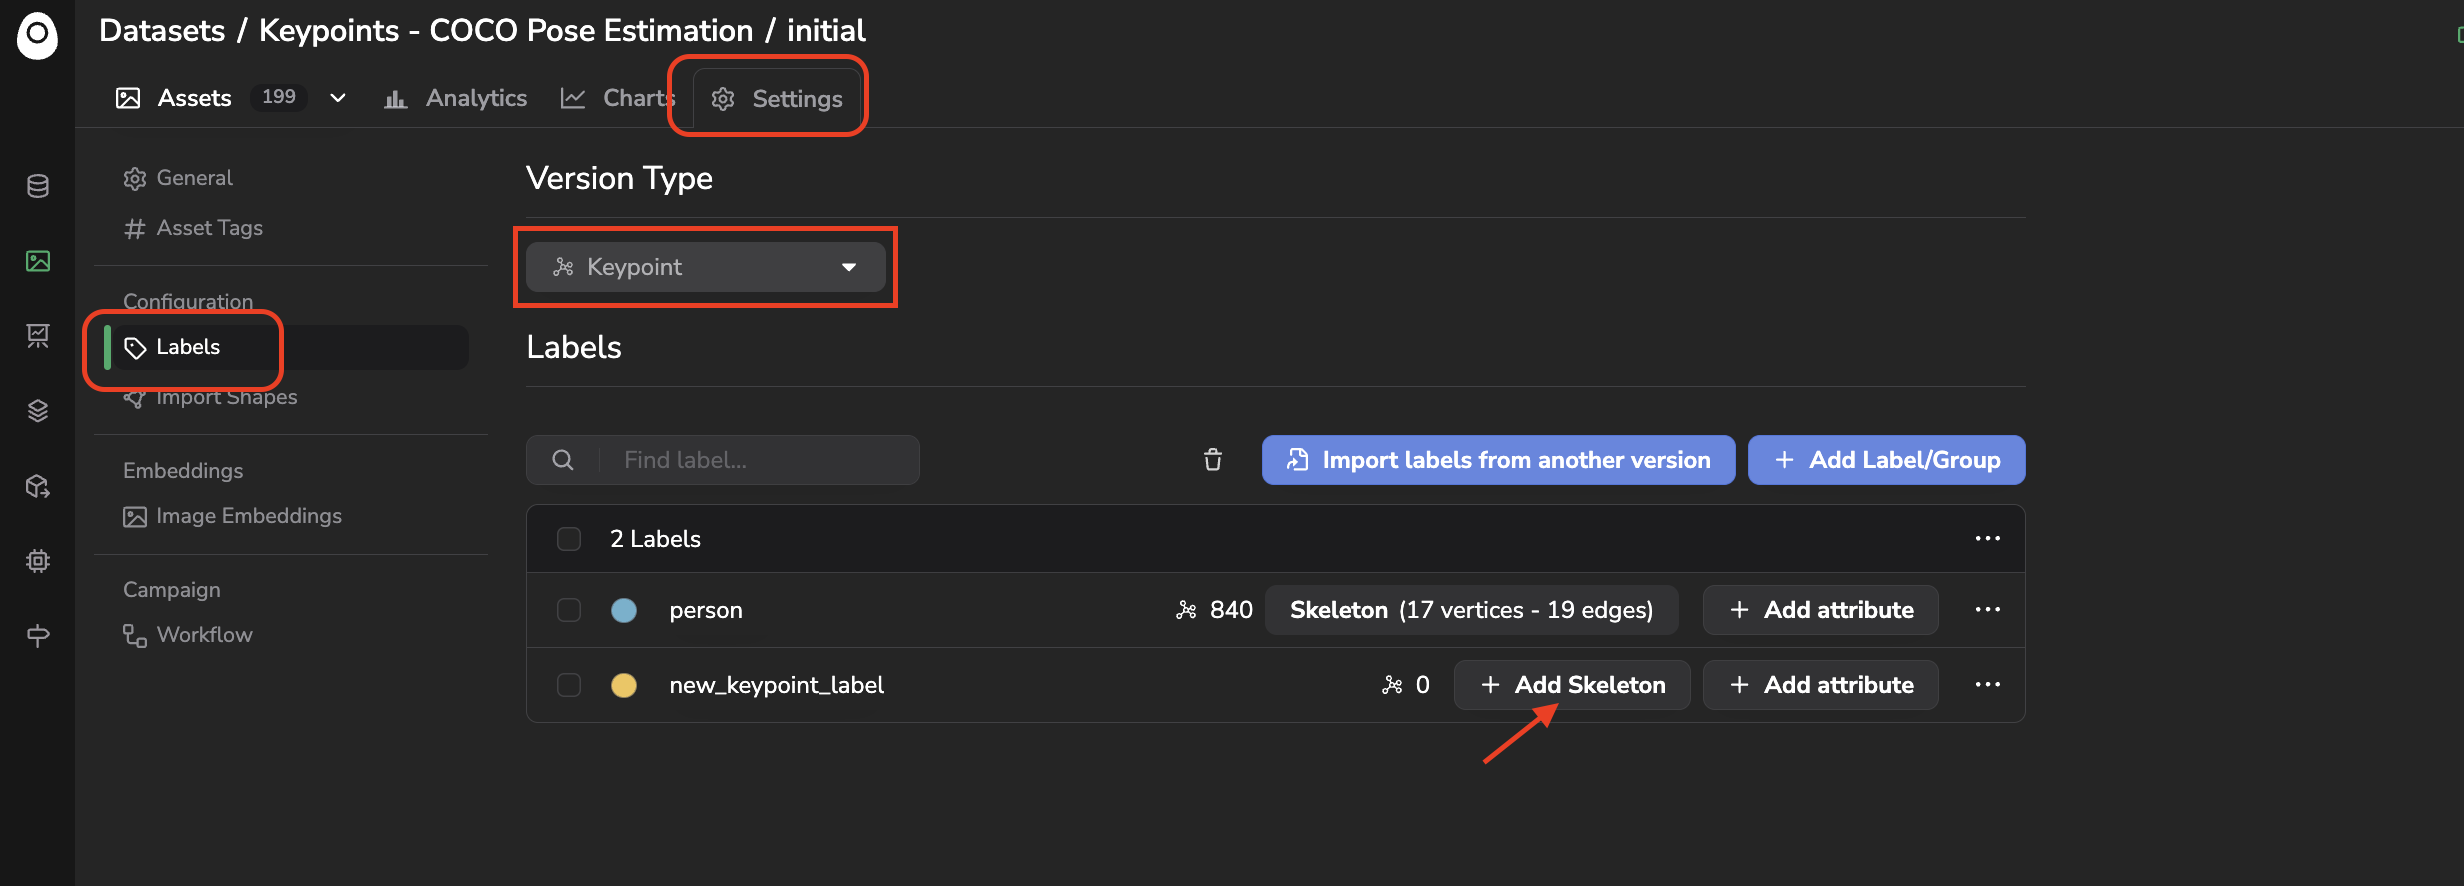
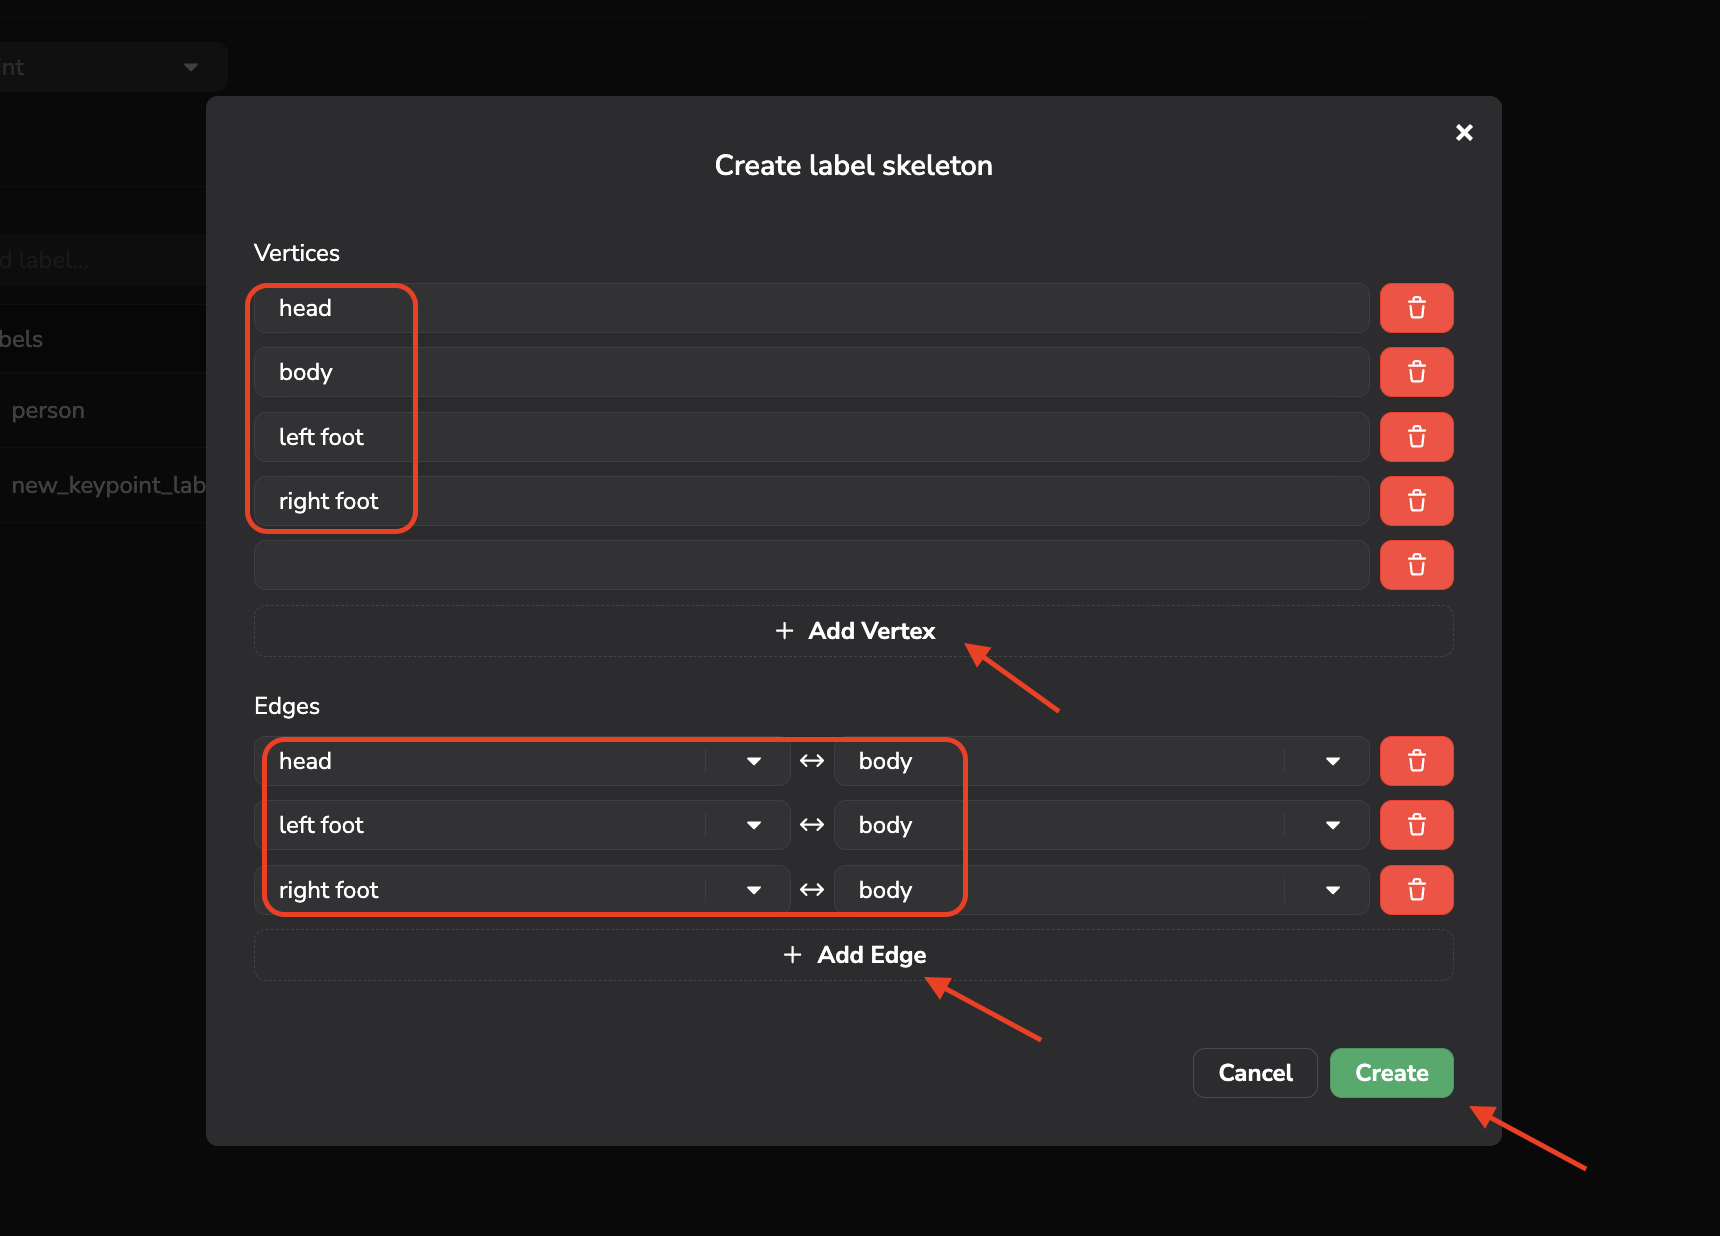
This is done from the Labels tab of the DatasetVersionSettings, through the Add Skeletons action in the Label options menu, where you define every vertex and the edges between them.
Initiate the configuration of a Skeleton related to a Label in a Dataset with Keypoint Version type
Create Vertices and Edges to configure your Skeletons
This step is crucial: the Skeleton configuration of a given Label determines how you create a Shape with that Label in the Annotation tool.
📘
Edit a Skeleton
Once the Skeleton is configured, it can be edited at anytime by clicking on it as shown below:
Edit Skeleton
B. Draw a Skeleton vertex by vertex
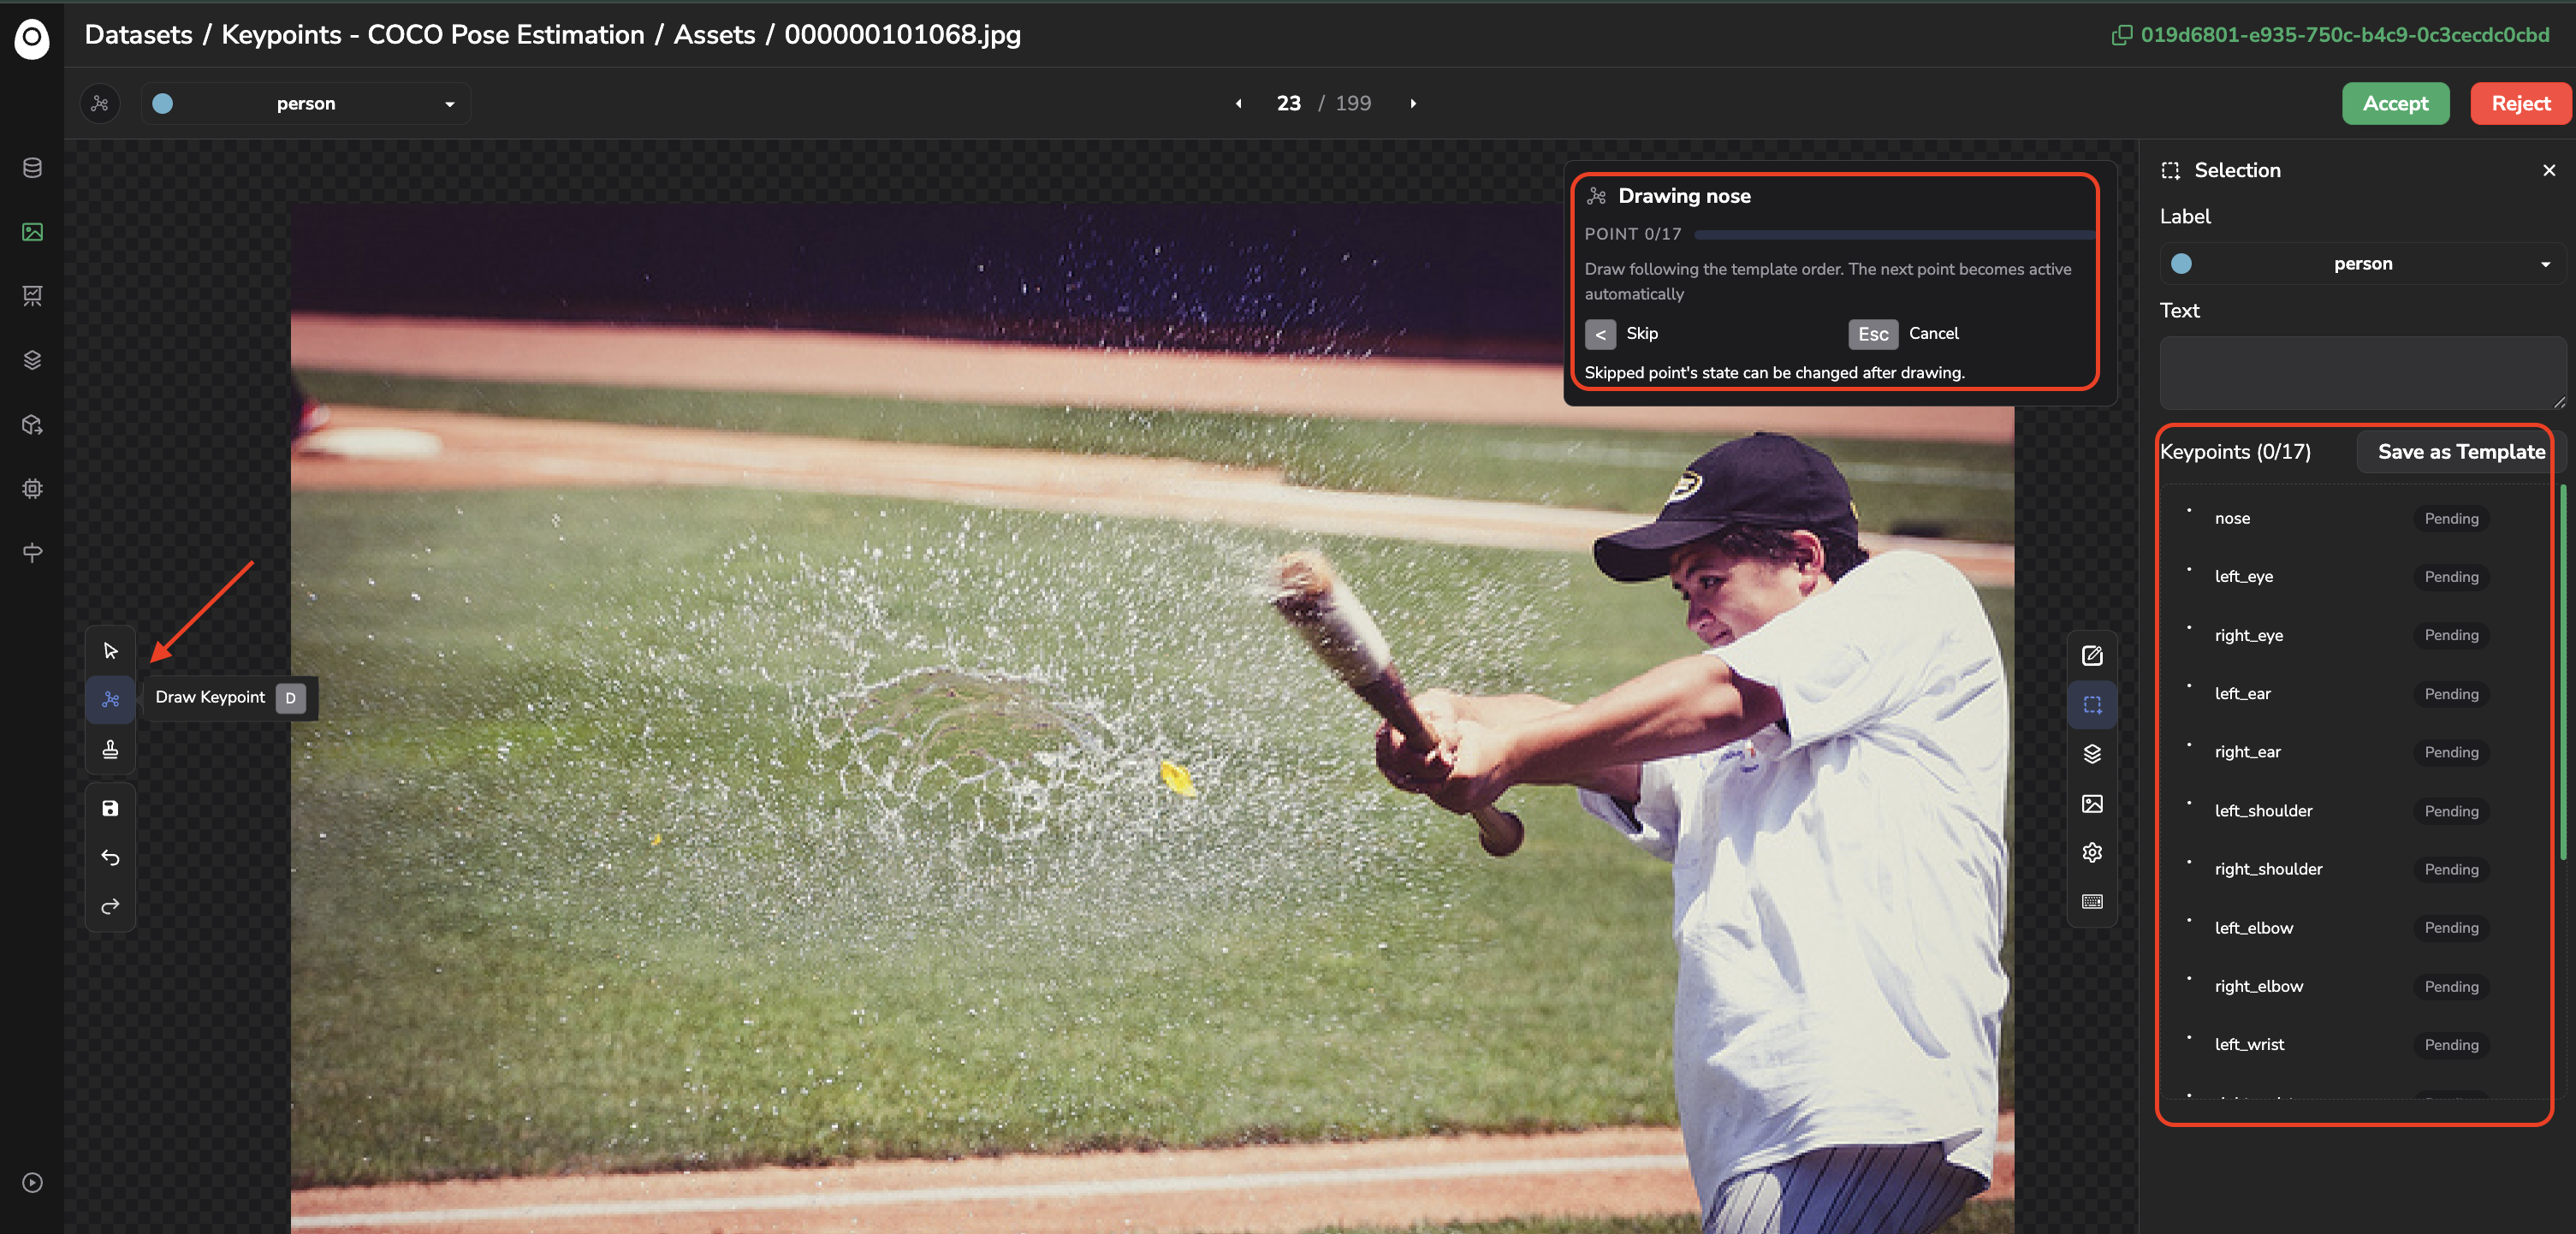
Once a Label has a Skeleton configured, you can reach the Annotation tool. Here, you can select the Draw Keypoint tool ("D" on your keyboard by default), which lets you place its vertices one by one by clicking on the image, following the order defined in the Skeleton configured for the active Label.
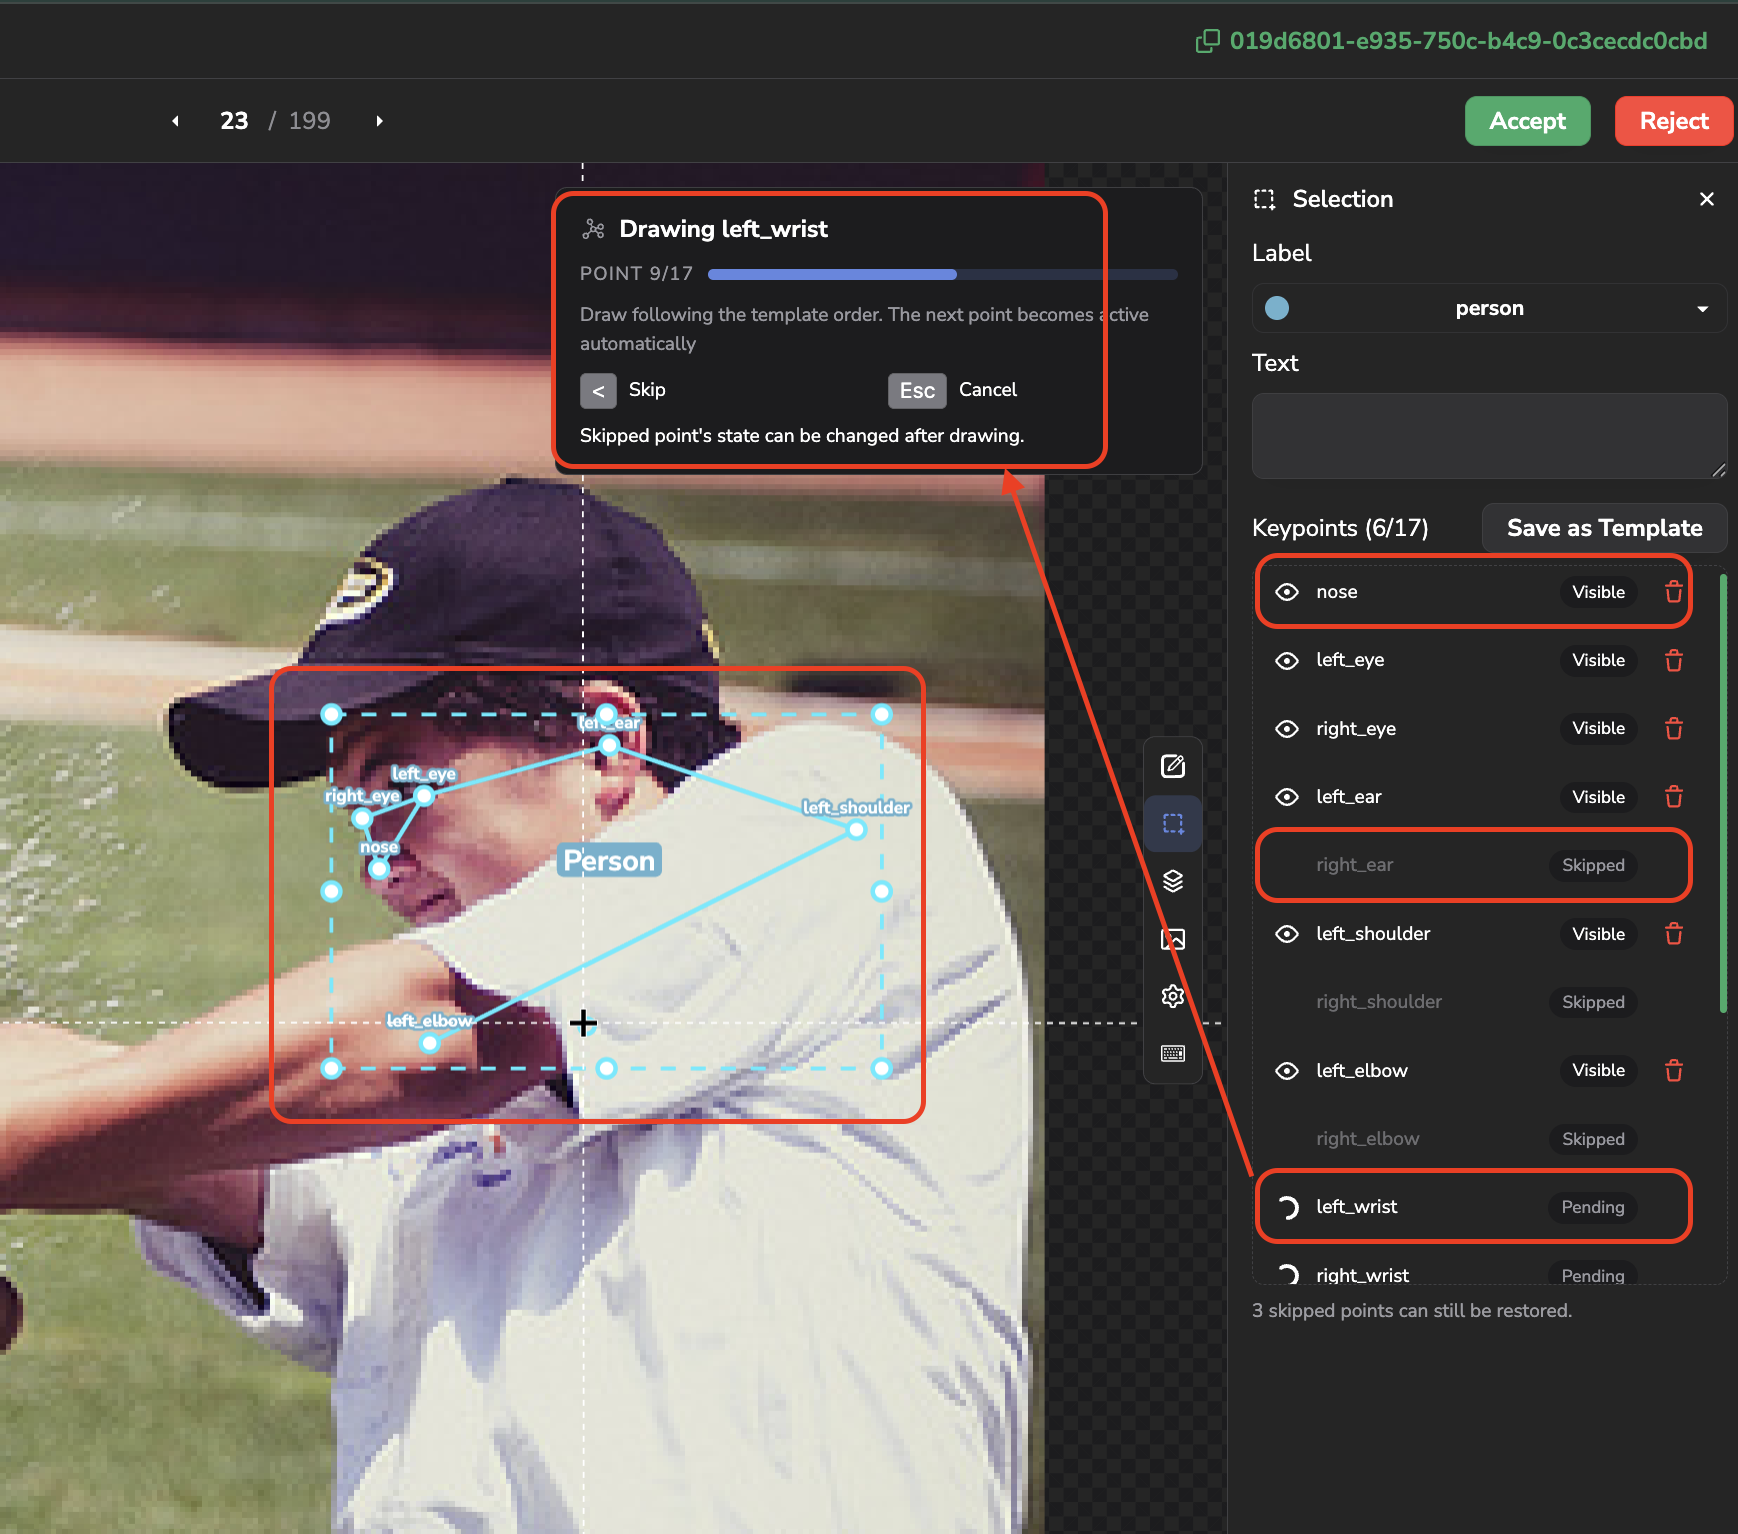
A guide in the top-right corner tracks your progress (Drawing <vertex name>, Point n/N) and automatically switches to the next vertex after each click. As soon as both vertices of an edge are placed, Picsellia draws that edge automatically, matching the Skeleton's configuration — you never need to draw an edge yourself.
If a vertex doesn't apply to the current Asset (for instance it falls outside the frame), click Skip instead of placing it; its state can be changed after the Skeleton is fully drawn.
Once all the points of the Skeleton have been placed (or skipped), the Shape is automatically completed.
You can also validate the Shape before all the points have been placed or skipped, by pressing Enter at any time in drawing mode.
C. Speed up drawing with a Skeleton template
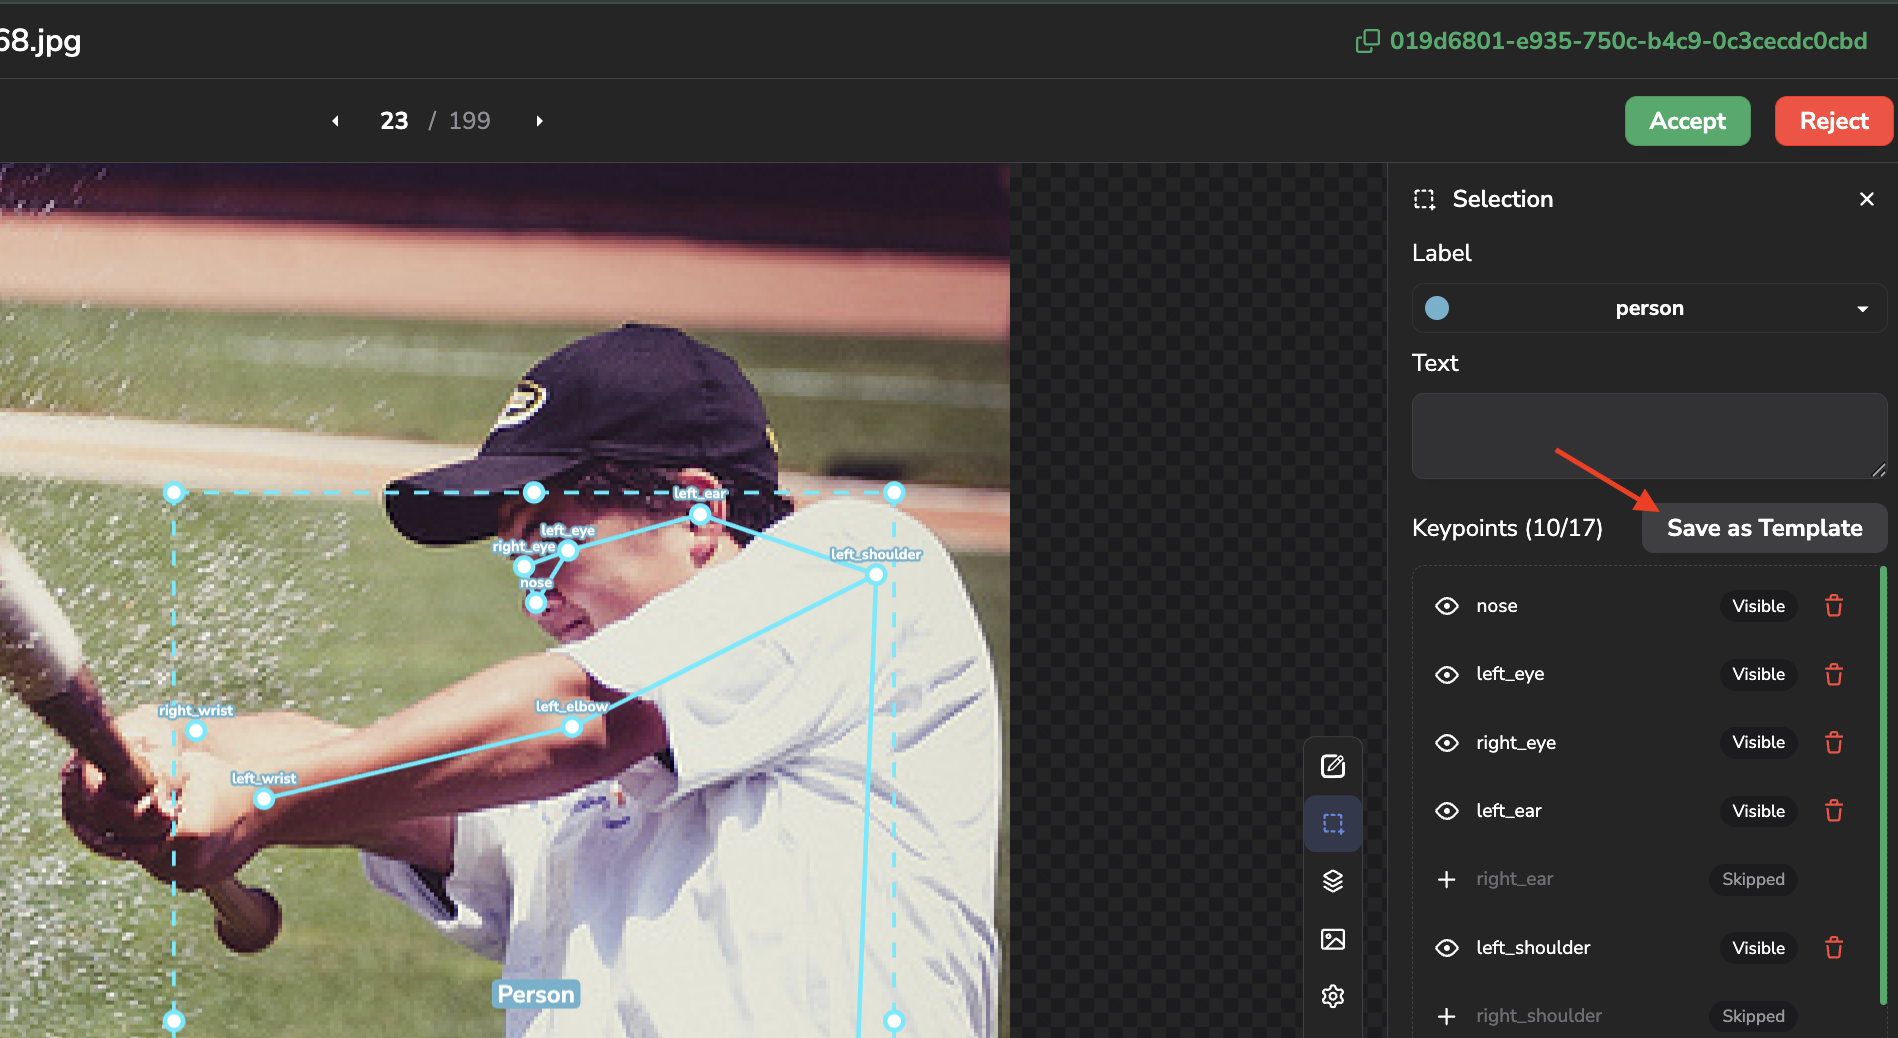
Drawing a complex Skeleton vertex by vertex every time can be slow. To make it faster, once you've fully drawn one instance of a Skeleton, you can click Save as Template in the Selection panel: you'll be asked to give a name to this template, this one will be then stored (every vertex and edge, at their relative position, including any vertex you marked as skipped) as a reusable template.
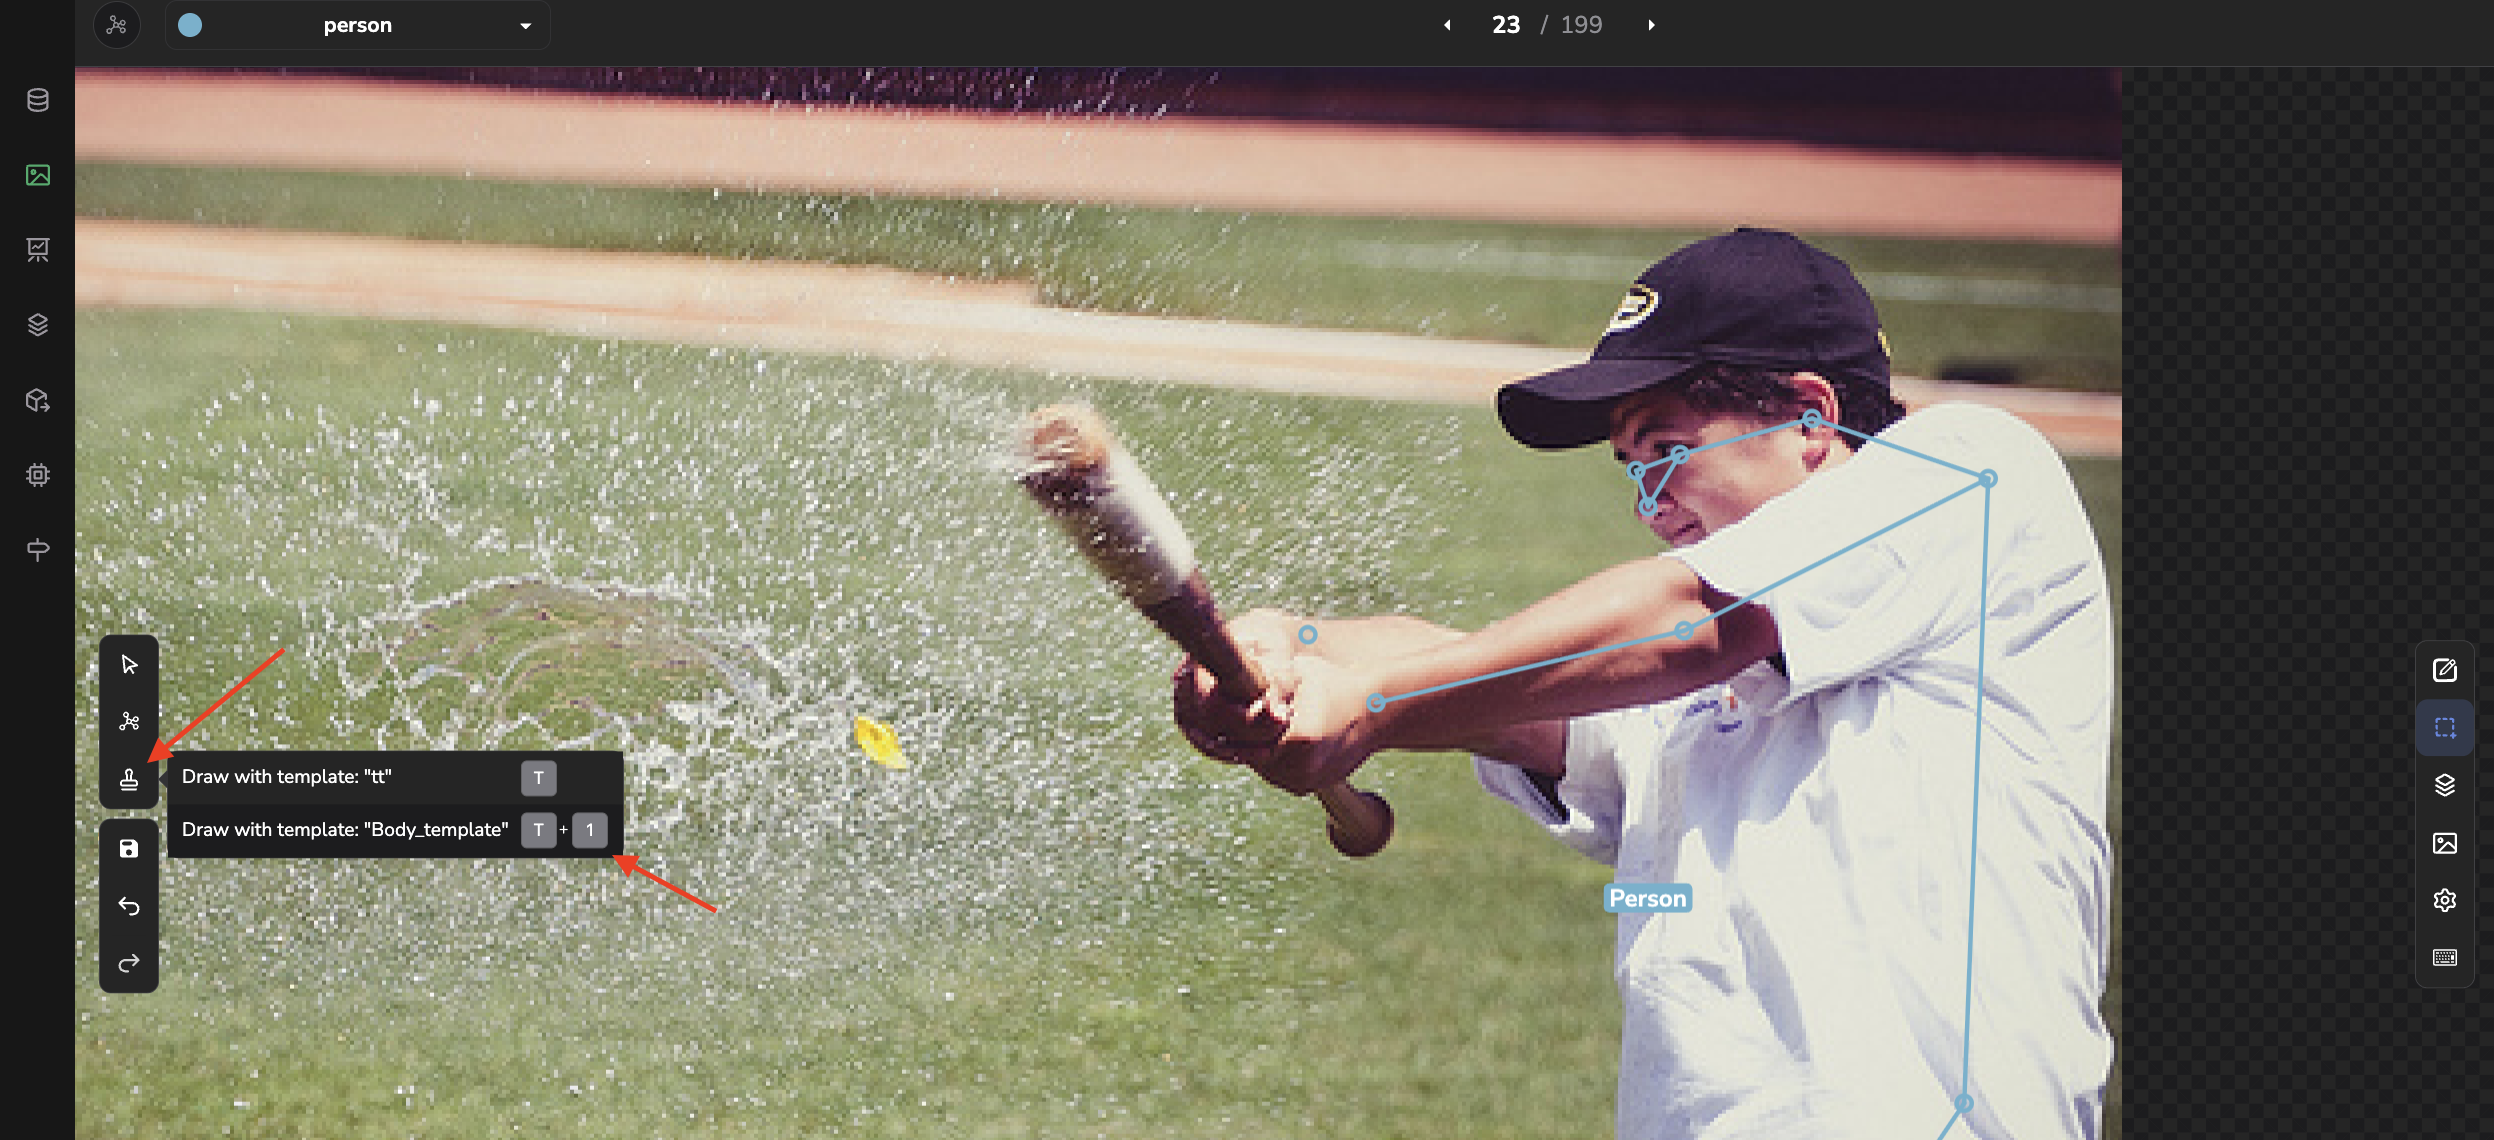
The Draw with template tool ("T" on your keyboard by default) then lets you place that template in a single gesture: click and drag on the Asset to position and size the whole Skeleton at once, instead of building it from scratch vertex by vertex. Once placed, only the position of a few individual vertices is typically left to adjust to match the Asset. Up to ten templates can be saved and selected using the Digit keys.
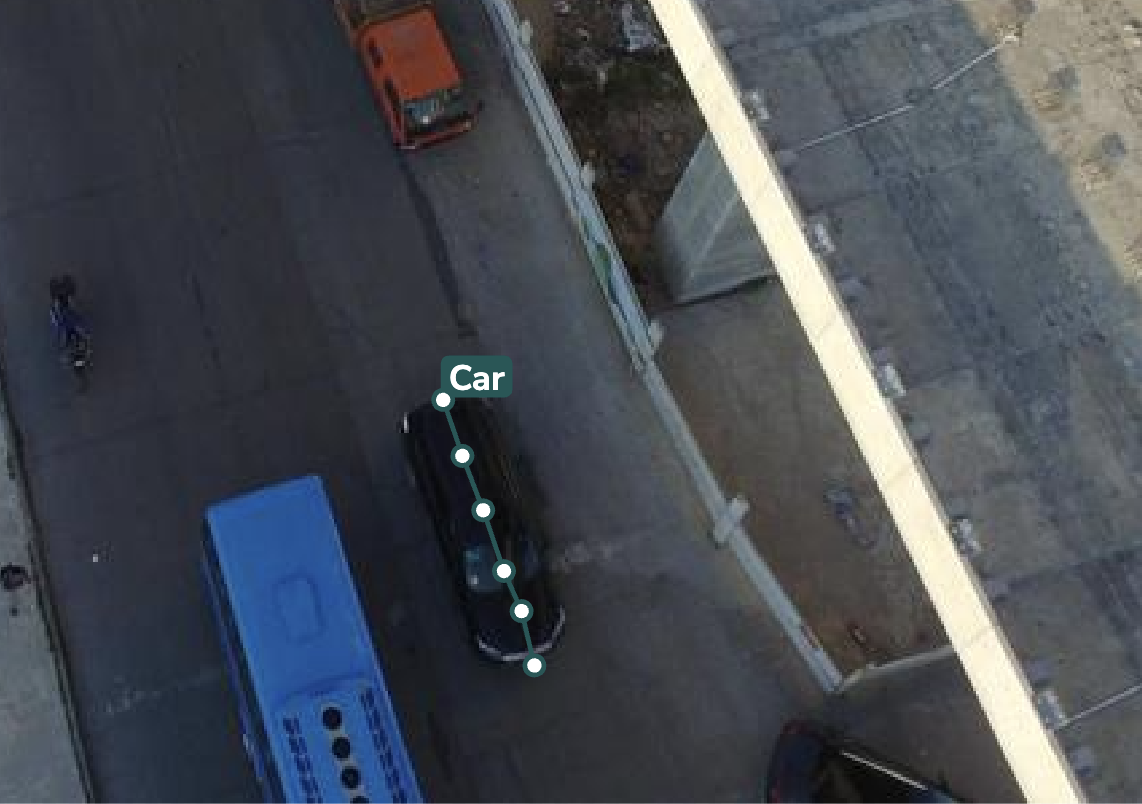
Using a template to create a Skeleton
D. Skeleton editing
Once a Skeleton is drawn — vertex by vertex or via a template — it can be edited the same way regardless of how it was created: select it and either drag the whole Shape at once to reposition it entirely, or manually reposition any individual vertex composing it, exactly like adjusting the points of a polygon.
Each vertex's state (occluded, placed, or skipped) can also be changed independently at any time, for instance to mark a vertex as skipped if you notice after drawing that it doesn't apply to the current Asset.
Once created, the Shape is added to the Shapes panel; you can then right-click on it to perform any available action (change label, fill in the Text field, adjust opacity, lock...) as described here.