For AI agents: the docs index is at https://documentation.picsellia.com/llms.txt. Append .md to any documentation page URL to get its markdown version.
A few seconds of video already represent hundreds of frames, and annotating each one by hand is out of reach for any Computer Vision team. When a DatasetVersion contains video Asset, the Annotation tool switches to a dedicated video interface: instead of a single static image, you work on a timeline of frames, and a Shape follows an object across many frames as a Track. You only place the Shape where the object visibly changes position, and Picsellia fills in the frames in between.
1. Access the video Annotation tool
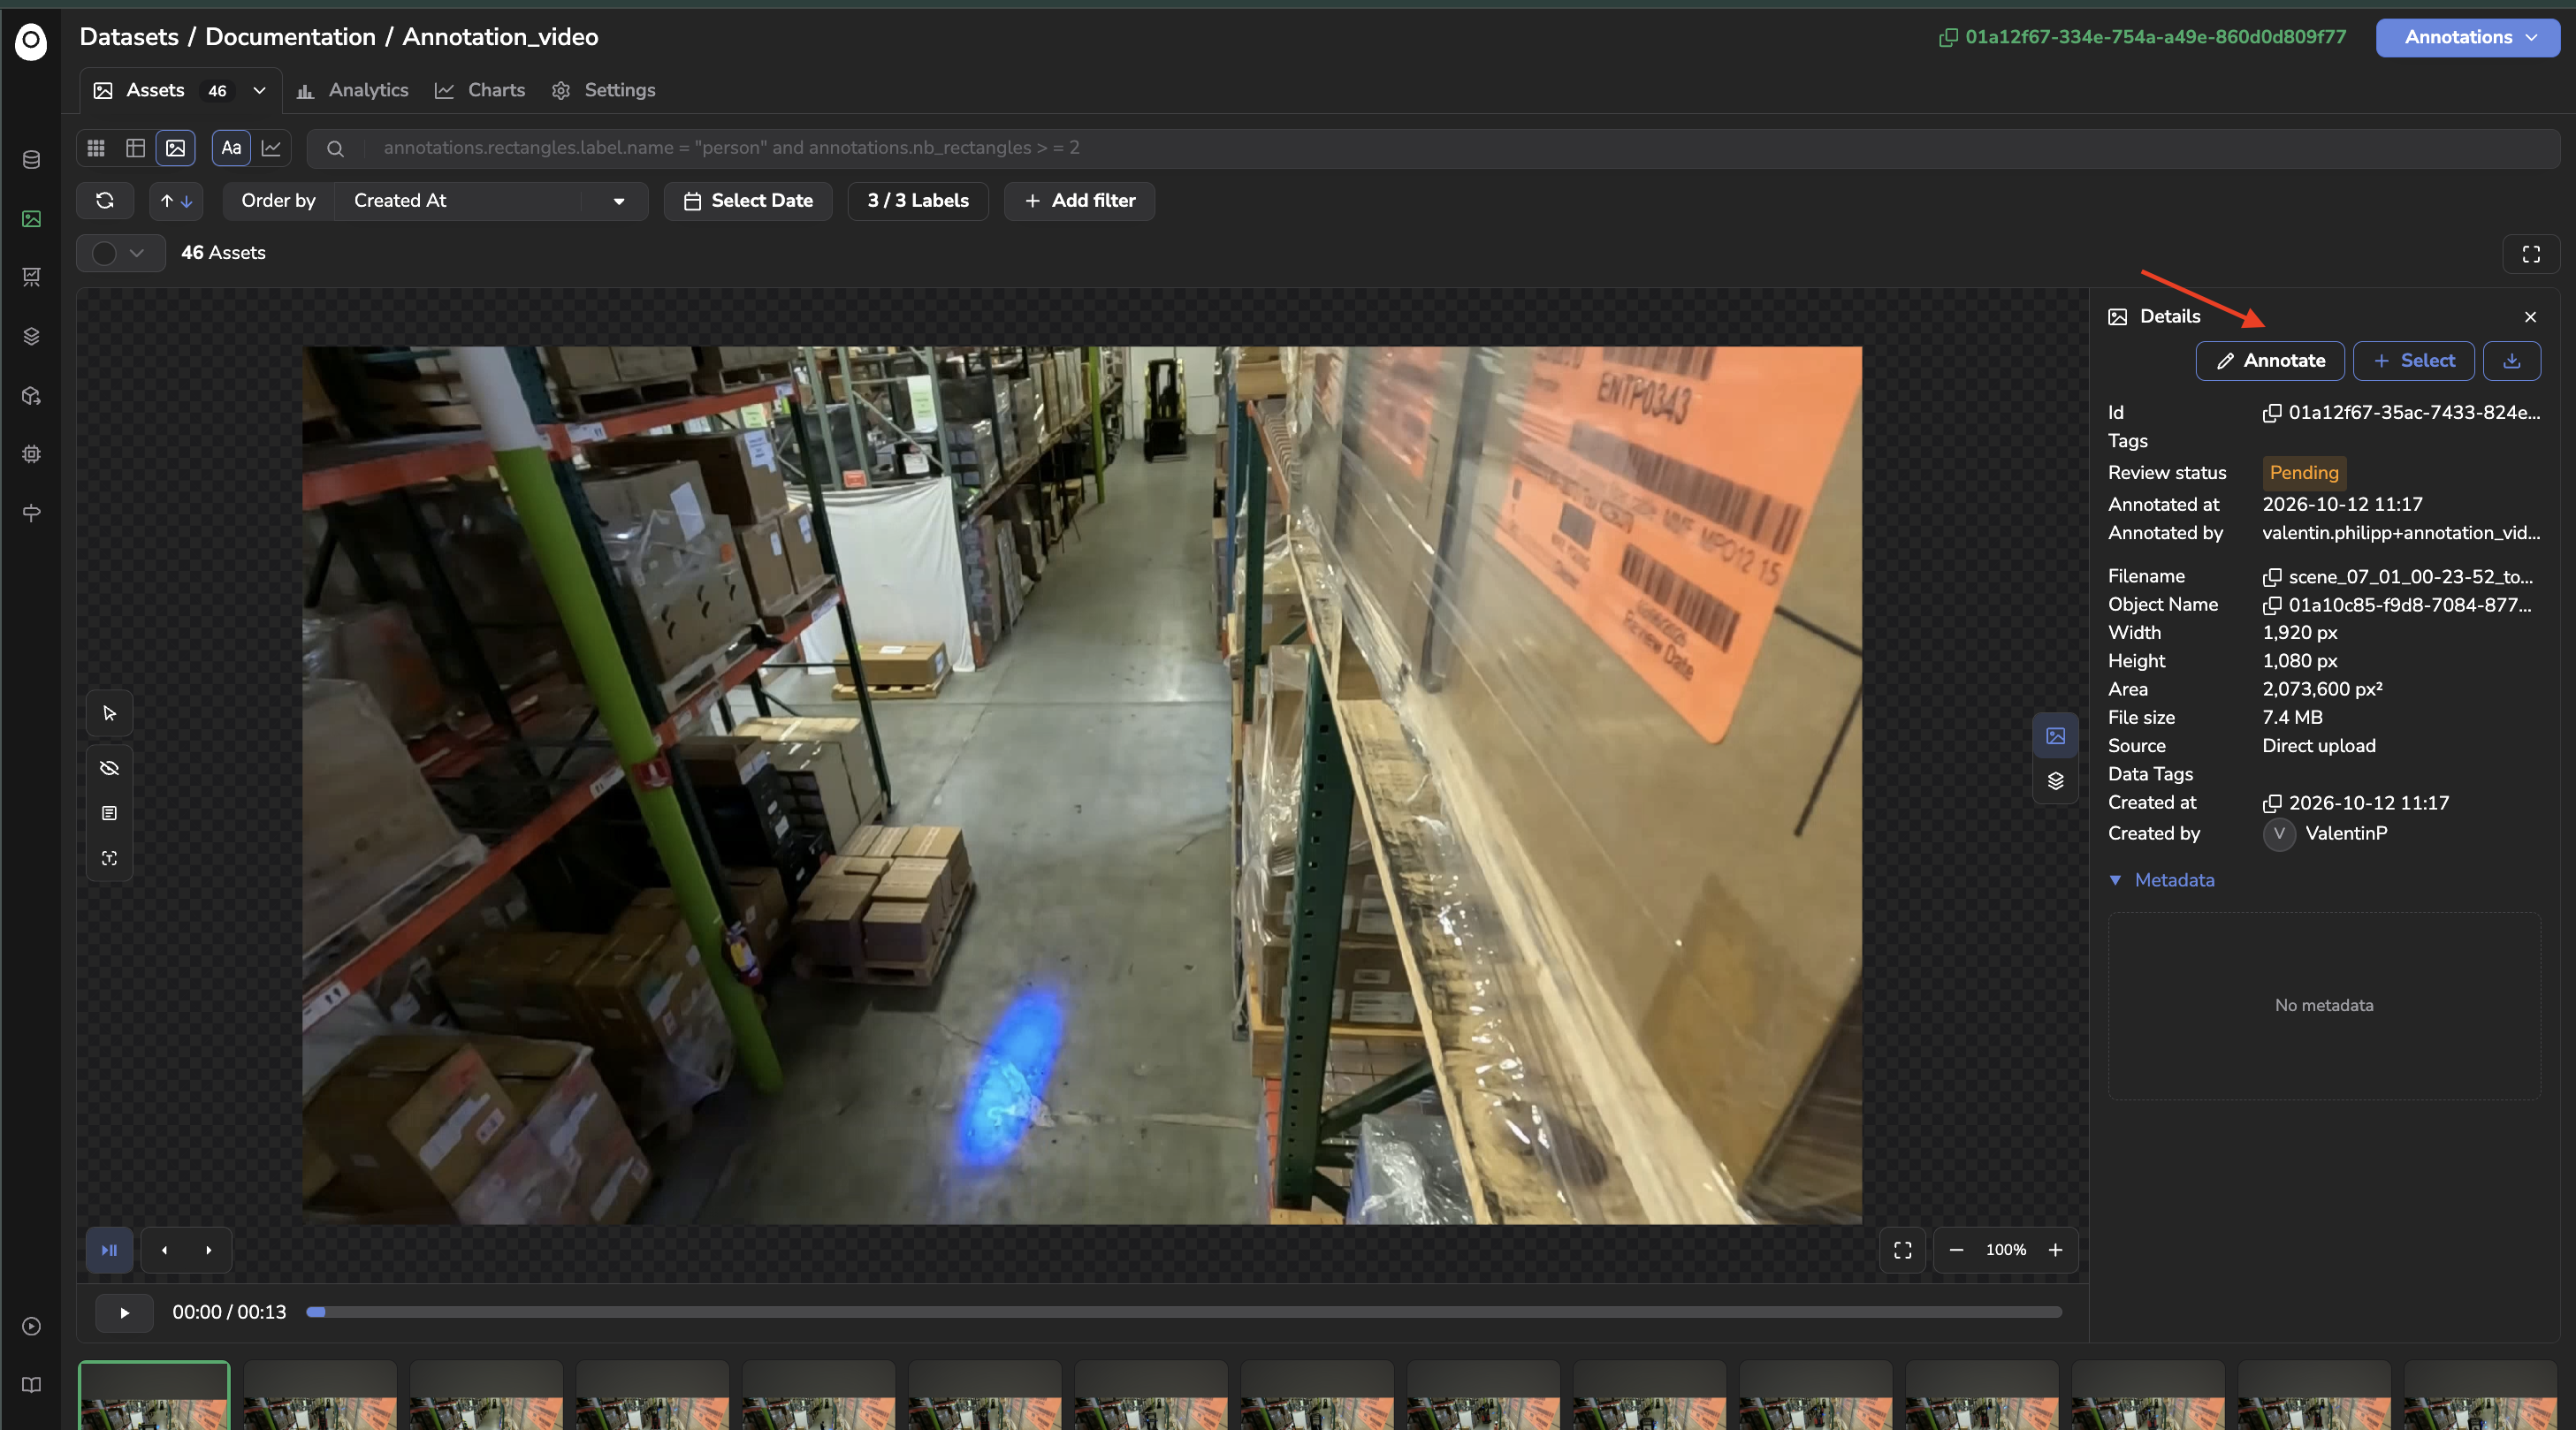
Access works the same way as for images: from the Grid view or the Details view of the DatasetVersion, click the pen icon displayed when you hover a video Asset. The tool opens on the video, and the header shows its file name.
Annotate button on a Video displayed in the Details view of a DatasetVersion
Before annotating, make sure the DatasetVersion has a Version Type and at least one Label, as detailed in Set up the dataset.
2. Interface overview
The video Annotation tool reuses the same left toolbar (Select mode and the drawing tools matching the Version Type of the DatasetVersion) and the same right-side icon rail (Shapes, Selection, Data, Details, Settings, Shortcuts) as the image tool.
📘
No SAM-assisted drawing on video
The AI-assisted, SAM3-powered drawing tools described here are only available on image Asset. On video, Shape are drawn manually.
Two elements are specific to video:
At the bottom-left, a Player / Assets toggle switches between the frame-by-frame Player of the current video and a strip with every Asset of the DatasetVersion, to jump to another video.
Below the video, a timeline replaces the simple Assets footer of the image tool.
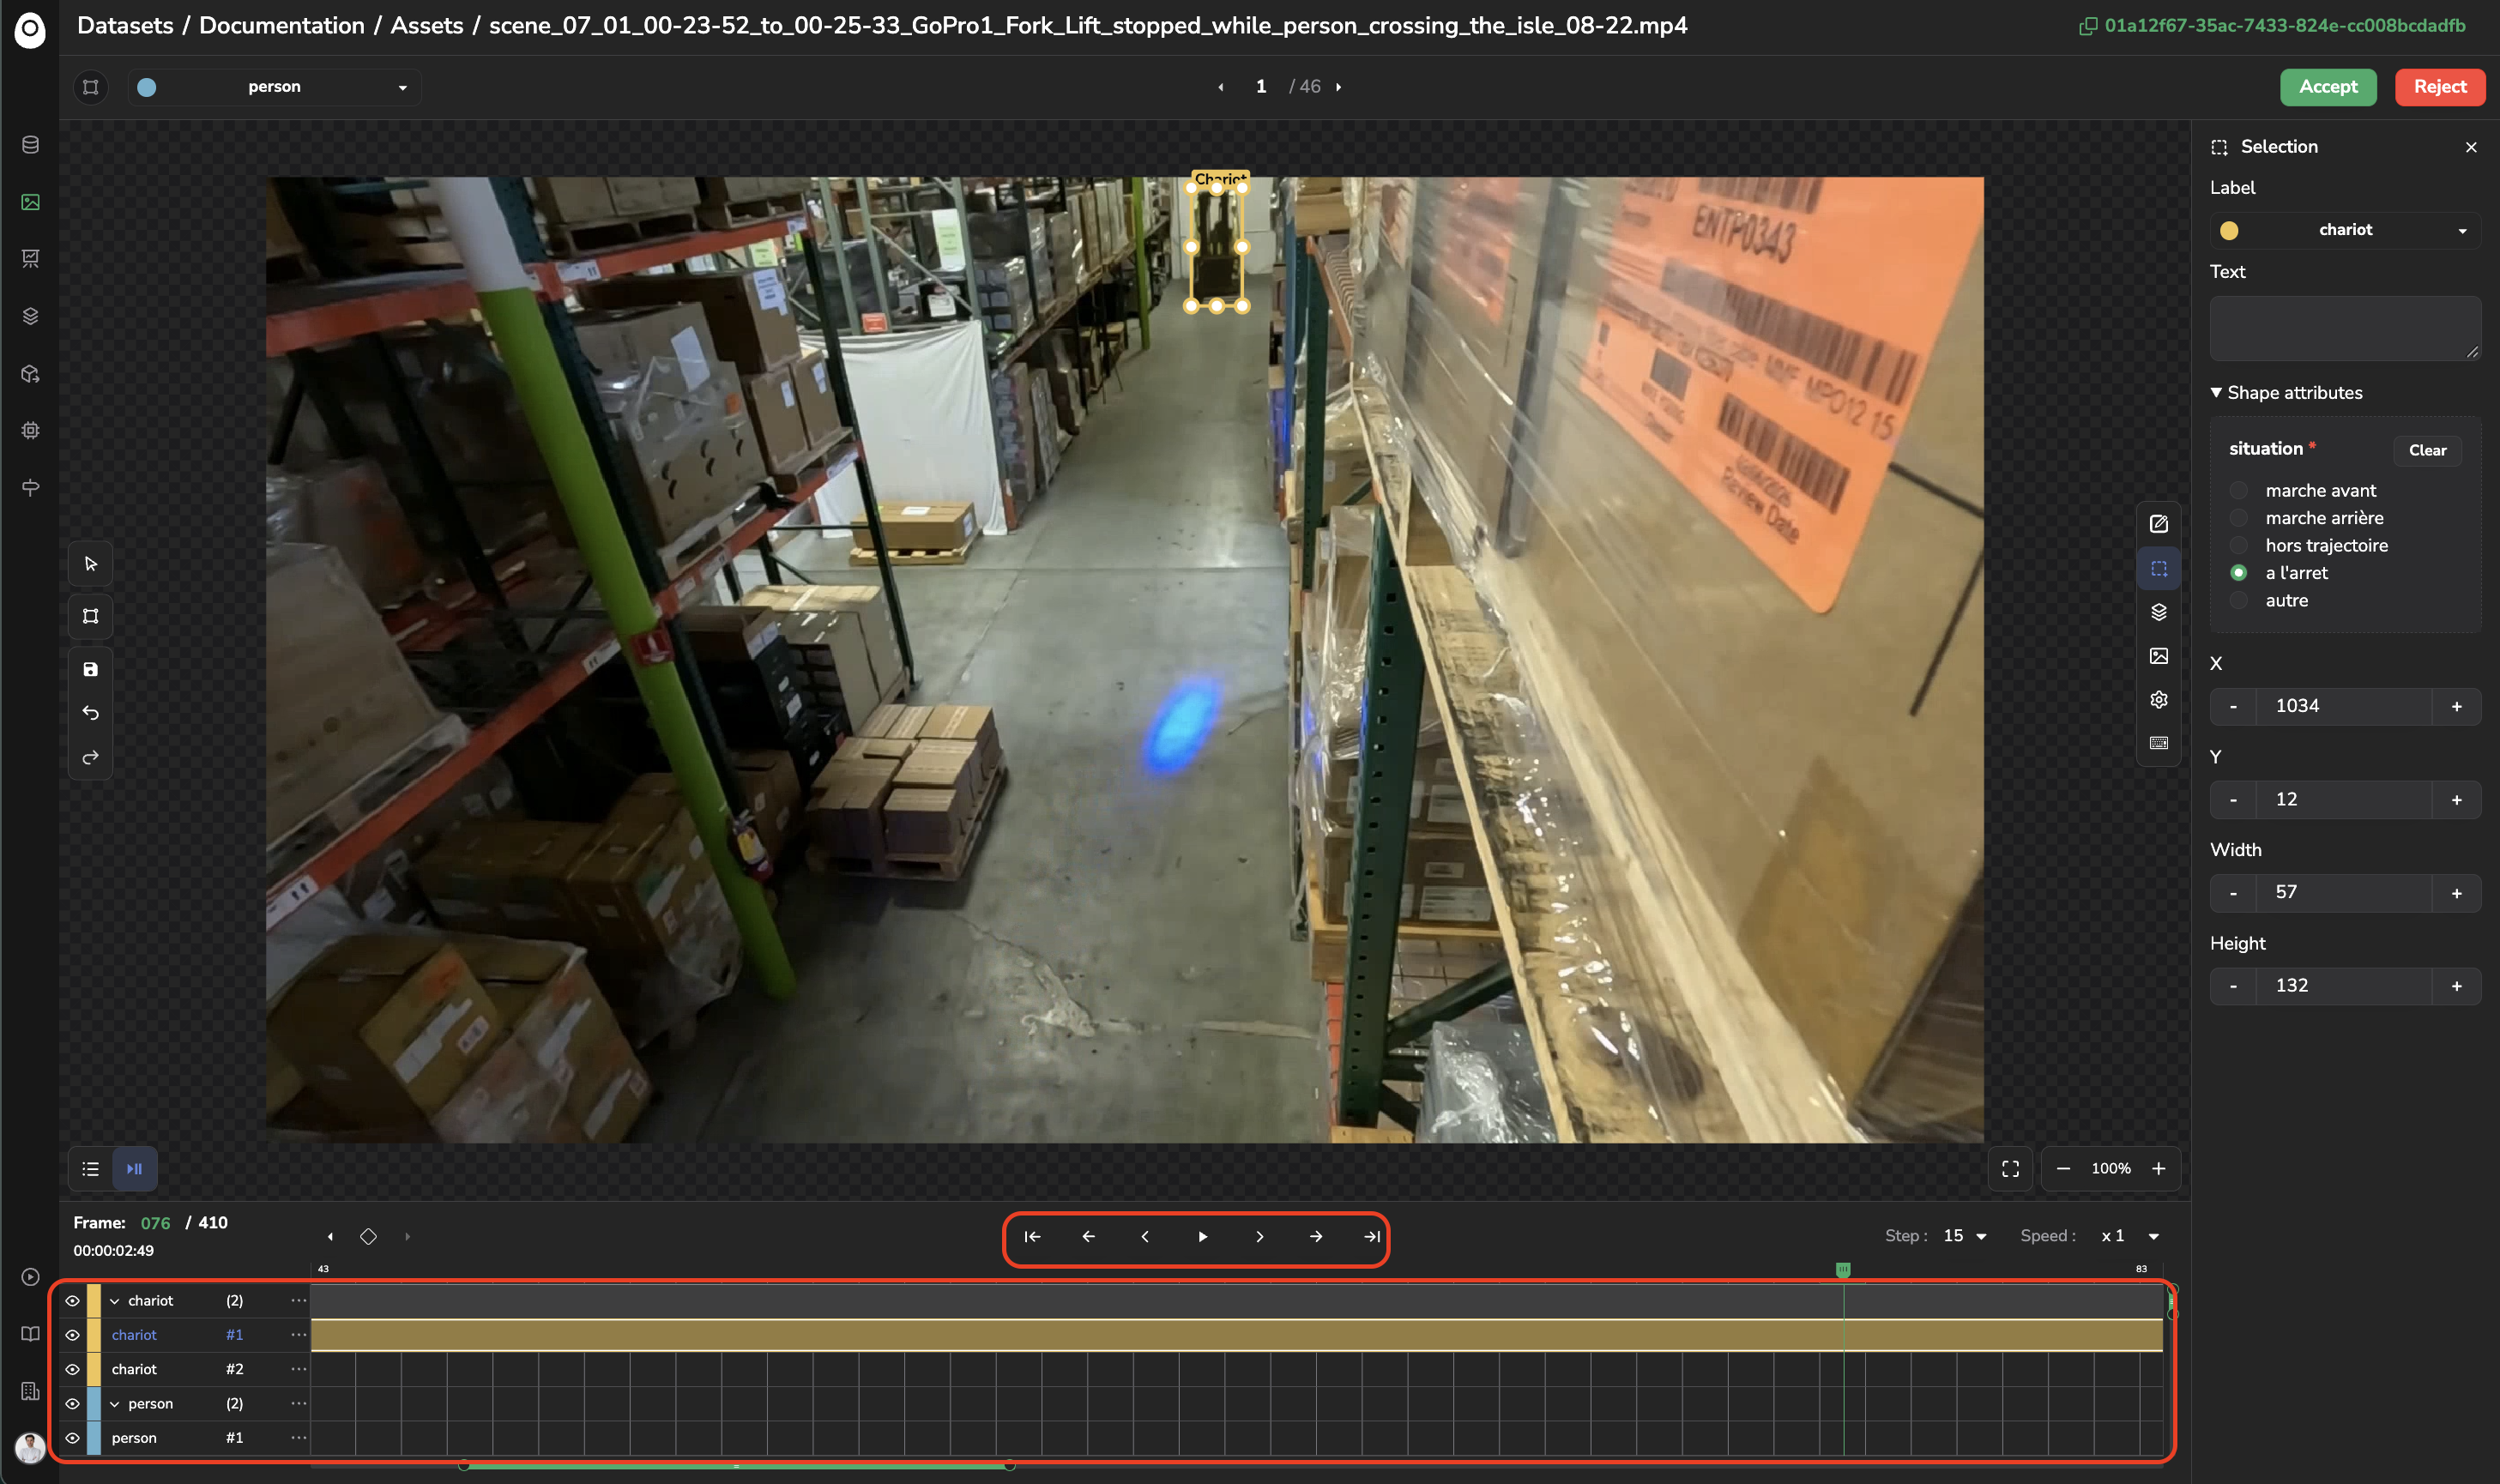
Playback controller and timeline
A. Playback controls
Above the timeline, the current Frame number (out of the total number of frames) and its timecode are displayed, together with the playback controls:
Move to first frame and Move to last frame, to jump to the start or the end of the video.
Move to previous frame and Move to next frame, to step one frame at a time.
Move N frames before and Move N frames after, to jump by a bigger increment. N is the Step value displayed on the right of the timeline, which you can change from its dropdown.
Play / Pause, and a Speed selector (x 1 by default) to control the playback rate.
These controls also have keyboard shortcuts, detailed in Shortcuts.
B. The timeline
The timeline lists the Track of the video, grouped by Label. As soon as a Label has several Track, they are gathered in a single row showing the number of Track it contains (for instance circle (2)). Expanding this row with the chevron on the left reveals the individual Track (circle #1, circle #2...). Each Track is displayed as a horizontal bar spanning the frames it covers, with a diamond marker on every keyframe. On a collapsed row, the keyframes of all its Track are displayed as circles. The green vertical line is the playback cursor, positioned on the current frame.
The Shapes panel of the right-side rail groups the Track the same way, which gives you a second way to select and manage them.
A Track does not have to span the whole video: it can start and end on any frame, for instance when an object enters or leaves the frame partway through.
3. What is a Track?
On video, a Shape is not a single, static object but a Track: the same Shape followed across a range of frames. A Track has one Label, and, as detailed below, one Text and one value per Attribute for its whole duration. What changes from one frame to the next is its geometry, which is described by keyframes and interpolation.
A. Keyframes
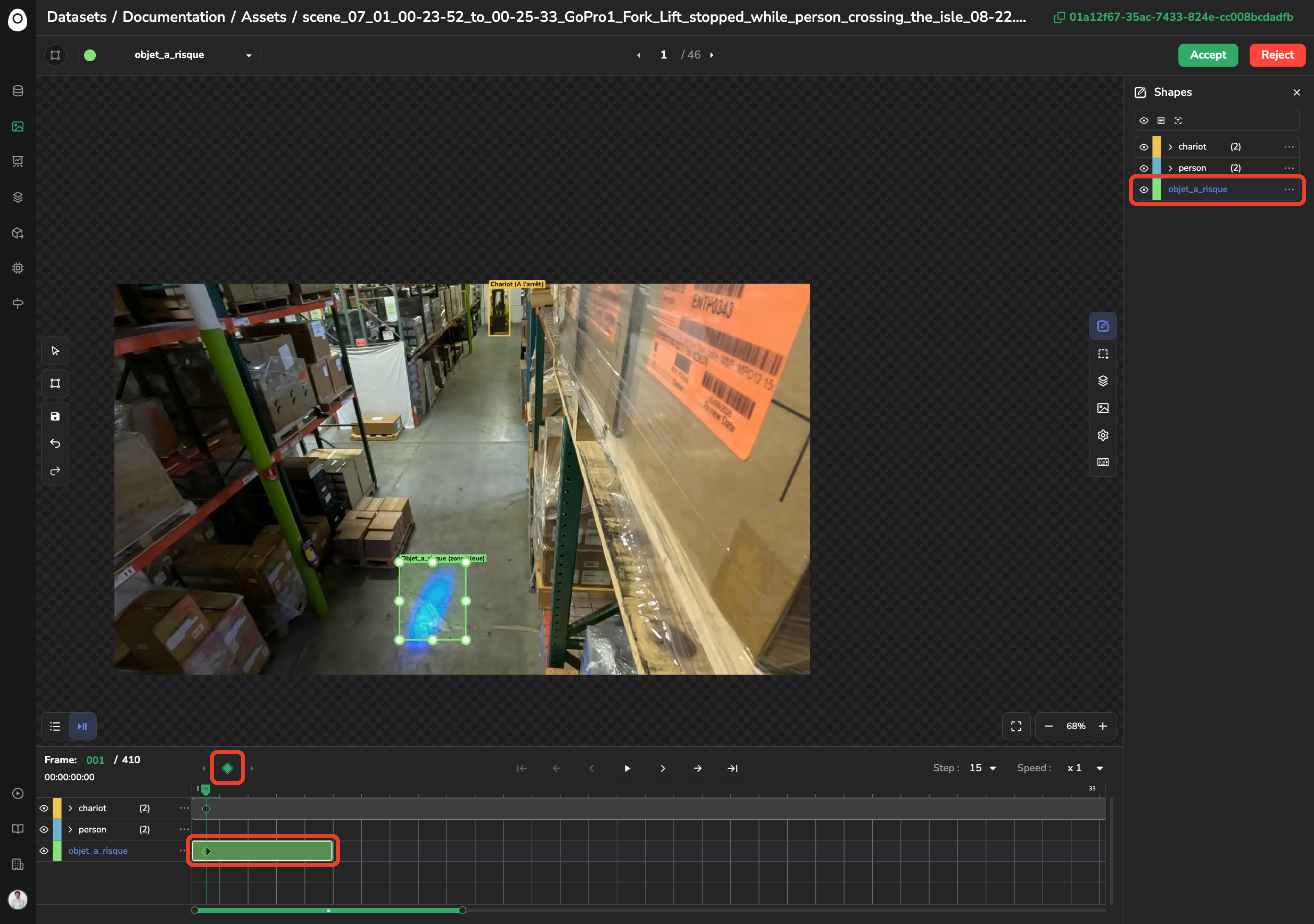
A keyframe is a frame on which you have set the geometry of the Shape yourself: the position and dimensions of a rectangle, the vertices of a polygon, or the vertices of a Skeleton. A Track always has at least one keyframe, created when you draw the Shape. Each keyframe is displayed as a diamond on the bar of the Track in the timeline.
For a Computer Vision team, keyframes are what makes video annotation affordable: you describe the motion of an object with a handful of keyframes, placed where its motion changes (it starts moving, changes direction, speeds up, stops), instead of annotating hundreds of frames one by one.
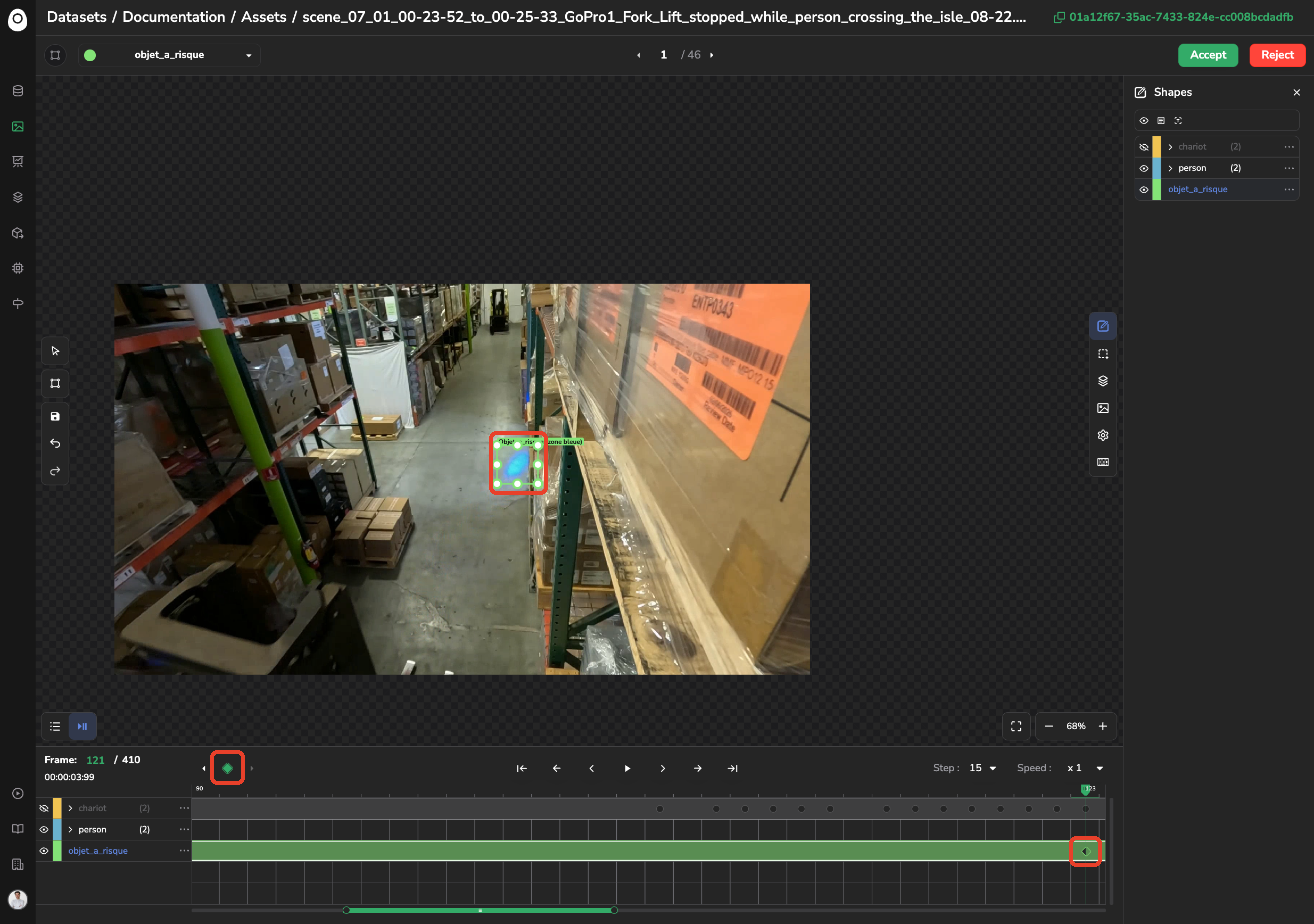
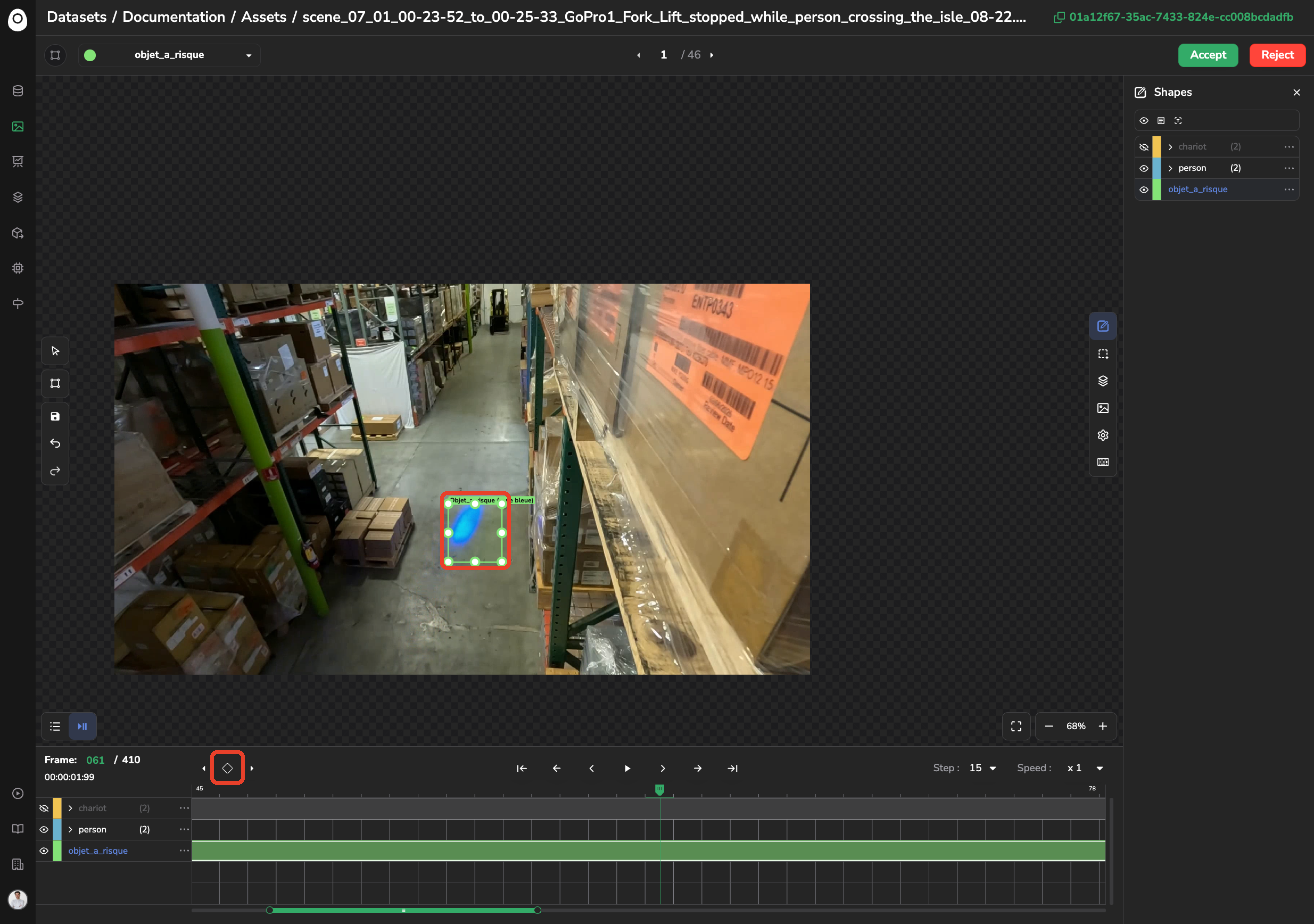
You create a keyframe by moving, resizing, or reshaping the Shape on a frame of the Track that is not a keyframe yet. You can also use the keyframe button, displayed above the timeline when a Track is selected:
The diamond is outlined on a frame that is interpolated, and filled green on a keyframe. Click on it to turn the current frame into a keyframe, or to remove the keyframe.
The two arrows on each side jump to the previous and to the next keyframe of the selected Track.
Keyframes on a Track
B. Linear interpolation
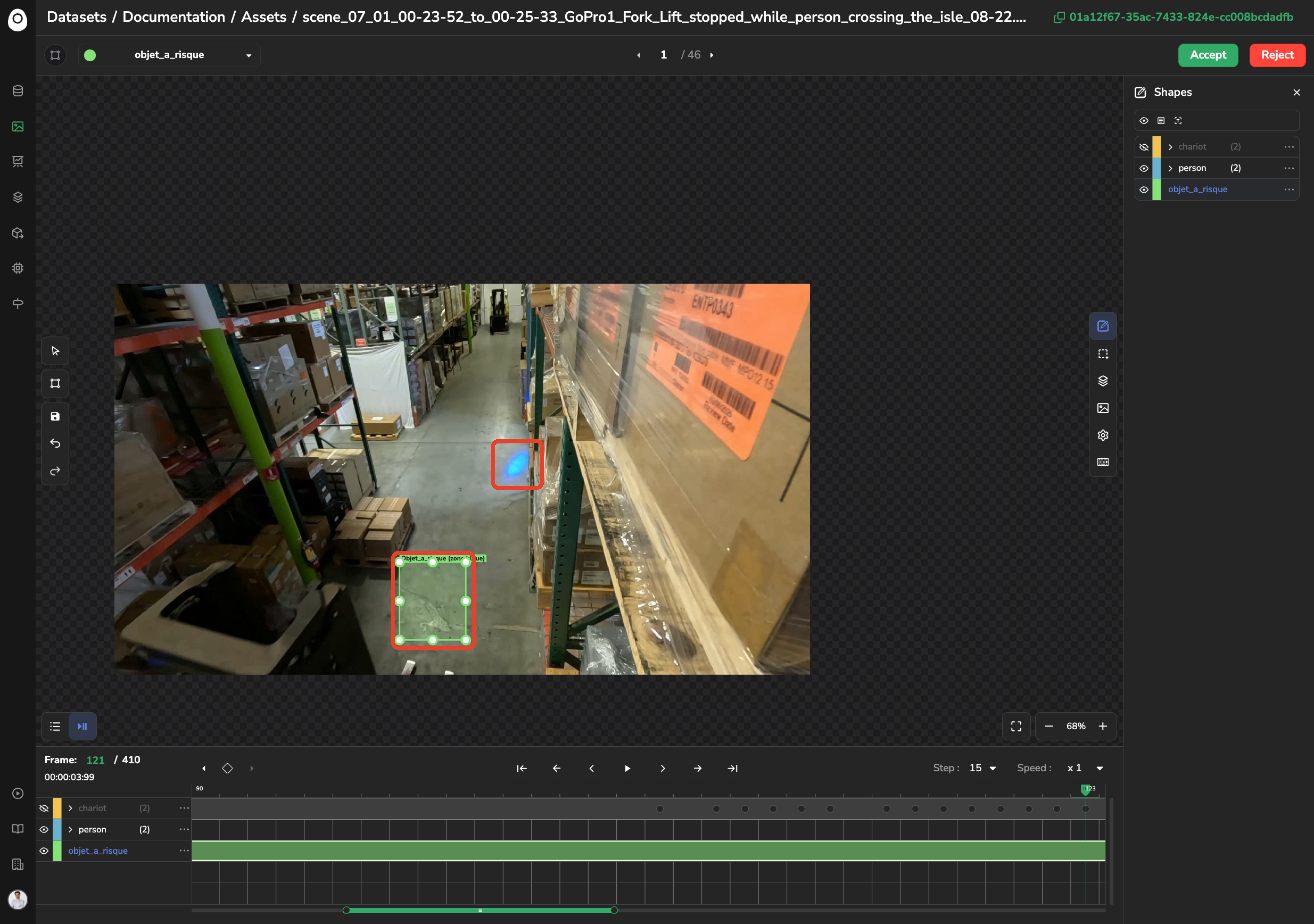
Between two consecutive keyframes, Picsellia computes the geometry of the Shape on every frame by linear interpolation: the Shape moves in a straight line at constant speed from one keyframe to the next, and its dimensions change at a constant pace. For instance, if the left edge of a box is at x = 100 on a keyframe and at x = 140 four frames later, it is at x = 110, 120, and 130 on the frames in between. For a polygon or a Skeleton, each vertex follows its own straight path the same way.
Linear interpolation explained
Two consequences are worth keeping in mind when you annotate:
Interpolation is linear, so an object that accelerates, slows down, or changes direction between two keyframes drifts away from the straight path the Shape follows. Add a keyframe where the Shape starts to drift: the more irregular the motion, the more keyframes you need.
After the last keyframe of a Track that has been extended (see Create a Track), the Shape stays where the last keyframe placed it.
Interpolation can be turned off with Enable Interpolation in the Settings panel.
4. Create a Track
Creating a Track means drawing a Shape on the frame where an object first appears, exactly like on an image Asset, then extending it and adding keyframes until it follows the object. You do not need to draw the same Shape again on every frame.
A. Choose a Label
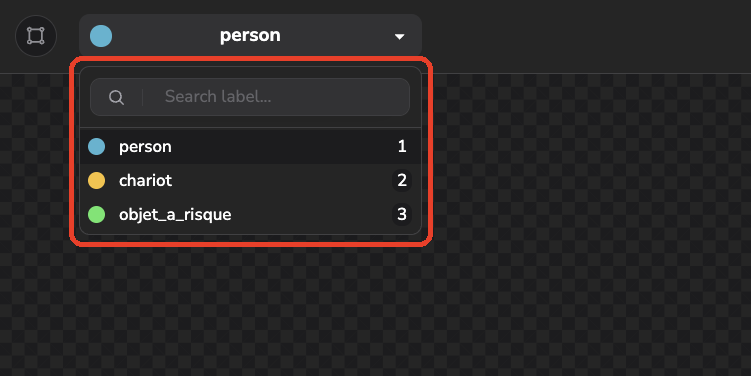
The Label selector, at the top left of the Annotation tool, sets the Label given to the next Shape you draw. Click on it to open the list of the Label of the DatasetVersion, which you can filter with the search field. The number displayed next to each Label is the key ("0" to "9" on your keyboard) that switches to it. You can still change the Label of a Track afterwards, as detailed below.
Label selector
B. Choose the drawing tool
🚧
Only some Version Type are available on video for now
The Object Detection, Segmentation, and KeypointVersion Type are the only ones you can annotate on video at the moment. You can still define the other Version Type on a DatasetVersion that contains videos, but the Annotation tool does not offer any dedicated tool to create their Shape on video yet: use them on image Asset.
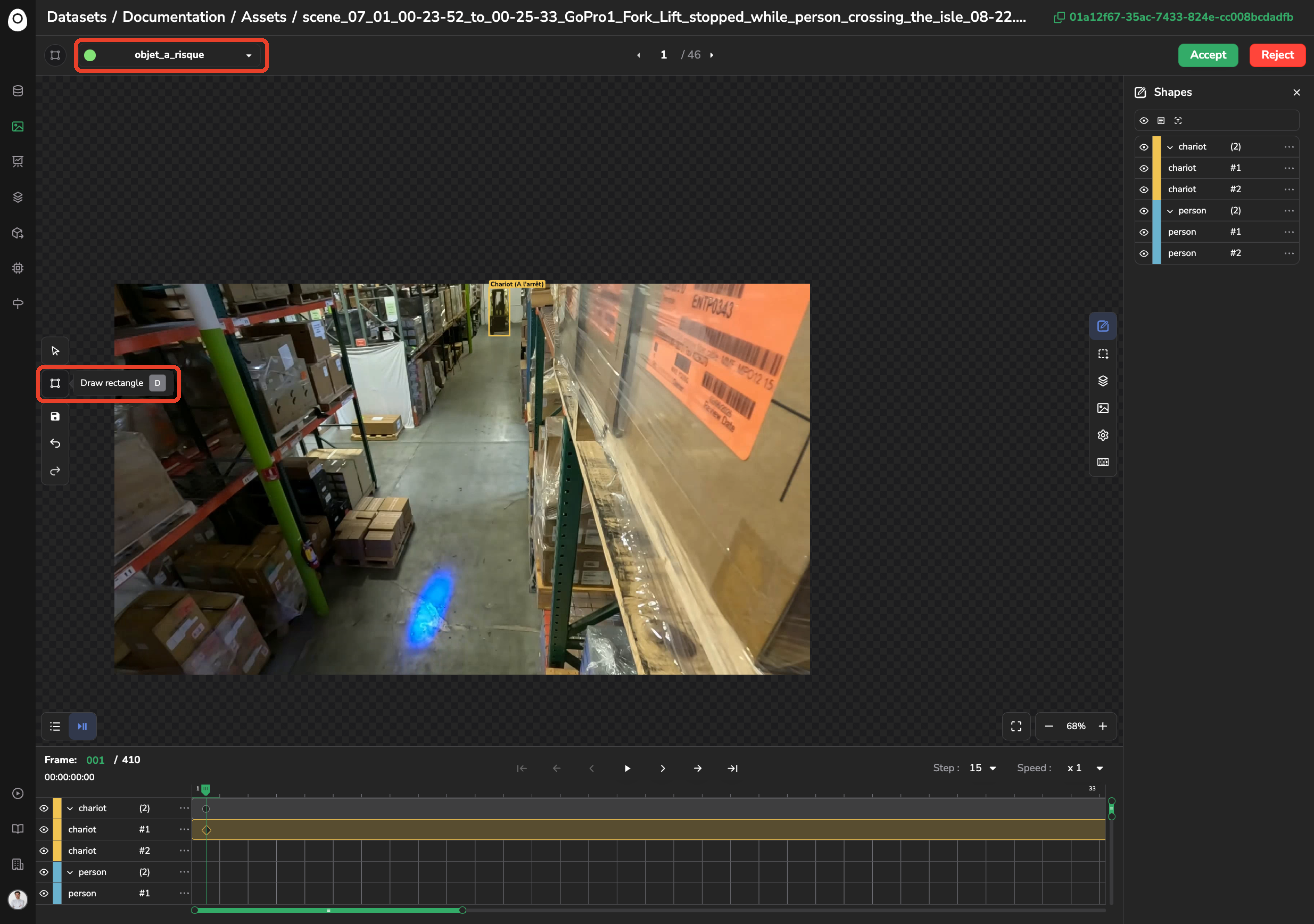
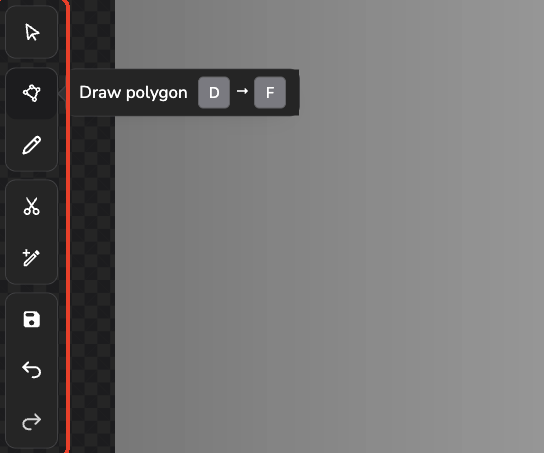
The drawing tools displayed in the left toolbar depend on the Version Type of the DatasetVersion. Hover a tool to display its name and its keyboard shortcut. On video, you can create a Track with:
The SAM-assisted tools are not available on video either, as mentioned above.
Drawing tools available for Segmentation mode
The drawing gestures are the ones of images:
Rectangle: press at one corner, drag, and release at the opposite corner.
Polygon: click on each vertex, then click on the first vertex again to close the polygon.
Skeleton: click on each vertex, in the order defined by the Skeleton of the Label. The Shape is completed once all the vertices are placed.
C. Draw the first Shape
Move to the frame where the object first appears, with the playback controls described above.
Select the Label and the drawing tool.
Draw the Shape on the object.
A new Track is created and a row appears for it in the timeline and in the Shapes panel. Its bar starts on the frame you drew the Shape on, and the first keyframe is displayed as a diamond at its start.
Creation of a Track
📘
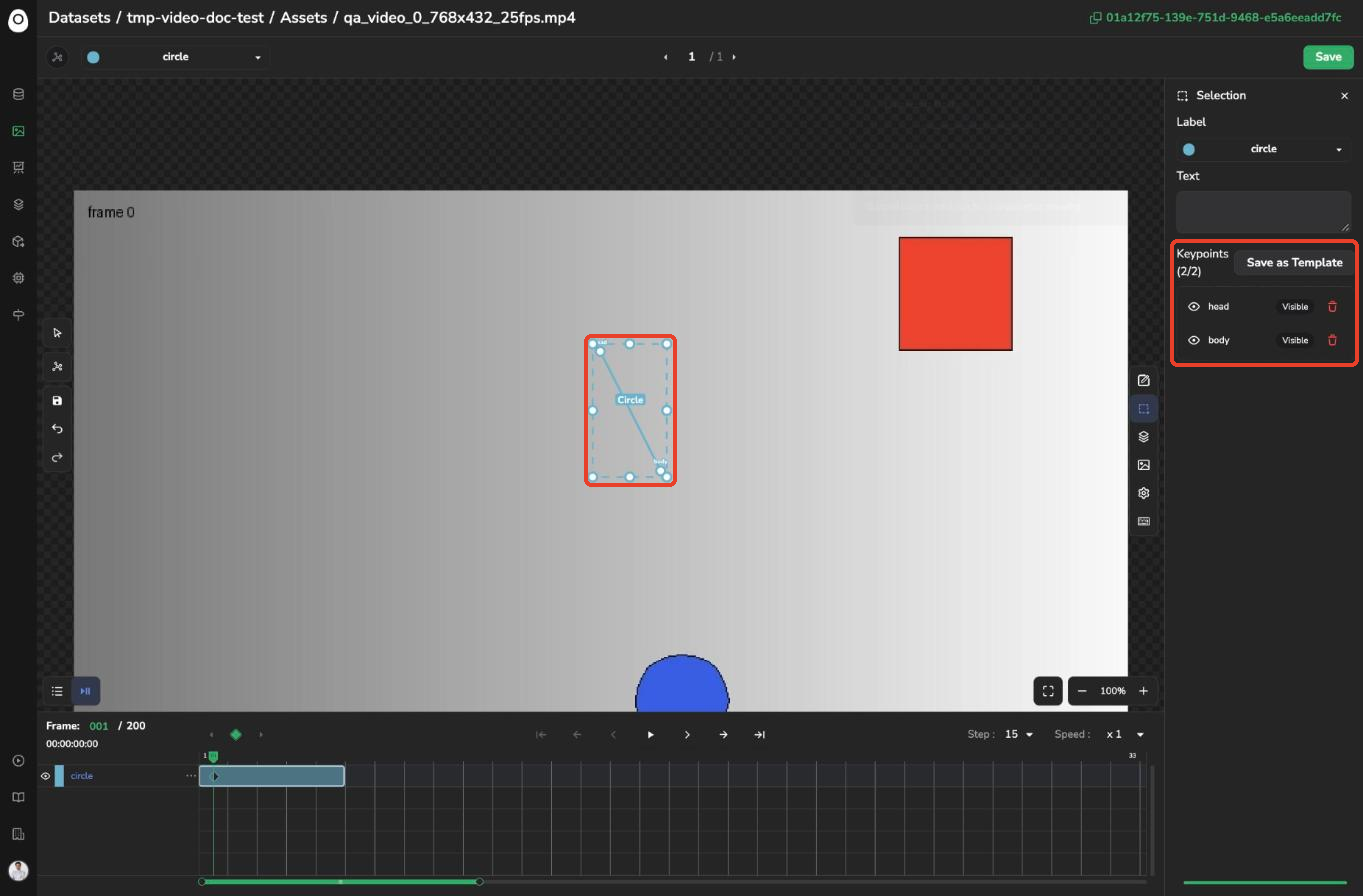
A Track can also be a Skeleton
On a KeypointDatasetVersion, the Track follows a whole Skeleton. Its vertices are listed in the Selection panel, each with a visibility state.
Create a Track in Keypoints mode
D. Extend the Track
The new Track covers a limited number of frames starting from the current one: 5 by default, as defined by Annotation Default Duration when created in the Settings panel. Beyond its last frame, the Shape is no longer displayed, so the Track must be extended to follow the object further.
The quickest way is to right-click the bar of the Track in the timeline and choose Expand to Last Frame, or Expand to Cursor after moving the playback cursor to the frame you want to reach (see Edit a Track). If most of your objects stay on screen for a long time, you can also raise the default duration in the Settings panel.
An extended Track has no new keyframe: the Shape stays where you drew it, even though the object keeps moving.
Adapt and edit the selected Track
E. Follow the object with keyframes
Move to a frame where the object has moved, for instance the last frame where it is still visible.
Move, resize, or reshape the Shape so that it fits the object again. This creates a keyframe on this frame.
Adding a keyframe to a Track
The frames in between are interpolated, as detailed above. Scrub through the frames to check the result, and add a keyframe wherever the Shape drifts away from the object.
Follow objects movements with a many keyframes as needed
📘
Start with the extremes
A reliable method is to place a keyframe at the start and at the end of the motion first, then to check the middle frame and add a keyframe only where the Shape is off. This keeps the number of keyframes low.
F. Annotate the other objects
Draw another Shape to create another Track: each object of the video has its own Track, with its own keyframes. Track that share a Label are grouped in the timeline, as described above.
G. Save your work
Click on Save at the top right of the Annotation tool to save the Annotation. A notification confirms it. What happens next depends on whether an Annotation Campaign is ongoing on the DatasetVersion:
Without an active Annotation Campaign: the Accept and Reject buttons appear in the header once the Annotation is saved, as for image Annotation. They let you review the Annotation, as detailed in Quality review.
With an active Annotation Campaign: the Annotation tool works the same way on video, with the additional features dedicated to an Annotation Campaign, such as submitting the Task, the history of the Asset in the Annotation Workflow, Issues, and the Annotation Instructions. The Accept and Reject buttons are not displayed. See Complete an Annotation task.
5. Edit a Track
A. Common actions
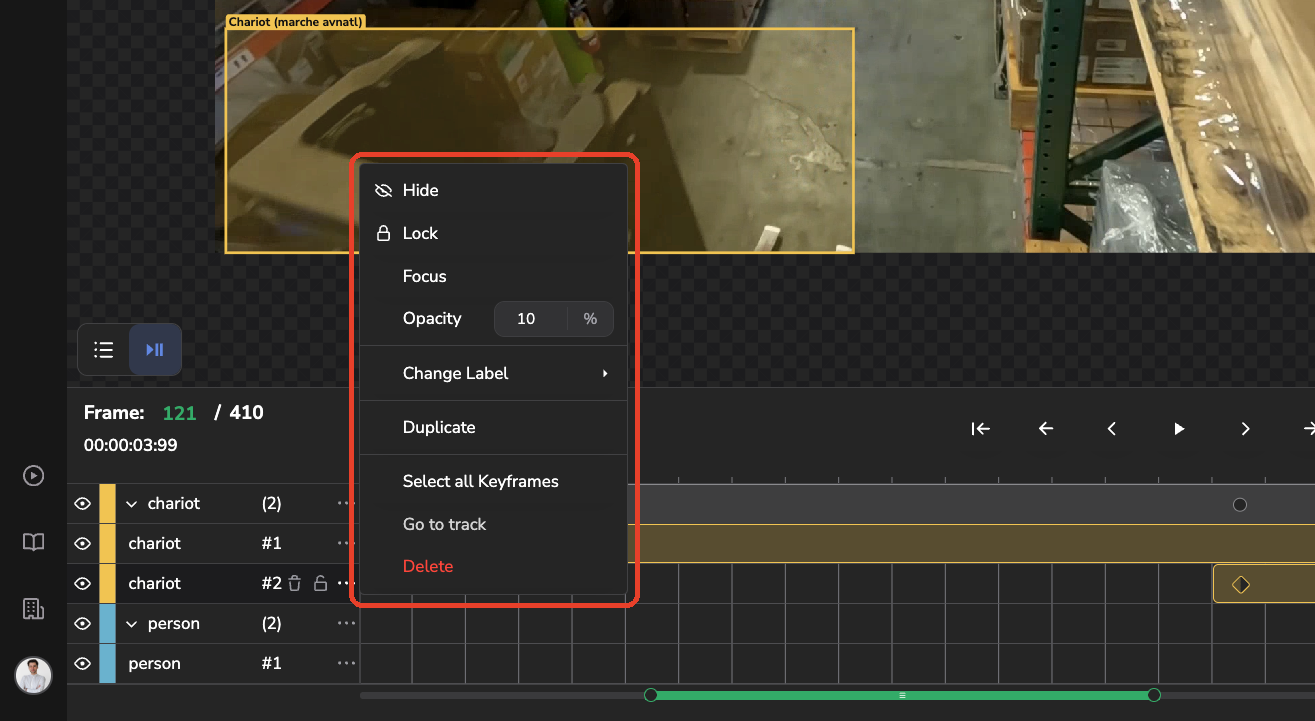
Using the … option menu of a Track row, in the timeline or in the Shapes panel, gives access to: Hide, Lock, Focus, Opacity, Change Label, Duplicate, Select all Keyframes, Go to track, and Delete.
Track edition options
B. Actions on the timeline
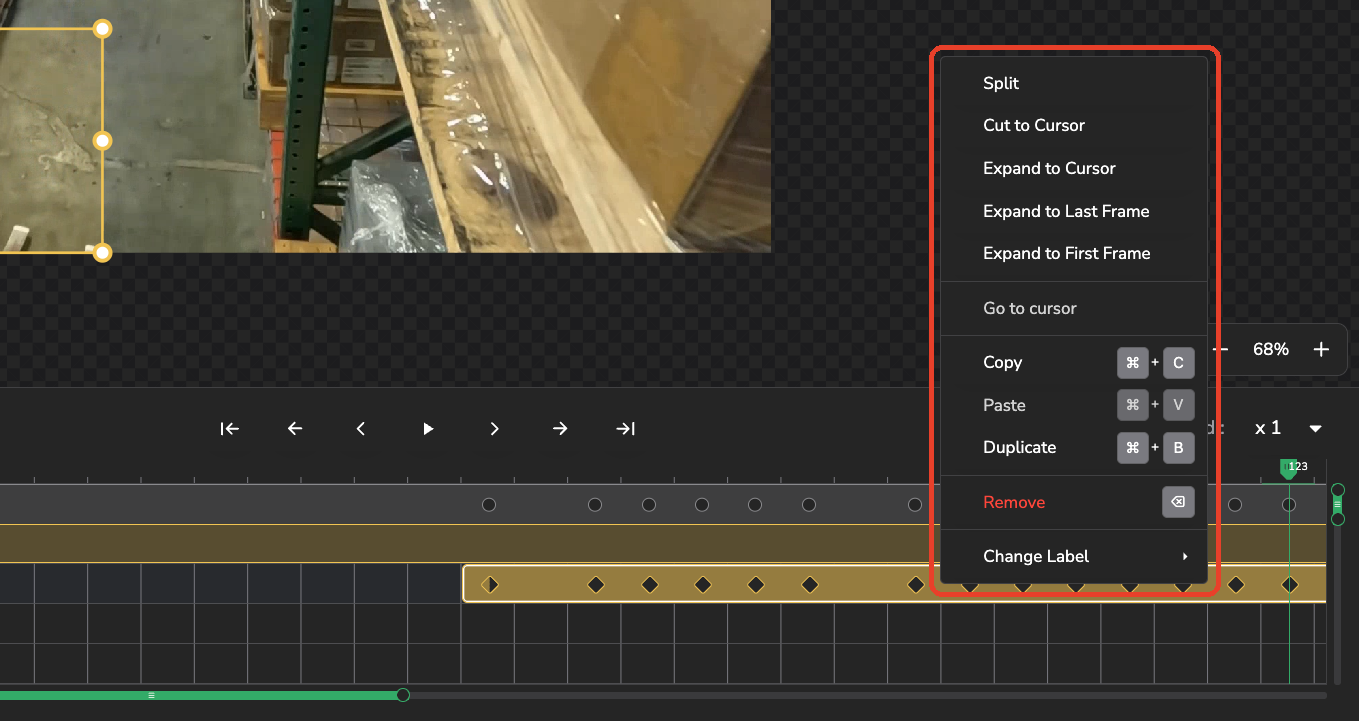
To change the frames a Track covers, right-click its bar in the timeline. The menu offers:
Split: cut the Track into two parts at the current frame. Both parts keep the position that interpolation gave the Shape before the split.
Cut to Cursor: trim the Track so that it ends at the current frame.
Expand to Cursor: extend the Track so that it reaches the current frame.
Expand to Last Frame / Expand to First Frame: extend the Track all the way to the end or to the start of the video.
Go to cursor: scroll the timeline to the playback cursor.
Copy (Cmd/Ctrl + C), Paste (Cmd/Ctrl + V), and Duplicate (Cmd/Ctrl + B), to reuse a Track instead of drawing it again.
Remove, and Change Label.
Expanding a Track is the quickest way to cover an object that stays on screen for a long time: extend the Track, then add keyframes only where the object moves.
Adapt a Track though its keyframes with several options
6. Shape details and Attribute
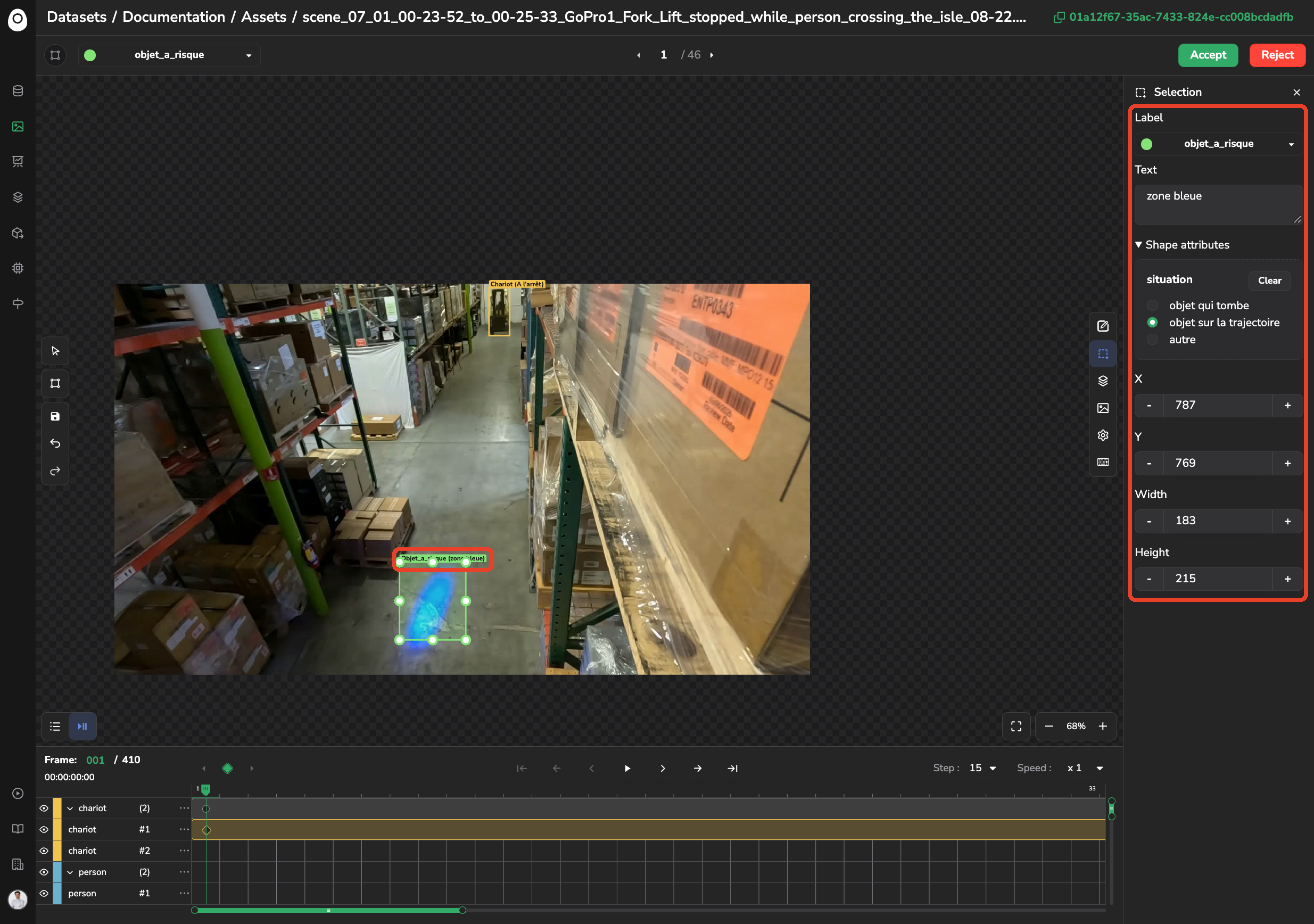
Selecting a Track opens the same Selection panel as on images. It shows the values of the Shape on the current frame, and lets you edit what describes the Track:
The Label, to change the class of the Track (see also Change Label in the menus above).
For a rectangle, its position and dimensions (X, Y, Width, and Height) on the current frame.
The Shape attributes section, which lists one input per Attribute configured on the Label. To configure them, see Attributes and Add Attribute to a Label.
For a Skeleton, the list of its vertices, each with its visibility state.
The Text and the Attribute values belong to the whole Track, not to a keyframe: filling or changing them on one frame applies them to every frame of the Track. The Text is also displayed next to the Label name on the Shape, for instance Objet_a_risque (zone bleue).
Fill in Track attributes
7. Settings
The Settings panel, available from the right-side icon rail, holds your personal preferences for the Annotation tool. They apply to your own account and persist across DatasetVersion: once you have changed them, click on Update to save them.
A. Generic settings
Most of the settings are the same as on images: the General ones (such as the default zoom), the Performances ones (cache), the Shapes ones (such as the Shape opacity), and the Labels ones (such as the display of the Label name on each Shape). They are detailed in Settings & Shortcuts.
B. Player settings
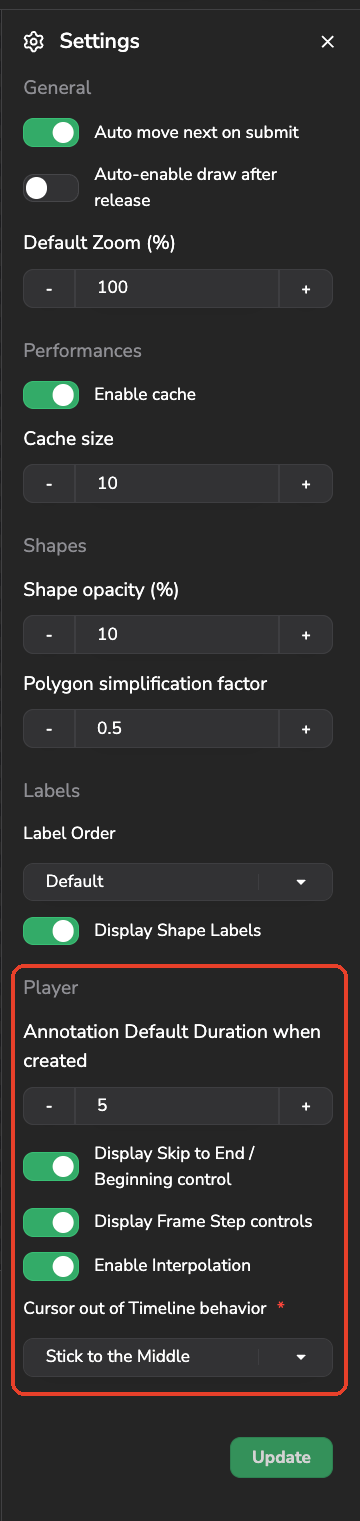
On a video DatasetVersion, the panel has an additional Player section, dedicated to the video player and to the creation of Track:
Annotation Default Duration when created: the number of frames covered by a new Track, starting from the frame you draw it on. It is 5 by default. Beyond its last frame, a Track is no longer displayed until you extend it (see Extend the Track). If the objects you annotate usually stay on screen for a long time, raising this value saves you from extending each Track; keep it low if they appear for a few frames only, so that you do not have to trim them.
Display Skip to End / Beginning control: shows or hides the buttons that jump to the first and to the last frame of the video in the playback controls. It is turned on by default.
Display Frame Step controls: shows or hides the frame-by-frame navigation buttons of the playback controls. It is turned on by default. You can turn it off if you navigate with the keyboard shortcuts and want a lighter footer.
Enable Interpolation: when it is turned on (default), the Shape of a Track is interpolated linearly between two keyframes, as detailed in Linear interpolation. This is the setting that lets you place a handful of keyframes instead of annotating every frame.
Cursor out of Timeline behavior: how the visible part of the timeline follows the playback cursor when the cursor reaches its edge, for instance while you play the video or step through it. The options are Stick to the Right, Stick to the Middle (default), and Moves back to the left. Choose the one that keeps the part of the timeline you are working on in view.
Parameters avaible for the Video Annotation Tool
8. Shortcuts
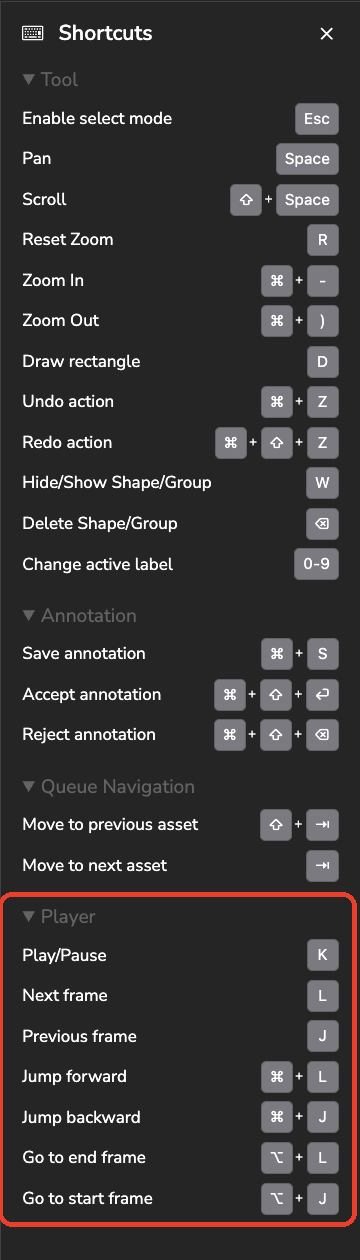
Most of the actions of the Annotation tool have a keyboard shortcut, which saves a lot of time on video where you move back and forth between frames all the time. The Shortcuts panel, at the bottom of the right-side icon rail, recaps the shortcuts currently active for the DatasetVersion you are annotating. On video, it contains an additional Player group, dedicated to the video player:
Action
Default shortcut
Play / Pause
K
Previous / Next frame
J / L
Jump backward / forward (Step frames)
Cmd/Ctrl + J / Cmd/Ctrl + L
Go to start / end frame
Alt + J / Alt + L
The number of frames of a jump is the Step value displayed on the right of the timeline. The Alt key is the Option key on a Mac.
Default Shortcuts
A few more shortcuts are useful when you work on Track:
Action
Default shortcut
Copy / Paste a Track
Cmd/Ctrl + C / Cmd/Ctrl + V
Duplicate a Track
Cmd/Ctrl + B
Remove a Track
Backspace
Change the active Label
0-9
The other shortcuts, such as the ones to draw, zoom, undo, save, or review an Annotation, are the same as on images. They are listed in Settings & Shortcuts, together with how to personalize your shortcuts.
9. Export video Annotation
Once your video Track are annotated, you will probably want to use them to train a model or to move them to another tool. Video Annotation can be exported to a COCO annotation file, but for now this is only possible through the Python SDK: the Annotations export of the DatasetVersion described in Annotation import and export does not export them yet.
With the SDK, call the export_annotation_file method of the DatasetVersion with the export_video parameter set to True:
By default, export_video is False. When it is True, the file describes the video Asset of the DatasetVersion instead of its image Asset. The file is downloaded in the directory given as the second argument.
📘
Attribute values are not exported yet
On video Asset, Attribute values are saved on the Track and are not yet included in COCO exports, as detailed in Attributes.